INTRODUCTION TO INTERPHALANGEAL JOINT TRAUMA
The interphalangeal joints of the hand—specifically the proximal interphalangeal (PIP) and distal interphalangeal (DIP) joints—are highly constrained hinge joints critical for the complex biomechanics of grip and fine motor manipulation. Injuries to these articulations, ranging from collateral ligament ruptures to intra-articular fractures and extensor mechanism disruptions (mallet finger), are common yet frequently underestimated.
Failure to accurately diagnose and meticulously repair these injuries can lead to devastating functional consequences, including chronic instability, early-onset post-traumatic osteoarthritis, and complex secondary deformities such as the swan neck cascade. This masterclass provides an exhaustive, evidence-based approach to the surgical management of interphalangeal joint injuries, tailored for the practicing orthopedic surgeon and hand specialist.
REPAIR OF A RUPTURED INTERPHALANGEAL JOINT COLLATERAL LIGAMENT
The PIP joint is stabilized by a robust capsuloligamentous complex comprising the proper collateral ligament (PCL), the accessory collateral ligament (ACL), and the volar plate. The PCL is under maximal tension in flexion, whereas the ACL and volar plate are taut in extension. Complete ruptures (Grade III sprains) of the collateral ligament, particularly those presenting with gross clinical instability or associated with large avulsion fractures, necessitate precise surgical repair to restore joint congruity and kinematics.
Surgical Anatomy and Preoperative Planning
Before incision, the surgeon must appreciate the layered anatomy of the digit. The transverse retinacular ligament (TRL) is a critical stabilizing structure that prevents dorsal subluxation of the lateral bands of the extensor mechanism. During collateral ligament repair, the TRL must be carefully managed to avoid iatrogenic extensor dysfunction.
Clinical Pearl: Always assess the joint under fluoroscopy with stress views prior to incision. A seemingly isolated collateral ligament tear frequently masks a concomitant volar plate avulsion or subtle osteochondral shear fracture.
Step-by-Step Surgical Technique
1. Patient Positioning and Approach
* Place the patient supine with the affected arm extended on a radiolucent hand table.
* Utilize a regional block (e.g., axillary or supraclavicular brachial plexus block) or a wide-awake local anesthesia no tourniquet (WALANT) technique, depending on patient factors and surgeon preference. If WALANT is not used, exsanguinate the limb and inflate a pneumatic tourniquet.
* Make a mid-axial lateral incision over the affected interphalangeal joint. This approach avoids the volar neurovascular bundle and prevents restrictive volar scarring.
* Dissect meticulously through the skin and subcutaneous tissue down to the transverse retinacular ligament.
2. Management of the Transverse Retinacular Ligament
* Identify the TRL, which runs from the volar flexor tendon sheath to the lateral border of the lateral band.
* Dissect carefully underneath the TRL to separate it from the underlying capsule and collateral ligament.
* Incise the TRL longitudinally. It is imperative to maintain the integrity of its volar and dorsal edges; these must be robust enough to hold a suture during the final closure.
3. Joint Inspection and Debridement
* Retract the lateral band dorsally to expose the underlying collateral ligament complex.
* Inspect the collateral ligament to determine the exact site of rupture (proximal avulsion, mid-substance tear, or distal avulsion).
* Perform a thorough arthrotomy. Inspect the joint space for loose osteochondral bone fragments, interposed ligamentous tissue, or chondral damage. Irrigate the joint copiously.
4. Suture Placement and Ligament Reconstruction
* Utilize a 4-0 monofilament nylon suture.
* Insert the needle proximal to the incision, passing through the skin and directly into the proximal segment of the ruptured collateral ligament.
* Continue the suture passage into the distal segment of the ligament.
* Create a locking loop in the distal segment to secure the tissue, then proceed proximally, paralleling the first suture line. Repeat this locking loop configuration at the distal segment to ensure a robust grasp of the ligamentous tissue.
* Pass the suture ends out through the skin on the contralateral side of the digit (or dorsolaterally, depending on the tear geometry).
* Tie these loop sutures over a felt-padded button outside the skin. This pull-out button technique distributes tension evenly, protecting the fragile skin while maintaining rigid coaptation of the ligament ends during the critical early healing phase.
5. Concomitant Repairs and Closure
* During the procedure, directly visualize the volar plate and the accessory collateral ligament. If these structures are torn, they must be repaired concurrently using 4-0 or 5-0 non-absorbable sutures to prevent multiplanar instability.
* Repair the transverse retinacular ligament using a running 4-0 monofilament nylon suture. Do not over-tighten the TRL, as this can tether the lateral band and restrict PIP joint flexion.
* Close the skin with interrupted 5-0 nylon sutures.
Postoperative Care and Rehabilitation
- Immobilize the finger in a dorsal blocking splint with the PIP joint in full extension to relieve tension on the repaired collateral ligament and volar plate.
- Motion Protocol: Controlled, protected active range of motion (ROM) is initiated at exactly 2 weeks postoperatively. The pull-out button and sutures are typically removed at 4 to 6 weeks, followed by progressive strengthening.
DIAGNOSTIC PITFALLS AND NEGLECTED DISLOCATIONS
A high index of suspicion is required when evaluating interphalangeal joint injuries. Swelling can mask significant angular deformity, particularly in pediatric patients with open physes or in adults with high-energy trauma.
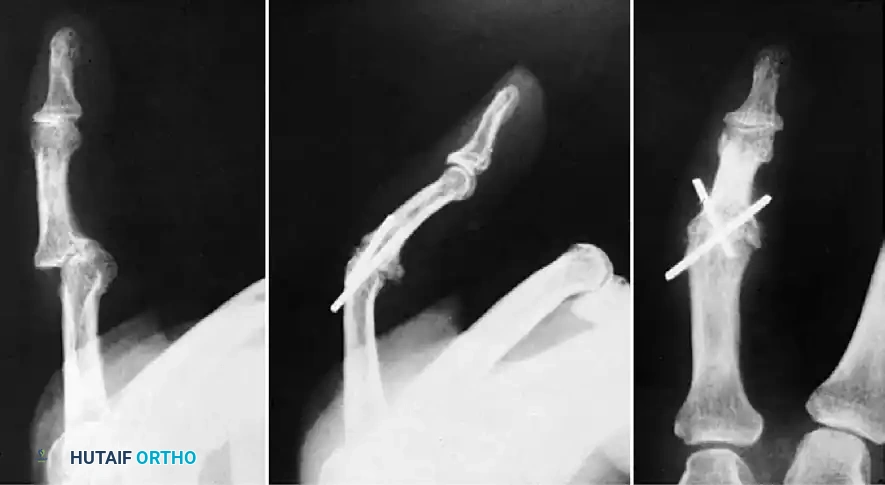
FIGURE 67-62 Radiographs of interphalangeal dislocation in a child. The injury had gone undiagnosed for 1 month because the deformity appeared slight externally. After open reduction, flexion of 30 degrees was eventually possible.
Surgical Warning: Neglected dislocations lead to rapid contracture of the collateral ligaments and volar plate, accompanied by progressive articular cartilage necrosis. Open reduction of a neglected dislocation often yields suboptimal range of motion, emphasizing the critical need for immediate, accurate radiographic diagnosis.
Salvage Procedures for Complicated Cases
In cases of severe delay, open fractures, or superimposed infection, joint preservation may become impossible. Chronic instability combined with infection rapidly destroys the articular cartilage.
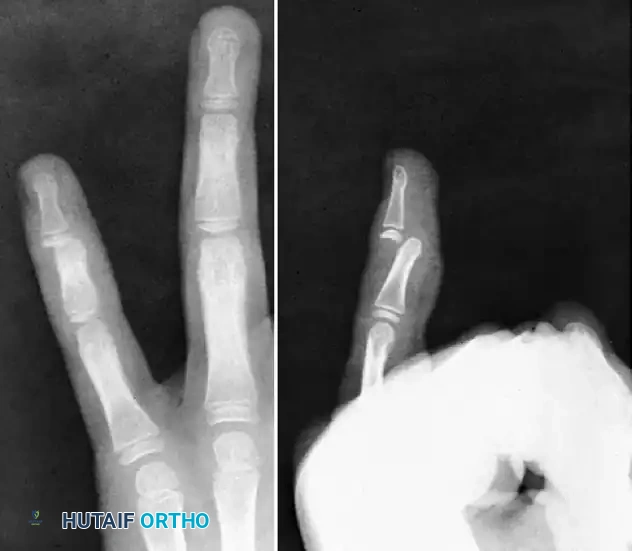
FIGURE 67-63 Undiagnosed interphalangeal dislocation in an adult complicated by an infected wound. Bone has been eroded. At 6 weeks after injury, the infection had been controlled, and the joint was arthrodesed.
When joint destruction is absolute, PIP joint arthrodesis is the salvage procedure of choice. The joint is typically fused at 40 to 50 degrees of flexion for the index and middle fingers, and 50 to 70 degrees for the ring and small fingers, utilizing crossed Kirschner wires or a tension band construct to maximize grip strength.
MANAGEMENT OF DISTAL PHALANGEAL FRACTURES
Distal phalangeal fractures are the most common fractures in the hand, typically resulting from direct crushing injuries (e.g., a finger caught in a door).
Clinical Evaluation and Soft Tissue Management
Because of the crush mechanism, these fractures are usually highly comminuted (tuft fractures). The bony injury is often secondary in clinical importance to the surrounding soft tissue envelope.
* Subungual Hematoma: A hematoma involving greater than 50% of the nail bed, or one associated with a displaced fracture, often indicates a significant nail bed laceration.
* Nail Bed Repair: The nail plate should be removed, and the sterile and germinal matrices meticulously repaired with 6-0 absorbable sutures (e.g., chromic gut) under loupe magnification to prevent future nail dystrophy.
Fixation Strategies
While non-displaced or highly comminuted tuft fractures require only protective splinting, specific patterns demand intervention:
* Transverse Shaft Fractures: These can be unstable and may result in a flexion deformity due to the unopposed pull of the flexor digitorum profundus (FDP).
* Near-Amputations: When a circular wound is present that nearly amputates the fingertip, skeletal stability is paramount for soft tissue survival. In these severe cases, a longitudinal Kirschner wire (0.028 or 0.035 inch) or a 22-gauge hypodermic needle is highly valuable. It is driven antegrade through the distal tip, across the fracture site, and into the proximal fragment to support the bone while the soft tissues heal.
Patient Counseling: Surgeons must proactively counsel patients that prolonged tenderness, cold intolerance, and hypoesthesia of the fingertip are exceedingly common and may persist for many months, even with optimal surgical management.
MALLET FINGER DEFORMITIES
A mallet finger results from the disruption of the terminal extensor tendon at its insertion on the dorsal base of the distal phalanx. This disruption frequently results in a characteristic DIP joint extension lag.
Pathoanatomy and the Swan Neck Cascade
While full passive DIP joint extension usually remains intact, the loss of active terminal extension alters the biomechanical balance of the entire digit.
If left untreated, the extensor apparatus migrates proximally. This proximal migration concentrates extensor force on the central slip at the PIP joint. Over time, this leads to secondary volar plate laxity and PIP joint hyperextension, culminating in a rigid swan neck deformity.
The usual mechanism of injury is a forceful blow to the tip of an extended finger, causing sudden, forced flexion (e.g., struck by a baseball). Alternatively, a hyperextension injury can cause an avulsion fracture of the dorsal lip of the distal phalanx, manifesting as a bony mallet deformity. While closed injuries predominate, open injuries caused by lacerations and crush abrasions are also encountered. Notably, approximately 40% of mallet fingers result from seemingly minor, low-energy trauma.
Comprehensive Classification System
Mallet fingers are classified into four distinct types based on the associated soft tissue injury and fracture pattern. Accurate classification is the cornerstone of treatment decision-making.
- Type 1: Closed or blunt trauma resulting in loss of tendon continuity, with or without a small, non-articular avulsion fracture.
- Type 2: Open laceration at or proximal to the DIP joint resulting in loss of tendon continuity.
- Type 3: Deep abrasion with significant loss of skin, subcutaneous cover, and tendon substance.
- Type 4: Intra-articular fractures (Bony Mallet). This is further subdivided:
- Type 4A: Transphyseal fracture in pediatric patients (Salter-Harris I or II equivalents).
- Type 4B: Hyperflexion injury with a fracture involving 20% to 50% of the articular surface.
- Type 4C: Hyperextension injury with a fracture of the articular surface usually greater than 50%, accompanied by early or late volar subluxation of the distal phalanx.
Evidence-Based Management Algorithms
Treating Type 1 Injuries
Type 1 mallet fingers are by far the most common. The gold standard of treatment is strict, continuous splinting of the DIP joint in slight hyperextension for 6 to 8 weeks, followed by 2 to 4 weeks of night splinting. The PIP joint must be left free to mobilize. Patient compliance is the single most critical factor in conservative success.
Differentiating Type 1 from Type 4 Fractures
Differentiating small avulsion fractures (Type 1) from larger intra-articular fractures (Type 4) is of paramount importance. The presence of volar subluxation or dislocation of the distal phalanx—which is the hallmark of Type 4C fractures—dictates the need for surgical intervention.
Surgical Management of Type 4C Injuries
When the articular fragment exceeds 30-50% of the joint surface and the distal phalanx subluxates volarly, conservative splinting will fail to restore joint congruity, leading to rapid post-traumatic arthritis.
* Extension Block Pinning (Ishiguro Technique): This is the preferred minimally invasive surgical technique. A dorsal K-wire is driven into the head of the middle phalanx just proximal to the fracture fragment to act as a buttress (extension block). The DIP joint is then reduced by extending the distal phalanx, which uses the intact periosteal hinge to reduce the dorsal fragment against the blocking wire. A second K-wire is then driven longitudinally across the DIP joint to hold the reduction.
* Open Reduction and Internal Fixation (ORIF): Reserved for cases where closed reduction fails or in chronic presentations. ORIF can be achieved using micro-screws (1.0 mm or 1.3 mm) or a hook plate, though this carries a higher risk of nail bed damage, skin necrosis, and hardware prominence.
By adhering to these strict biomechanical principles and classification-based treatment algorithms, the orthopedic surgeon can reliably restore function, stability, and anatomy to the traumatized interphalangeal joint.
