Radial Nerve Palsy: Advanced Surgical Principles and Tendon Transfers
Key Takeaway
Radial nerve palsy profoundly impairs hand function, primarily through the loss of wrist, thumb, and metacarpophalangeal joint extension. Management depends on the injury level—high versus low—and the potential for spontaneous recovery. When nerve repair is unfeasible or delayed, tendon transfers, such as the pronator teres to the extensor carpi radialis brevis, reliably restore functional biomechanics, grip strength, and wrist stability.
Introduction to Radial Nerve Palsy
Peripheral nerve injuries of the upper extremity present complex reconstructive challenges, with radial nerve palsy being one of the most functionally debilitating. The radial nerve is highly susceptible to injury, particularly along the humeral shaft and the proximal third of the dorsoradial forearm.
The clinical presentation and subsequent surgical management are dictated by the anatomic level of the lesion:
* High Radial Nerve Palsy: Occurring proximal to the elbow, these injuries typically spare triceps function, preserving active elbow extension. However, predictable motor paralysis results in the profound loss of wrist extension, thumb extension and abduction, and finger metacarpophalangeal (MCP) joint extension. Because wrist extension is an absolute biomechanical prerequisite for proper flexor tendon tensioning, grasp strength is profoundly reduced. This loss of power grip represents the most critical functional deficit.
* Low Radial Nerve Palsy: Occurring more distally (often involving the posterior interosseous nerve), this variant is characterized by the preservation of wrist extension (via the extensor carpi radialis longus). However, the loss of thumb extension/abduction and finger MCP joint extension prevents appropriate grasp posture, resulting in striking awkwardness and clumsiness of the hand.
Clinical Pearl: The primary goal in reconstructing a radial nerve palsy is not merely restoring extension, but restoring the synergistic wrist stability required for a powerful and effective flexor grasp.
Natural History and Timing of Intervention
Observation is the gold standard for most radial nerve palsies associated with closed humeral shaft fractures, as spontaneous return of normal function can be anticipated in a majority of cases within 3 to 6 months.
Historically, the Holstein-Lewis fracture pattern (a spiral fracture at the junction of the middle and distal thirds of the humerus) was considered an indication for early surgical exploration due to the risk of nerve entrapment. However, contemporary evidence suggests that a significant series of patients with this specific fracture pattern achieve full spontaneous recovery regardless of early surgical intervention. Therefore, indications for open reduction and internal fixation (ORIF) of acute closed humeral fractures should rely on orthopedic parameters (e.g., polytrauma, open fracture, vascular compromise, unacceptable alignment) rather than solely on the status of the radial nerve.
Indications for Nerve Exploration
The timing for nerve exploration in closed injuries varies but is generally indicated at 3 months post-injury in the absence of clinical recovery or an advancing Tinel sign.
While the results of primary nerve repair or grafting are optimal when performed within 6 months of injury, Zachary noted that successful repairs can be performed 9 to 16 months post-injury because the radial nerve is primarily a motor nerve. Nerve exploration should routinely accompany the management of open humeral fractures and lacerations associated with nerve deficits. Radial nerve neurorrhaphy is highly suitable due to its largely motor composition and the relatively short distance between the site of injury and the target motor endplates.
The Role of Early Tendon Transfers
When a nerve repair is performed and suitable recovery is anticipated, definitive tendon transfers should generally be delayed for 6 months. However, Burkhalter outlined three distinct indications for early tendon transfer:
1. As an Internal Splint: To act as a substitute during the regrowth of the nerve, eliminating the need for cumbersome external orthoses.
2. As a Helper: To assist function as reinnervation proceeds.
3. As Definitive Intervention: To intervene early when the results of nerve repair are anticipated to be poor or the nerve is deemed irreparable.
Burkhalter strongly contended that the early transfer of the pronator teres (PT) to establish wrist extension creates no functional disability, as the transferred unit continues to function effectively as a forearm pronator while providing critical wrist stability.
Biomechanics and Principles of Tendon Transfer
When neurorrhaphy is impossible or has failed, tendon transplantation remains the gold standard. As Jones stated in 1921, "unless an end-to-end suture can be secured, a tendon transplantation is indicated."
Procedures for low radial nerve palsy are derived from the more comprehensive procedures used for high radial nerve palsy. The synergistic wrist flexors, long finger flexors, palmaris longus (PL), and pronator teres (PT) are commonly utilized as donor motors.
Donor Selection: FCR vs. FCU
Despite numerous variations, the most critical debate centers on the choice of donor for finger extension: the Flexor Carpi Radialis (FCR) versus the Flexor Carpi Ulnaris (FCU).
- The FCU Transfer: Historically popular, transferring the FCU to the extensor digitorum communis (EDC) provides robust extension. However, the FCU is the major wrist flexor and the only remaining ulnar deviator of the wrist (since the extensor carpi ulnaris is paralyzed). Normal wrist motion arcs from dorsoradial extension to volar-ulnar flexion. Sacrificing the FCU eliminates this balancing force, accentuating radial deviation and severely compromising the ulnar-deviated wrist position required for power grip. In patients with pre-existing radial deviation, use of the FCU is strictly contraindicated.
- The FCR Transfer: Most modern surgeons prefer retaining the FCU and utilizing the FCR for MCP joint extension. This preserves ulnar deviation and power grip. Zachary critically pointed out that at least one strong wrist flexor must be retained to prevent debilitating wrist hyperextension.
Excursion Mismatch and the Boyes Modification
In 1960, Boyes highlighted a fundamental biomechanical challenge: wrist flexors possess an excursion of approximately 33 mm, which falls significantly short of the 50 mm excursion required for full, independent digital extension.
To achieve full excursion, Boyes devised transfers utilizing the flexor digitorum sublimis (FDS) tendons of the middle and ring fingers. While biomechanically superior regarding excursion, these transfers are technically demanding, and restrictive adhesions frequently occur within the interosseous space through which the FDS tendons are routed.
Surgical Warning: Most surgeons attempt to balance the wrist and decrease the likelihood of radial deviation by transferring the Pronator Teres into the centrally located Extensor Carpi Radialis Brevis (ECRB), rather than the Extensor Carpi Radialis Longus (ECRL). Brand suggested transferring the ECRL insertion to a point between the ECRB and ECU to further centralize extension forces.
Preoperative Planning and Patient Positioning
All tendon transfer procedures for radial nerve palsy are performed under general anesthesia or a regional axillary block. The patient is positioned supine with the operative arm extended on a radiolucent hand table. A high arm pneumatic tourniquet is applied. The hand, forearm, and elbow are prepped and draped in a standard sterile fashion. The surgeon sits on the axillary side of the arm, with the assistant opposite.
Surgical Technique: The Standard FCR Transfer
The following technique describes the most reliable and commonly utilized combination: Pronator Teres to ECRB, Flexor Carpi Radialis to EDC, and Palmaris Longus to rerouted EPL.
1. Dorsal Exposure and Extensor Preparation
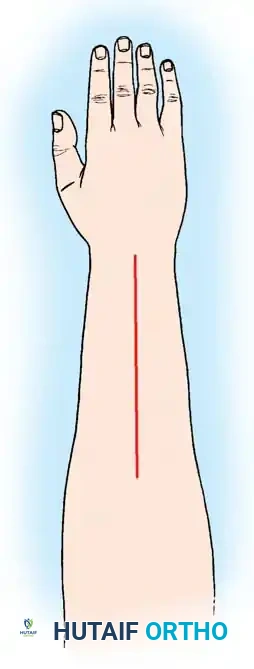
Make a gently curved incision in the middle third of the dorsal forearm to expose the extensor pollicis longus (EPL), the common extensor tendons (EDC), and the extensor indicis proprius (EIP) proximal to the extensor retinaculum.
Dorsal incision approach for exposure of the extensor compartments.
Flex the fingers fully and hold the wrist in extension. Sequentially secure the EDC and EIP tendons together under equal tension just proximal to the extensor retinaculum using 2-0 nonabsorbable braided sutures.
Place the wrist in neutral and evaluate synchronous MCP joint extension by placing traction on a Kocher clamp positioned proximal to the sutured region of the EDC/EIP composite. Additional extensor tendon balancing may be required by adjusting tension with supplementary mattress sutures. Inclusion of the extensor digiti minimi (EDM) may be necessary to ensure small finger extension.
Identification and isolation of the Extensor carpi radialis longus and brevis.
2. Volar Exposure and Motor Unit Harvest
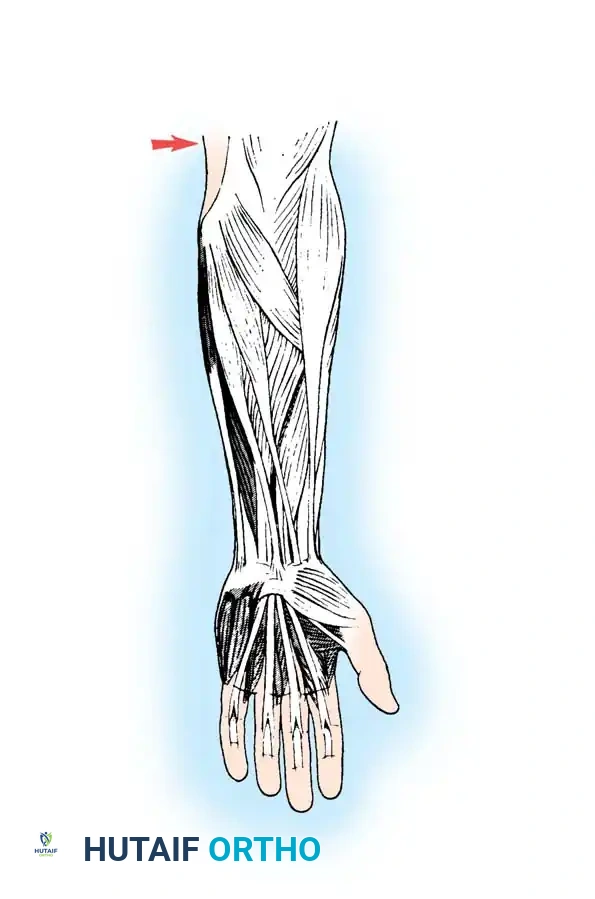
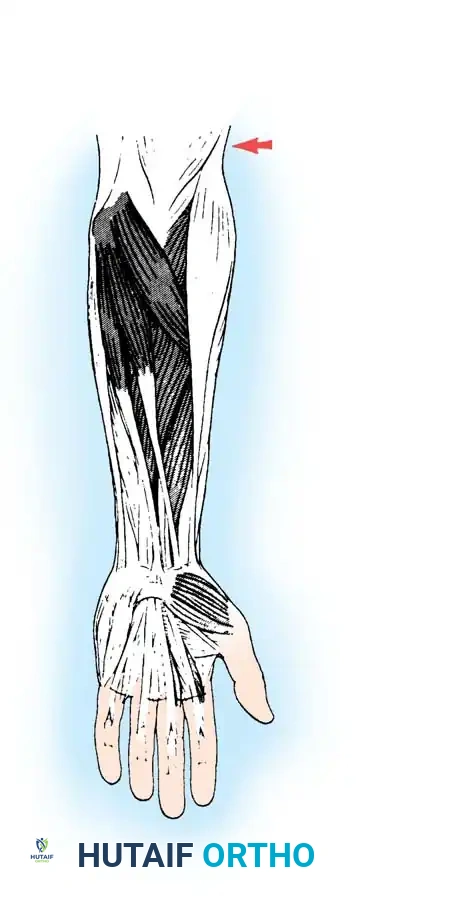
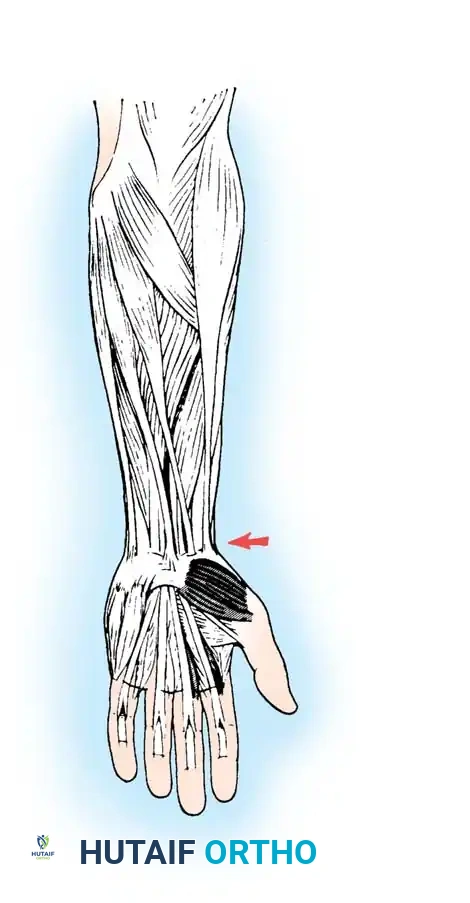
Make a gently curved volar incision, extending from the junction of the proximal-middle third of the forearm to 4 cm proximal to the distal wrist flexion crease. This exposes the pronator teres, flexor carpi radialis, and palmaris longus musculotendinous units.
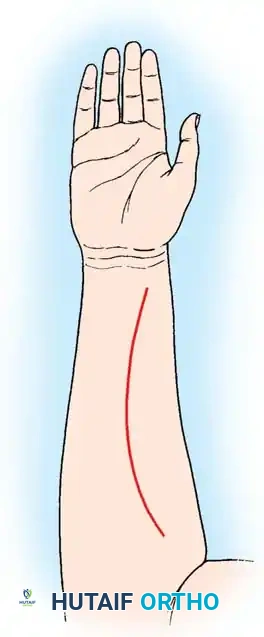
Volar incision approach for harvesting the PT, FCR, and PL.
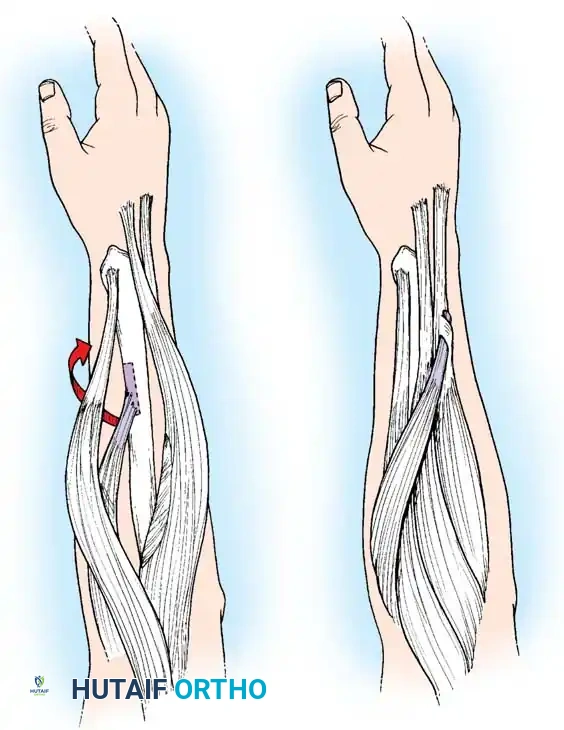
Locate the interval between the brachioradialis and the pronator teres. Trace the PT to its insertion on the radial shaft. Sharply free the PT from the radius, meticulously harvesting a 2 to 3 cm periosteal extension in continuity with the tendinous insertion. This periosteal slip is critical for achieving adequate length for the subsequent weave.
Harvesting the Pronator Teres with its periosteal extension.
Trace the FCR distally. With the wrist flexed to relieve tension, transect the FCR exactly at the level of the distal wrist crease. Verify the presence of the palmaris longus (absent in ~15% of patients), trace its tendon distally, and divide it at the distal wrist flexion crease.
Surgical Pitfall: Exercise extreme caution during the distal dissection of the PL and FCR to avoid mishandling or injuring the underlying median nerve, which lies in close proximity.
Mobilization of the FCR and PL motor units.
Elevate and dissect these three motor units proximally, releasing their fascial attachments to allow for a straight, colinear alignment with their intended dorsal insertions.
3. Tendon Rerouting and Subcutaneous Tunneling
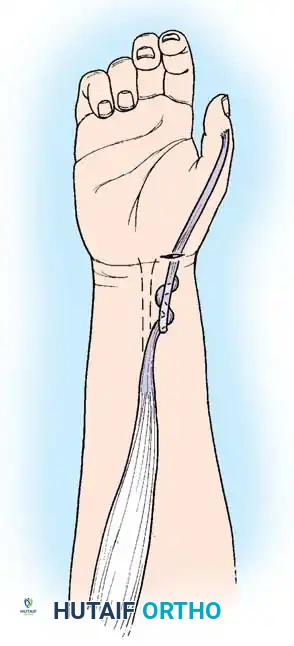
Transect the EPL at its musculotendinous junction. Make a 2-cm incision dorsally just proximal to the thumb MCP joint. Deliver the EPL tendon into this wound using a Kelly clamp, releasing any restrictive fascial attachments.
Release of the EPL from the Third dorsal wrist compartment.
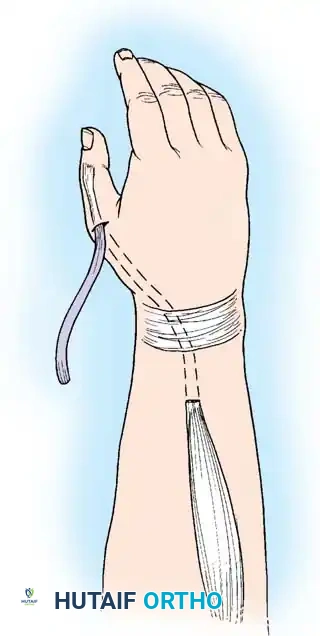
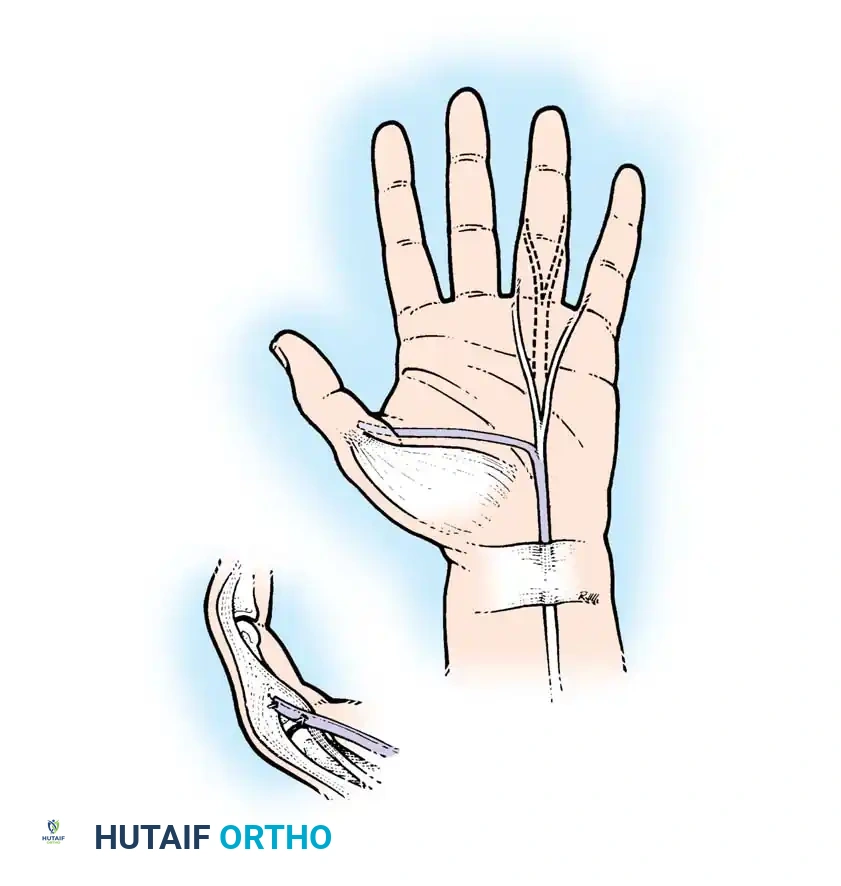
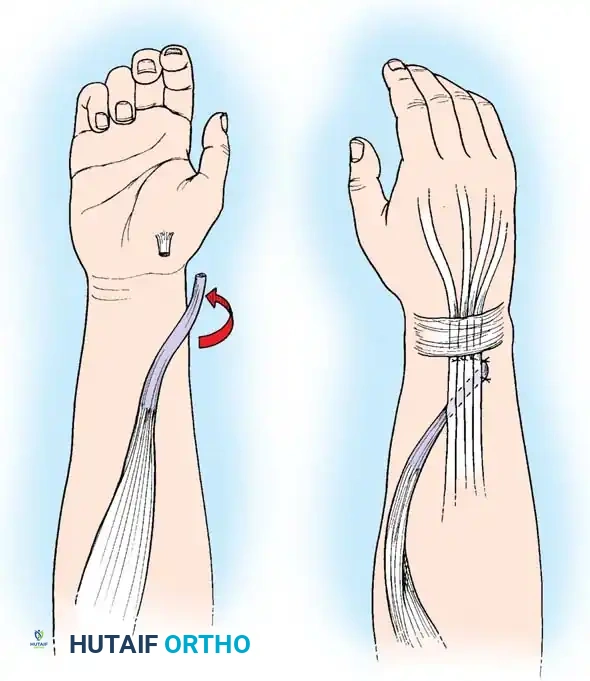
Make another 2-cm transverse incision in the distal wrist flexion crease at the base of the thenar eminence. Create a subcutaneous tunnel with a Kelly clamp to pass the EPL volar and radial to the thumb carpometacarpal joint.
Rerouting the EPL toward the volar aspect of the wrist.
Tunnel the EPL tendon to the volar wound. Effortless excursion must be achieved by releasing any remaining fascial bands. Assess the desired thumb radial abduction and extension by placing traction on the free, rerouted EPL tendon in line with the PL toward the medial epicondyle. Wrap the tendon in a moist sponge.
Develop wide subcutaneous tunnels from the proximal-volar incision to the distal-dorsal incision, maintaining a straight-line approach for the PT and FCR motors.
Creation of subcutaneous tunnels for tendon transfer.
Clinical Pearl: The tunnels must pass superficial to the brachioradialis and ECRL. Passing tendons deep or through tight fascial windows risks compression of the superficial sensory branch of the radial nerve and restricts tendon excursion.
4. Tendon Weaving and Precise Tensioning
FCR to EDC/EIP:
Pass the FCR tendon through the EDC/EIP tendon composite in a proximal-radial to distal-ulnar direction. Because of the size mismatch and anatomical constraints, a standard Pulvertaft-type weave is often impossible. Instead, use multiple horizontal mattress sutures (2-0 nonabsorbable) to anchor the FCR tendon to each individual tendon in the EDC/EIP composite.

Weaving and suturing the FCR to the EDC/EIP composite.
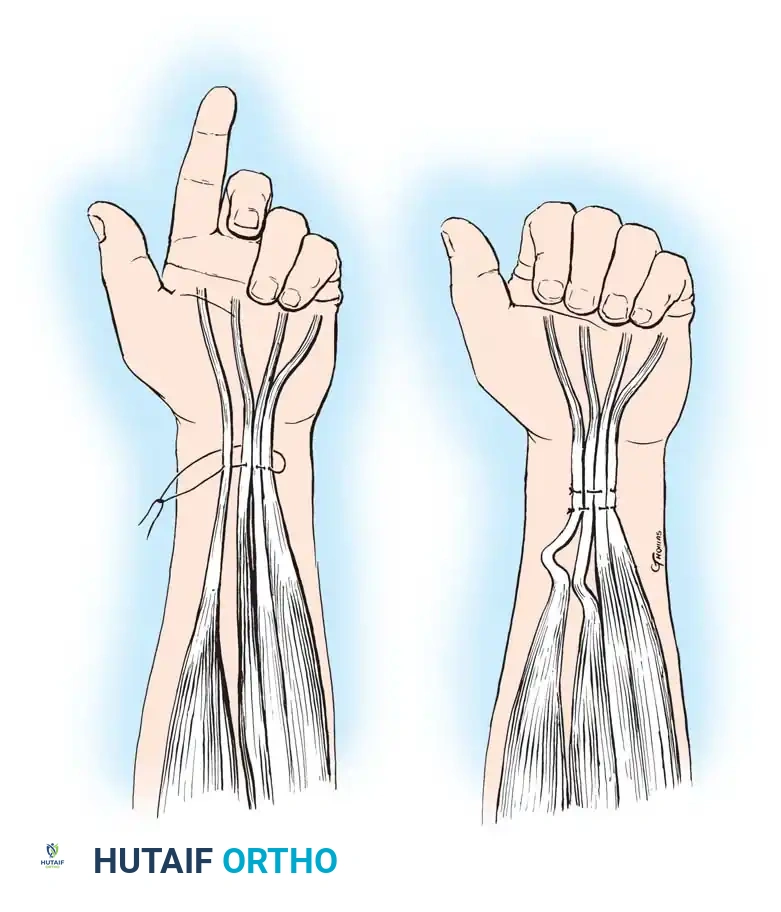
Tensioning the FCR: Adjust the tension so that with full passive wrist flexion, the MCP joints extend fully. Conversely, with full passive wrist extension, the fingers must be able to be passively flexed into the palm. This utilizes the tenodesis effect to overcome the excursion mismatch.
Assessing the tenodesis effect: Wrist flexion yielding MCP extension.
PT to ECRB:
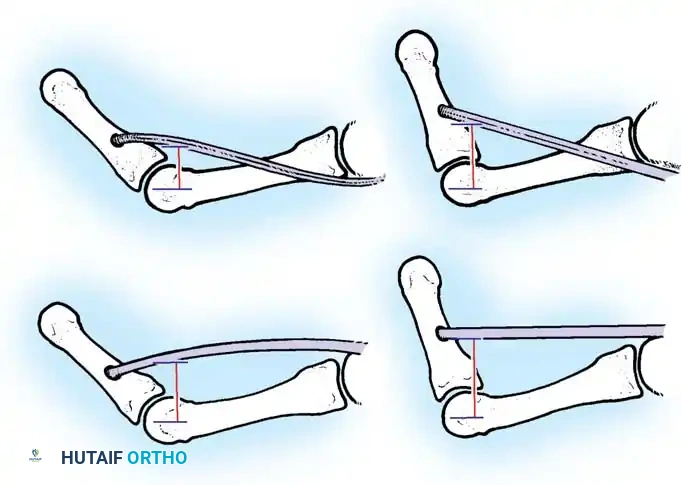
Weave the PT tendon and its periosteal slip through the centralized ECRB tendon. The PT and ECRB are joined by several passages of the PT through the recipient ECRB.
Weaving the Pronator Teres into the Extensor Carpi Radialis Brevis.
This is simplified using a No. 15 blade and a mosquito hemostat. Hold the blade parallel to the ECRB fibers and pierce the tendon. Grasp the blade with the hemostat, pull it back through, and grasp the free end of the PT. Repeat this three or more times, rotating the pass 90 degrees each time. Secure the weave with multiple 2-0 braided nonabsorbable sutures in a horizontal mattress fashion.
Tensioning the PT: The wrist must be held in 40 degrees of extension with the PT under near-maximal tension during suturing.
Final tensioning of the PT to ECRB transfer.
PL to EPL:
Weave the rerouted EPL tendon through the PL in a standard 90-90 Pulvertaft fashion.
Weaving the Palmaris Longus to the rerouted Extensor Pollicis Longus.
Tensioning the PL: Place traction on the tendon in line with the PL and check for the desired thumb palmar abduction and interphalangeal joint extension. The tension should maintain slightly more than half-maximal PL excursion, balancing the thumb perfectly in abduction and extension.
5. Closure and Splinting
Deflate the tourniquet and achieve meticulous hemostasis. Close the wounds in a routine layered fashion.
Apply a bulky, well-padded volar splint. The wrist is immobilized in 40 to 45 degrees of extension, the MCP joints in 0 to 10 degrees of flexion (neutral), and the thumb in maximal radial and palmar abduction with the interphalangeal joint extended. The proximal interphalangeal (PIP) and distal interphalangeal (DIP) joints of the fingers are left free to allow immediate active flexion, which prevents intrinsic tightness and extensor mechanism adhesions.
Postoperative Protocol and Rehabilitation
Successful tendon
You Might Also Like
