PRINCIPLES OF FLATFOOT RECONSTRUCTION
The surgical management of Adult Acquired Flatfoot Deformity (AAFD), increasingly referred to as Progressive Collapsing Foot Deformity (PCFD), demands a profound understanding of foot and ankle biomechanics. Correction rarely relies on a single procedure; rather, it requires a meticulously planned combination of soft tissue reconstructions and bony osteotomies to restore the static "triangle of support" originally described by Cotton.
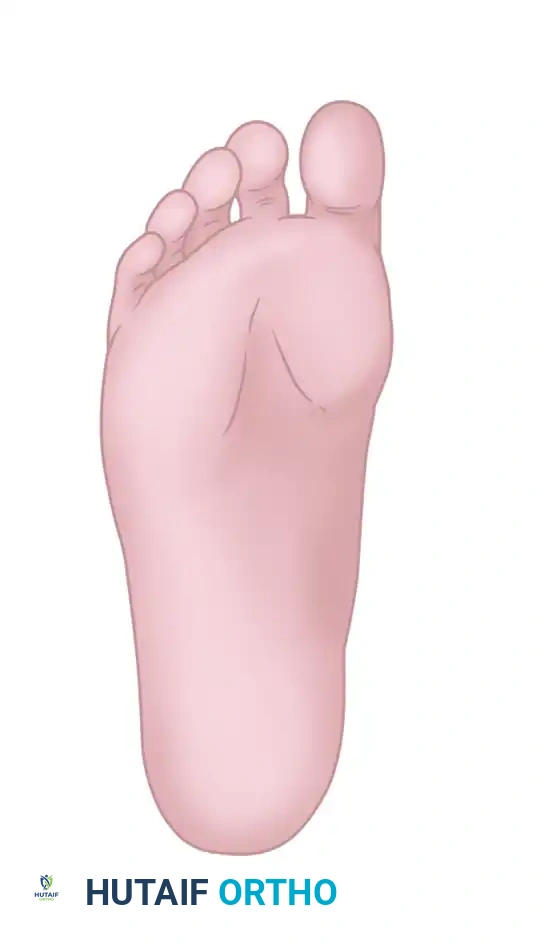
When the posterior tibial tendon (PTT) fails, the medial longitudinal arch collapses, leading to hindfoot valgus, midfoot abduction, and compensatory forefoot varus (supinatus). If the hindfoot is corrected to a neutral alignment, a fixed forefoot supinatus will cause the lateral border of the foot to bear excessive weight, leading to lateral column overload and recurrent deformity. Therefore, addressing the medial column is paramount.
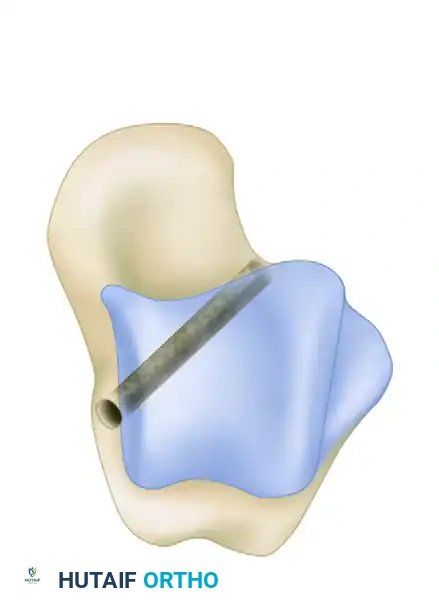
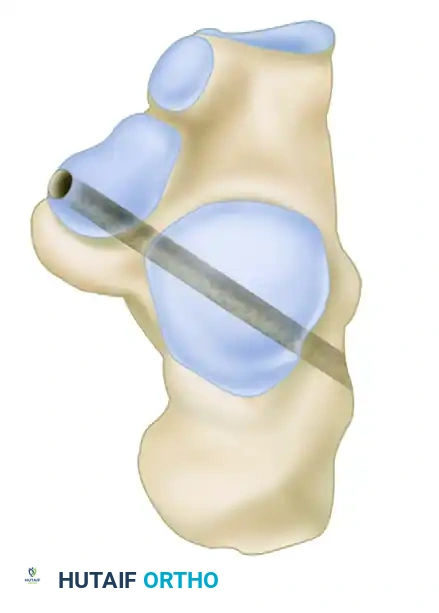
OPENING WEDGE MEDIAL CUNEIFORM (COTTON) OSTEOTOMY
The opening wedge osteotomy of the medial cuneiform, commonly known as the Cotton osteotomy, is a powerful adjunctive procedure utilized to plantarflex the first ray and correct fixed forefoot varus associated with flatfoot deformity.
Hirose and Johnson reported excellent clinical results with no major complications in a cohort of 16 patients treated with an opening wedge osteotomy of the medial cuneiform as an adjunctive procedure in flatfoot correction.
Clinical Pearl: Suggested advantages of the Cotton osteotomy over a first tarsometatarsal (Lapidus) arthrodesis include highly predictable union rates, preservation of essential first ray mobility, and the intraoperative ability to easily vary the amount of correction by titrating the size of the bone wedge.
Biomechanics and the Triangle of Support
The fundamental goal of the Cotton osteotomy is to restore the tripod effect of the foot—specifically, the weight-bearing distribution between the calcaneal tuberosity, the fifth metatarsal head, and the first metatarsal head.
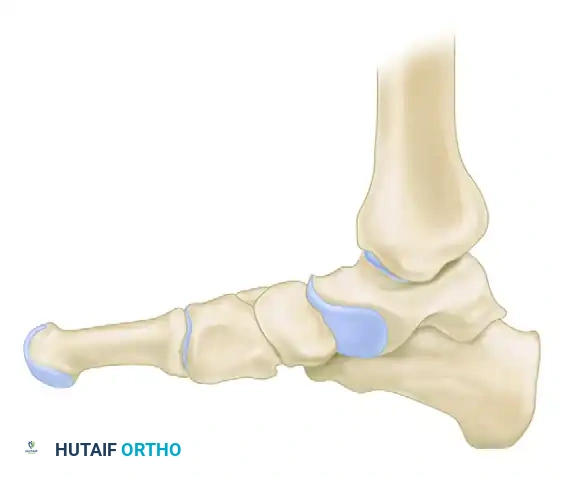
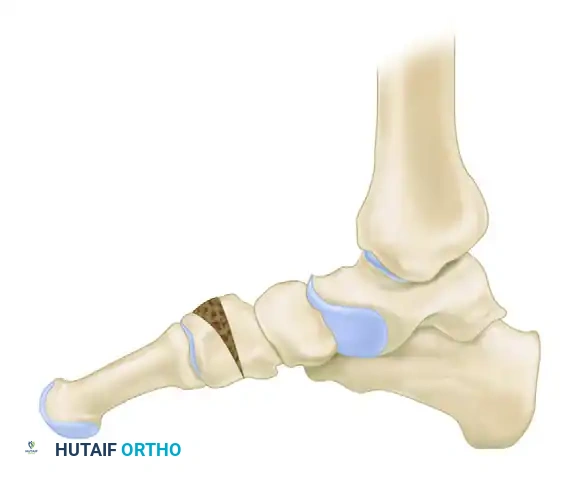
By plantarflexing the medial column through the medial cuneiform, the surgeon effectively re-establishes the medial pillar of this triangle, ensuring a plantigrade foot following hindfoot correction.
Surgical Technique: Cotton Osteotomy
Patient Positioning and Approach:
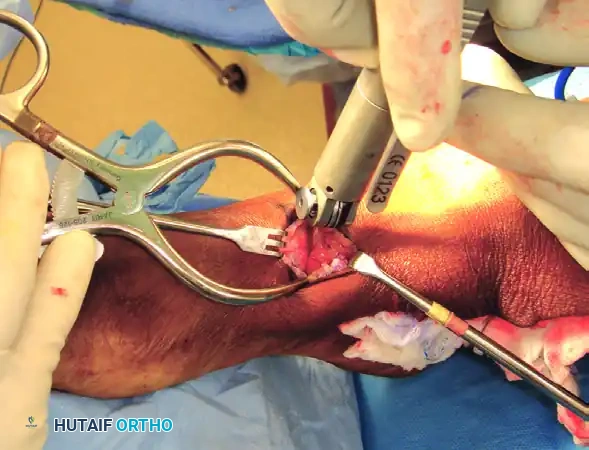
The patient is positioned supine with a bump under the ipsilateral hip to allow neutral rotation of the leg. A tourniquet is applied to the proximal thigh.
A 4-cm longitudinal incision is made over the dorsomedial aspect of the medial cuneiform, carefully positioned between the tibialis anterior (TA) and the extensor hallucis longus (EHL) tendons.
Osteotomy Execution:
1. Deepen the incision through the extensor retinaculum. Retract the TA tendon medially and the EHL tendon laterally.
2. Expose the dorsal, medial, and lateral surfaces of the medial cuneiform using subperiosteal dissection.
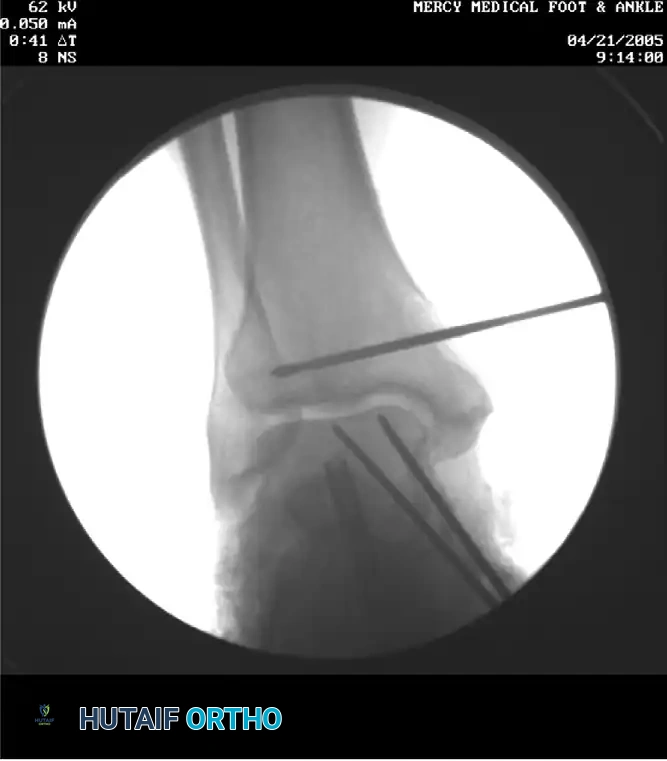
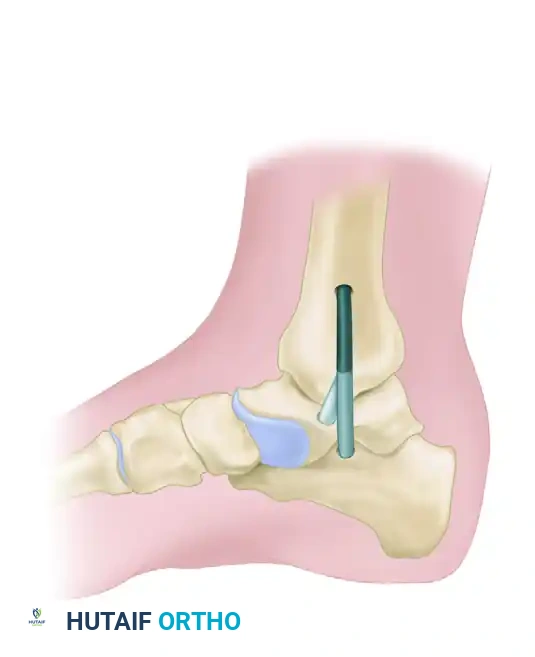
3. Under fluoroscopic guidance, identify the center of the medial cuneiform.
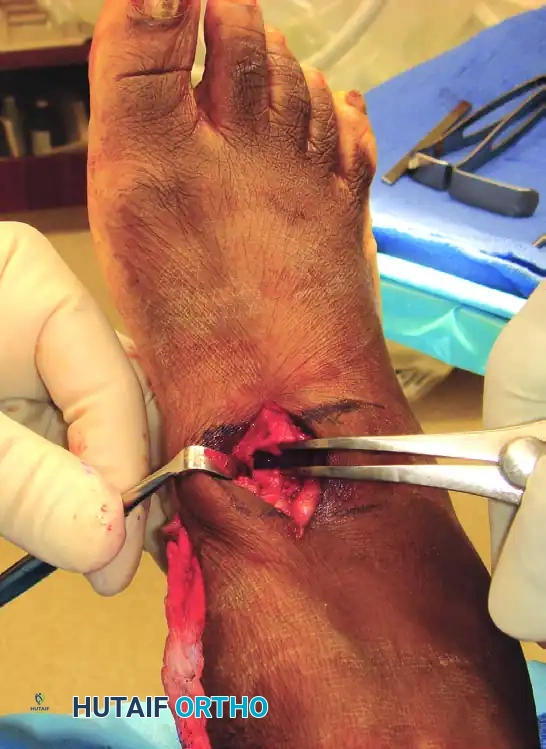
- Create a transverse osteotomy using a sagittal saw. The cut should be directed from dorsal to plantar, stopping approximately 2 to 3 mm short of the plantar cortex to preserve a plantar periosteal-bone hinge.
Surgical Warning: Penetration of the plantar cortex destabilizes the osteotomy and risks injury to the medial plantar nerve and vessels. Always use a controlled, oscillating motion and complete the deepest portion of the cut with a sharp osteotome.
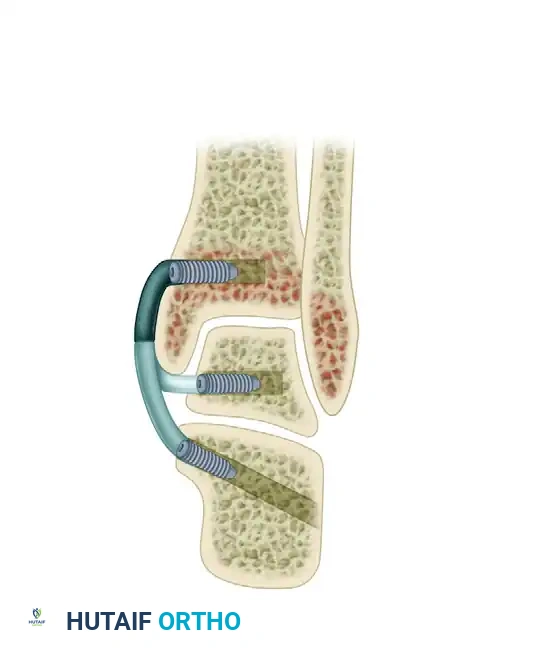
Wedge Insertion and Fixation:
1. Gently open the osteotomy using a smooth lamina spreader or a broad osteotome.
2. Assess the required correction by simulating weight-bearing (loading the foot in a neutral ankle position).
3. Prepare a structural bone wedge (typically tricortical iliac crest autograft or allograft, or a porous titanium wedge) measuring between 4 to 8 mm at its dorsal base, depending on the severity of the supinatus.
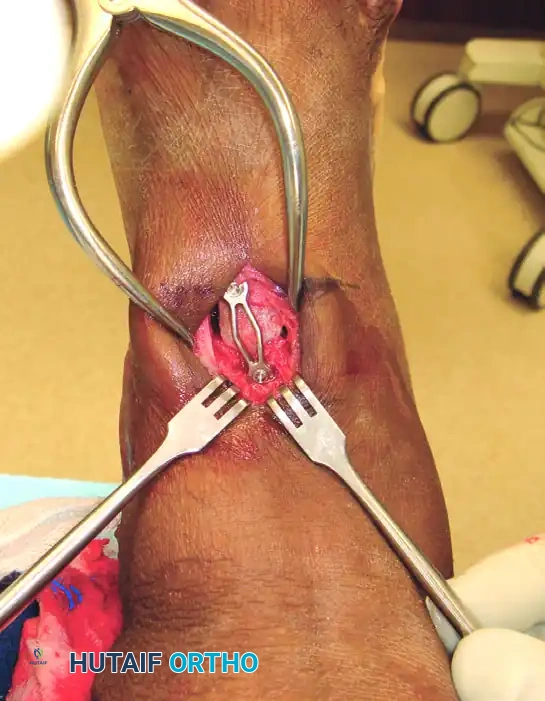
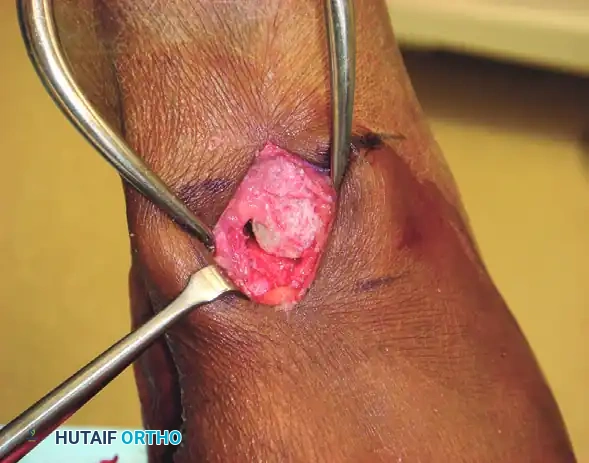
- Impact the wedge into the osteotomy site. Ensure the graft is flush with the dorsal cortex to prevent hardware irritation.

- Fixation is typically achieved using a dorsal locking plate, a staple, or crossed K-wires, depending on surgeon preference and bone quality.
MINIMALLY INVASIVE DELTOID LIGAMENT RECONSTRUCTION (JENG ET AL.)
In Stage IV AAFD, the deformity progresses to involve the ankle joint, characterized by deltoid ligament insufficiency and valgus talar tilt within the ankle mortise. Reconstruction of the deltoid ligament is critical to restoring tibiotalar congruency. The minimally invasive technique described by Jeng, Bluman, and Myerson offers robust reconstruction while minimizing soft tissue morbidity.
Allograft Preparation
- Before the creation of the bone tunnels, prepare the allograft hamstring tendon (semitendinosus or gracilis) on the back table.
- From a fully thawed allograft tendon, utilize approximately 20 cm for the reconstruction.
- Split the graft longitudinally, leaving approximately 6 cm intact at the proximal end.
- Place Krackow stitches of No. 00 Orthocord (Ethicon, Somerville, NJ) or equivalent high-tensile nonabsorbable suture in all three limbs of the tendon graft.
- Apply a mechanical preload to stretch the tendon on a preparation board for 15 minutes to minimize viscoelastic creep after insertion.
Surgical Technique: Deltoid Reconstruction
Tibial Tunnel Creation:
- Create a tibial tunnel by inserting a guidewire parallel to the joint surface at the level of the distal tibial physeal scar. The wire must be centered in the sagittal plane within the tibia.
- Confirm the guidewire position with multiplanar fluoroscopy.
- Drill a 6.5-mm tunnel to a depth of 25 mm over the wire.
- Insert the intact (nonsplit) end of the tendon graft into this blind tunnel. Fix it securely in place with a biotenodesis screw. Bioabsorbable polylactic acid interference screws of 6.25 to 8.0-mm diameter are recommended, selected based on the patient's local bone density.
Subcutaneous Passage and Medial Exposure:
- Using blunt dissection, create a subcutaneous tunnel from the tibial insertion site inferiorly to the tip of the medial malleolus. Pass the distal split tendon limbs through this tunnel using a large hemostat clamp.
- Make a longitudinal incision extending from the distal end of the medial malleolus to approximately 1 cm inferior to the sustentaculum tali.
- Excise the degenerated posterior tibial tendon and the remaining attenuated soft tissues (e.g., tendon sheaths and superficial deltoid fibers) as needed to gain clear access to the medial talar dome and sustentaculum.
Surgical Warning: Take meticulous care not to damage the flexor digitorum longus (FDL) or flexor hallucis longus (FHL) tendons. The posteromedial neurovascular bundle of the ankle must remain posterior to all tunnels at the level of the ankle, and posteroinferior to them at the level of the sustentaculum tali.
Talar Tunnel Creation:
- Create a talar tunnel beginning at the medial center of tibiotalar rotation. Approximate this position through the anatomical footprint of the previously transected deep deltoid fibers.
- Locate the junction of the lateral talar neck and body by palpation, and establish the lateral exit of the tunnel here.
- Taking care not to damage branches of the superficial peroneal nerve, use a small hemostat to bluntly dissect down to the most proximal portion of the lateral talar neck.
- Advance a guidewire along this axis and confirm its position with anteroposterior and lateral fluoroscopy.
- With a cannulated drill, drill a 5-mm tunnel over the guidewire in an anterograde direction.
- Using a suture passer, pass the talar limb of the sutured tendon through the tunnel from medial to lateral.
- Hand-tension this limb of the tendon graft while an assistant holds the ankle and hindfoot in maximal inversion. Place a 5.5-mm interference screw in the medial aspect of the tunnel to secure the graft.
Calcaneal Tunnel Creation:
- With digital palpation, locate the medial border of the sustentaculum tali. Advance a guidewire for a biotenodesis screw along an axis from the sustentaculum tali to a point approximately 1 cm superior to the peroneal tubercle on the lateral side of the calcaneus.
- Confirm the position of the guidewire with fluoroscopy, and create a 5-mm tunnel over the guidewire.
- Pass the free end of the remaining limb of the tendon graft through this calcaneal tunnel.
- Manually tension the graft to obtain a congruent tibiotalar joint position on fluoroscopy. Insert a 5.5-mm interference screw from medial to lateral into the calcaneal tunnel.

Closure and Postoperative Care:
- Close the incisions in a routine layered fashion and apply a sterile dressing followed by a well-padded plaster splint in neutral alignment.
- At 2 weeks: Splint immobilization is removed, sutures are extracted, and a rigid cast boot is fitted.
- At 6 weeks: Progressive weight-bearing is initiated.
- At 12 weeks: Immobilization is discontinued, and the patient transitions to supportive footwear with physical therapy focusing on proprioception and peroneal strengthening.
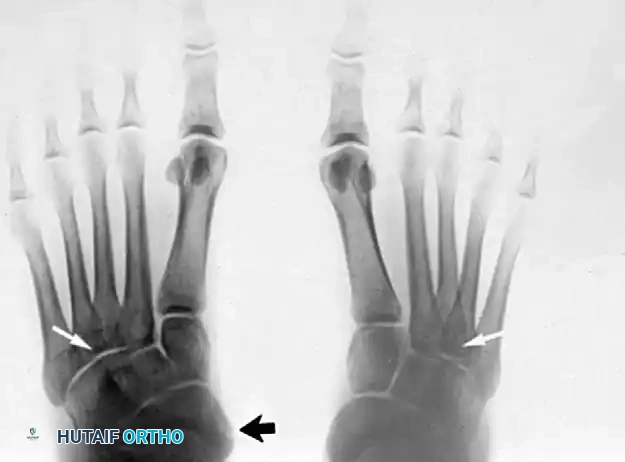
INSUFFICIENCY OF POSTERIOR TIBIAL TENDON SECONDARY TO ACCESSORY NAVICULAR
Insufficiency of the posterior tibial tendon secondary to an accessory navicular presents unique biomechanical problems. The presence of an accessory navicular alters the insertion vector of the PTT, reducing its mechanical advantage and predisposing the tendon to tendinosis and eventual rupture.
It would seem reasonable that if unilateral pes planus develops in a "prehallux foot," simply excising the accessory navicular and advancing the posterior tibial tendon should suffice. This is true provided the deformity is not severe and the opposite foot has a cornuate or accessory navicular but no pes planus.
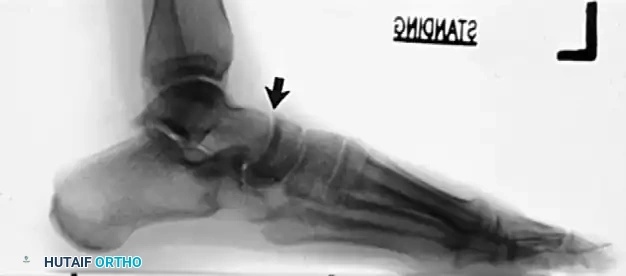
However, this is most often not the case in advanced pathology. In a skeletally mature foot, unilateral pes planus with a plantar-flexed talus secondary to PTT insufficiency associated with a prehallux foot implies abnormal insertion and function of the PTT.
The Role of the Evans Procedure
In these advanced cases, isolated soft tissue advancement is doomed to fail. The deformity requires a combination of advancing the tendon, excising the extended corner or accessory navicular on the medial side, and lengthening the lateral column of the foot with a bicortical bone graft (Evans procedure).
The Evans anterior calcaneal osteotomy helps restore and stabilize the longitudinal arch by elongating the lateral column of the foot, thereby reducing the talonavicular joint congruously.
- The graft is usually 8 to 10 mm wide and is placed 1.5 cm proximal to the calcaneocuboid articulation.
- It is internally fixed with a single 3/32-inch Steinmann pin driven from the fourth intermetatarsal space, distal to proximal, crossing the calcaneocuboid articulation, and cut beneath the skin.
- The pin is removed in 6 to 8 weeks using local anesthesia in the clinic, and a short-leg weight-bearing cast is worn for another 6 to 8 weeks to ensure complete graft incorporation.
THE KIDNER PROCEDURE
The classic Kidner procedure consists of excising the accessory navicular and rerouting the posterior tibial tendon into a more plantar position to restore its mechanical advantage as an arch elevator.
Clinical Pearl: Preoperative patient counseling is vital. The parents (or adult patients) must be informed before surgery that permanent correction of the arch sag cannot be guaranteed. However, relief of symptoms around the prominent tuberosity and reduction or elimination of fatigue from arch strain are highly predictable.
Indications:
Indications for the Kidner procedure include a symptomatic accessory navicular bone (Type II or III) with point tenderness in the region that has failed conservative management. In most patients with an acute injury to the synchondrosis, 6 to 8 weeks of cast or boot immobilization is recommended as a trial before surgical intervention.
Surgical Technique: Kidner Procedure
Incision and Exposure:
1. Beginning 1.0 to 1.5 cm inferior and distal to the tip of the medial malleolus, arch the skin incision slightly dorsalward, peaking at the medial prominence of the accessory navicular, and sloping distally to the base of the first metatarsal.
2. Carefully ligate the plantar communicating branches of the saphenous venous system. Identify the posterior tibial tendon as it approaches the accessory navicular.
3. Identify the dorsal and plantar margins of the tendon 2 cm proximal to the accessory navicular, and expose the tendon distally, ending at the bone. By this means, the entire tendon can be exposed, and the part extending plantarward toward its multiple insertions is not disturbed.
Transposition and Advancement:
1. Using sharp dissection, shell the accessory navicular from the posterior tibial tendon. Attempt to leave a small sliver of bone within the tendon if transposition of the tendon is planned, as this aids in bone-to-bone healing during reattachment.
2. Resect the medial prominence of the main navicular flush with the medial border of the first cuneiform using a rongeur and rasp. Remove the portion of the cuneiform using sharp dissection, and shift the tendon plantarward and laterally as far as possible.
3. Suture the tendon to the apex of the medial longitudinal arch. Use local peri
