Introduction to Complex Achilles Tendon Reconstruction
The management of chronic, neglected, or re-ruptured Achilles tendons presents a formidable challenge to the orthopaedic surgeon. When the tendon ends have retracted significantly, or when the intervening tissue is heavily scarred and non-viable, primary end-to-end anastomosis is often impossible without excessive tension. In such scenarios, tendon transfer techniques become essential to bridge the defect, restore the resting length of the gastrocsoleus complex, and re-establish the critical plantarflexion lever arm required for normal gait.
The Teuffer technique, first described as a reliable method for reconstructing large Achilles tendon defects, utilizes the peroneus brevis tendon. By harvesting the peroneus brevis, routing it through the calcaneus, and creating a dynamic loop, the surgeon provides both a robust biological scaffold for healing and a dynamic assist to plantarflexion. This comprehensive guide details the surgical anatomy, indications, step-by-step execution of the Teuffer technique, the Turco and Spinella modification, and the rigorous postoperative rehabilitation required for optimal clinical outcomes.
Surgical Anatomy and Biomechanics
A profound understanding of the regional anatomy is non-negotiable when performing complex hindfoot reconstructions.
The Achilles Tendon and Sural Nerve
The Achilles tendon is the conjoined tendon of the gastrocnemius and soleus muscles. It lacks a true synovial sheath, being enveloped instead by a highly vascularized paratenon. The vascular watershed area, located 2 to 6 cm proximal to the calcaneal insertion, is notoriously prone to rupture and poor healing.
The sural nerve is the most critical neurovascular structure at risk during this approach. It courses distally along the posterolateral aspect of the calf, crossing the lateral border of the Achilles tendon approximately 9.8 cm (range, 7-13 cm) proximal to the calcaneal insertion. It then runs parallel to the lateral border of the tendon before passing posterior to the lateral malleolus.
⚠️ Surgical Warning: Sural Nerve Injury
Iatrogenic injury to the sural nerve can result in painful neuromas and lateral foot numbness, significantly compromising patient satisfaction. The nerve must be meticulously identified in the proximal extent of the posterolateral incision and gently retracted with a vessel loop.
The Peroneus Brevis
The peroneus brevis muscle originates from the distal two-thirds of the lateral fibular shaft and the adjacent intermuscular septa. Its tendon passes posterior to the lateral malleolus, anterior and medial to the peroneus longus tendon, and inserts onto the tuberosity at the base of the fifth metatarsal.
Biomechanically, the peroneus brevis is a primary evertor and a secondary plantarflexor of the ankle. Harvesting it for Achilles reconstruction sacrifices some eversion strength; however, the peroneus longus is typically sufficient to maintain functional eversion. The transfer of the peroneus brevis to the calcaneus effectively converts it into a primary plantarflexor, supplementing the weakened gastrocsoleus complex.
Indications and Contraindications
Indications
- Chronic or Neglected Ruptures: Ruptures presenting more than 4 to 6 weeks post-injury where gap formation prevents primary repair.
- Massive Tendon Defects: Acute or chronic ruptures with a defect greater than 3 to 5 cm after debridement of non-viable tissue.
- Revision Surgery: Failed primary Achilles tendon repairs with poor tissue quality.
- Degenerative Tendinopathy: Severe insertional or non-insertional tendinosis requiring extensive debridement that compromises tendon continuity.
Contraindications
- Active Infection: Local or systemic infections must be eradicated prior to reconstruction.
- Severe Peripheral Vascular Disease: Poor vascularity precludes adequate wound healing, especially with the extensive posterolateral approach.
- Peroneal Nerve Palsy: Pre-existing weakness or paralysis of the peroneal compartment makes the peroneus brevis unavailable or unsuitable for transfer.
- Charcot Arthropathy: Active neuroarthropathy of the hindfoot or ankle.
Preoperative Planning and Patient Positioning
Imaging
Standard weight-bearing radiographs of the ankle and foot are obtained to rule out osseous abnormalities, such as Haglund's deformity or calcaneal spurs. Magnetic Resonance Imaging (MRI) is the gold standard for preoperative planning. It allows the surgeon to accurately quantify the length of the tendon defect, assess the degree of fatty infiltration in the gastrocsoleus muscle belly, and evaluate the quality of the peroneus brevis tendon.
Positioning and Anesthesia
The procedure is typically performed under general or regional anesthesia (spinal or popliteal block).
1. The patient is placed in the prone position on a radiolucent operating table.
2. Chest rolls and pelvic supports are utilized to ensure adequate ventilation and prevent pressure sores.
3. A well-padded thigh tourniquet is applied to provide a bloodless surgical field.
4. The bilateral lower extremities should be prepped and draped to allow intraoperative comparison of resting equinus tension.
Surgical Technique: The Teuffer Procedure
The Teuffer technique requires meticulous soft tissue handling to prevent wound complications, which are the most common source of morbidity in Achilles tendon surgery.
Step 1: Incision and Exposure
- Expose the Achilles tendon and the tuberosity of the calcaneus through a posterolateral longitudinal incision. The incision should be placed just lateral to the Achilles tendon to avoid the watershed vascularity directly posterior to the tendon.
- Carry the dissection sharply through the skin and subcutaneous tissues. Create full-thickness fasciocutaneous flaps to preserve the delicate blood supply to the skin edges.
- Identify and retract the sural nerve in the proximal part of the wound. Use a silastic vessel loop for gentle, atraumatic retraction.
Step 2: Tendon Debridement
- Incise the paratenon longitudinally and reflect it carefully.
- Identify the ruptured ends of the Achilles tendon. In chronic cases, the gap will be filled with disorganized, hypertrophic scar tissue.
- Radically debride the scar tissue and degenerative tendon margins until healthy, parallel collagen fibers are visualized both proximally and distally. Measure the resulting defect.
Step 3: Harvest of the Peroneus Brevis
- Make a secondary, small longitudinal incision (approximately 2-3 cm) over the lateral aspect of the foot at the base of the fifth metatarsal.
- Identify the insertion of the peroneus brevis tendon on the styloid process.
- Detach the peroneus brevis tendon directly from its bony insertion to maximize graft length.
- Returning to the primary posterolateral incision, excise the aponeurotic septum that separates the lateral and posterior compartments of the leg.
- Deliver the freed peroneus brevis tendon proximally into the first incision. Ensure that the muscle belly is adequately mobilized to allow a straight line of pull without tethering.
💡 Clinical Pearl: Peroneus Brevis Mobilization
When delivering the peroneus brevis into the posterior compartment, ensure that the fascial window is wide enough to prevent a "bowstringing" or strangulation effect on the muscle belly, which could compromise its excursion and vascularity.
Step 4: Preparation of the Calcaneus
- Dissect the soft tissues off the superior and lateral aspects of the calcaneal tuberosity, just anterior to the Achilles tendon insertion.
- Using a cannulated drill system or a standard drill bit (typically 5.0 mm to 7.0 mm, depending on the diameter of the harvested tendon), drill a transverse hole through the calcaneal tuberosity.
- The tunnel should be placed far enough anteriorly and inferiorly to prevent superior cortical blowout, but posterior enough to maintain the biomechanical lever arm of the ankle joint.
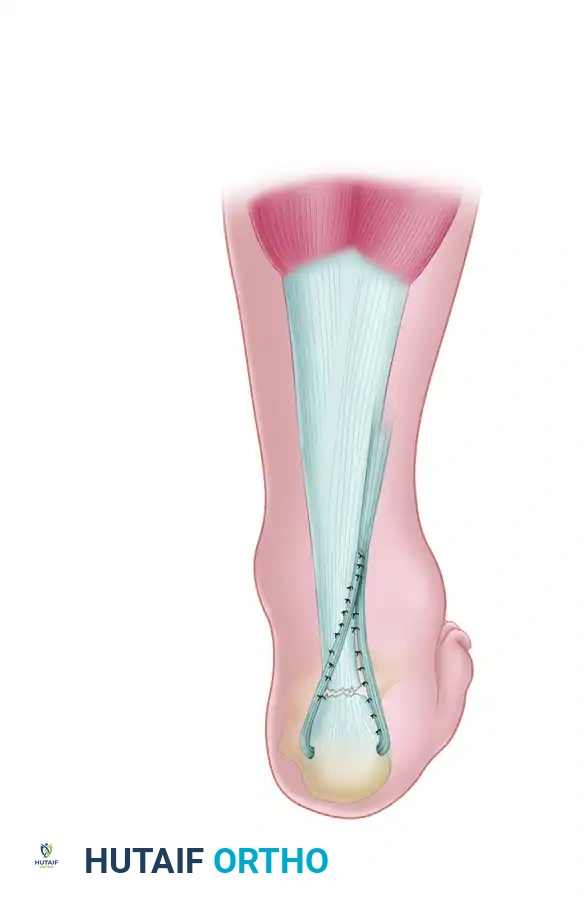
Step 5: Tendon Routing and Dynamic Loop Fixation
- Pass the distal end of the peroneus brevis tendon through the transverse calcaneal drill hole from lateral to medial.
- Route the tendon back proximally, running it beside the remaining Achilles tendon or bridging the defect.
- Apply tension to the peroneus brevis tendon while holding the ankle in maximum plantarflexion (matching the resting equinus of the contralateral limb).
- Suture the peroneus brevis tendon to itself, producing a robust dynamic loop. Use heavy, non-absorbable braided sutures (e.g., #2 FiberWire or Ethibond) in a Krackow or figure-of-eight configuration.
- If residual Achilles tendon stumps are present, suture the dynamic loop to the proximal and distal stumps to reinforce the site of rupture and provide a scaffold for biological healing.
The Turco and Spinella Modification
While the classic Teuffer technique is highly effective, Turco and Spinella described a biomechanically advantageous modification specifically designed for cases where a substantial, viable distal stump of the Achilles tendon remains.
Technique Modification
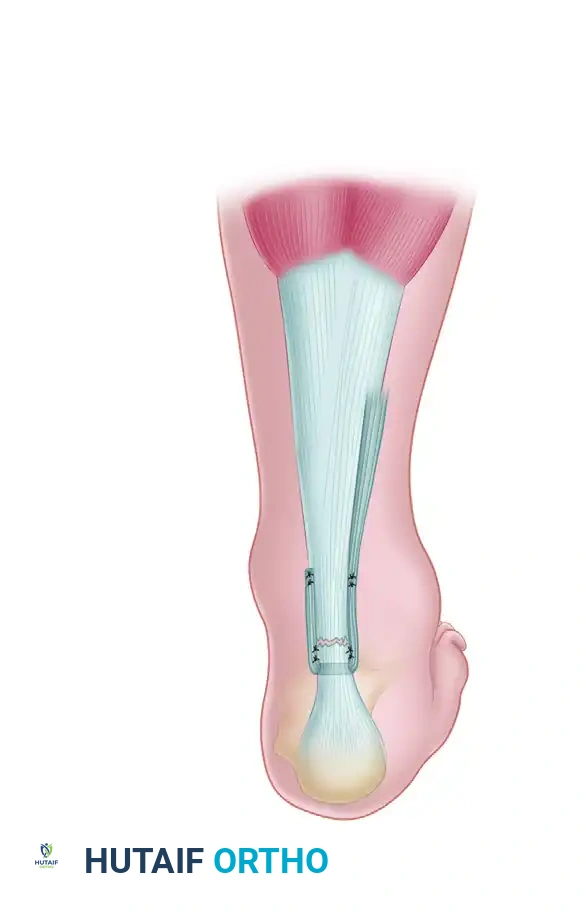
Instead of routing the peroneus brevis tendon back onto itself to form a free-standing loop, the Turco and Spinella modification integrates the graft directly into the distal Achilles stump.
- After passing the peroneus brevis through the calcaneal tunnel, create a midcoronal slit (a longitudinal split in the coronal plane) through the center of the distal stump of the Achilles tendon.
- Pass the peroneus brevis graft directly through this midcoronal slit.
- Suture the graft medially and laterally to the distal stump using multiple interrupted non-absorbable sutures. This prevents the distal tendon stump from splitting further under tension.
- Continue routing the graft proximally and suture it to the proximal Achilles tendon stump and to the peroneus brevis itself.
💡 Clinical Pearl: The Turco and Spinella Advantage
This modification is highly beneficial if a long distal stump is present. By passing the graft through the center of the distal stump, the surgeon centralizes the vector of pull, closely replicating the native anatomic axis of the Achilles tendon and enhancing the biological integration of the graft.
Wound Closure
Meticulous wound closure is paramount to prevent infection and skin necrosis.
1. Deflate the tourniquet and achieve meticulous hemostasis. Hematoma formation is a primary catalyst for wound breakdown.
2. Close the paratenon (if viable) over the reconstruction using fine absorbable sutures (e.g., 3-0 Vicryl) to provide a gliding layer.
3. Close the subcutaneous tissue in layers, ensuring no tension is placed on the skin edges.
4. Close the skin using a subcuticular technique or interrupted nylon sutures. Avoid staples in this region due to the thin soft tissue envelope.
Postoperative Care and Rehabilitation Protocol
The postoperative rehabilitation following a Teuffer reconstruction must be carefully staged. The goal is to protect the tendon transfer while it heals into the bone tunnel and integrates with the native tissues, followed by a progressive restoration of range of motion (ROM) and strength.
Phase 1: Maximum Protection (Weeks 0 to 4)
- Weeks 0-2: Immediately postoperatively, the leg is placed in a well-padded short-leg splint or cast with the foot in gravity equinus (approximately 20 to 30 degrees of plantarflexion) to remove all tension from the repair. The patient is strictly non-weight-bearing (NWB) on crutches.
- Week 2: The cast is removed. The wound is meticulously inspected. Staples or sutures are removed (unless subcuticular sutures were used). Note: Occasionally, in patients with compromised healing (e.g., diabetics, smokers), another week is required for proper wound healing before suture removal.
- Weeks 2-4: A new short-leg cast is applied, maintaining the foot in gravity equinus. The patient remains NWB.
Phase 2: Controlled Mobilization (Weeks 4 to 8)
- Week 4: The cast is changed. Over the next 2 weeks, the foot is gradually brought out of equinus toward a plantigrade position (neutral, 0 degrees).
- Weight-Bearing: Walking is gradually resumed with partial weight-bearing (PWB) on crutches during this 2-week period.
- Alternative to Casting: In reliable patients, a removable controlled ankle motion (CAM) boot or brace allowing only plantarflexion (using heel wedges) can be used as early as 4 to 6 weeks after surgery. This allows for hygiene and early, protected ROM.
- Early ROM: If a removable brace is utilized, gentle active range-of-motion (AROM) exercises for 20 minutes twice a day are begun. Strictly avoid passive dorsiflexion.
Phase 3: Early Strengthening (Weeks 8 to 12)
- Weeks 6-8: A short-leg walking cast or CAM boot is applied with the foot in the plantigrade position. Full weight-bearing (FWB) is allowed.
- Physical Therapy: Isometric ankle exercises are initiated. A comprehensive knee-strengthening and hip-strengthening program is instituted to address proximal kinetic chain atrophy.
- Weaning: By week 8 to 10, the patient is gradually weaned out of the CAM boot into regular footwear with a slight heel lift, which is progressively reduced.
Phase 4: Advanced Rehabilitation (Months 3 to 6+)
- Strengthening: Toe raises, progressive resistance exercises (PREs), and proprioceptive exercises (e.g., BAPS board, single-leg stance) constitute the third stage of rehabilitation.
- Acceleration: In reliable, well-supervised patients with excellent tissue repair, this program can be accelerated with earlier use of dorsiflexion-stop orthoses and advanced AROM exercises.
- Return to Sport: Return to full, unrestricted activity, including high-impact sports or heavy manual labor, usually requires at least 6 months, and often up to 9 to 12 months for maximum medical improvement.
Complications and Pitfalls
- Wound Breakdown and Infection: The posterolateral skin envelope is tenuous. Excessive retraction, hematoma, or tight closure can lead to necrosis. Management ranges from local wound care to flap coverage in severe cases.
- Sural Nerve Neurapraxia/Neuroma: Caused by aggressive retraction or accidental suturing. Prevention through direct visualization is key.
- Eversion Weakness: Expected due to the harvest of the peroneus brevis. Patients should be counseled preoperatively. The peroneus longus typically compensates, but targeted physical therapy is required.
- Re-rupture or Elongation: Can occur if the dynamic loop is not tensioned correctly in equinus, or if the patient is non-compliant with the postoperative weight-bearing restrictions.
By adhering to the meticulous surgical steps of the Teuffer technique and enforcing a strict, phased rehabilitation protocol, orthopaedic surgeons can reliably restore function and stability to patients suffering from complex, chronic Achilles tendon ruptures.
