INTRODUCTION TO THE NEER INFERIOR CAPSULAR SHIFT
The management of multidirectional instability (MDI) and recurrent posterior glenohumeral instability remains one of the most complex challenges in orthopedic shoulder surgery. Originally described by Charles S. Neer II and C.R. Foster in 1980, the inferior capsular shift procedure revolutionized the surgical treatment of MDI by directly addressing the primary pathoanatomy: a redundant, patulous inferior capsular pouch.
While the anterior approach is more commonly utilized for anterior-dominant MDI, Neer and Foster meticulously detailed the inferior capsular shift performed through a posterior approach for patients presenting with posterior-dominant multidirectional instability or isolated recurrent posterior instability. The core principle of this procedure involves a longitudinal splitting of the posterior capsule, releasing the capsular attachment along the humeral neck as far inferiorly and anteriorly as possible, and advancing these flaps to obliterate the redundant inferior axillary pouch.
This comprehensive guide details the indications, biomechanical rationale, precise surgical technique, and postoperative rehabilitation protocols required to successfully execute the Neer inferior capsular shift through a posterior approach.
INDICATIONS AND PATIENT SELECTION
Proper patient selection is the cornerstone of a successful capsular shift. Surgery is rarely the first line of treatment for MDI or posterior instability.
Primary Indications
- Posterior-Dominant Multidirectional Instability: Patients exhibiting symptomatic instability in multiple planes (anterior, inferior, posterior) but where the posterior subluxation or dislocation is the most clinically significant and disabling.
- Recurrent Posterior Instability: Patients with recurrent posterior subluxations or dislocations who have a patulous posterior and inferior capsule without a significant bony defect (e.g., reverse Hill-Sachs lesion < 20% of the articular surface).
- Failure of Conservative Management: A minimum of 6 to 12 months of dedicated, shoulder-specific physical therapy focusing on periscapular stabilization and rotator cuff strengthening (particularly the external rotators and posterior deltoid) must be exhausted before surgical intervention is considered.
Contraindications
- Voluntary Instability with Psychiatric Overlay: Patients who willfully dislocate their shoulders for secondary gain are absolute contraindications for this procedure.
- Significant Glenoid Bone Loss: Posterior glenoid bone loss exceeding 15-20% requires a bony augmentation procedure (e.g., posterior bone block or distal tibial allograft) rather than an isolated soft-tissue shift.
- Large Reverse Hill-Sachs Lesions: Significant anteromedial humeral head defects may require a McLaughlin procedure or structural allografting.
CLINICAL PEARL:
Always perform a thorough examination under anesthesia (EUA) prior to incision. The EUA confirms the direction of maximal instability and ensures that the posterior approach is the correct surgical trajectory. If the anterior translation is unexpectedly dominant during EUA, the surgeon must be prepared to alter the surgical plan to an anterior approach.
BIOMECHANICS AND PATHOANATOMY
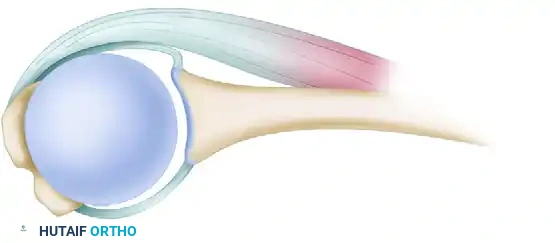
The glenohumeral joint relies on a delicate balance of static and dynamic stabilizers. In patients with posterior instability or MDI, the static stabilizers—specifically the posterior band of the inferior glenohumeral ligament (IGHL) and the posterior capsule—are attenuated and hyperelastic.
The Neer inferior capsular shift biomechanically restores stability by:
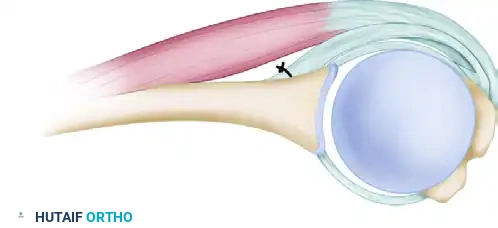
1. Volume Reduction: Detaching the capsule from the humeral neck and advancing it superiorly and laterally significantly reduces the overall global volume of the glenohumeral joint.
2. Obliteration of the Axillary Pouch: By releasing the capsule past the 6 o'clock position (inferiorly) and into the anterior calcar region, the surgeon can pull the redundant inferior pouch upward, effectively eliminating the pathological laxity.
3. Restoration of the Capsular Sling: The overlapping of the superior and inferior capsular flaps creates a reinforced, thickened posterior capsular barrier that acts as a robust check-rein against posterior humeral head translation.
PREOPERATIVE PLANNING AND POSITIONING
Imaging
Standard preoperative imaging must include a true anteroposterior (Grashey), scapular Y, and axillary lateral radiograph. Magnetic Resonance Arthrography (MRA) is the gold standard for evaluating capsular volume, labral integrity (e.g., posterior Bankart or Kim lesions), and the quality of the rotator cuff musculature.
Patient Positioning
The procedure is typically performed with the patient in the lateral decubitus position.
* The patient is placed in the lateral decubitus position on a beanbag with all bony prominences meticulously padded.
* The operative arm is suspended using a sterile hydraulic arm positioner (e.g., Spider arm) to allow for precise control of rotation, abduction, and traction during the capsular shift.
* The torso is tilted slightly posteriorly (approximately 20 to 30 degrees) to bring the posterior glenohumeral joint parallel to the floor, optimizing the surgeon's visual trajectory.
SURGICAL TECHNIQUE: STEP-BY-STEP
1. The Posterior Approach and Superficial Dissection
The posterior approach to the shoulder provides excellent access to the posterior capsule, glenoid, and posterior rotator cuff.
- Incision: Make a linear or slightly curved incision over the posterior aspect of the shoulder. The incision begins 2 to 3 cm medial to the posterolateral corner of the acromion and extends distally for 5 to 6 cm toward the posterior axillary fold.
- Deltoid Splitting: Subcutaneously dissect to expose the deep fascia overlying the deltoid. Split the deltoid muscle longitudinally in line with its fibers.
CRITICAL SURGICAL WARNING:
To protect the axillary nerve, the deltoid muscle must not be split distally beyond the teres minor. The axillary nerve exits the quadrangular space and courses along the deep surface of the deltoid approximately 5 to 7 cm distal to the acromion. In highly muscular individuals, rather than risking a distal split, the deltoid muscle can be safely reflected directly from the spine of the scapula or the acromion to enhance exposure.
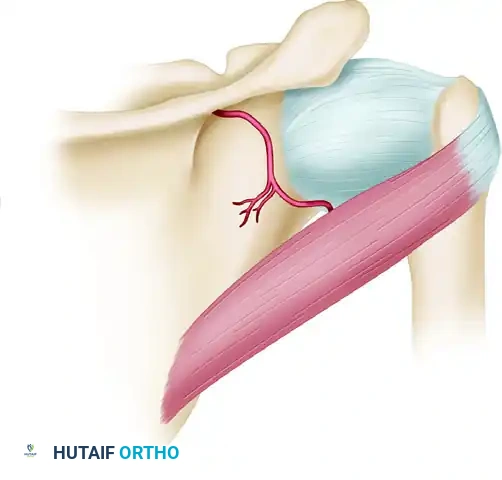
2. Deep Dissection and Infraspinatus Management
Once the deltoid is retracted, the posterior rotator cuff musculature is visualized.
- Identify the Interval: Expose the teres minor and infraspinatus muscles. Carefully develop the interval between these two muscles. The teres minor is innervated by the axillary nerve, while the infraspinatus is innervated by the suprascapular nerve; respecting this internervous plane is critical.
- Infraspinatus Detachment: The infraspinatus tendon is managed uniquely in the Neer technique. Detach the infraspinatus obliquely. This specific oblique tenotomy ensures that a superficial piece of the tendon is preserved and left attached laterally. This superficial slip will be utilized later to reinforce the posterior part of the capsule during closure.
3. Capsulotomy and Flap Creation
With the posterior capsule exposed, the critical capsular shift begins.
- T-Shaped Capsulotomy: Make a T-shaped opening in the posterior pouch of the capsule. The vertical limb of the "T" is placed adjacent to the humeral articular margin.
- Superior Flap: Form a superior capsular flap by detaching approximately 1.5 cm of the capsule above the initial longitudinal capsular incision.
- Inferior Flap (The Shift): This is the most critical step of the procedure. Use a flat elevator to protect the axillary nerve inferiorly. With the arm placed in progressive internal rotation (to bring the inferior capsule posteriorly), meticulously detach the capsule from the neck of the humerus. Continue this detachment inferiorly around the 6 o'clock position and anteriorly to the portion of the calcar.
- Teres Minor Preservation: Elevate the teres minor from the underlying capsule, ensuring it is left completely intact.
4. Joint Inspection and Labral Assessment
Before shifting the capsule, the intra-articular structures must be evaluated.
- Distraction: Distract the joint. The anesthesia team may need to administer additional muscle relaxants to allow for adequate visualization. Inspect the glenoid labrum anteriorly and posteriorly.
- Labral Management:
- If the anterior portion of the glenoid labrum has been detached: The surgeon must make a second, separate anterior approach through which the labrum is sutured to the anterior glenoid bone (Bankart repair). Attempting to shift the capsule against an unanchored anterior labrum will result in failure.
- If the anterior part of the labrum is intact: Proceed with the posterior shift. Draw the posterior part of the capsule backward and superiorly to eliminate the inferior pouch and reduce anterior capsular laxity.
5. Humeral Neck Preparation
For the capsular flaps to heal securely, they must be anchored to a bleeding bone bed.
- Using curets, a small gouge, or a high-speed burr, create a shallow slot or decorticated trough in the sulcus of the humeral anatomic neck. This ensures that when the capsular flaps are shifted, they are approximated directly to raw, cancellous bone rather than smooth cortical bone, optimizing biological healing.
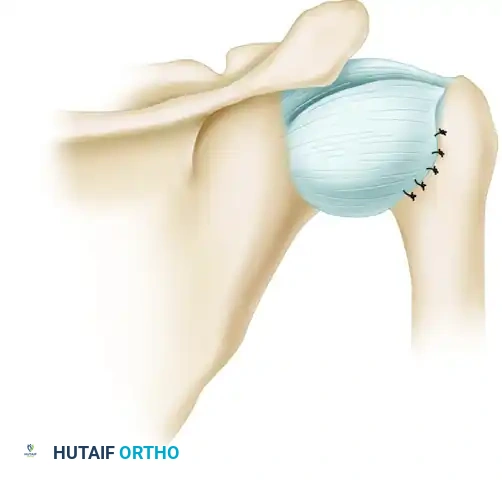
6. Capsular Tensioning and Reattachment
The tensioning of the flaps dictates the postoperative stability and range of motion. Over-tightening will lead to severe loss of internal rotation and potential secondary osteoarthritis (capsulorrhaphy arthropathy).
- Arm Positioning: During the tensioning of the flaps, the position of the arm is paramount. As suggested by Bigliani, hold the extremity in 5 to 10 degrees of external rotation, 10 to 15 degrees of abduction, and neutral flexion and extension.
- Superior Flap First: Reattach the superior flap first. Draw it downward and laterally into the prepared humeral trough to eliminate the posterior pouch. Secure it using suture anchors or transosseous sutures.
- Inferior Flap Second: Next, draw the longer, mobilized inferior flap superiorly and laterally over the superior flap. This creates a robust, double-layered capsular reinforcement. Turn back any excess part of the capsule and suture it to itself for additional reinforcement posteriorly.
7. Reinforcement and Closure
The final steps involve reinforcing the repair and closing the anatomical layers.
- Infraspinatus Reinforcement: Utilize the superficial portion of the infraspinatus tendon (which was preserved during the initial oblique detachment) to further reinforce the posterior portion of the capsule. Suture this superficial slip against the raw bone on the scapular neck, and suture the deep portion over it.
- Tendon Reattachment: Reattach the deep part of the infraspinatus superficially to its anatomic footprint to preserve active external rotation strength.
- Deltoid Repair: If the deltoid was detached from the acromion or scapular spine, carefully and robustly reattach it using heavy non-absorbable sutures passed through transosseous drill holes.
- Wound Closure: Irrigate the wound copiously and close the subcutaneous tissues and skin in a standard layered fashion.
POSTOPERATIVE REHABILITATION PROTOCOL
The success of a posterior capsular shift is heavily dependent on strict adherence to the postoperative immobilization and rehabilitation protocol. The posterior tissues are notoriously prone to stretching out if subjected to early stress.
Phase I: Strict Immobilization (Weeks 0-6)
- Positioning: The arm must be immobilized at the side in neutral flexion-extension and 10 degrees of external rotation.
- Orthosis: A light plaster splint extending from the wrist to the middle part of the arm and around the waist, with the elbow bent at 90 degrees, was historically recommended by Neer. Today, a rigid, custom-molded thermoplastic "gun-slinger" orthosis or a highly secure commercial external rotation brace is utilized.
- Rationale: Rigid external immobilization is absolutely required to ensure that the 10 degrees of external rotation is maintained, preventing any internal rotation that would stretch the posterior capsular repair.
- Exercises: Active hand, wrist, and elbow motion (while maintaining shoulder position) are encouraged. Scapular retractions are permitted.
Phase II: Protected Range of Motion (Weeks 6-12)
- The rigid orthosis is discontinued.
- Begin passive range of motion (PROM) and active-assisted range of motion (AAROM).
- Restrictions: Strictly avoid internal rotation past neutral and avoid cross-body adduction, as these motions place direct stress on the posterior capsule.
- Focus on restoring forward elevation and external rotation.
Phase III: Strengthening (Weeks 12-20)
- Begin active range of motion (AROM) in all planes.
- Initiate isotonic strengthening of the rotator cuff and periscapular stabilizers.
- Gradually introduce internal rotation stretching, but only as tolerated and without aggressive overpressure.
Phase IV: Return to Play (Months 6-9)
- Progress to sport-specific or work-specific functional activities.
- Return to contact sports or heavy manual labor is generally restricted until 6 to 9 months postoperatively, contingent upon the restoration of 90% strength compared to the contralateral side and a stable, pain-free joint.
COMPLICATIONS AND PITFALLS
- Axillary Nerve Injury: The axillary nerve is at high risk during the inferior capsular release and during the deltoid split. Always use a flat elevator to protect the nerve inferiorly and respect the 5 cm limit for deltoid splitting.
- Over-tightening (Loss of Motion): Tensioning the capsule with the arm in internal rotation will lead to a severe loss of internal rotation and cross-body adduction. Always tension the flaps in 5 to 10 degrees of external rotation.
- Recurrent Instability: Failure to adequately release the capsule inferiorly past the 6 o'clock position will result in an incomplete shift, leaving the axillary pouch intact and leading to recurrent multidirectional instability.
- Missed Anterior Pathology: Failing to inspect and address an anterior Bankart lesion will cause the posterior shift to fail, as the humeral head will simply subluxate anteriorly once the posterior capsule is tightened.
CLINICAL PEARL:
The Neer inferior capsular shift is a technically demanding procedure that requires a deep understanding of 3D glenohumeral anatomy. The key to success lies not just in the suturing, but in the completeness of the inferior capsular release. If the capsule does not freely mobilize superiorly, the release down to the anterior calcar is incomplete.
