INTRODUCTION TO MINIMALLY INVASIVE ACHILLES TENDON REPAIR
The management of acute Achilles tendon ruptures has evolved significantly, driven by the dual imperatives of restoring optimal plantarflexion strength and minimizing the high complication rates historically associated with traditional open surgical approaches. A number of techniques have been developed to allow repair through smaller incisions, aiming to speed recovery and minimize devastating soft-tissue complications, particularly deep infection, wound dehiscence, and iatrogenic sural nerve damage.
Because of the inherent risk of sural nerve injuries associated with "blind" suturing of the tendon in purely percutaneous methods, contemporary techniques frequently utilize multiple micro-incisions (e.g., the three-incision technique), endoscopic assistance, or specially designed targeting devices (such as the PARS or Achillon systems).
Extensive literature comparing open repairs with minimally invasive or percutaneous techniques has demonstrated functional results that are highly comparable to those obtained with open repair. Crucially, minimally invasive techniques yield fewer wound complications, better cosmetic results, and no apparent increased risk of rerupture when paired with modern, accelerated functional rehabilitation protocols. However, cited disadvantages of minimally invasive techniques include the risk of sural nerve injury, failure to perfectly appose tendon ends, potential malalignment of the tendon stumps, and a theoretically lower initial biomechanical strength of the repair construct. In a landmark study of 211 patients undergoing early-generation minimally invasive repairs, sural nerve injury occurred in 41 patients (19%), and reruptures occurred in 17 patients (8%), highlighting the critical need for meticulous surgical technique and anatomical awareness.
Surgical Warning: The sural nerve crosses the lateral border of the Achilles tendon approximately 9.8 cm proximal to the calcaneal insertion. Blind passage of needles in the proximal lateral quadrant carries a high risk of nerve entrapment. Always spread the subcutaneous tissues bluntly down to the paratenon before passing sutures.
SURGICAL ANATOMY AND BIOMECHANICS
The Achilles tendon is the largest and strongest tendon in the human body, formed by the confluence of the gastrocnemius and soleus muscles. It is capable of withstanding forces up to 10 times body weight during athletic activities such as running and jumping. The tendon lacks a true synovial sheath; instead, it is enveloped by a paratenon—a highly vascularized layer of loose connective tissue that provides the majority of the tendon's extrinsic blood supply.
Ruptures typically occur in the "watershed" zone, located 2 to 6 cm proximal to the calcaneal insertion, where intrinsic vascularity is notoriously poor. Minimally invasive techniques are specifically designed to preserve the paratenon and the delicate peritendinous vascular network, thereby optimizing the biological environment for tendon healing while minimizing the risk of skin necrosis.
SURGICAL TECHNIQUE: PERCUTANEOUS REPAIR (MA AND GRIFFITH)
The Ma and Griffith technique remains a foundational percutaneous approach for acute Achilles tendon ruptures. It utilizes a series of strategic stab incisions to weave a heavy nonabsorbable suture through the proximal and distal tendon stumps, allowing for secure approximation without a large longitudinal incision.
Preoperative Preparation and Positioning
- Anesthesia: The procedure can be performed under local, regional (popliteal block), or general anesthesia, depending on patient factors and surgeon preference.
- Positioning: Place the patient in the prone position with the feet extending just past the edge of the operating table. This allows for free manipulation of the ankle joint to assess resting tension and equinus positioning.
- Preparation: Prepare and drape the extremity in a standard sterile fashion, identical to an open surgical approach. Use a thigh or calf tourniquet to ensure a bloodless field if necessary, though many percutaneous procedures can be performed without one.
Step-by-Step Execution
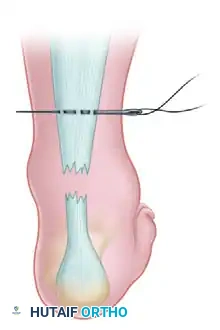
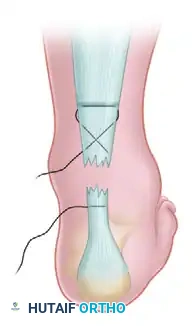
Step 1: Proximal Suture Passage
Palpate the palpable tendon defect. Make small stab wounds on each side of the Achilles tendon approximately 2.5 cm proximal to the rupture defect. Use a small hemostat to bluntly free the underlying tendon sheath from the subcutaneous tissue, protecting the sural nerve laterally. Pass a No. 0 or No. 1 nonabsorbable suture (e.g., FiberWire or Ethibond) threaded on a straight needle from the lateral stab wound, transversely through the body of the proximal tendon, to exit in the medial stab wound.
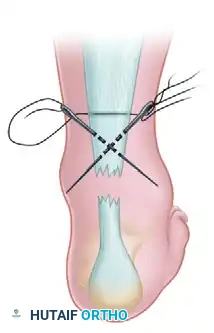
Step 2: Crisscross Suture Configuration
With a straight needle on each end of the inserted suture, crisscross the needles within the body of the tendon and puncture the skin just distal to the site of the tendon rupture. Enlarge the sites of needle puncture with a scalpel to prevent skin dimpling or necrosis. Pull the suture completely through the stab wounds and snug the suture within the proximal portion of the ruptured tendon to ensure a secure hold.
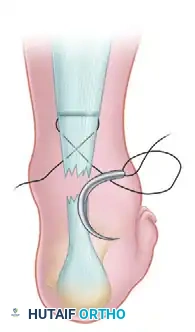
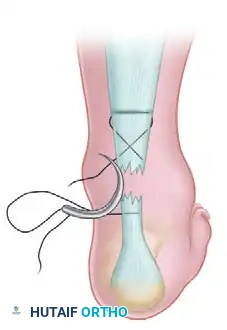
Step 3: Distal Lateral Passage
With the lateral suture now threaded on a curved cutting needle, pass the suture back through the last stab wound to exit at about the midportion of the distal stump of the ruptured tendon on the lateral side. Enlarge the hole with a scalpel before pulling the suture through.
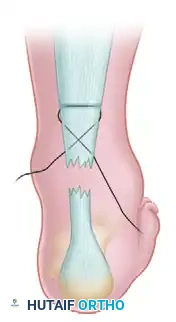
Step 4: Subcutaneous Dissection
Use a hemostat to carefully free the subcutaneous tissue from the underlying tendon sheath at the distal stab wounds. This step is critical to ensure that the suture slides freely and does not entrap the skin or superficial nerves when tension is applied.
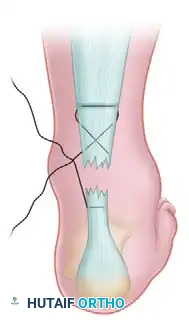
Steps 5 & 6: Transverse Distal Passage
Using a straight needle, pass the lateral suture transversely through the body of the distal stump of the tendon to exit medially. Enlarge the puncture wound in the skin on the medial side as before.
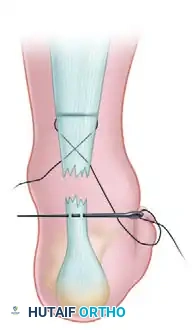
Step 7: Distal Medial Passage
Using a curved cutting needle, pass the suture from this distalmost stab wound on the medial side and exit at the middle stab wound on the medial side of the ruptured tendon.
Steps 8 & 9: Tensioning and Knot Tying
With the ankle maintained in a strict equinus position (typically 20 to 30 degrees of plantarflexion) to approximate the tendon ends, apply tension to the suture in a crisscross manner. Bring the tendon ends together, ensuring the palpable gap is eliminated. Tie the suture securely in this position. With a small hemostat, carefully bury the knot deep within the depths of the wound to prevent postoperative soft-tissue irritation.
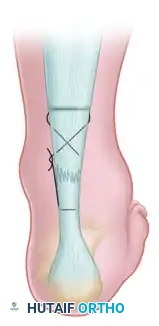
Clinical Pearl: Suturing the skin is generally unnecessary for these micro-incisions. Apply a sterile dressing directly to the stab wounds, and immediately apply a short-leg cast or rigid splint in gravity equinus position before the patient awakens to prevent accidental dorsiflexion and catastrophic failure of the repair.
Postoperative Care Protocol
The postoperative rehabilitation phase is as critical as the surgical execution.
* Weeks 0-4: The short-leg cast is worn with strict non-weight-bearing precautions. The ankle is maintained in equinus.
* Weeks 4-8: The initial cast is removed, and a weight-bearing, low-heeled, short-leg equinus cast or a controlled ankle motion (CAM) boot with heel wedges is applied.
* Weeks 8-12: The cast or boot is removed, and a formal physical therapy program is initiated. This includes toe-heel raising and progressive gastrocnemius-soleus strengthening exercises. The patient gradually restores the foot to a neutral position over a 4-week period by sequentially removing heel wedges.
* Months 3+: The patient begins aggressive heel cord stretching exercises and sport-specific training. Full return to explosive sports may take 6 to 9 months.
MANAGEMENT OF CHRONIC ACHILLES TENDON RUPTURES
The definition of a "chronic" or neglected Achilles tendon rupture has historically ranged from those diagnosed more than 48 hours after injury to those diagnosed up to 2 months post-injury. However, modern orthopedic consensus dictates that a rupture diagnosed 4 to 6 weeks after the initial injury should be classified as a chronic rupture. These injuries present a significantly more complex reconstructive challenge than acute ruptures.
Pathophysiology and Clinical Presentation
At approximately 1 week following an acute rupture, the hematoma within the defect begins to organize, and any space between the retracted tendon ends fills with dense, non-functional scar tissue. If left untreated, the tendon heals in an elongated position. This elongation drastically alters the resting length-tension relationship of the triceps surae complex, leaving the patient unable to generate sufficient plantarflexion power to push off on the affected side.
Clinically, patients present with severe compromise in running, jumping, and activities of daily living such as ascending or descending stairs. Physical examination typically reveals profound calf atrophy, a loss of the normal Achilles tendon contour, and often a visible or palpable tendon defect, though this may be masked by bridging scar tissue.
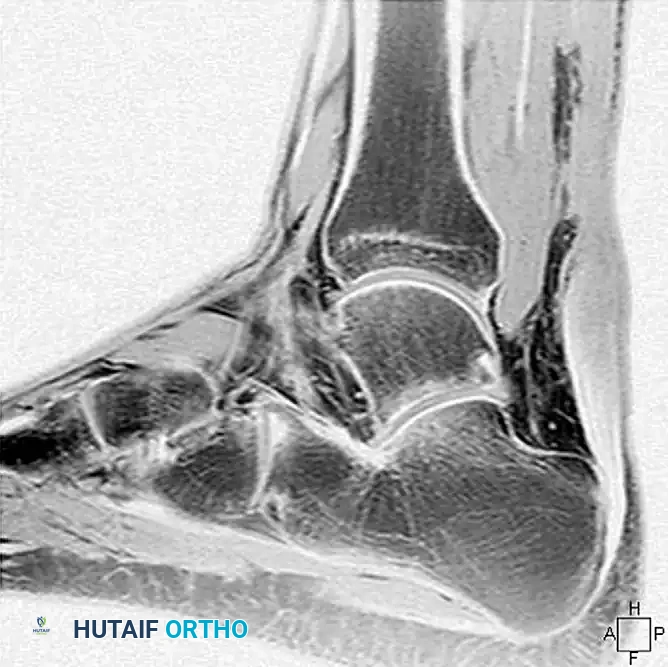
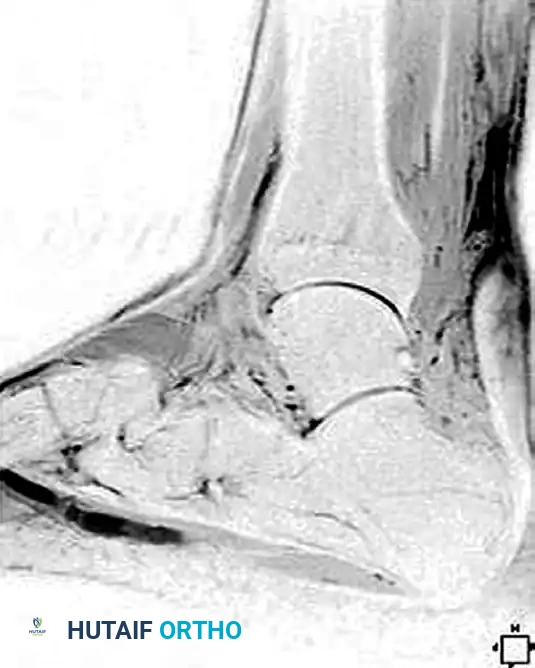
Imaging Evaluation
Magnetic Resonance Imaging (MRI) is the gold standard for evaluating chronic ruptures. It is highly helpful in estimating the exact gap between the retracted, degenerated ends of the tendon, which dictates the surgical reconstructive algorithm. Chronic ruptures appear as an area of low-intensity signal on T1-weighted images and exhibit an alteration in T2-weighted signal due to scar interposition and tendinosis.
Indications for Surgery
If posterior heel pain, chronic swelling, or functional impairment is disabling, delayed repair or reconstruction is strictly indicated. In most active adults, anatomical repair is preferable but often impossible due to tendon retraction and degeneration. For ruptures more than 3 months old, the treatment strategy depends heavily on the patient’s physiological age, baseline activity level, and the degree of functional impairment.
Reconstructive Algorithms Based on Defect Size
A number of techniques have been described for the reconstruction of a neglected Achilles tendon rupture. The surgical decision-making process is primarily guided by the size of the tendon defect after radical debridement of the interposed scar tissue back to healthy, viable tendon fibers.
1. Small Defects (< 3 cm)
If the tendon defect is less than 3 cm after debridement and the injury is relatively recent (less than 3 months old), direct end-to-end repair is often possible. This may require maximizing plantarflexion and utilizing heavy core sutures (e.g., Krackow technique).
2. Moderate Defects (3 to 6 cm)
If the tendon gap is more than 3 cm, direct repair will result in excessive tension and subsequent failure. Additional techniques must be utilized:
* V-Y Plasty: A V-shaped incision is made in the proximal gastrocnemius aponeurosis and advanced distally, then closed in a Y-configuration to gain length.
* Gastrocnemius-Soleus Fascia Turn-Down Graft: A strip of the proximal aponeurosis is harvested, left attached distally, and flipped 180 degrees to bridge the defect.
3. Large Defects (> 6 cm)
For massive defects, local tissue transfer, tissue augmentation, synthetics, or allografts are required.
* Local Tendon Transfers: The Flexor Hallucis Longus (FHL) is the workhorse for large defects due to its proximity, in-phase firing pattern, and excellent strength. Other options include the Flexor Digitorum Longus (FDL), Peroneus Brevis, Peroneus Longus, Plantaris, or Posterior Tibial tendon.
* Synthetic or Allograft Augmentation: Polyglycol threads, Marlex mesh, Dacron vascular grafts, Carbon fiber, or Achilles allografts can be utilized to bridge the gap and provide a scaffold for native tissue ingrowth.
Advanced Surgical Insight: Minimally invasive and endoscopically assisted techniques have recently been described for tendon transfers (e.g., less-invasive FHL or peroneus brevis transfers through paramidline incisions). Maffulli et al. described a less-invasive technique for the transfer of the peroneus brevis through two small incisions, recommending this for tendon gaps of less than 6 cm. However, long-term outcome data for these advanced minimally invasive reconstructive procedures remain limited compared to traditional open reconstruction.
Summary of Reconstruction Techniques for Chronic Ruptures
- Primary Repair: Uncommon, reserved for gaps < 3 cm.
- Augmentation: Free fascia tendon graft (Fascia lata), Donor tendons (semitendinosus, gracilis).
- Fascia Advancement: V-Y plasty, Gastrocnemius-soleus fascia turn-down graft.
- Local Tendon Transfer: Flexor hallucis longus, Flexor digitorum longus, Peroneus brevis/longus.
- Synthetic/Allograft: Polyglycol threads, Carbon fiber, Allograft tendon.
By meticulously selecting the appropriate surgical technique based on chronicity, gap size, and patient profile, orthopedic surgeons can reliably restore function and minimize complications in both acute and chronic Achilles tendon ruptures.
