Masterclass in Microvascular Techniques: Anastomosis, Vein Grafting, and Neurorrhaphy
Key Takeaway
Microvascular techniques are foundational to orthopaedic limb salvage, replantation, and free tissue transfer. This comprehensive guide details the precise surgical steps for end-to-end and end-to-side microvascular anastomoses, interpositional vein grafting, and primary neurorrhaphy. Emphasizing meticulous vessel preparation, strict adherence to biomechanical principles of tension-free repair, and advanced microsurgical handling, these protocols ensure optimal patency rates and functional outcomes in complex reconstructive procedures.
INTRODUCTION TO MICROVASCULAR SURGERY IN ORTHOPAEDICS
The advent of microvascular surgery has fundamentally transformed the landscape of reconstructive orthopaedics, enabling the successful execution of digit and limb replantations, composite free tissue transfers, and complex nerve reconstructions. The primary objective of any microvascular procedure is to establish immediate, unimpeded, and sustained blood flow across a vascular anastomosis while minimizing the risk of thrombogenesis.
Success in microvascular surgery is predicated upon a triad of principles: meticulous handling of the tunica intima, absolute tension-free coaptation of vessel ends, and the precise placement of sutures to ensure a watertight yet non-constrictive seal. This masterclass delineates the foundational techniques required for end-to-end and end-to-side anastomoses, interpositional vein grafting, and primary neurorrhaphy, providing a rigorous, evidence-based framework for the practicing microsurgeon.
PREOPERATIVE CONSIDERATIONS AND EQUIPMENT
Optical Magnification
The operating microscope is the cornerstone of microvascular surgery. For the dissection and preparation of vessels less than 2 mm in external diameter, continuous microscopic magnification is mandatory.
* Dissection and Adventitial Stripping: Magnification of 6× to 10× is generally sufficient.
* Intimal Inspection and Suture Placement: High-power magnification ranging from 25× to 40× is required to identify intimal tears, micro-thrombi, or subintimal hematomas.
Instrumentation and Suture Material
Microvascular instruments must be maintained in pristine condition. Essential tools include jeweler’s forceps (typically #3, #4, or #5), microscissors (straight and curved), vessel dilators, and specialized microvascular clamp approximators (e.g., Acland clamps).
Suture selection is dictated by vessel caliber. Arteries and veins ranging from 0.8 mm to 1.5 mm typically require 9-0 or 10-0 monofilament nylon sutures on a spatulated or taper-point microneedle.
Surgical Warning: Never grasp the tunica intima with forceps. Mechanical trauma to the endothelial lining exposes subendothelial collagen, triggering the intrinsic coagulation cascade and virtually guaranteeing anastomotic thrombosis. Forceps should only be used to manipulate the adventitia or as a counter-pressor during needle passage.
TECHNIQUE 60-1: MICROVASCULAR END-TO-END ANASTOMOSIS
The end-to-end anastomosis remains the workhorse technique for replantation and free flap revascularization. It provides excellent hemodynamics by maintaining linear, laminar flow, provided there is no significant size mismatch between the donor and recipient vessels.
Vessel Preparation and Mobilization
- Exposure: Expose the selected vessel via careful, blunt and sharp dissection under magnification.
- Mobilization: Mobilize both the proximal and distal ends of the vessel to obtain adequate length. The goal is to allow the vessel ends to be approximated within the clamp approximator with absolute zero tension.
- Branch Management: Identify tethering side branches. Cauterize these branches using bipolar electrocautery well away from the main vessel wall to prevent thermal necrosis of the primary vessel, then transect them.
- Field Optimization: Place a contrasting colored background material (typically a blue or green rubber/plastic sheet) behind the vessel. This reduces visual fatigue and enhances the contrast of the translucent vessel edges and fine monofilament sutures.
- Irrigation: Frequently irrigate the operative field with heparinized lactated Ringer’s solution (typically 100 units of heparin per 100 mL of Ringer's) to prevent desiccation and wash away thrombogenic debris.
Adventitial Excision
The adventitia contains potent thromboplastins. If adventitial fibers are dragged into the vascular lumen during suturing, they will act as a nidus for platelet aggregation.
* Remove sufficient adventitia from the vessel ends to expose the muscularis media.
* This can be achieved by careful circumferential trimming using microscissors. Alternatively, apply gentle longitudinal traction to the adventitia and transect it flush with the vessel end, allowing it to retract proximally—a technique often likened to a circumcision.
Intimal Inspection and Dilation
- Under 25× to 40× magnification, rigorously inspect the vascular intima. Resect the vessel wall back to healthy tissue until the cut ends appear entirely normal, with no evidence of crush injury, red-line sign (subintimal hemorrhage), or delamination.
- Gently dilate the vessel ends by inserting the closed tips of jeweler’s forceps or specialized smooth dilators, allowing them to open gently. This overcomes local vasospasm and expands the luminal diameter to facilitate suturing.
- Apply topical vasodilators, such as 2% lidocaine or papaverine, to the external surface of the vessel to combat mechanically induced vasospasm.
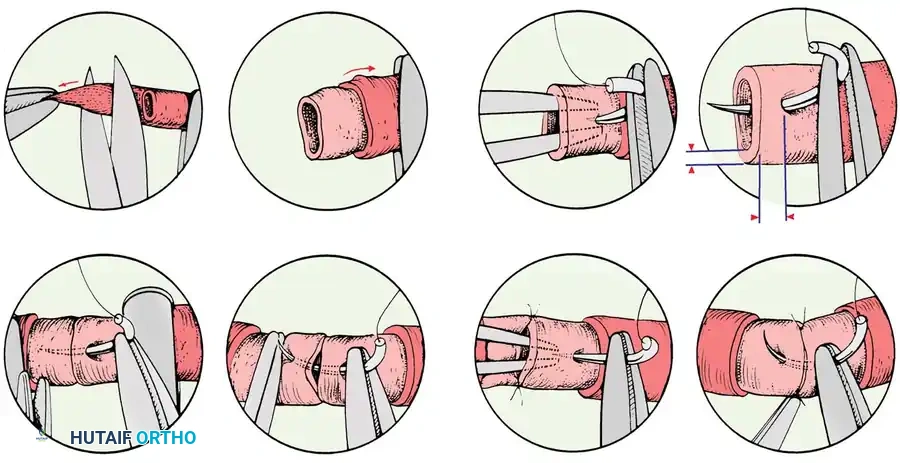
Suturing Protocol (The 120-Degree Technique)
- Approximation: Appose the vessel ends using a double-clamp approximator. Ensure the vessel is not twisted.
- Initial Sutures: Place the first two sutures approximately 120 degrees apart on the vessel’s circumference. Pass the needle through the full thickness of the vessel wall, entering at a distance from the cut edge slightly greater than the thickness of the wall itself.
- Traction: Leave the ends of these initial two sutures long. They will serve as traction sutures to manipulate the vessel and define the anterior and posterior walls.
- Posterior Wall Exposure: Rotate the clamp approximator to expose the posterior vessel wall. Place a third stitch exactly 120 degrees from the initial two stitches. This triangulation prevents the inadvertent suturing of the anterior and posterior walls together.
- Completion: Place additional interrupted stitches in the remaining spaces to complete the anastomosis.
- Arteries (1 mm diameter) typically require 5 to 8 stitches.
- Veins (1 mm diameter), being thinner-walled and more prone to collapse, usually require 7 to 10 stitches to ensure a watertight seal.
Clinical Pearl: While Chen et al. demonstrated in a rabbit model that continuous suture techniques reduce anastomosis time with similar patency rates in larger microvessels (>0.7 mm arteries, >1 mm veins), interrupted sutures remain the gold standard in orthopaedic microsurgery. Interrupted sutures prevent purse-string constriction of the anastomosis, allowing for maximal luminal dilation during systolic expansion.
Clamp Removal and Patency Assessment
- Sequence of Release: Always remove the downstream (distal) clamp first. This allows back-bleeding to purge any trapped air or micro-thrombi from the anastomotic site. Subsequently, remove the upstream (proximal) clamp to restore pulsatile arterial flow.
- Hemostasis: Minimal pinpoint bleeding between stitches is expected and usually ceases spontaneously or with gentle application of a topical hemostatic sponge. Excessive, pulsatile bleeding requires rapid control via reapplication of clamps or inflation of a pneumatic tourniquet, followed by the placement of supplementary sutures.
- The Strip Test (Acland Test): Assess patency by occluding a segment of the vessel with two forceps just distal to the anastomosis. Gently strip the blood from the segment in a proximal-to-distal direction using the distal forceps. Release the proximal forceps. Rapid, instantaneous filling of the emptied segment confirms a patent anastomosis.
- Closure: Close the overlying soft tissues as expeditiously as possible to prevent desiccation of the vessel wall, which can lead to delayed thrombosis.
TECHNIQUE 60-2: MICROVASCULAR END-TO-SIDE ANASTOMOSIS
End-to-side anastomosis is indicated when there is a significant size discrepancy between donor and recipient vessels, or when it is imperative to preserve the distal flow of the recipient artery (e.g., tying a free flap into a single-vessel runoff limb).
Vessel Preparation
- Recipient Vessel Arteriotomy: After mobilizing the recipient vessel, isolate the segment with microvascular clips. Using microscissors, carefully excise a small, longitudinal, elliptical portion of the recipient vessel wall. The length of the arteriotomy should match the diameter of the donor vessel.
- Donor Vessel Beveling: Cut the end of the donor vessel at an oblique angle of approximately 45 degrees. This spatulation increases the cross-sectional area of the anastomosis, mitigating the risk of stricture and optimizing laminar flow dynamics by reducing turbulence at the junction.

Suturing the End-to-Side Anastomosis
- Anchoring Sutures: Begin by placing two anchoring sutures at the proximal and distal apices (the "heel" and "toe") of the elliptical opening. Tie these sutures and leave the ends long for traction.
- Wall Completion: Complete the anastomosis by placing interrupted sutures evenly along the anterior and posterior lips of the opening between the traction sutures. Careful spacing is critical to prevent leakage while avoiding tissue strangulation.
- Flow Restoration: Release the occluding clamps (distal first, then proximal) and assess patency and flow. The donor vessel should exhibit strong, bounding pulsations.
TECHNIQUE 60-3: MICROVASCULAR VEIN GRAFTING
When an end-to-end anastomosis cannot be achieved without tension—often due to extensive zones of injury requiring aggressive vessel debridement or bone shortening limitations—interpositional vein grafting is mandatory. Tension across an anastomosis causes luminal narrowing and endothelial shearing, inevitably leading to failure.
Graft Harvesting and Preparation
- Donor Sites: Vein grafts can be harvested from the dorsum of the hand, the dorsal and volar aspects of the forearm, or the dorsum of the foot. The selected vein should roughly approximate, or be slightly larger than, the diameter of the recipient artery to avoid turbulence-induced thrombosis.
- Harvesting Technique: Dissect the vein meticulously. Cauterize small side branches with bipolar forceps well away from the main vein wall, and ligate larger branches with fine silk or hemoclips.
- Graft Reversal: Crucial Step. When a vein graft is used for arterial reconstruction, it must be reversed end-for-end. Veins contain unidirectional valves; if not reversed, these valves will snap shut against the arterial pressure, completely obstructing blood flow. Reversal is unnecessary when grafting for venous reconstruction.
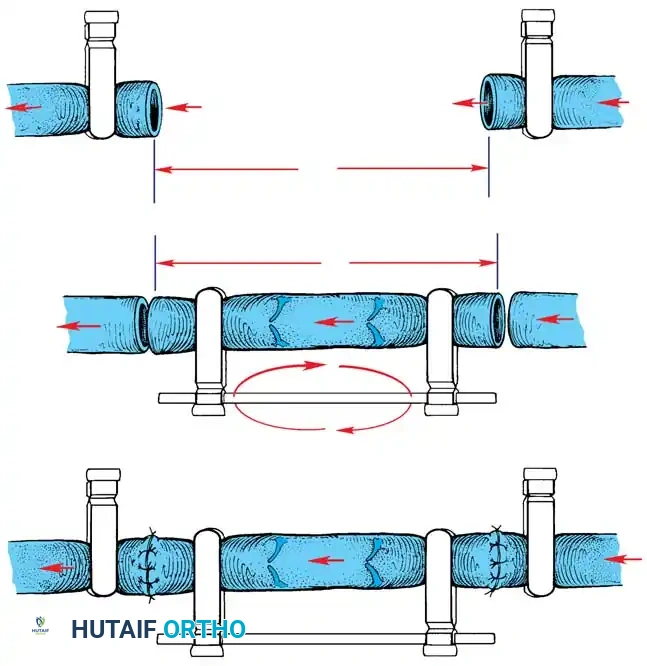
Anastomotic Sequence for Vein Grafts
- Preparation: Gently perfuse the harvested vein graft with heparinized Ringer’s solution to dilate the vessel, check for unligated side branches (leaks), and confirm valve orientation.
- Proximal Anastomosis: Perform the proximal anastomosis first, utilizing the standard end-to-end technique. Accommodate minor diameter discrepancies by cutting the smaller vessel end obliquely or in a fish-mouth configuration.
- Flow Confirmation: Release the proximal occluding clamp briefly to confirm robust, pulsatile flow through the graft and to flush out any debris.
- Distal Anastomosis: Reapply the clamp, cut the vein graft to the exact required length (avoiding redundancy which causes kinking), and perform the distal anastomosis.
- Final Release: Release the clamps to demonstrate flow across both anastomoses simultaneously.
Pitfall: Redundancy in a vein graft is a common cause of late failure. Arterial pressure will cause a vein graft to elongate by up to 20%. The graft must be measured and cut while under physiological tension to prevent postoperative kinking and turbulent flow.
PRIMARY NEURORRHAPHY: MICROSURGICAL NERVE REPAIR
The restoration of sensory and motor function following peripheral nerve transection relies heavily on precise microsurgical coaptation. The best candidates for primary repair are patients with clean, sharp lacerations (e.g., glass or knife injuries).
Timing of Repair
- Primary Repair (< 24 hours): Ideal for sharp, clean transections where the patient is stable and the wound is uncontaminated.
- Delayed Primary Repair (2 to 18 days): Suitable when initial conditions preclude immediate repair, but the zone of injury is well-demarcated.
- Secondary Repair (> 18 days to < 3 months): Indicated for crush or avulsion injuries where the true extent of intraneural scarring takes weeks to declare itself. This often requires intercalary nerve grafting.
Microsurgical Techniques
Magnification is non-negotiable. While magnifying loupes (3.5× to 4.5×) may suffice for simple epineurial repairs of large mixed nerves, the operating microscope is essential for perineurial (fascicular) or epiperineurial neurorrhaphies.
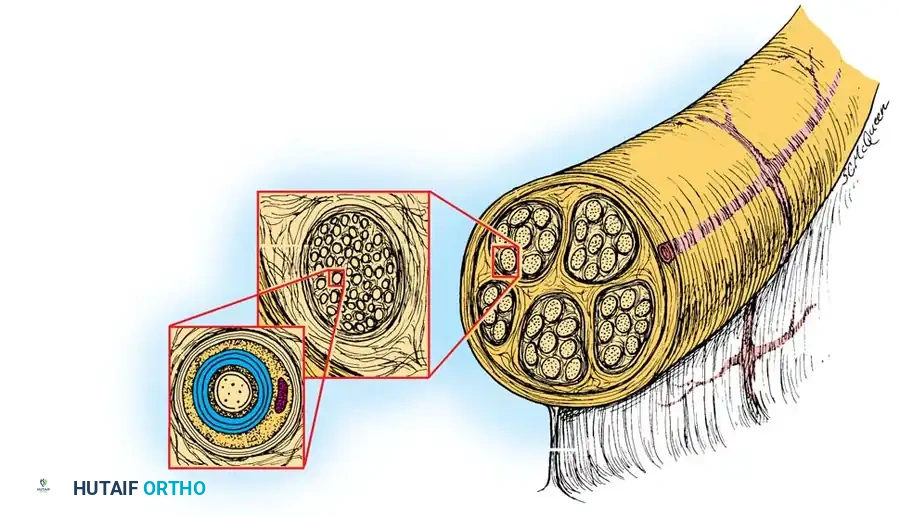
- Epineurial Repair: The standard technique for most peripheral nerve lacerations. Fine monofilament sutures (8-0 or 9-0) are placed through the external epineurium to approximate the nerve ends. Care must be taken to align the longitudinal epineurial blood vessels to ensure correct rotational alignment.
- Grouped Fascicular (Perineurial) Repair: Involves matching and suturing corresponding groups of fascicles using 10-0 sutures through the internal epineurium or perineurium. This is theoretically superior for mixed motor-sensory nerves to prevent cross-innervation, though clinical superiority over meticulous epineurial repair remains debated.
- Tension-Free Coaptation: As with blood vessels, nerves must be repaired without tension. Tension causes ischemia of the intraneural capillary plexus, leading to fibroplasia and neuroma-in-continuity formation. If tension is present, an interfascicular nerve graft (e.g., sural nerve) must be utilized.
POSTOPERATIVE PROTOCOL AND MONITORING
The postoperative management of microvascular procedures is as critical as the surgical execution.
- Environment: The patient must be kept warm and well-hydrated to maintain high cardiac output and peripheral vasodilation. The room temperature should be maintained above 24°C (75°F).
- Monitoring: Flap or replant viability is monitored clinically (color, capillary refill, turgor, temperature) and adjunctively using implantable venous Doppler probes or surface handheld Doppler ultrasound. Monitoring is typically performed hourly for the first 48 to 72 hours.
- Anticoagulation: Protocols vary by institution, but commonly include intravenous hydration, low-dose aspirin (81 mg), and prophylactic low-molecular-weight heparin (LMWH). In cases of crush injury or high-risk anastomoses, intravenous dextran or therapeutic heparin infusions may be considered, though their use must be weighed against the risk of hematoma formation.
- Salvage: If vascular compromise is detected (arterial insufficiency presents as pale, cool, empty tissue; venous congestion presents as blue, swollen, rapidly refilling tissue), immediate return to the operating room for anastomotic exploration and revision is mandatory. Time is tissue; delays beyond 4-6 hours significantly reduce the salvage rate.
You Might Also Like