Karlsson Technique for Chronic Lateral Ankle Instability
Key Takeaway
The Karlsson technique is an anatomic reconstruction for chronic lateral ankle instability. It involves the imbrication and reattachment of the anterior talofibular and calcaneofibular ligaments to the fibula. By utilizing a bony trough and periosteal flap duplication, this procedure restores native ankle kinematics. This guide details the surgical approach, biomechanical principles, and postoperative rehabilitation required to achieve optimal functional outcomes in patients with recurrent ankle sprains.
INTRODUCTION TO CHRONIC LATERAL ANKLE INSTABILITY
Chronic lateral ankle instability (CLAI) is a debilitating condition characterized by recurrent sprains, persistent pain, and a subjective feeling of the ankle "giving way." While the majority of acute lateral ankle sprains resolve with conservative management and targeted physical therapy, approximately 20% to 30% of patients develop chronic mechanical instability. This instability is primarily driven by the attenuation, elongation, or complete rupture of the lateral ligamentous complex—specifically the anterior talofibular ligament (ATFL) and the calcaneofibular ligament (CFL).
Historically, non-anatomic tenodesis procedures (such as the Evans, Watson-Jones, or Chrisman-Snook techniques) were utilized to stabilize the ankle. However, these procedures often resulted in altered hindfoot kinematics, restricted subtalar motion, and accelerated degenerative joint disease. The paradigm shifted dramatically with the introduction of anatomic repairs, pioneered by Broström in 1966.
The Karlsson et al. modification of the anatomic repair represents a critical evolution in operative orthopaedics. Recognizing that mid-substance ligamentous repairs often fail due to poor tissue quality, Karlsson introduced a technique that involves dividing the attenuated ligaments near their fibular origin, creating a bleeding bony trough in the lateral malleolus, and advancing the ligaments directly into the bone. This imbrication, reinforced by a periosteal flap, provides a robust, anatomic reconstruction that restores normal joint mechanics without sacrificing dynamic peroneal function.
SURGICAL ANATOMY AND BIOMECHANICS
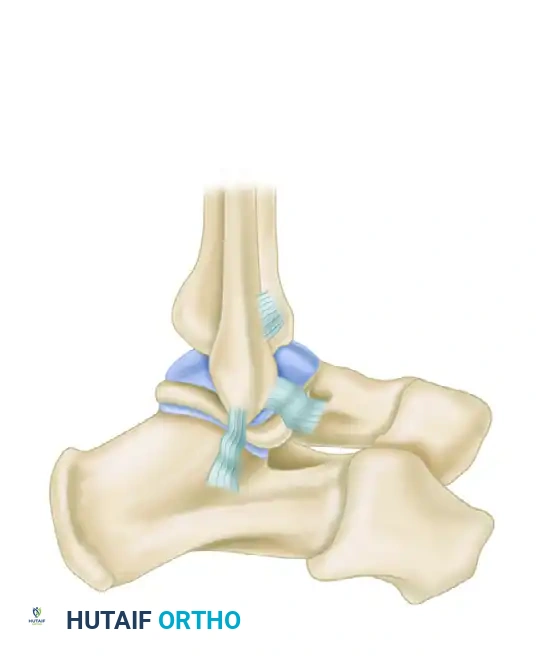
A profound understanding of the lateral ankle anatomy is mandatory for the successful execution of the Karlsson technique. The lateral ligamentous complex consists of three primary structures, though only the first two are routinely addressed in chronic instability:
- Anterior Talofibular Ligament (ATFL): The ATFL is a thickening of the anterior joint capsule. It originates from the anterior margin of the lateral malleolus and inserts on the talar body just anterior to the lateral articular facet. It is the primary restraint to anterior translation of the talus within the mortise, particularly when the ankle is in plantarflexion.
- Calcaneofibular Ligament (CFL): The CFL is an extra-articular, cord-like structure that originates from the tip of the lateral malleolus, courses deep to the peroneal tendons, and inserts on the lateral surface of the calcaneus. It is the primary restraint to inversion of the hindfoot when the ankle is in dorsiflexion.
- Posterior Talofibular Ligament (PTFL): The strongest of the three, the PTFL is rarely torn except in severe ankle dislocations and is not routinely reconstructed in standard CLAI procedures.
💡 Clinical Pearl: The Isometric Principle
The ATFL and CFL exhibit a reciprocal tension pattern during the ankle arc of motion. The ATFL is taut in plantarflexion, while the CFL is taut in dorsiflexion. The Karlsson technique respects this biomechanical relationship by tensioning the repaired ligaments with the foot held in neutral dorsiflexion and slight pronation, ensuring that neither ligament is over-constrained during the functional arc of motion.
INDICATIONS AND CONTRAINDICATIONS
Indications
- Documented Chronic Mechanical Instability: Recurrent lateral ankle sprains persisting for greater than 6 months despite a comprehensive, supervised physical therapy program (focusing on peroneal strengthening and proprioceptive training).
- Positive Clinical Provocation Tests: A positive anterior drawer test (indicating ATFL laxity) and a positive talar tilt test (indicating CFL laxity) compared to the contralateral asymptomatic limb.
- Radiographic Evidence: Stress radiographs demonstrating an anterior talar translation of >10 mm (or >3 mm compared to the contralateral side) and a talar tilt angle of >10 degrees (or >3 degrees compared to the contralateral side).
Contraindications
- Absolute: Active local or systemic infection, severe peripheral vascular disease, or Charcot neuroarthropathy.
- Relative: Generalized ligamentous laxity (e.g., Ehlers-Danlos syndrome, Marfan syndrome), severe long-standing instability with insufficient local tissue quality (which may necessitate an autograft or allograft reconstruction), and uncorrected hindfoot varus malalignment.
⚠️ Surgical Warning: Hindfoot Alignment
Performing a soft-tissue stabilization procedure in the presence of a rigid, uncorrected cavovarus foot deformity will inevitably lead to premature failure of the repair. A lateralizing calcaneal osteotomy or dorsiflexion first metatarsal osteotomy must be performed concomitantly if a bony malalignment is driving the instability.
PREOPERATIVE PLANNING AND IMAGING
Thorough preoperative evaluation is essential. Standard weight-bearing radiographs (anteroposterior, lateral, and mortise views) are obtained to rule out fractures, assess joint space narrowing, and evaluate for malalignment.
Magnetic Resonance Imaging (MRI) is highly recommended prior to surgical intervention. Up to 50% of patients with chronic lateral ankle instability possess concomitant intra-articular pathology, most notably osteochondral lesions of the talus (OLTs), loose bodies, or peroneal tendon tears. Identifying these lesions preoperatively allows the surgeon to plan for concurrent arthroscopic debridement or microfracture.
PATIENT POSITIONING AND ANESTHESIA
- Anesthesia: The procedure is typically performed under general anesthesia or regional anesthesia (spinal or popliteal block) combined with intravenous sedation.
- Positioning: The patient is placed in the lateral decubitus position or the supine position with a large bump under the ipsilateral hip to internally rotate the leg, bringing the lateral malleolus directly anterior.
- Tourniquet: A well-padded pneumatic tourniquet is applied to the proximal thigh or proximal calf and inflated to 250-300 mm Hg after exsanguination of the limb.
- Preparation: The limb is prepped and draped in a standard sterile fashion, ensuring the foot and ankle are freely mobile to allow for intraoperative manipulation and tensioning.
SURGICAL TECHNIQUE: STEP-BY-STEP (KARLSSON ET AL.)
The Karlsson technique is distinguished by its meticulous preparation of the fibular bone bed and the precise imbrication of the ligamentous complex.
Step 1: Incision and Exposure
A curvilinear or J-shaped incision is made posterior to the lateral malleolus, extending distally toward the base of the fifth metatarsal. This posterior placement is deliberate; it avoids the sural nerve distally and the superficial peroneal nerve anteriorly, while providing excellent access to both the ATFL and the CFL.
Careful subcutaneous dissection is performed. The sural nerve and lesser saphenous vein must be identified and protected, typically retracting them inferiorly and posteriorly.
Step 2: Identification and Division of the Ligaments
The deep fascia is incised, and the peroneal tendon sheath is opened. The peroneus brevis and longus tendons are inspected for longitudinal split tears—a common concomitant finding in chronic instability. The tendons are then retracted posteriorly to expose the underlying calcaneofibular ligament (CFL).
Moving anteriorly, the anterior talofibular ligament (ATFL) is identified. In chronic cases, these ligaments may appear as a thickened, scarred, and redundant mass of capsular tissue rather than distinct bands.
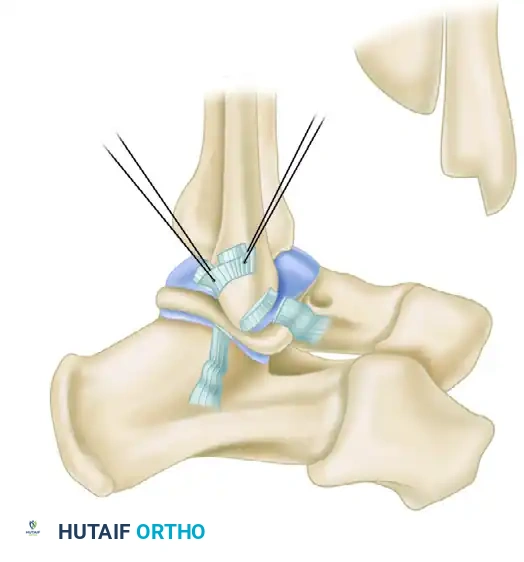
Once identified, the ATFL, CFL, and the intervening joint capsule are sharply divided approximately 1 to 2 mm from their anteroinferior fibular attachment. Leaving a small 1-2 mm cuff of tissue on the fibula can serve as a landmark, but the primary goal is to mobilize the distal ligamentous stumps for advancement.
Step 3: Intra-articular Inspection and Debridement
With the capsule opened, the anterolateral ankle joint is exposed. The surgeon must meticulously inspect the joint space. Any hypertrophic synovitis, which often causes anterolateral impingement, is excised using a rongeur or motorized shaver. Loose bony or cartilaginous bodies are removed. The talar dome is inspected for osteochondral defects; if present, they are addressed via curettage and microfracture at this stage.
Step 4: Fibular Preparation and Bone Block Resection
To ensure robust ligament-to-bone healing, Karlsson described the creation of a bony trough. Using a sharp osteotome or chisel, a bone block measuring approximately 4 × 4 mm in the shape of an inverted "L" is resected from the anteroinferior border of the fibula.
This decortication exposes a bleeding, cancellous bone bed. The removal of the cortical bone is a hallmark of the Karlsson technique, differentiating it from simple soft-tissue plication. It provides a highly vascularized surface that promotes rapid and rigid integration of the advanced ligamentous tissue.
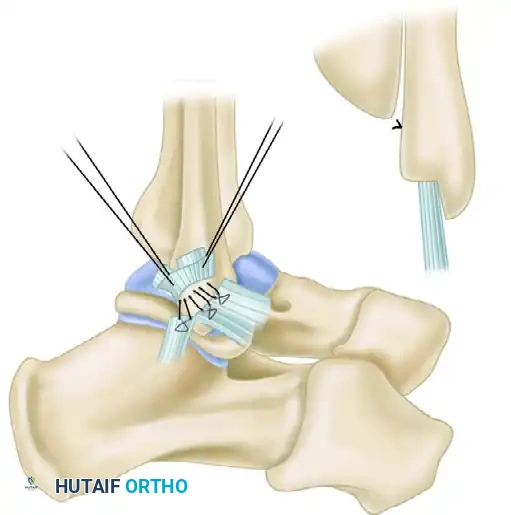
Step 5: Drilling the Fibular Tunnels
To secure the ligaments into the newly created bony trough, transosseous tunnels are required. Using a 2-mm drill bit, five or six small holes are drilled through the lateral edge of the fibula, entering the cancellous trough and exiting the posterior or lateral fibular cortex.
💡 Modern Evolution: Suture Anchors
While the classic Karlsson technique utilizes transosseous drill holes, many contemporary surgeons substitute this step with the placement of two or three double-loaded biocomposite or metallic suture anchors into the fibular footprint. Suture anchors provide equivalent biomechanical pull-out strength and reduce the operative time associated with passing sutures through transosseous tunnels.
Step 6: Ligament Imbrication and Tensioning
Nonabsorbable, heavy braided sutures (e.g., #0 or #2-0) are passed through the distal stumps of the ATFL and CFL using a locking Krackow or mattress stitch configuration. The suture limbs are then passed through the pre-drilled fibular holes (or utilized directly from the suture anchors).
Critical Positioning: Before the sutures are tied, the foot must be placed in the correct position. The ankle is held in neutral dorsiflexion and slight pronation (eversion).
* Why Dorsiflexion? Tying the sutures in plantarflexion will over-tighten the ATFL, leading to a postoperative loss of dorsiflexion and an iatrogenic equinus contracture.
* Why Pronation? Pronation closes the lateral joint space, relaxing the lateral ligaments and allowing for maximal advancement of the tissue into the bony trough.
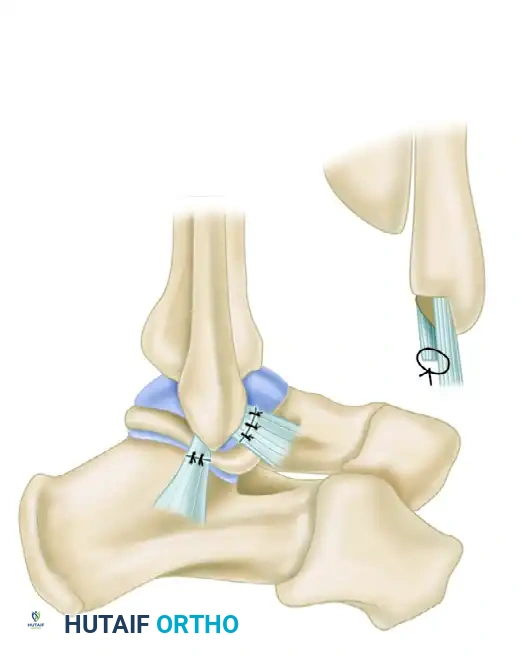
While an assistant holds the foot rigidly in this position, the four or five mattress sutures are tied, firmly drawing the ligamentous complex and joint capsule into the bleeding fibular bed.
Step 7: Periosteal Flap Duplication
To reinforce the repair and provide secondary mechanical stability, a duplication (or "pants-over-vest" imbrication) is performed. The proximal periosteal flap of the fibula—along with the 1-2 mm proximal remnant of the divided ligaments—is pulled distally over the repaired ligament stumps.
This flap is sutured to the advanced ligaments using absorbable sutures. This duplication thickens the repair construct, smooths the lateral fibular border, and provides an additional layer of vascularized tissue to aid in healing.
Step 8: Closure
The peroneal tendon sheath is carefully repaired over the tendons to prevent postoperative subluxation. The subcutaneous tissues are closed with interrupted absorbable sutures, and the skin is closed with a subcuticular stitch or nylon sutures. A sterile dressing is applied.
POSTOPERATIVE CARE AND REHABILITATION
The success of the Karlsson lateral repair relies as much on strict adherence to the postoperative rehabilitation protocol as it does on surgical execution. The classic protocol described by Karlsson emphasizes protection of the healing tissue followed by aggressive functional rehabilitation.
Phase 1: Maximum Protection (Weeks 0 to 6)
- Immediately postoperatively, the patient is placed in a well-padded, below-knee nonwalking cast or a rigid posterior splint.
- The ankle is immobilized in neutral dorsiflexion and slight eversion.
- Weight-bearing status: Strict non-weight-bearing (NWB) with crutches for the first 6 weeks to protect the ligament-to-bone healing interface.
- Note: Some modern accelerated protocols transition patients to a controlled ankle motion (CAM) boot at 2 to 3 weeks to allow early protected range of motion, but the classic Karlsson protocol mandates 6 weeks of cast immobilization.
Phase 2: Early Mobilization and Strengthening (Weeks 6 to 12)
- The cast is removed at the 6-week mark.
- The patient is transitioned to a functional ankle brace (e.g., ASO brace) and allowed to weight-bear as tolerated.
- Physical Therapy Initiation: Active and active-assisted range of motion (ROM) exercises are initiated. Plantarflexion and inversion are introduced gradually to avoid stretching the repair.
- Peroneal Strengthening: Aggressive strengthening of the peroneus longus and brevis is paramount. The peroneal muscles act as the primary dynamic stabilizers of the lateral ankle; their rapid rehabilitation is critical to preventing recurrent instability.
Phase 3: Proprioception and Return to Play (Weeks 12+)
- Physical therapy shifts focus toward proprioceptive training using balance boards, BAPS boards, and uneven surface training.
- Plyometric exercises and sport-specific drills (cutting, pivoting, jumping) are introduced once the patient demonstrates symmetric strength and pain-free ROM.
- Return to competitive sports activities is generally permitted between 4 to 6 months postoperatively, provided the ankle is functionally stable and the patient passes functional hop testing. The use of a prophylactic ankle brace during high-risk sports is recommended for the first year following surgery.
COMPLICATIONS AND PITFALLS
While the Karlsson technique is highly successful, with good to excellent outcomes reported in over 85% to 90% of patients, complications can occur:
- Sural Nerve Injury: The most common complication. Neuroma formation or transient neuropraxia can occur due to aggressive retraction or entrapment in scar tissue. Meticulous dissection and posterior retraction are preventative.
- Overtightening / Loss of Motion: Tying the sutures with the foot in plantarflexion will restrict postoperative dorsiflexion. The foot must be held in neutral to slight dorsiflexion during knot tying.
- Recurrent Instability: Often the result of unrecognized and uncorrected hindfoot varus, poor tissue quality, or premature return to high-impact activities before adequate ligamentous healing and peroneal rehabilitation have occurred.
- Wound Healing Issues: The lateral malleolus has a tenuous blood supply and thin soft-tissue envelope. Careful handling of the skin edges and avoiding excessive tourniquet times mitigate the risk of necrosis or dehiscence.
CONCLUSION
The Karlsson lateral repair remains a foundational procedure in operative orthopaedics for the management of chronic lateral ankle instability. By prioritizing anatomic restoration, creating a highly vascularized bony trough for ligamentous integration, and reinforcing the construct with a periosteal flap, this technique provides durable mechanical stability. When combined with a rigorous, phased postoperative rehabilitation program focusing on peroneal strengthening and proprioception, surgeons can reliably return patients to their pre-injury levels of function and athletic performance.
You Might Also Like

