Introduction to Intramedullary Clavicle Fixation
The management of displaced midshaft clavicle fractures has undergone a significant paradigm shift over the last two decades. While nonoperative management was historically the gold standard, contemporary evidence demonstrates that operative fixation of significantly displaced, shortened, or comminuted midshaft fractures yields superior functional outcomes, lower nonunion rates, and faster return to baseline activities.
Among the operative modalities, plate osteosynthesis remains highly prevalent; however, it requires extensive soft tissue stripping, disrupts the periosteal blood supply, and frequently results in symptomatic hardware requiring secondary removal. Intramedullary (IM) fixation utilizing a headed, distally threaded pin—specifically the Rockwood Clavicle Pin—provides a minimally invasive, load-sharing alternative. By acting as an internal splint, the Rockwood pin confers excellent rotational and bending stability while preserving the fracture hematoma, thereby promoting robust secondary bone healing via callus formation.
This comprehensive guide details the indications, biomechanical principles, preoperative setup, and step-by-step surgical execution of intramedullary fixation using the Rockwood clavicle pin.
Indications and Patient Selection
Proper patient selection is paramount for the success of intramedullary clavicle fixation. The Rockwood pin is specifically designed for fractures where the medullary canal can be instrumented and where length can be maintained without the rigid buttressing of a plate.
Primary Indications
- Displaced Midshaft Fractures (Robinson Type 2B1/2B2): Acute fractures with >100% displacement or >2 cm of shortening.
- Skin Tenting: Impending open fractures where the proximal fragment threatens the integrity of the overlying skin.
- Polytrauma: Patients requiring early mobilization of the upper extremity for weight-bearing (e.g., crutch use for concomitant lower extremity injuries).
- Floating Shoulder: Concomitant ipsilateral scapular neck fractures requiring stabilization of the superior suspensory shoulder complex.
Contraindications
- Severe Comminution: Segmental fractures or severe comminution where the IM pin cannot maintain clavicular length (telescoping risk).
- Extreme Canal Narrowing: Congenitally narrow medullary canals (<3 mm) that cannot accommodate the smallest available pin or drill.
- Medial or Lateral Third Fractures: Fractures too proximal or distal to allow adequate thread purchase or hardware seating.
- Active Infection: Local or systemic active infectious processes.
💡 Clinical Pearl: Preoperative Templating
Always evaluate the medullary canal diameter on preoperative AP and 15-degree cephalad radiographs. If the canal appears obliterated or excessively narrow, have a low-profile superior or anterior-inferior clavicle plating system available as a backup.
Biomechanics of the Rockwood Clavicle Pin
The Rockwood clavicle pin represents a significant evolutionary step over historical smooth IM devices (e.g., Hagie pins, Knowles pins, or standard Kirschner wires). Smooth wires are notorious for catastrophic migration into the thoracic cavity or mediastinum.
The Rockwood pin mitigates this risk through a highly engineered design:
1. Distal Machine Threads: The medial end of the pin features wide-pitch threads designed to achieve robust purchase in the dense cancellous and cortical bone of the medial clavicle fragment.
2. Lateral Locking Nuts: The lateral end utilizes a dual-nut system. Once the medial threads are engaged, the lateral nuts are tightened against the posterolateral cortex of the clavicle. This creates dynamic compression across the fracture site.
3. Load-Sharing Construct: Unlike rigid plates that can cause stress shielding, the IM pin allows micromotion at the fracture site, stimulating enchondral ossification and robust callus formation.
Preoperative Setup and Positioning
Meticulous positioning is critical. The clavicle's complex S-shaped anatomy makes intraoperative fluoroscopy challenging if the patient is not positioned correctly.
Patient Positioning
- Place the patient in a semi-sitting (beach chair) position on a fully radiolucent table.
- Ensure the head is secured in a neutral position, avoiding excessive lateral flexion or rotation that could place tension on the brachial plexus.
- Place a small bump between the scapulae to allow the shoulders to fall posteriorly, aiding in fracture reduction.
- Drape the entire forequarter free to allow full manipulation of the arm and shoulder girdle during the procedure.
Fluoroscopy Setup
- Position the C-arm image intensifier on the ipsilateral side, coming in from the head or the contralateral side depending on the room setup.
- Orthogonal Imaging: Because the clavicle cannot be imaged in a true lateral plane due to the thorax, orthogonal views are obtained by rotating the C-arm 45 degrees cephalad and 45 degrees caudal. Verify that clear, unobstructed views of the entire clavicle can be obtained before making the incision.
Surgical Approach
The surgical approach for IM nailing is significantly smaller than that required for plating, minimizing disruption of the supraclavicular nerves.
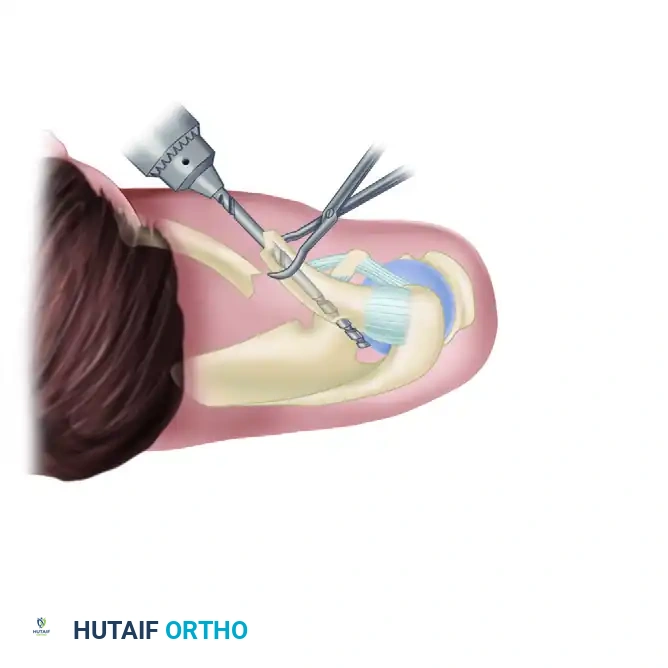
- Incision: Make a 2- to 3-cm transverse incision over the posterolateral corner of the clavicle, approximately 2 to 3 cm medial to the acromioclavicular (AC) joint, directly over the fracture site.
- Soft Tissue Dissection: There is minimal subcutaneous fat in this region. Proceed with caution to avoid inadvertent injury to the underlying platysma muscle.
- Platysma Splitting: Use dissecting scissors to free the platysma muscle from the overlying skin. Split its fibers longitudinally in line with the muscle belly.
🚨 Surgical Warning: Supraclavicular Nerve Protection
Take extreme care to identify and protect the middle branch of the supraclavicular nerve. This nerve is usually found directly beneath the platysma muscle near the midclavicle. Iatrogenic transection results in painful neuromas and anterior chest wall numbness. Identify, mobilize, and gently retract the nerve using vessel loops.
Step-by-Step Surgical Technique
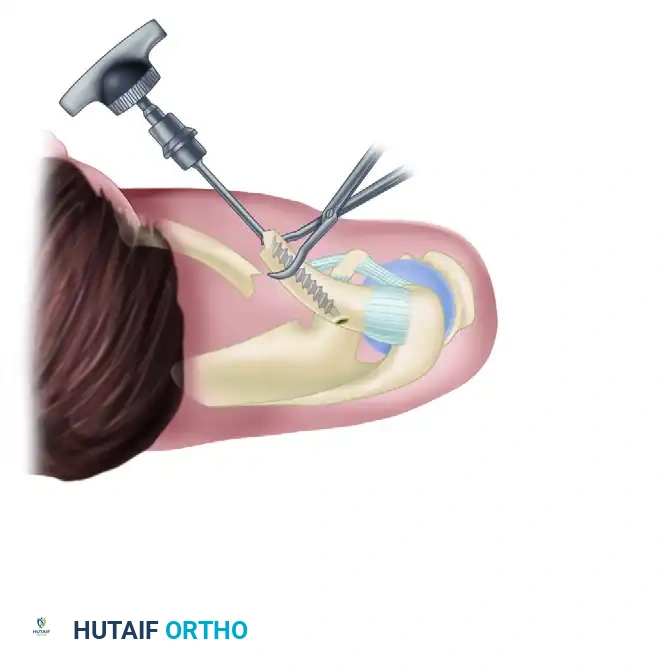
Phase 1: Preparation of the Medial Fragment
-
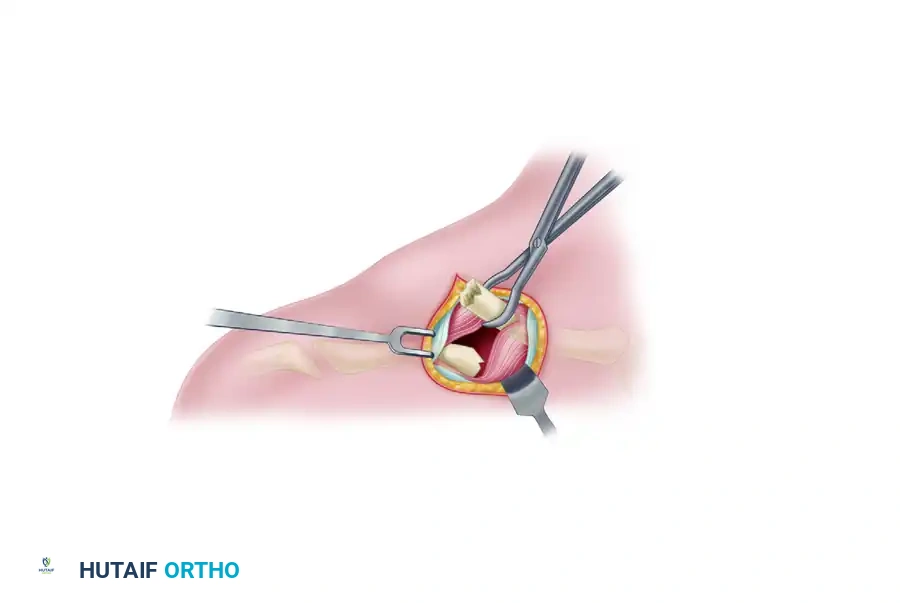
Elevation: Use a towel clip or a small bone tenaculum to grasp and elevate the proximal end of the medial clavicle fragment through the incision.
-
Drilling the Medial Canal: Attach the appropriate-sized drill bit to a ratchet T-handle. Carefully introduce the drill into the medullary canal of the medial fragment. Advance the drill manually.
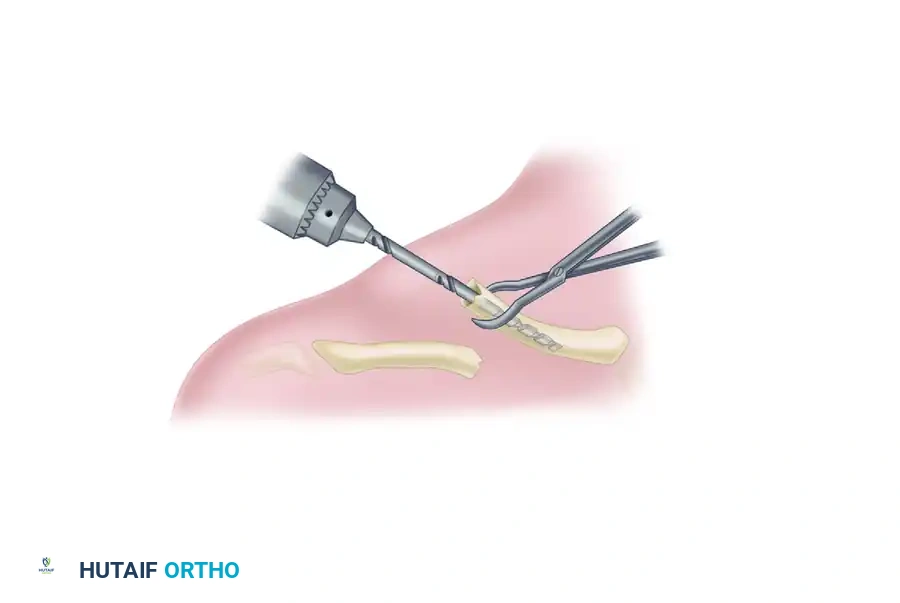
Crucial Step: Take absolute care not to penetrate the anterior, inferior, or posterior cortices of the medial fragment. The subclavian vessels and brachial plexus lie immediately posteroinferior to the medial third of the clavicle. -
Tapping the Medial Canal: Remove the drill. Attach the corresponding appropriate-sized tap to the T-handle. Tap the medullary canal until you reach the dense anterior cortex of the medial clavicle.
Recommendation: Hand tapping is strictly recommended over power tapping, especially in smaller patients or when using smaller-diameter pins, to preserve tactile feedback and prevent stripping of the cancellous bone.
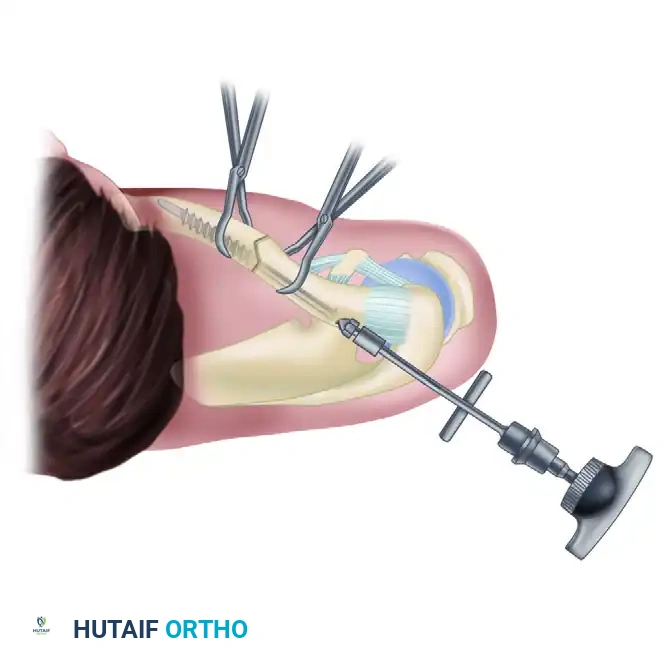
Phase 2: Preparation of the Lateral Fragment
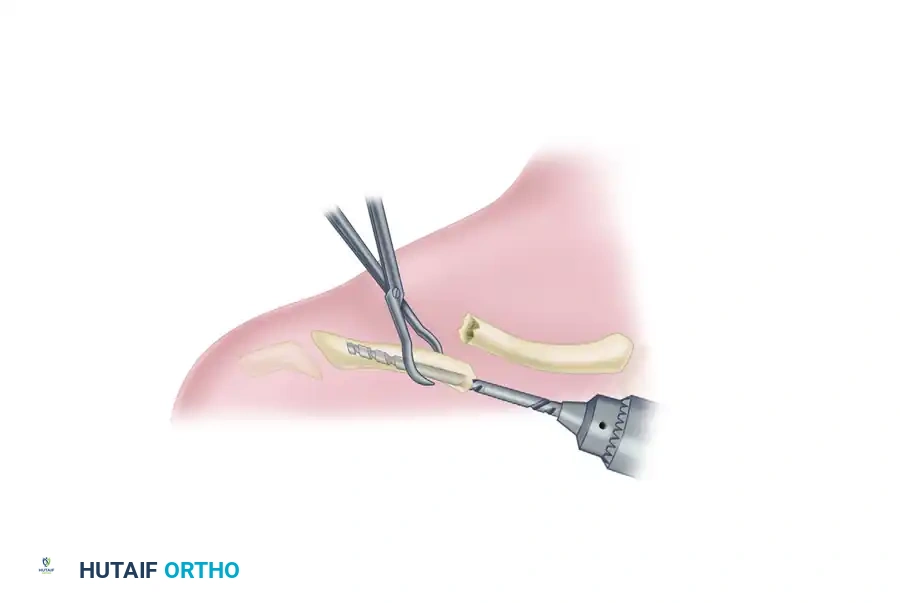
- Exposure: Elevate the lateral fragment through the incision. Externally rotating the arm and lifting the shoulder girdle helps improve exposure and aligns the lateral fragment with the surgical window.
-
Drilling the Lateral Canal: Attach the same-sized drill used for the medial fragment to the ratchet T-handle. Introduce it into the medullary canal of the lateral fragment.
-
Posterolateral Exit: Under continuous C-arm fluoroscopic guidance, advance the drill laterally until it passes out through the posterolateral cortex of the clavicle.

Trajectory Check: The drill's exit position must be posterior and medial to the acromioclavicular joint, approximately at the level of the coracoid process. Ensure the drill exits no higher than the equator (midline) of the posterolateral clavicle to prevent superior skin tenting or AC joint violation. -
Tapping the Lateral Canal: Remove the drill from the lateral fragment. Attach the appropriate-sized tap to the T-handle and tap the lateral medullary canal so that the large threads are advanced fully into the canal.
Troubleshooting: If the tap is an excessively tight fit, consider redrilling the canal with the next larger drill size to prevent iatrogenic comminution of the lateral fragment. Again, hand tapping is strongly recommended.
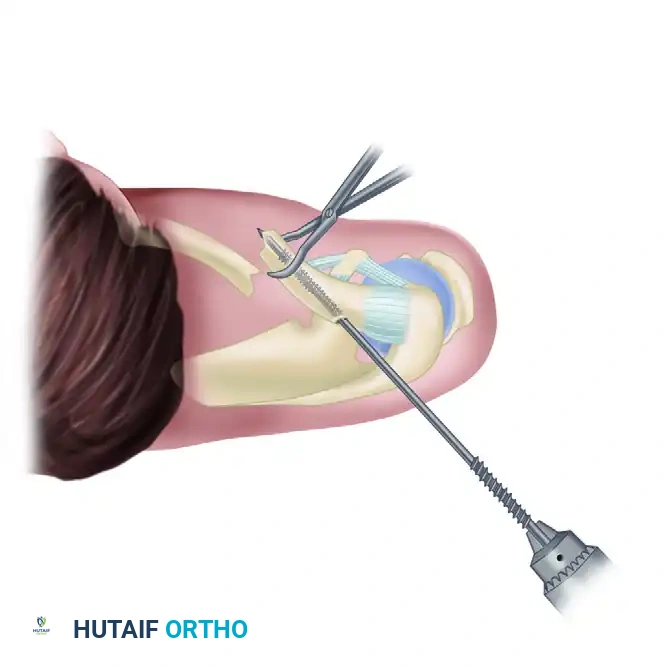
Phase 3: Retrograde Pin Insertion
- Initial Pin Passage: While holding the distal fragment securely with a bone clamp, remove the locking nuts from the Rockwood pin assembly. Pass the smooth, trocar-tipped end of the pin into the medullary canal of the distal fragment at the fracture site. Advance it laterally until it exits through the previously drilled hole in the posterolateral cortex.
- Lateral Incision: Once the pin exits the clavicle laterally, its sharp tip can be palpated subcutaneously. Make a small (1 cm) stab incision directly over the palpable tip. Spread the subcutaneous tissue bluntly with a hemostat.
Place the tip of the hemostat under the tip of the clavicle pin to guide its passage safely through the skin incision. - Engaging the Threads: Attach a drill to the lateral protruding tip of the pin. Drill the pin out laterally until the large, medial machine threads just start to engage the lateral cortex at the fracture site.
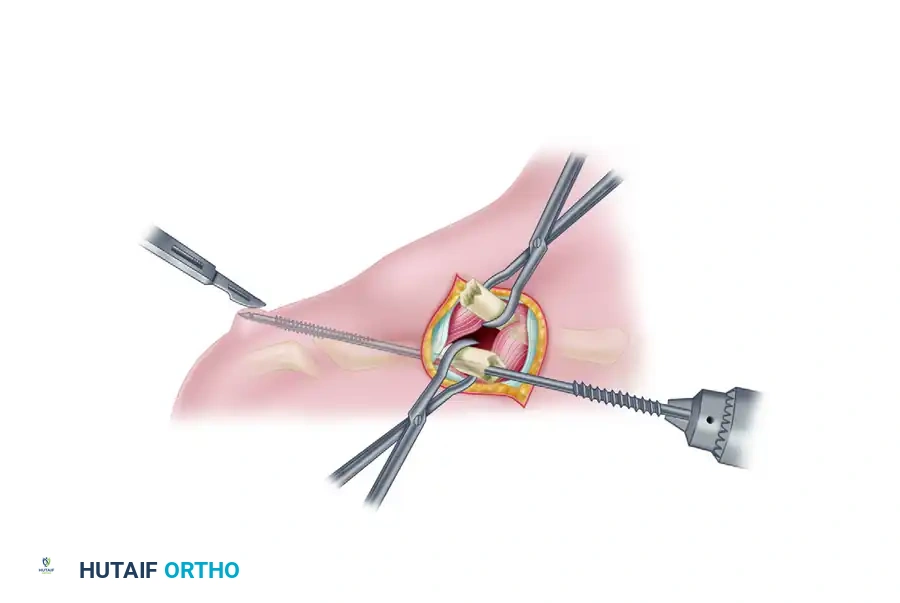
Phase 4: Fracture Reduction and Antegrade Passage
- Pin Retraction: Attach a Jacobs chuck and T-handle to the lateral protruding end of the pin. Caution: Do not place the chuck over the machined threads (neither the lateral fine threads nor the medial wide threads) to avoid damaging them. Carefully retract the pin laterally into the lateral fragment until the medial tip is flush with the fracture site.
Ensure the pin is correctly oriented within the canal. - Fracture Reduction: Anatomically reduce the fracture. Because the weight of the arm naturally pulls the lateral fragment inferiorly, having an assistant physically lift the shoulder will greatly facilitate alignment and subsequent pin passage into the medial fragment.
- Antegrade Advancement: Once reduced, pass the pin across the fracture site and into the medial fragment. Advance the pin until all of the wide medial threads have crossed the fracture site and are fully seated within the medial fragment.
Phase 5: Compression and Final Seating
- The "Cold Weld" Technique: Place the larger medial nut onto the lateral threaded portion of the pin, followed by the smaller lateral nut. You must "cold weld" the two nuts together to drive the pin further. Grasp the medial nut with a needle driver or needle-nose pliers, and aggressively tighten the lateral nut against it using the lateral nut wrench.
- Final Advancement: Use the T-handle and wrench on the cold-welded lateral nut to advance the pin medially into the medial fragment until the tip contacts the dense anterior cortex. Confirm this final position with orthogonal fluoroscopy.
- Applying Compression: Break the cold weld between the nuts by grasping the medial nut with pliers and quickly turning the lateral nut counterclockwise with the wrench. Advance the medial nut medially until it sits flush against the posterolateral cortex of the clavicle, compressing the fracture. Tighten the lateral nut against the medial nut to lock the construct.
- Trimming the Pin: Use the medial wrench to back the pin out 1 cm or more to expose the nuts away from the soft tissue. Ensure the medial clavicle threads remain fully engaged in the cortical bone. Use a heavy side-cutting pin cutter to cut the excess pin as close to the lateral nut as possible. Finally, readvance the clavicle pin using the lateral nut wrench until the medial nut is once again flush against the lateral cortex.
Postoperative Care and Rehabilitation
The postoperative protocol is designed to protect the hardware while preventing shoulder stiffness, capitalizing on the load-sharing nature of the IM device.
Phase I: Immediate Postoperative (0 to 14 Days)
- Immobilization: The operative arm is placed in a standard shoulder sling for comfort.
- Early Motion: Gentle pendulum exercises are initiated immediately to prevent glenohumeral adhesive capsulitis. Active range of motion (ROM) of the elbow, wrist, and hand is encouraged.
- Wound Care: Sutures are removed at 10 to 14 days postoperatively.
Phase II: Intermediate Rehabilitation (2 to 6 Weeks)
- Clinical Evaluation: At the 2-week mark, if early callus formation or stable alignment is visualized on orthogonal radiographs, the sling is discontinued.
- Mobility: Unrestricted active and active-assisted range-of-motion exercises are allowed.
- Restrictions: Strict avoidance of lifting >5 lbs, strengthening exercises, resisted motions, or sports activities.
Phase III: Strengthening and Return to Play (6 to 12 Weeks)
- Consolidation Check: Radiographs are obtained at 6 weeks. If clinical and radiographic union is evident (bridging callus on multiple views, absence of pain at the fracture site), resisted and strengthening activities are initiated.
- Sports: Contact sports (e.g., football, hockey, rugby) must be strictly avoided for a minimum of 12 weeks after surgery to prevent catastrophic refracture or hardware failure.
Phase IV: Hardware Removal
- Routine Extraction: Unlike plates, which are only removed if symptomatic, the Rockwood clavicle pin is typically removed routinely once the fracture is solidly healed.
- Timing: If the fracture is fully consolidated at 12 weeks, the pin can be removed in a brief outpatient procedure under local or light general anesthesia. Leaving the pin in situ long-term increases the risk of lateral skin irritation, acromial impingement, or late migration.
Complications and Pitfalls
While highly effective, intramedullary clavicle fixation carries specific risks that the orthopedic surgeon must anticipate:
- Hardware Migration: The primary historical complication of IM clavicle fixation. The threaded medial tip and dual-nut lateral locking mechanism of the Rockwood pin specifically neutralize this risk, provided the medial threads achieve adequate cortical purchase.
- Cortical Blowout: Forcing a drill or tap that is too large for a narrow canal can cause iatrogenic comminution. Always use hand-tapping and respect the tactile feedback of the bone.
- Skin Irritation: The lateral nuts can become prominent, especially in thin patients. Ensuring the exit hole is at the equator of the bone and cutting the pin flush with the lateral nut minimizes this issue. Routine removal at 12 weeks definitively resolves it.
- Nonunion: Rare, but can occur if the fracture is excessively distracted during the locking phase. Ensure the medial nut is used to actively compress the fracture site before final tightening.
Conclusion
Intramedullary fixation with the Rockwood clavicle pin is a highly sophisticated, biomechanically advantageous technique for the treatment of displaced midshaft clavicle fractures. By respecting the soft tissue envelope, preserving the periosteal blood supply, and providing load-sharing stability, this technique facilitates rapid, robust osseous union. Mastery of the precise surgical steps—particularly orthogonal imaging, meticulous canal preparation, and the dual-nut compression technique—is essential for optimizing patient outcomes and minimizing complications.
