Arthroscopic Management of Osteochondritis Dissecans: Screw Fixation and OATS
Key Takeaway
Osteochondritis dissecans (OCD) of the medial femoral condyle requires precise surgical management based on lesion stability and size. Small, stable lesions are optimally treated with arthroscopic bioabsorbable or metal screw fixation following base debridement. Conversely, larger full-thickness defects (1.0 to 2.5 cm) in weight-bearing zones necessitate osteochondral autograft transfer (OATS) to restore the articular surface with viable hyaline cartilage, ensuring long-term joint stability and function.
INTRODUCTION TO OSTEOCHONDRITIS DISSECANS OF THE KNEE
Osteochondritis dissecans (OCD) of the knee represents a focal, idiopathic alteration of subchondral bone with risk for instability and disruption of adjacent articular cartilage. The medial femoral condyle (MFC) is the most frequently affected site, accounting for approximately 70% to 85% of all knee OCD lesions, typically localizing to the lateral aspect of the medial condyle.
The surgical management of these lesions is dictated by the patient's skeletal maturity, lesion size, and the stability of the osteochondral fragment. While non-operative management is often successful in juvenile patients with open physes, adult patients or those with unstable, detached, or large lesions require meticulous surgical intervention to prevent early-onset osteoarthritis. This comprehensive guide details the operative techniques for arthroscopic screw fixation, the management of osteochondritic loose bodies, and Osteochondral Autograft Transfer (OATS).
ARTHROSCOPIC SCREW FIXATION FOR OSTEOCHONDRITIS DISSECANS LESIONS IN THE MEDIAL FEMORAL CONDYLE
For small (< 2.5 cm), relatively stable lesions that have failed conservative management, in situ fixation is the gold standard. The primary goal is to achieve rigid compression of the fragment into its anatomical bed, promoting osteointegration and healing of the subchondral bone while preserving the overlying articular cartilage.
Implant Selection: Bioabsorbable vs. Metal Screws
The choice of fixation device depends on the surgeon's preference, the morphological characteristics of the lesion, and the patient's compliance profile.
- Bioabsorbable Screws (PLLA/PLGA): We generally prefer the use of an absorbable screw fixation technique for stable, in situ lesions. These implants provide adequate compression without the need for a secondary removal surgery. However, they possess less secure initial pull-out strength compared to metal, exhibit variable absorption rates, and carry a known risk of inducing sterile synovitis or cyst formation during the degradation process.
- Metal Screws (1.5-mm to 2.7-mm): Unstable fragments or those requiring maximal compressive forces are best secured with metal screws (e.g., titanium or stainless steel headless compression screws). Metal screws provide superior biomechanical security and rigid fixation. The primary disadvantage is the absolute necessity for a secondary arthroscopic procedure for hardware removal once radiographic healing is confirmed, to prevent catastrophic third-body wear and articular cartilage damage to the opposing tibial plateau.
💡 Clinical Pearl
Evaluate the defect meticulously during diagnostic arthroscopy. Displaced lesions that require significant contouring, bone grafting, and complex reduction are often best treated via an open approach through a limited medial parapatellar arthrotomy rather than struggling with inadequate arthroscopic visualization.
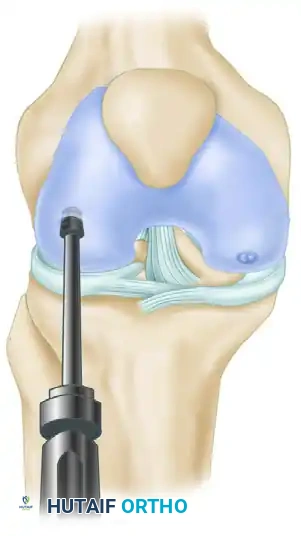
Surgical Technique: Arthroscopic Fixation
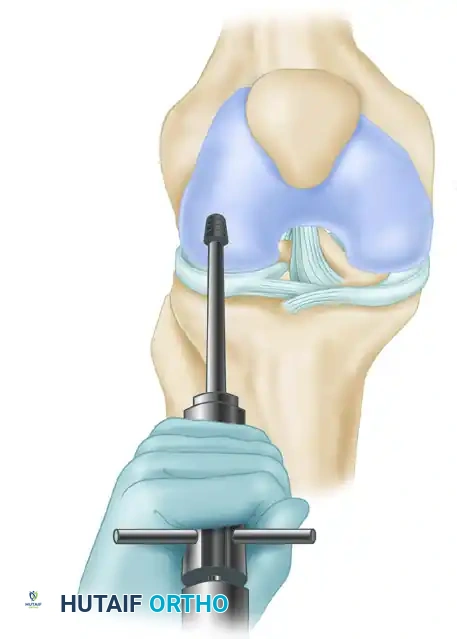
- Patient Positioning and Setup: The patient is positioned supine on the operating table. A lateral post or a dedicated leg holder is utilized to allow valgus stress for optimal visualization of the medial compartment. A standard anterolateral viewing portal and an anteromedial working portal are established.
- Lesion Evaluation: Probe the lesion to assess stability (ICRS Classification). If the cartilage is intact but ballotable, the lesion is considered stable but unhealed.
- Bed Preparation: For relatively stable lesions, it is imperative to stimulate a healing response. Use a motorized shaver or a curette to meticulously débride the fibrous tissue at the base of the lesion. If the fragment is hinged, gently elevate it to clear the crater base down to bleeding subchondral bone.
- Bone Grafting (If Indicated): If the subchondral defect is large or cystic, use cancellous bone graft obtained from the proximal tibia (via a small cortical window) to fill the cavity prior to fragment reduction.
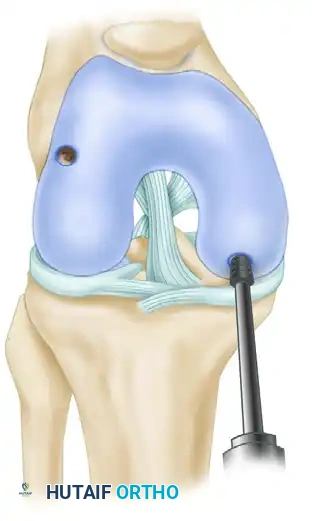
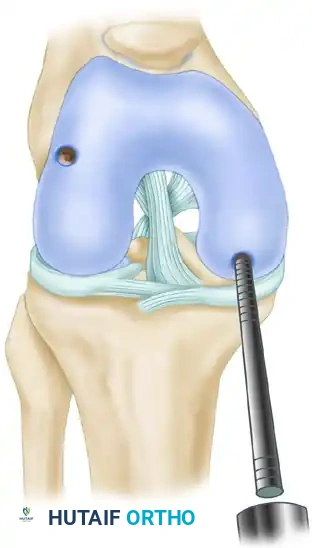
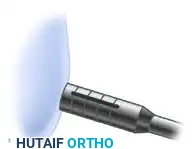
- Screw Fixation:
- Reduce the fragment anatomically.
- Secure the lesion with cannulated bioabsorbable screws or small 1.5- to 2.7-mm metal screws.
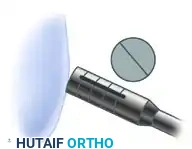
- Trajectory: Screws must be placed strictly perpendicular to the lesion to maximize compression and minimize shear forces.
- Countersinking: Ensure the screw heads are countersunk at least 1 to 2 mm below the articular surface to prevent impingement.
Postoperative Care for Screw Fixation
Immediate postoperative range of motion (ROM) is highly encouraged to nourish the articular cartilage and prevent arthrofibrosis. Strict non–weight-bearing status with crutches for 6 to 12 weeks is necessary to facilitate subchondral healing and to protect the joint surfaces. If metal screws were utilized, weight-bearing is often restricted or heavily modified until the metal screws are removed arthroscopically (typically at 8 to 12 weeks postoperatively, pending radiographic evidence of integration).
MANAGEMENT OF OSTEOCHONDRITIC LOOSE BODIES
Osteochondritic loose bodies that are already completely detached and floating free within the joint present a distinct clinical challenge.
Indications for Extraction vs. Fixation
Only a recently detached loose body with viable, healthy cartilage and bone, accompanied by a fresh crater base, is suitable for replacement and internal fixation.
More often, the loose body or bodies have been detached for a prolonged period. They become rounded off, hypertrophied due to synovial fluid nourishment, and cannot be made to fit congruously back within the donor crater by either open or closed methods. In these instances, attempting to force a mismatched fragment into the defect will result in abnormal contact pressures and early failure.
🚨 Surgical Warning
Never attempt to fix a chronic, rounded loose body back into a defect. The incongruity will act as a "pebble in a shoe," rapidly accelerating localized chondral wear on the opposing tibial surface.
Surgical Technique: Loose Body Extraction and Crater Preparation
- Extraction: Locate and extract all loose bodies from the joint using arthroscopic graspers. Thoroughly sweep the posterior compartments and gutters, as fragments frequently migrate.
- Crater Debridement: The base of the crater must be cleared of all fibrous debris and calcified cartilage.
- Marrow Stimulation: The underlying eburnated and sclerotic bone must be penetrated to allow access to mesenchymal stem cells. This is achieved by perforating the base with multiple drill holes (microfracture) or abrading it to bleeding cancellous bone (abrasion arthroplasty).
- Edge Contouring: The edges and walls of the crater must be contoured and smoothed to create stable, vertical margins. Crucially, do not remove additional healthy, attached articular cartilage during this process.
Postoperative Care for Loose Body Extraction
Postoperatively, immediate motion and weight-bearing as tolerated are allowed, as there is no fixation to protect. Prolonged protection in these circumstances does not seem to improve the coverage of the base of the crater with fibrocartilaginous tissue. The use of a Constant Passive Motion (CPM) machine for 6 weeks has proved effective in promoting the differentiation of the marrow clot into a robust fibrocartilage repair tissue.
OSTEOCHONDRAL AUTOGRAFT TRANSFER (OATS)
Larger defects (1.0 to 2.5 cm) located in a weight-bearing portion of the condyle, surrounded by a wall of intact cartilage, are preferably treated using an osteochondral autograft transfer (OATS) or mosaicplasty technique. This procedure plugs the defect with mature, autologous hyaline cartilage and structurally sound subchondral bone.
Historical Context and Evolution
The first reports of osteochondral autograft transfer were published by Yamashita et al. in 1985, followed by Fabbriciani et al. in 1992. The osteochondral transfer method for autogenous material subsequently developed into two primary, yet similar, commercial procedures:
- The Arthrex System (Bobic and Morgan): Advocated by Bobic and Morgan from the United Kingdom, this system involves the use of individual, larger donor cores ranging from 5 to 10 mm in size. Proponents believe this larger graft fills the recipient site with more contiguous hyaline cartilage and is ideal for defects ranging from 1.0 to 2.5 cm.
- The Smith & Nephew System (Hangody): Developed in conjunction with Hangody from Hungary, this transfer system utilizes smaller plugs, ranging from 2.7 to 8.5 mm. The rationale is that smaller plugs cause significantly less trauma to the donor site and can be tessellated (mosaicplasty) into the recipient site to restore an area up to about 2 cm in diameter.
Many researchers currently agree that the most advantageous size for a single graft is between 4.5 and 6.5 mm. When multiple grafts are used (mosaicplasty), Hangody et al. suggested using an open or mini-open technique to enable the ideal restoration of the complex articular cartilage surface curvature. When multiple grafts are taken, the defect is thought to fill with 60% to 80% of true hyaline cartilage, with the interstices filling with fibrocartilage. To maximize cartilage transfer and integration, a cartilage-bone paste can be used to fill the small dead spaces between the circular cartilage surfaces.
Indications and Contraindications
Indications:
* Patients younger than 45 years of age.
* Sharply defined, full-thickness chondral or osteochondral defects.
* Normal-appearing hyaline cartilage surrounding the borders of the defect.
* Lesions should be unipolar (affecting only one side of the joint).
* Defect size generally no more than 2.0 to 2.5 cm.
* Normal mechanical alignment and a ligamentously stable knee are absolute prerequisites for long-term success.
Relative Contraindications:
* Patient age older than 45 years (due to decreased cellularity and healing potential).
* Obvious chondromalacia or generalized osteoarthritis of the articular cartilage surrounding the defect.
* Bipolar "kissing" lesions.
* Uncorrected malalignment or instability.
🔪 Surgical Technique: Osteochondral Autograft Transfer (OATS)
The following steps detail the standard OATS procedure, utilizing specialized instrumentation to harvest and transfer the osteochondral plug.
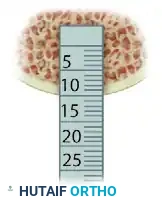
Step 1: Defect Evaluation and Sizing
The recipient defect is thoroughly debrided of all unstable cartilage to create vertical margins. A calibrated sizing tool is introduced to determine the exact diameter of the defect. This dictates the size of the donor harvester required.
Step 2: Donor Site Selection and Harvester Assembly
The donor site is typically selected from a non-weight-bearing region of the knee, most commonly the superolateral or superomedial margins of the femoral trochlea. The harvester driver extractor is assembled with the appropriate diameter tube harvester and collared pin loaded.
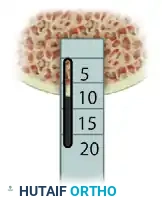
Step 3: Harvesting the Graft
The harvester is positioned strictly perpendicular to the articular surface of the donor site to ensure the cartilage cap is not skewed.
The harvester is then driven into the subchondral bone using a mallet to a depth of approximately 15 mm.
Once the desired depth is reached, the harvester is toggled slightly to break the cancellous bone base, and the graft is extracted. The length of the harvested bone plug is carefully measured.
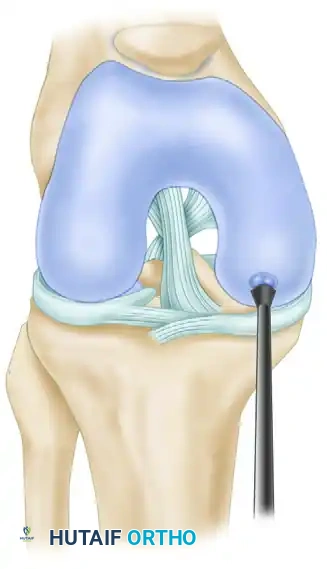
Step 4: Recipient Socket Preparation
Attention is returned to the recipient site. A recipient reamer or drill, matching the exact diameter of the harvested plug, is introduced.
It is critical that the recipient socket is drilled perfectly perpendicular to the surrounding articular cartilage to ensure a flush fit.
Step 5: Socket Measurement and Alignment Check
A calibrated OATS alignment stick of the appropriate diameter is inserted into the newly created recipient socket.
This stick is used to measure the exact depth of the recipient socket and to verify that the angle of the socket correctly matches the position of the insertion portal.
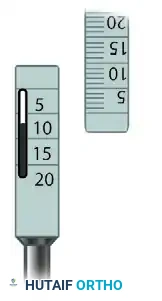
The depth of the recipient socket is then meticulously compared against the length of the harvested donor plug. The socket should be exactly the same depth, or 1 mm deeper, to prevent the graft from sitting proud.
Step 6: Graft Insertion
The delivery tube containing the donor graft is placed over the recipient socket. Using the tamp, the graft is gently advanced into the socket.
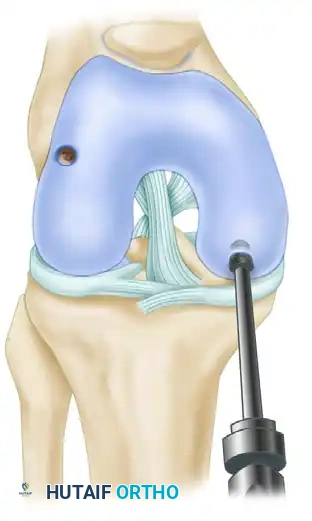
The graft must be seated flush with the surrounding native articular cartilage. A graft that sits proud will experience excessive shear forces and fail, while a sunken graft will lead to altered joint mechanics and incomplete healing.
💡 Clinical Pearl
When performing mosaicplasty with multiple plugs, always place the largest plug in the center of the weight-bearing zone first. Fill the periphery with smaller plugs. Ensure a minimum of 1 to 2 mm of native bone bridge remains between sockets to prevent catastrophic confluence and collapse of the recipient bed.
Postoperative Rehabilitation for OATS
Rehabilitation following OATS is critical to the success of the procedure and is generally more conservative than simple loose body removal.
- Phase 1 (0-6 Weeks): The patient is kept strictly non-weight-bearing or touch-down weight-bearing on crutches. Immediate use of a CPM machine is initiated (typically 0 to 90 degrees) to encourage synovial fluid diffusion and graft nutrition.
- Phase 2 (6-12 Weeks): Progressive weight-bearing is initiated, advancing to full weight-bearing by 8 to 10 weeks. Closed kinetic chain exercises are introduced to rebuild quadriceps and hamstring strength.
- Phase 3 (3-6 Months): Advanced strengthening, proprioception training, and functional movements are emphasized.
- Phase 4 (6+ Months): Return to high-impact sports or heavy labor is generally delayed until 6 to 9 months postoperatively, contingent upon complete radiographic integration of the bone plugs and the absence of clinical effusions.
You Might Also Like