Volar Approach for Distal Radius Fractures: Surgical Anatomy & Management
Key Takeaway
The volar approach is the workhorse for distal radius fractures, leveraging its direct visualization for reduction and robust fixation. It offers superior stability and early rehabilitation. Key anatomical considerations include restoring volar tilt and radial inclination, identifying the FCR tendon as a critical landmark, and carefully protecting adjacent neurovascular structures.
Introduction & Epidemiology
Distal radius fractures (DRFs) represent the most prevalent fracture of the upper extremity, accounting for approximately one-sixth of all fractures treated in emergency departments. Their incidence exhibits a bimodal distribution, affecting younger, active individuals through high-energy trauma and the elderly population, particularly post-menopausal women, through low-energy falls secondary to osteoporosis. The surgical management of displaced or unstable DRFs has evolved significantly over the past two decades, with a notable paradigm shift from dorsal to volar plating techniques. This evolution has been largely driven by advancements in implant technology, specifically the advent of anatomically contoured, angle-stable locking plates. These implants offer superior construct stability, improved articular reduction, and facilitate earlier functional rehabilitation compared to historical methods like K-wire fixation, external fixation, or dorsal plating.
The volar approach to the distal radius has emerged as the workhorse for addressing the vast majority of DRFs amenable to internal fixation. Its popularity stems from several key advantages: direct visualization of the critical volar articular surface and metaphysis, the ability to restore volar tilt effectively, and the capacity for robust fixation using modern locking plate systems. Furthermore, the volar approach provides an internervous plane that minimizes muscle dissection and often allows for better soft tissue coverage of the implant compared to dorsal approaches, thereby potentially reducing tendon irritation and rupture. Understanding the intricate surgical anatomy of the distal forearm and wrist, with particular emphasis on the flexor carpi radialis (FCR) tendon as a critical landmark, is paramount for minimizing iatrogenic complications and achieving optimal surgical outcomes.
Surgical Anatomy & Biomechanics
A thorough understanding of the anatomical structures encountered during the volar approach to the distal radius is indispensable for safe and effective surgical intervention.
Osteology of the Distal Radius
The distal radius exhibits several critical anatomical features that must be restored during fracture management:
*
Volar Tilt:
The articular surface is typically angled 11-12 degrees volarly relative to the radial shaft axis. Loss of volar tilt is a common sequela of DRFs and can lead to carpal instability and decreased grip strength.
*
Radial Inclination:
The radial styloid extends approximately 22-23 degrees distally compared to the ulnar styloid. This inclination is crucial for ulnar deviation.
*
Ulnar Variance:
The distal ulna typically lies at or slightly distal (0 to -2 mm) to the distal radius articular surface. Positive ulnar variance can lead to ulnocarpal impaction.
*
Articular Surface:
The distal radius articulates with the scaphoid and lunate through the scaphoid and lunate fossae. Intra-articular step-offs or gaps exceeding 1-2 mm are generally considered unstable and predispose to post-traumatic arthritis.
*
Watershed Line:
This is an important anatomical landmark on the volar aspect of the distal radius, representing the most distal extent of the pronator quadratus insertion. Volar plates are typically positioned proximal to this line to prevent flexor tendon irritation.
Soft Tissue Anatomy and Internervous Plane
The volar approach leverages a relatively safe internervous plane, minimizing muscular and neurovascular disruption.
- Skin and Subcutaneous Tissue: A longitudinal incision centered over the FCR tendon provides excellent access. Care must be taken to identify and protect superficial nerves.
- Palmar Cutaneous Branch of the Median Nerve: This purely sensory nerve typically emerges 5-7 cm proximal to the wrist crease, medial to the FCR tendon, and courses superficially over the flexor retinaculum. It supplies sensation to the radial aspect of the palm. Injury can lead to a painful neuroma or sensory deficit.
- Superficial Radial Nerve: While primarily on the dorsal aspect, its terminal branches can be encountered radially near the radial styloid.
-
Flexor Carpi Radialis (FCR) Tendon:
This is the most crucial surgical landmark for the volar approach.
- Origin: Medial epicondyle of the humerus.
- Course: It passes through a fibrous tunnel in the flexor retinaculum, forming a distinct groove in the trapezium, and inserts primarily onto the base of the second metacarpal, with slips to the third metacarpal.
- Function: Flexes and radially deviates the wrist.
- Relevance: The FCR tendon is easily palpable and serves as a reliable guide for the incision. Retraction of the FCR ulnarward creates a safe corridor.
- Radial Artery: Located immediately radial to the FCR tendon. It is the primary neurovascular structure to protect. The plane between the FCR tendon (retracted ulnarward) and the radial artery (retracted radially) is the primary internervous interval utilized.
- Flexor Digitorum Superficialis and Profundus: These tendons lie deep and ulnar to the FCR and radial artery.
- Flexor Pollicis Longus (FPL) Tendon: This tendon lies deep to the FCR and radial artery, within its own fibrous sheath, running along the radial aspect of the deep forearm compartment. Its muscle belly attaches to the volar aspect of the radius distal to the pronator quadratus.
- Median Nerve: Located ulnar to the FCR tendon and radial artery, deep to the flexor retinaculum, and typically does not lie within the immediate operative field if the approach is centered on the FCR. However, its proximity necessitates careful dissection and awareness, particularly when performing a concomitant carpal tunnel release.
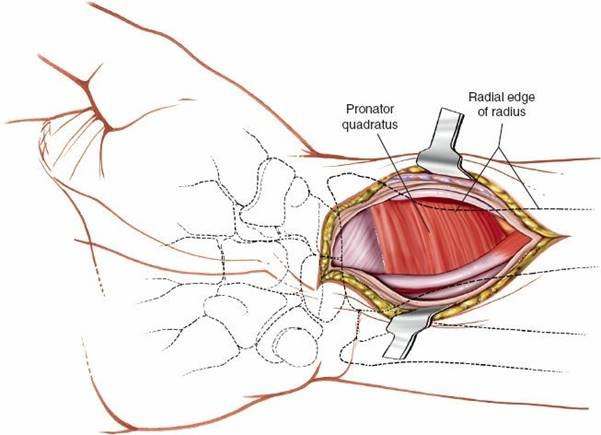
- Pronator Quadratus (PQ): This quadrangular muscle lies on the volar aspect of the distal radius and ulna, covering the metaphyseal area. It originates from the distal ulna and inserts onto the distal radius. The PQ is the deepest muscle in the forearm and must be elevated or incised to expose the distal radius. An L-shaped incision (vertical limb along the radial border, horizontal limb proximally) or a transverse incision are common approaches, allowing subperiosteal elevation to expose the fracture site. Preservation of its distal attachment aids in repair and restoration of pronation function.
Biomechanics of Distal Radius Fixation
Volar locking plates provide internal fixation that counters the deforming forces acting on a DRF. The locking screws, particularly those engaging the subchondral bone, create a fixed-angle construct, resisting collapse and maintaining reduction, especially in osteoporotic bone. The plate itself acts as a buttress against volar displacement and loss of volar tilt. Proper plate positioning, typically proximal to the watershed line, is crucial to prevent mechanical irritation of the FPL tendon. The biomechanical stability afforded by volar locking plates allows for early mobilization, which is critical for preventing joint stiffness and improving long-term functional outcomes.
Indications & Contraindications
The volar approach with locking plate fixation has become the standard for a wide range of distal radius fractures.
Indications for Operative Management via Volar Approach
- Unstable Distal Radius Fractures: These include fractures that are significantly displaced, highly comminuted, intra-articular with step-off or gap > 2mm, or show a propensity for secondary displacement after non-operative treatment.
- Loss of Radial Length: Radial shortening > 2-3 mm compared to the contralateral wrist.
- Loss of Radial Inclination: Radial inclination < 15 degrees.
- Loss of Volar Tilt: Dorsal angulation > 0 degrees (i.e., loss of normal volar tilt or frank dorsal angulation).
- Intra-articular Fractures: Any intra-articular step-off or gap > 1-2 mm, especially those involving the lunate facet.
- Open Distal Radius Fractures: After thorough debridement and irrigation.
- Associated Carpal Instability or Ligamentous Injuries: Where volar access is necessary for direct repair or stabilization.
- Malunions/Nonunions of the Distal Radius: Requiring corrective osteotomy, bone grafting, and stabilization.
- Excision of the Radial Styloid or Release of the Brachioradialis: Although less common, the volar approach can be adapted for these specific indications as noted in the seed content.
- Concomitant Carpal Tunnel Syndrome: A carpal tunnel release can be easily performed through the same incision.
Contraindications
-
Absolute Contraindications:
- Active infection at the surgical site.
- Severe soft tissue compromise (e.g., severe open injury with extensive contamination, severe burns) where implant coverage would be inadequate or risk of infection prohibitively high.
-
Relative Contraindications:
- Extensive dorsal comminution or instability requiring primary dorsal fixation or a combined approach (though rare).
- Patients with significant medical comorbidities that preclude safe anesthesia and surgery.
- Extremely osteoporotic bone where plate and screw purchase may be insufficient, potentially favoring external fixation or alternative less invasive techniques.
- Fracture patterns with primary dorsal displacement that may be better approached dorsally (e.g., isolated dorsal Barton's fracture, though often still amenable to volar fixation).
Table: Operative vs. Non-Operative Indications
| Indication Type | Operative Management (Volar Approach) | Non-Operative Management |
|---|---|---|
| Displacement | Dorsal angulation > 0°, Radial shortening > 2-3mm, Intra-articular step-off > 1-2mm, Loss of radial inclination > 5° from normal | Minimally displaced, stable fractures |
| Stability | Unstable fracture patterns (e.g., high-energy, comminuted, irreducible) | Stable fracture patterns, low risk of secondary displacement |
| Articular | Intra-articular involvement with step-off or gap > 1-2mm | Extra-articular, or minimally displaced intra-articular (e.g., <1mm step-off in low-demand patient) |
| Patient Factors | Younger, active patients; High functional demand; Failure of non-operative treatment; Neurological compromise (e.g., median nerve compression) | Elderly, low-demand patients; Significant medical comorbidities precluding surgery; Patient preference for non-operative treatment |
| Fracture Pattern | AO/OTA Type C, B (displaced intra-articular), Type A3 (unstable extra-articular) | AO/OTA Type A1, A2 (stable extra-articular); Select minimally displaced Type B, C fractures |
Pre-Operative Planning & Patient Positioning
Meticulous pre-operative planning and appropriate patient positioning are critical for successful outcomes and minimizing complications with the volar approach to the distal radius.
Pre-Operative Planning
-
Imaging Review:
- Plain Radiographs: Standard AP, lateral, and oblique views are essential for initial assessment of fracture pattern, displacement, and articular involvement.
- Computed Tomography (CT) Scan: Indispensable for intra-articular fractures. A CT scan with 1-2 mm cuts, including 3D reconstructions, provides detailed information on articular congruity, fragment orientation, comminution, and aid in surgical strategy (e.g., fragment-specific fixation, bone graft requirements). This helps to visualize the joint surface and identify critical articular fragments, particularly the volar lunate facet, which often requires direct reduction.
- Magnetic Resonance Imaging (MRI): Rarely indicated for acute DRFs, but may be considered if concomitant ligamentous injuries (e.g., TFCC tears) are suspected and would alter management.
- Implant Selection: Based on the fracture pattern and patient bone quality, select an appropriate volar locking plate system (e.g., fixed-angle, variable-angle, narrow, wide, specific for osteoporotic bone). Consider screw lengths and types (locking, non-locking, cortical, cancellous). Pre-contoured plates significantly aid in restoring anatomical parameters.
-
Surgical Strategy:
- Determine the planned incision length and location.
- Plan the reduction technique (e.g., ligamentotaxis, direct manipulation, K-wire joysticks).
- Decide on the extent of pronator quadratus elevation.
- Consider the need for bone grafting (autograft/allograft) for metaphyseal defects or void filling.
- Anticipate potential challenges (e.g., severe comminution, osteoporosis).
- Plan for intra-operative fluoroscopic views.
- Anesthesia and Tourniquet: Discuss with the anesthesia team regarding regional blocks (interscalene or supraclavicular brachial plexus block) for post-operative pain control, in addition to general anesthesia. A tourniquet placed high on the arm is routinely used to provide a bloodless field, which is crucial for identifying delicate neurovascular structures.
- Prophylactic Antibiotics: Administer intravenous broad-spectrum antibiotics (e.g., Cefazolin) typically 30-60 minutes prior to incision.
Patient Positioning
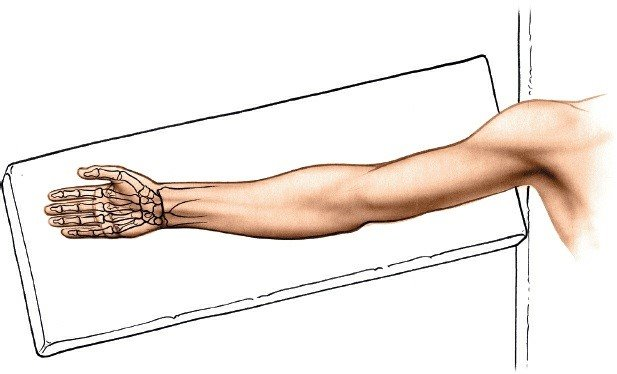
- Operating Table: Place the patient supine on the operating table.
- Arm Position: The affected arm is abducted approximately 90 degrees at the shoulder and positioned on a sterile hand table or an arm board. This allows for excellent access to the volar aspect of the forearm and wrist.
-
Forearm Supination:
The forearm is placed in a fully supinated position, with the palm facing upward. This orientation is critical as it presents the volar aspect of the distal radius directly to the surgeon, facilitates access to the plane between the FCR and radial artery, and often places the pronator quadratus under less tension.
- Exsanguination and Tourniquet Inflation: Apply an exsanguinating bandage (e.g., Esmarch bandage) from the fingertips proximally to the tourniquet cuff to minimize blood in the field. Inflate the tourniquet to a pressure typically 250-300 mmHg (or 100 mmHg above systolic blood pressure).
-
Sterile Prep and Drape:
Thoroughly prep and drape the entire limb from the shoulder to the fingertips, ensuring mobility of the digits and wrist for intra-operative manipulation and fluoroscopy.
Finger traps may be applied to the index and middle fingers and suspended from an overhead gantry to provide continuous longitudinal traction, aiding in fracture reduction through ligamentotaxis, especially for initial disimpaction.
Detailed Surgical Approach / Technique
The volar approach to the distal radius is a meticulous procedure requiring precise anatomical dissection and careful execution of reduction and fixation principles.
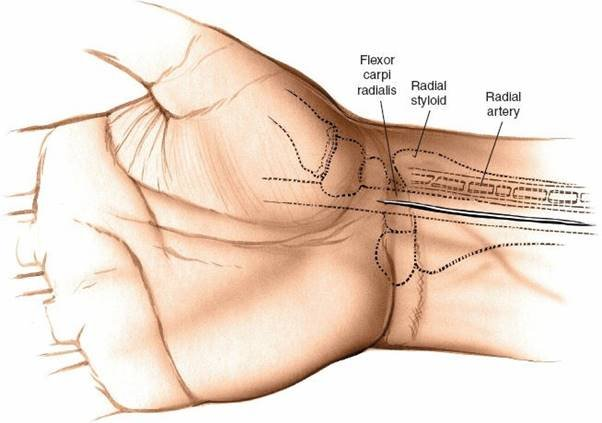
1. Landmarks and Incision
- Landmarks: Palpate the styloid process of the radius, which is the most distal part of the lateral side of the radius. Then move in an ulnar direction to palpate the prominent tendon of the flexor carpi radialis (FCR). Confirm the FCR tendon by having the patient gently flex and radially deviate the wrist against resistance (if awake/regional anesthesia).
-
Incision:
A longitudinal skin incision is made, typically 5-8 cm in length, centered directly over the FCR tendon. It starts just proximal to the wrist crease (e.g., 1-2 cm) and extends proximally up the forearm. For more proximal fractures or osteotomies, a longer incision may be necessary. Some surgeons prefer a slightly curved incision, concave radially, for improved cosmetic outcome and to avoid crossing skin creases perpendicularly.
2. Superficial Dissection and Identification of Neurovascular Structures
- Skin and Subcutaneous Tissue: Incise the skin with a scalpel. Carefully dissect through the subcutaneous fat using sharp dissection or small Metzenbaum scissors.
- Palmar Cutaneous Branch of the Median Nerve: Identify and protect the palmar cutaneous branch of the median nerve. This nerve typically courses superficially, 1-2 cm medial (ulnar) to the FCR tendon. It should be carefully retracted ulnarward or protected throughout the case.
- Superficial Radial Nerve: While less commonly encountered, its terminal branches should be protected if the incision extends too radially or distally toward the radial styloid.
- Deep Fascia: Incise the deep forearm fascia longitudinally, parallel to and directly over the FCR tendon sheath.
3. Deep Dissection and Internervous Plane Development
- FCR Tendon Exposure: Once the deep fascia is incised, the FCR tendon is clearly visible within its sheath.
-
Development of the Internervous Plane:
This is the critical step for accessing the distal radius safely.
- Retract the FCR tendon: Gently retract the FCR tendon in an ulnar direction.
-
Identify the Radial Artery:
The radial artery will be immediately radial (lateral) to the FCR tendon. Retract the radial artery, along with the brachioradialis muscle belly (if present more proximally), in a radial direction. This maneuver creates the safe internervous plane between the FCR (ulnar retraction) and the radial artery (radial retraction).
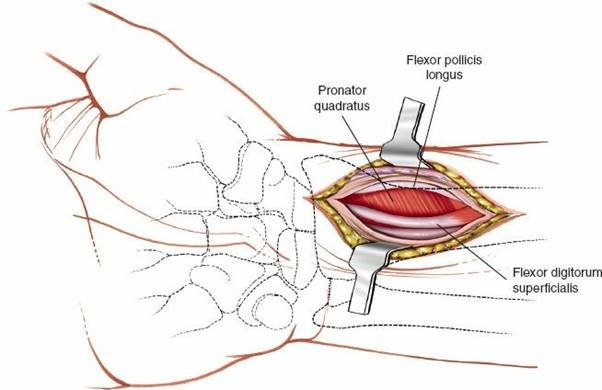
- Deep Tendons: Deeper to the FCR and radial artery, the tendons of flexor pollicis longus (FPL) and flexor digitorum profundus (FDP) will be visible. The FPL tendon typically lies in close proximity to the volar aspect of the radius.
-
Radial Recurrent Vessels:
Be prepared to ligate or cauterize small radial recurrent vessels that may cross the surgical field deep to the radial artery.
4. Exposure of the Distal Radius and Pronator Quadratus Management
-
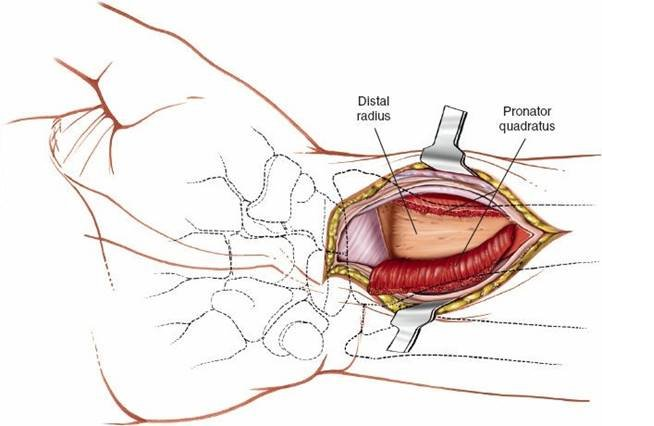
Pronator Quadratus (PQ):
The pronator quadratus muscle covers the volar aspect of the distal radius. To expose the fracture site, the PQ must be elevated subperiosteally.
- Incision: Typically, an L-shaped incision is made in the PQ. The vertical limb is along the radial border of the PQ, and the horizontal limb is made proximally, approximately 1-2 cm distal to the proximal extent of the muscle. Some surgeons prefer a transverse incision across the muscle belly.
- Elevation: Subperiosteally elevate the PQ from its origin on the ulna and its insertion on the radius. Preserve the distal attachment of the PQ to the radius whenever possible, as this facilitates repair at closure and helps restore pronation strength. Careful elevation minimizes disruption of the muscle's neurovascular supply.
- Fracture Exposure: Once the PQ is elevated, the volar aspect of the distal radius and the fracture fragments are fully exposed. Evacuate any hematoma to clearly visualize the fracture lines and articular surface.
5. Fracture Reduction
- Traction: If not already in place, apply longitudinal traction (e.g., using finger traps) to help disimpact the fracture and restore initial length.
-
Direct Visualization and Manipulation:
Using periosteal elevators, bone hooks, and K-wires as joysticks, directly manipulate the fracture fragments. The goal is to restore anatomical alignment, including:
- Volar Tilt: Correct dorsal angulation and restore the normal volar tilt.
- Radial Inclination: Restore radial length and inclination.
- Articular Congruity: This is paramount. Directly reduce intra-articular fragments under fluoroscopic guidance and direct vision. A small ball-tipped probe or dental pick can be useful to feel for and reduce articular step-offs or gaps. An arthroscope may be utilized in complex intra-articular fractures to confirm reduction.
- Temporary Fixation: Once reduction is achieved, maintain it with temporary K-wires.
6. Plate Application and Fixation
- Plate Selection and Positioning: Select the appropriate volar locking plate. Position the plate on the volar aspect of the distal radius, typically 2-3 mm proximal to the "watershed line" (a ridge on the volar aspect of the distal radius where the FPL tendon can impinge if the plate is too distal). This positioning minimizes the risk of flexor tendon irritation or rupture, particularly the FPL.
- Proximal Fixation: Secure the proximal shaft of the plate to the radial diaphysis using cortical or locking screws. Ensure bicortical purchase for stability.
-
Distal Fixation:
Insert locking screws into the distal fragments, aiming for subchondral bone support.
- Fluoroscopic Guidance: Use fluoroscopy (AP, lateral, and oblique views) extensively to confirm screw length and trajectory, ensuring no intra-articular penetration.
- Variable-Angle Screws: If using a variable-angle plate, utilize the ability to target specific articular fragments and achieve optimal subchondral support.
-
Lag Screws:
Consider non-locking lag screws for interfragmentary compression if significant articular fragments are present and can be compressed.

- Final Assessment: Perform final fluoroscopic checks in multiple planes to confirm anatomical reduction, appropriate plate placement, and satisfactory screw positions. Check active and passive range of motion of the wrist and fingers to rule out mechanical impingement.
7. Wound Closure
- Pronator Quadratus Repair: Reattach the elevated pronator quadratus muscle if possible. This can be done by suturing it back to its periosteal attachment or by passing sutures through drill holes in the radial cortex. Repairing the PQ helps to cover the plate, providing a soft tissue barrier that reduces the risk of flexor tendon irritation and rupture.
- Fascial Closure: Close the deep fascia over the FCR tendon.
- Subcutaneous Closure: Approximate subcutaneous tissues with absorbable sutures.
- Skin Closure: Close the skin with non-absorbable sutures or staples.
- Dressing and Splint: Apply a sterile dressing and a well-padded volar or sugar-tong splint for initial immobilization. Ensure the wrist is in a neutral to slight flexion position.
Complications & Management
While the volar approach with locking plates has significantly improved outcomes for DRFs, complications can still occur. A thorough understanding of these potential issues is crucial for prompt recognition and appropriate management.
Neurological Complications
-
Median Nerve Neuropathy (Carpal Tunnel Syndrome):
- Incidence: Up to 15-20% post-fracture, with surgery increasing risk if carpal tunnel is not adequately decompressed.
- Etiology: Pre-existing compression, acute trauma leading to hematoma/edema within the carpal tunnel, or plate/screw impingement.
- Management: Prophylactic carpal tunnel release can be performed concomitantly. For acute post-op CTS, elevate the limb, monitor. If severe or progressive, surgical decompression (release of flexor retinaculum) is indicated. For chronic CTS, surgical release is standard.
-
Palmar Cutaneous Branch of the Median Nerve Injury:
- Incidence: Varies, 5-10%.
- Etiology: Direct transection or traction during incision/retraction.
- Management: Careful identification and retraction during surgery. If transected, a painful neuroma can develop. Management includes local steroid injection, nerve blocks, or surgical excision of the neuroma with burying into muscle/bone or nerve grafting if a significant defect.
-
Superficial Radial Nerve (SRN) Injury:
- Incidence: Less common with a properly centered volar approach, but can occur with radial extension of the incision.
- Etiology: Direct trauma or retraction.
- Management: Prevention through careful surgical technique. Symptomatic neuromas may require surgical excision or neurolysis.
Tendon Complications
-
Flexor Pollicis Longus (FPL) Rupture:
- Incidence: 0.5-3%, most common tendon complication.
- Etiology: Plate or screw prominence, particularly if positioned distal to the watershed line, causing mechanical abrasion. Delayed FPL rupture (Weeks to months post-op).
- Management: Prevention by careful plate positioning and ensuring no screw prominence. If FPL rupture occurs, treatment depends on the timing and patient factors: tendon repair (direct or interpositional graft), tendon transfer (e.g., FDS to FPL), or tenodesis if proximal stump is short. Hardware removal is typically a prerequisite.
-
Other Flexor Tendon Irritation/Rupture:
Less common than FPL but can occur.
- Etiology: Similar to FPL, due to prominent hardware.
- Management: Hardware removal, tenolysis, or tendon repair/transfer as indicated.
Vascular Complications
-
Radial Artery Injury:
- Incidence: Rare, <1%.
- Etiology: Direct laceration during dissection or excessive retraction.
- Management: Careful technique, clear identification, and gentle retraction. If injured, primary repair with fine sutures is indicated, often requiring vascular surgeon consultation. If minor, ligation may be acceptable if the ulnar artery provides adequate collateral flow (Allen's test).
Infection
-
Incidence:
<2% for superficial infections, <1% for deep infections.
- Etiology: Contamination during surgery.
- Management: Superficial infections often respond to oral antibiotics and local wound care. Deep infections (osteomyelitis) require surgical debridement, irrigation, hardware removal (if stable fracture union), and prolonged intravenous antibiotic therapy.
Malunion/Nonunion
-
Incidence:
Malunion (loss of anatomical parameters) is more common (up to 10-15% with some residual deformity), nonunion is rare (<1%).
- Etiology: Inadequate reduction, poor surgical technique, inadequate fixation, severe comminution, patient non-compliance.
- Management: Malunion may be asymptomatic or cause pain, stiffness, or functional impairment. Symptomatic malunion may require corrective osteotomy with internal fixation and bone grafting. Nonunion requires revision surgery, often with bone grafting and more rigid fixation.
Implant-Related Complications
-
Plate Prominence/Impingement:
- Incidence: Variable, contributing to tendon issues.
- Etiology: Improper plate selection or positioning.
- Management: Hardware removal, particularly if symptomatic.
-
Screw Back-out/Loosening/Breakage:
- Incidence: Low with locking plates.
- Etiology: Poor bone quality, inappropriate screw length, technical error.
- Management: Revision surgery, potentially with bone grafting, longer screws, or a different plate.
Complex Regional Pain Syndrome (CRPS)
-
Incidence:
1-5%.
- Etiology: Unclear, but often associated with trauma and surgery. Early mobilization and pain control are thought to reduce risk.
- Management: Multimodal approach involving physical therapy, occupational therapy, pain management specialists (nerve blocks, medications like gabapentin, amitriptyline), psychological support. Early diagnosis and intervention are key.
Table: Common Complications, Incidence, and Salvage Strategies
| Complication | Incidence (%) | Etiology | Salvage Strategy |
|---|---|---|---|
| Median Neuropathy (CTS) | 5-20 | Hematoma, edema, plate impingement, pre-existing | Carpal tunnel release, elevation, conservative management |
| Palmar Cutaneous Nerve Injury | 5-10 | Direct trauma/retraction | Careful technique, neuroma excision/burying, nerve block |
| FPL Rupture | 0.5-3 | Plate/screw prominence, mechanical abrasion | Hardware removal, tendon repair/transfer, tenodesis |
| Radial Artery Injury | <1 | Direct laceration, excessive retraction | Primary repair, ligation (with adequate collaterals) |
| Infection (Deep) | <1 | Intra-operative contamination | Debridement, I&D, antibiotics, hardware removal (if union stable) |
| Malunion | 5-15 | Inadequate reduction/fixation | Corrective osteotomy, internal fixation, bone grafting |
| Nonunion | <1 | Significant bone loss, unstable fixation | Revision surgery, bone grafting, rigid fixation |
| Plate Prominence | Variable | Improper plate selection/positioning | Hardware removal |
| Complex Regional Pain Syndrome | 1-5 | Traumatic event, surgery | Multimodal pain management, PT/OT, nerve blocks, medications |
Post-Operative Rehabilitation Protocols
Post-operative rehabilitation following volar plating of distal radius fractures is crucial for optimizing functional recovery, minimizing stiffness, and preventing complications. Protocols are typically individualized based on fracture stability, bone quality, patient compliance, and surgeon preference. The inherent stability of modern volar locking plates generally allows for early, protected mobilization.
Phase 1: Immobilization and Early Protected Motion (Weeks 0-2)
- Immobilization: The wrist is typically immobilized in a well-padded volar or sugar-tong splint for 1-2 weeks. The splint keeps the wrist in a neutral to slightly flexed position, limiting extreme range of motion while allowing for elbow and shoulder movement.
-
Pain and Edema Management:
- Elevation of the hand above heart level (e.g., sling or pillow support) to reduce swelling.
- Cryotherapy (ice packs) to reduce pain and inflammation.
- Analgesics as prescribed.
-
Early Motion (Non-wrist):
- Finger and Thumb ROM: Patients are encouraged to perform gentle active range of motion exercises for the fingers and thumb immediately to prevent stiffness and facilitate circulation. This includes full flexion and extension of all digits.
- Elbow and Shoulder ROM: Active range of motion exercises for the elbow and shoulder are initiated immediately to prevent stiffness in these joints.
Phase 2: Gradual Mobilization and Gentle Strengthening (Weeks 2-6)
- Transition from Splint: At approximately 2 weeks, if soft tissue healing is adequate and pain is controlled, the splint may be removed, and the patient may transition to a removable wrist brace for protection as needed, especially during activity or sleep. Some surgeons may continue a splint for longer (up to 4-6 weeks) depending on fracture stability and bone quality.
-
Wrist Range of Motion (ROM):
- Begin gentle active and passive wrist ROM exercises.
- Focus on achieving full pronation and supination first, followed by gradual wrist flexion and extension.
- Gravity-assisted exercises can be helpful.
- Avoid forceful manipulation or exercises that cause significant pain.
-
Light Strengthening (Isometric):
- Initiate gentle isometric exercises for wrist flexors, extensors, pronators, and supinators.
- No resistance initially.
- Scar Management: Begin scar massage once the wound is well-healed to prevent adhesions and improve tissue mobility.
Phase 3: Progressive Strengthening and Functional Return (Weeks 6-12)
- Increased ROM: Continue to work on achieving full pain-free wrist ROM.
-
Progressive Strengthening:
- Begin with light resistance exercises using therapy putty, light weights, or resistance bands.
- Gradually increase the intensity and variety of exercises for grip strength, wrist flexion/extension, and forearm rotation.
- Focus on eccentric and concentric muscle contractions.
- Functional Activities: Incorporate activities that mimic daily living tasks and work-related movements.
- Proprioception and Coordination: Exercises to improve wrist stability, balance, and fine motor control.
Phase 4: Advanced Strengthening and Return to Sport/Work (Weeks 12+)
- Advanced Strengthening: Continue to advance strengthening exercises to prepare for higher demand activities.
- Sport-Specific or Work-Specific Training: Tailored exercises to meet the specific demands of the patient's sport or occupation.
- Impact Loading: Gradually introduce activities involving impact loading or heavy lifting, based on radiographic evidence of bone healing and clinical assessment.
- Return to Activity: Full return to unrestricted activities, including sports, typically occurs between 3-6 months, depending on the severity of the injury, healing progress, and individual patient factors.
Role of Hand Therapy
Collaboration with certified hand therapists (occupational therapists or physical therapists) is paramount throughout the rehabilitation process. They provide expert guidance, manual therapy, customized exercise programs, orthotic fabrication, and patient education, significantly contributing to optimal functional recovery.
Summary of Key Literature / Guidelines
The landscape of distal radius fracture management has been shaped by a robust body of literature and evolving guidelines, largely endorsing the role of volar locking plate fixation.
-
Shift to Volar Plating:
Numerous studies, including systematic reviews and meta-analyses, have documented the superiority of volar locking plates over traditional methods (e.g., K-wires, external fixation) for unstable distal radius fractures. This superiority is primarily demonstrated in terms of improved anatomical reduction, greater construct stability, and earlier return to function, particularly in elderly and osteoporotic patients. The ability of locking plates to create fixed-angle constructs irrespective of bone quality is a significant advantage.
- Source: A key meta-analysis by Kwok et al. (2014) in the Journal of Bone & Joint Surgery (Am) compared volar locking plates to external fixation, showing improved functional outcomes and fewer complications with plates.
-
Anatomical Reduction and Functional Outcomes:
The primary goal of DRF treatment is to restore anatomical alignment and articular congruity. Studies consistently demonstrate that achievement of acceptable radiographic parameters (volar tilt >0°, radial length >10mm, articular step-off <2mm) correlates with better long-term functional outcomes and reduced rates of post-traumatic arthritis. Volar plating offers excellent potential for achieving and maintaining these parameters.
- Source: Orbay and Fernandez's work (e.g., 2004, J Hand Surg Am) provided foundational understanding and techniques for modern volar plating, emphasizing direct visualization and anatomical reduction.
-
Complication Profile:
While efficacious, the volar approach is not without its complications. Tendon irritation and rupture, especially of the FPL, remain a concern. Literature highlights the importance of precise plate positioning proximal to the watershed line and adequate soft tissue coverage (pronator quadratus repair) to mitigate this risk.
- Source: Reports from organizations like the AO Foundation emphasize surgical technique to avoid FPL complications. Studies by Ruch et al. (2009, J Bone Joint Surg Am) and other authors have detailed the incidence and prevention of FPL rupture.
-
Role of CT Imaging:
For intra-articular fractures, pre-operative CT imaging is widely recognized as essential for accurate fracture classification, detailed surgical planning, and identification of critical articular fragments, particularly the volar lunate facet, which can significantly influence the surgical approach and fixation strategy.
- Source: American Academy of Orthopaedic Surgeons (AAOS) guidelines for DRFs often recommend CT for complex articular injuries.
-
Rehabilitation Principles:
Current guidelines emphasize early, protected range of motion, facilitated by the stability of locking plate constructs. This approach aims to prevent stiffness and facilitate a quicker return to activities of daily living.
- Source: Rehabilitation protocols are often developed based on expert consensus and studies demonstrating the benefits of early mobilization (e.g., from institutions like the Mayo Clinic or AO Trauma).
-
Emerging Concepts and Controversies:
Ongoing research explores topics such as fragment-specific fixation, arthroscopy-assisted reduction, ideal plate design, and the management of associated ligamentous injuries. While volar plating remains the gold standard for most unstable DRFs, careful consideration of specific fracture patterns and patient comorbidities guides the optimal treatment choice. The debate on the necessity of routine hardware removal, especially in asymptomatic patients, continues.
- Source: Ongoing research published in journals like the Journal of Hand Surgery, Journal of Orthopaedic Trauma, and Injury continually refine our understanding and techniques.
In summary, the volar approach to the distal radius, leveraging the safe internervous plane identified by the FCR tendon and radial artery, combined with modern locking plate technology, represents a significant advancement in the surgical management of distal radius fractures. Adherence to meticulous surgical technique, comprehensive pre-operative planning, and structured post-operative rehabilitation protocols are paramount for achieving optimal functional outcomes and minimizing the risk of complications.
