Posterior Approach to the Humeral Diaphysis: Anatomy, Techniques & Radial Nerve Protection
Key Takeaway
The posterior approach to the humeral diaphysis offers extensive access for complex fractures, nonunions, and tumor excisions. Critical considerations include precise identification and protection of the radial nerve within the spiral groove, understanding triceps anatomy, and applying appropriate biomechanical fixation, such as plate osteosynthesis or retrograde intramedullary nailing, to ensure stable outcomes.
Optimal Humerus Posterior Approach: Maximize Access & Nerve Safety
Introduction & Epidemiology
The posterior approach to the humeral diaphysis is a fundamental surgical exposure in orthopedic trauma and reconstructive surgery. Classically described as an extensile approach, it affords unparalleled access to the posterior and posterolateral aspects of the lower three-fourths of the humerus, from the surgical neck proximally to the supracondylar region distally. This approach is particularly advantageous for managing complex diaphyseal fractures, nonunions, tumor excisions, and osteomyelitis affecting the posterior humerus, as well as for direct exploration of the radial nerve.
Fractures of the humeral shaft represent approximately 1-3% of all fractures, with a bimodal distribution affecting young males involved in high-energy trauma and elderly females with osteoporotic bone. While many humeral shaft fractures can be managed non-operatively, surgical intervention is indicated for displaced fractures, open fractures, segmental fractures, those with neurovascular compromise, and nonunions. The posterior approach, whether utilized for open reduction and internal fixation (ORIF) with plating or for retrograde intramedullary nailing, remains a cornerstone technique for achieving stable fixation and optimal outcomes. A critical consideration inherent to this approach is the protection and precise identification of the radial nerve, which has a predictable yet variable course within the spiral groove. Understanding its anatomical relationship with the humerus and the surrounding musculature is paramount for minimizing iatrogenic injury.
Surgical Anatomy & Biomechanics
A thorough understanding of the regional anatomy is indispensable for safe and effective execution of the posterior humeral approach. The key anatomical structures include the skin and subcutaneous tissues, the deep fascia, the triceps brachii muscle, and critically, the radial nerve and its accompanying profunda brachii artery.
The
triceps brachii muscle
forms the bulk of the posterior arm. It originates from three heads:
*
Long head:
Arises from the infraglenoid tubercle of the scapula.
*
Lateral head:
Originates from the posterior surface of the humerus, superior to the spiral groove.
*
Medial head:
Originates from the posterior surface of the humerus, inferior to the spiral groove.
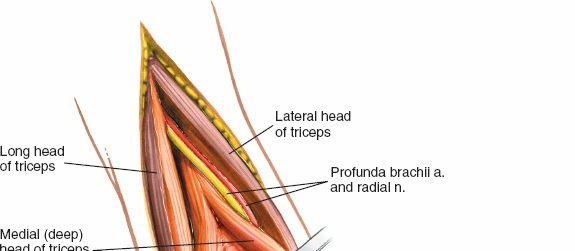
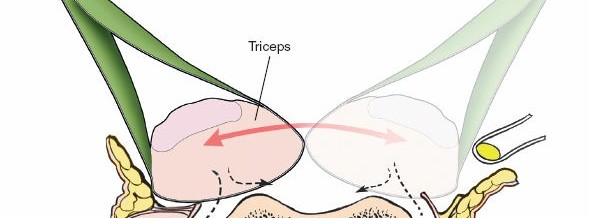
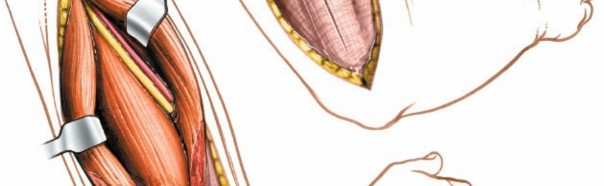
These three heads converge into a common tendon inserting onto the olecranon. The triceps provides a natural internervous plane for dissection. The plane between the long head and the lateral head, or more commonly, a split within the lateral head, provides access to the superior aspect of the spiral groove. A split between the medial and lateral heads, or directly through the medial head, provides access to the distal humerus.
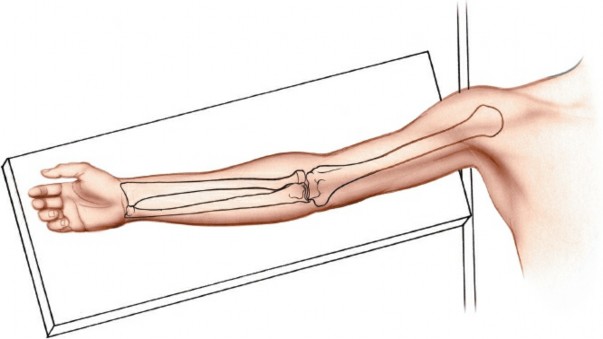
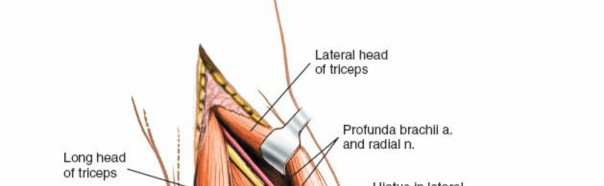
The radial nerve is the largest nerve of the brachial plexus and is the most frequently injured nerve in humeral shaft fractures. After exiting the axilla, it spirals distally and laterally around the posterior surface of the humerus within the spiral groove (or radial groove) . It is accompanied by the profunda brachii artery (deep brachial artery) , which is a branch of the brachial artery. The nerve typically crosses the lateral border of the humerus approximately 10-14 cm proximal to the lateral epicondyle, and then passes anteriorly into the anterior compartment. Its course is often between the lateral and medial heads of the triceps, and then between the brachialis and brachioradialis muscles in the distal arm. The nerve is most vulnerable in the middle third of the humerus where it lies in direct contact with the periosteum within the spiral groove. Proximal and distal to this region, it is somewhat protected by muscular coverings.
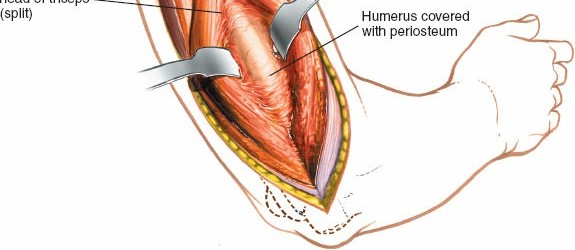
Illustration depicting the posterior course of the radial nerve in the spiral groove of the humerus, passing between the medial and lateral heads of the triceps.
Further distally, the radial nerve gives off branches to the triceps and anconeus muscles. Sensory branches also originate from the radial nerve in the posterior arm. Identifying and carefully protecting the radial nerve throughout the dissection is the cardinal principle of this approach.
Biomechanics
Fixation of humeral shaft fractures via the posterior approach typically involves plate osteosynthesis or intramedullary nailing.
*
Plate Osteosynthesis:
A posterior plate is typically applied directly to the posterior or posterolateral aspect of the humerus. Biomechanically, posterolateral plating for humeral shaft fractures offers favorable load sharing, especially against bending and torsional forces, given the relative lack of soft tissue coverage on the posterior aspect and the direct application to the tension side of the bone. Low-profile locked compression plates (LCPs) are commonly used, providing angular stability, which is particularly beneficial in osteopenic bone or comminuted fractures. Optimal plate length ensures adequate working length and screw purchase both proximally and distally, typically requiring 6-8 cortices of purchase on each side of the fracture.
*
Intramedullary Nailing:
Retrograde intramedullary nails can also be inserted via the posterior approach. This technique offers load-sharing capabilities and is often considered a less invasive option for certain fracture patterns, though careful consideration of the nail entry point through the olecranon fossa is crucial to avoid iatrogenic fracture or impingement. The posterior approach allows direct visualization for nail entry, reaming, and locking screw placement.
The choice between plating and nailing depends on fracture morphology, bone quality, patient comorbidities, and surgeon preference. Both methods, when properly applied through the posterior approach, aim to restore anatomical alignment, provide stable fixation for indirect healing, and permit early functional rehabilitation.
Cadaveric dissection demonstrating the posterior compartment musculature and the deep structures of the arm relevant to the posterior approach.
Indications & Contraindications
The posterior approach to the humerus is a versatile surgical exposure with well-defined indications in trauma, oncology, and reconstructive surgery. Careful patient selection and pre-operative planning are crucial for optimizing outcomes.
Indications:
1.
Open reduction and internal fixation (ORIF) of humeral shaft fractures:
* Displaced transverse, short oblique, or comminuted fractures, particularly in the middle and distal thirds of the humerus.
* Segmental fractures.
* Open fractures, especially Gustilo-Anderson Type II and III, where thorough debridement and stable fixation are required.
* Fractures associated with neurovascular injury, particularly radial nerve transection or entrapment, where direct exploration and repair/neurolysis are necessary.
* Fractures with ipsilateral elbow or shoulder injuries (floating elbow/shoulder).
* Pathological fractures where stable fixation is required for tumor resection or palliation.
2.
Treatment of humeral nonunions or malunions:
* Hypertrophic or atrophic nonunions, especially those associated with radial nerve involvement.
* Corrective osteotomies for symptomatic malunions.
3.
Exploration or repair of the radial nerve:
* Suspected radial nerve transection or entrapment in the spiral groove, particularly in sharp or highly displaced fractures.
* Progressive radial nerve palsy after conservative management.
* Delayed recovery of radial nerve function after an appropriate observation period (typically 3-6 months).
4.
Debridement and stabilization for osteomyelitis.
5.
Biopsy and excision of tumors or metastatic lesions affecting the posterior humerus.
6.
Insertion of retrograde humeral nails:
The posterior approach provides a direct view for appropriate entry point and nail insertion, especially beneficial in more distal fractures where a deltoid-splitting approach for antegrade nailing might be challenging or compromise rotator cuff integrity.
Contraindications:
*
Absolute Contraindications:
* Severe local soft tissue compromise (e.g., severe burns, active cellulitis at the incision site) unless the approach is part of the debridement and reconstruction plan for the soft tissue injury itself.
* Uncontrolled active infection at the surgical site (unless the surgery is specifically for infection control).
* Medical instability precluding general anesthesia or major surgery.
*
Relative Contraindications:
* Extremely proximal humeral shaft fractures (subcapital/surgical neck), which are often better accessed via anterior or anterolateral approaches.
* Certain distal intra-articular fractures (e.g., capitellum, trochlea) that may benefit from alternative exposures providing better articular visualization.
* Significant pre-existing scarring or radiation changes that may complicate dissection and healing.
* Patient refusal or inability to comply with post-operative rehabilitation.
Operative vs. Non-Operative Indications for Humeral Shaft Fractures
| Indication Type | Operative Management | Non-Operative Management |
|---|---|---|
| Fracture Pattern | - Displaced transverse, short oblique, comminuted fractures | - Minimally displaced or stable oblique/spiral fractures |
| - Segmental fractures | - Acceptable angulation (<20° anterior/posterior, <30° varus/valgus) and shortening (<3 cm) | |
| - Intra-articular extension (if specific for posterior access) | ||
| Open Fractures | - All Gustilo-Anderson Type I, II, III fractures | - N/A (all open fractures require operative management) |
| Associated Injury | - Radial nerve palsy (especially transection/entrapment), neurovascular injury | - Radial nerve palsy (neuropraxia) with improving trend or stable/resolving symptoms. |
| - Ipsilateral forearm fracture (floating elbow) | ||
| - Polytrauma requiring early mobilization | ||
| Pathology | - Pathological fractures (tumor, metastatic disease) | - N/A (typically requires stabilization for pain relief/function) |
| Nonunion/Malunion | - Symptomatic nonunions or malunions | - Asymptomatic nonunions (rarely non-operative if symptomatic) |
| Patient Factors | - Obese patients (difficult cast/brace management) | - Co-morbidities precluding surgery (relative) |
| - Patient requiring rapid functional recovery (e.g., bilateral injuries, wheelchair-bound) | - Patients able to tolerate a period of functional bracing or casting | |
| Other | - Impending skin compromise due to fracture fragment | - (For certain spiral/oblique patterns) Functional bracing (Sarmiento brace) as initial treatment, with close follow-up for alignment and healing. |
Pre-Operative Planning & Patient Positioning
Meticulous pre-operative planning is essential for a successful outcome, encompassing detailed imaging analysis, implant selection, and careful patient positioning.
Pre-Operative Planning
-
Imaging Review:
- Plain Radiographs: Anteroposterior (AP) and lateral views of the entire humerus, including the shoulder and elbow joints, are mandatory. These delineate fracture morphology, comminution, displacement, and rotational alignment.
- Computed Tomography (CT) Scan: Indicated for complex fracture patterns, articular involvement, nonunions, or when precise fracture geometry is required for templating or preoperative planning, especially for tumor resections. CT with 3D reconstructions can provide invaluable information regarding the spiral groove and radial nerve relationship to the fracture.
- Magnetic Resonance Imaging (MRI): Useful for evaluating soft tissue injuries, tumor extension, or nerve integrity if a radial nerve lesion is suspected beyond simple neuropraxia.
- Angiography/Doppler Ultrasound: If vascular injury is suspected, these modalities are critical.
-
Implant Selection & Templating:
- Plates: Locked compression plates (LCPs) are commonly used due to their angular stability. Plate length, screw diameter, and bicortical purchase are determined by fracture location and comminution. Templating on radiographs helps estimate plate length and screw requirements. Typically, 8-12 hole plates are used, ensuring 3-4 screws proximally and distally to the fracture.
- Nails: For retrograde nailing, nail length, diameter, and locking options are templated. The appropriate entry point in the olecranon fossa must be considered.
- Radial Nerve Consideration: Always assume the radial nerve is in jeopardy. Review imaging for fracture patterns commonly associated with radial nerve injury (e.g., highly displaced transverse or spiral fractures in the midshaft). Discuss with the patient the possibility of radial nerve exploration and the potential for temporary or permanent palsy.
- Equipment Check: Ensure all necessary instruments, drills, reamers, retractors (e.g., army-navy, Hohmann, malleable), and nerve protectors are available.
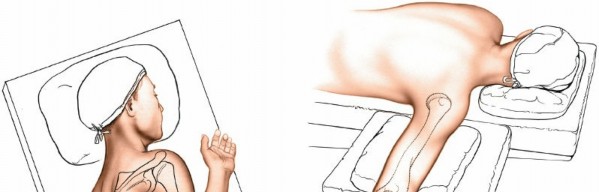
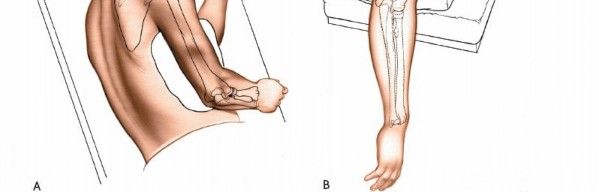
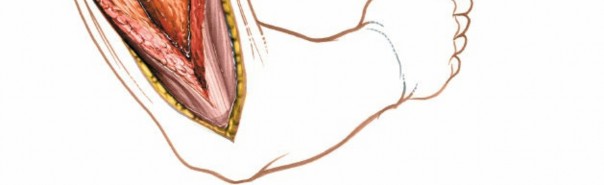
Patient Positioning
The choice of patient position is critical for optimal access, stability, and surgical ergonomics. The posterior approach can be performed in several positions, with prone and lateral decubitus being the most common. The seed content references Illustration 2-14B , indicating a specific positioning.
-
Lateral Decubitus Position:
- The patient is positioned on the unaffected side.
- The affected arm is draped free or supported on a padded arm rest.
- A beanbag or sandbag is placed under the ipsilateral shoulder, as per the original seed content's suggestion, to elevate the shoulder and allow the arm to hang freely.
- The elbow should be allowed to bend and the forearm to hang over the side of the table. This brings the posterior aspect of the humerus into an accessible plane.
- Careful padding of all bony prominences (e.g., contralateral elbow, iliac crest, malleoli) is crucial to prevent pressure neuropathies.
- This position is often preferred as it allows for easier conversion to an anterior approach if needed, and avoids the complexities of prone positioning.
-
 -
 - Positioning of the patient in lateral decubitus for the posterior approach, with the affected arm draped free and supported.
-
Prone Position:
- The patient is positioned prone on the operating table.
- Chest rolls or a specialized frame (e.g., Jackson table) are used to elevate the chest, allowing for free abdominal breathing and minimizing vena caval compression.
- The affected arm is positioned on an arm board, often abducted to 90 degrees and externally rotated, with the elbow flexed to expose the posterior aspect of the humerus.
- Alternatively, the arm can be left to hang freely over the side of the table, similar to the lateral decubitus setup, to allow easier manipulation and access to the entire length of the humerus.
- The head is turned to the contralateral side and padded.
- This position offers excellent visualization for long constructs and is particularly useful for proximal exposures or when performing a triceps-sparing approach.
Tourniquet Use:
The original seed content states: "A tourniquet should not be used because it will get in the way." While this is often true for the midshaft exposure with a proximal tourniquet, the decision is nuanced:
*
General Avoidance:
For typical midshaft exposures where the radial nerve lies in the spiral groove, a proximally placed tourniquet can obscure the proximal extent of the dissection, interfere with identifying the nerve's entry into the spiral groove, and limit the extensibility of the approach. Furthermore, a bloodless field can often be achieved with careful hemostasis and electrocautery.
*
Selective Use:
In certain situations, such as distal humeral exposures where the tourniquet is placed more proximally and does not interfere with the primary field, or for very vascular tumors, a tourniquet may be cautiously employed. If used, it should be inflated after careful exanguination, and operative time should be strictly monitored to prevent ischemic complications. A lower arm tourniquet can sometimes be used for distal exposures but offers less benefit for midshaft fractures. Ultimately, surgeon preference and specific clinical circumstances dictate its use. For most posterior humeral shaft approaches, many surgeons prefer to proceed without a tourniquet.
Draping: The limb should be draped sterilely to allow full manipulation of the arm, from the shoulder to the hand, to facilitate fracture reduction and radial nerve protection during various maneuvers.
Detailed Surgical Approach / Technique
The posterior approach to the humerus requires meticulous attention to anatomical planes and, most critically, the precise identification and protection of the radial nerve. The technique can vary slightly based on the specific location of the pathology and surgeon preference (e.g., triceps-splitting vs. triceps-sparing for more proximal/distal lesions). This outline focuses on a general extensile triceps-splitting approach suitable for mid-diaphyseal fractures.
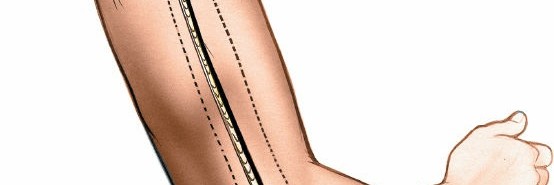
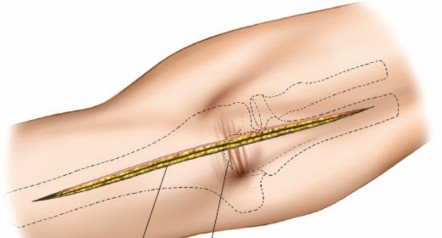
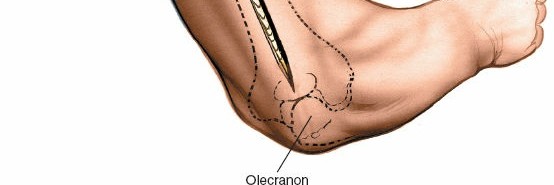
1. Skin Incision
- A straight longitudinal incision is made over the posterior aspect of the arm, centered on the fracture site.
- The incision extends from approximately 5 cm distal to the posterior deltoid insertion proximally, to just proximal to the olecranon fossa distally. This provides an extensile exposure.
- The length of the incision should be sufficient to expose healthy bone proximal and distal to the fracture, allowing for proper plate application and screw placement, typically 15-20 cm.
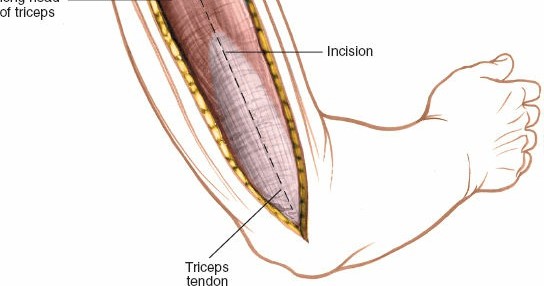
Pre-operative planning and marking of the skin incision for the posterior approach to the humerus.
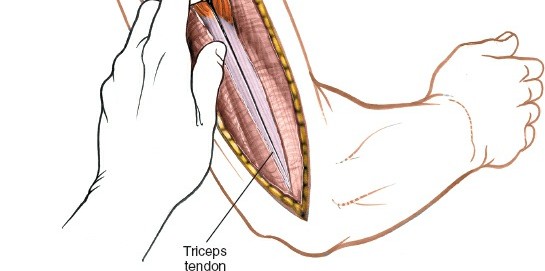
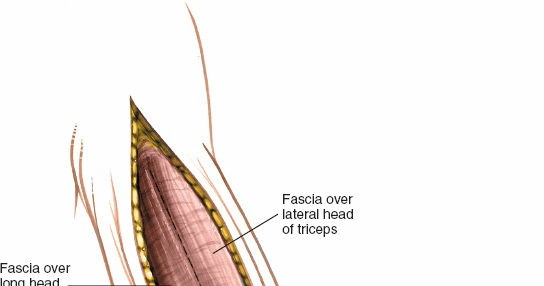
2. Superficial Dissection
- The skin incision is deepened through the subcutaneous tissue.
- Careful hemostasis of subcutaneous vessels is maintained.
- The deep fascia of the arm is identified and incised longitudinally along the midline of the triceps brachii muscle.

Incision of the deep fascia over the triceps muscle, exposing the underlying muscle belly.
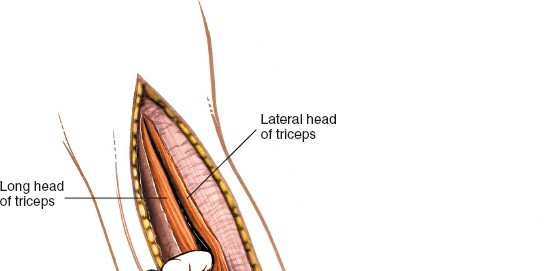
3. Triceps Dissection and Radial Nerve Identification
- The triceps muscle is exposed. The internervous plane between the long head (medially) and the lateral head (laterally) is identified, or a direct split through the lateral head of the triceps is performed. For midshaft exposure, a longitudinal split of the triceps is usually preferred.
-
Crucial Step: Radial Nerve Identification.
This is the most critical step to prevent iatrogenic injury.
- The radial nerve lies deep to the triceps, spiraling obliquely from medial to lateral across the posterior aspect of the humerus within the spiral groove.
- It is often helpful to start the search proximally, by dissecting along the medial border of the lateral head of the triceps or through the interval between the lateral and long heads. The nerve can often be found near the deltoid insertion, just as it begins its spiral course.
- Alternatively, for distal fractures, the nerve can be identified more distally as it emerges from beneath the brachialis and brachioradialis to enter the forearm.
- Once identified, the nerve should be carefully mobilized and protected with a vessel loop or Penrose drain throughout the remainder of the procedure. It is essential to remember that the profunda brachii artery accompanies the nerve.

Longitudinal splitting of the triceps muscle belly in the midline to gain access to the humeral shaft.
Intraoperative view demonstrating early identification of the radial nerve proximally, protected with a vessel loop.
The radial nerve (highlighted) traversing the spiral groove, mobilized and protected with a rubber vessel loop for clear visibility and safety.
Close-up view of the radial nerve isolated and gently retracted using a specialized nerve protector or vessel loop.
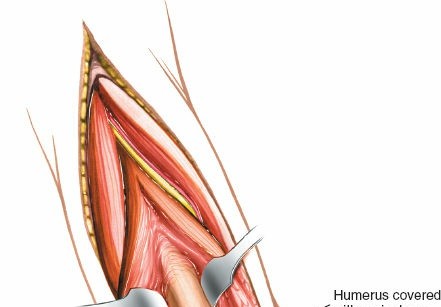
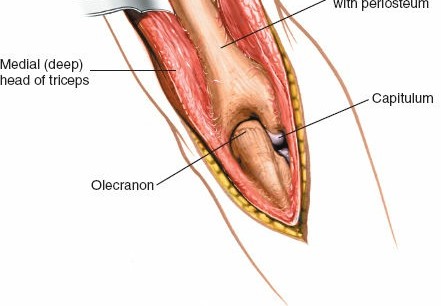
4. Exposure of the Humerus
- Once the radial nerve is identified and safely retracted, the triceps muscle is further retracted medially and laterally.
- The periosteum covering the posterior aspect of the humerus is incised longitudinally.
- Subperiosteal dissection is then performed, carefully elevating the periosteum off the bone to expose the fracture site and the required length of the humeral shaft for plate application. This subperiosteal plane helps protect the radial nerve and its branches.
- Maintain the radial nerve protection meticulously throughout this step. Malleable retractors or Hohmann retractors can be used to hold the muscle and nerve bundles away from the bone.

Exposure of the humeral shaft after triceps splitting and radial nerve protection, revealing the bone for fracture management.
5. Fracture Reduction and Temporary Fixation
- The fracture fragments are then anatomically reduced. This may involve indirect reduction techniques (e.g., traction, manipulation) or direct reduction using reduction clamps (e.g., Verbrugge, pointed reduction clamps).
- Temporary fixation with K-wires or bone-holding clamps is employed to maintain reduction and allow for plate application.
- Ensure that no soft tissues, especially the radial nerve, are caught within the fracture site or reduction clamps.

Intraoperative image showing the humeral fracture site exposed and initial reduction maneuvers being performed.
6. Definitive Fixation (Plate Osteosynthesis)
- A appropriately contoured plate (e.g., LCP) is selected. It should be long enough to span the fracture with at least 3-4 bicortical screws proximally and distally to the fracture.
- The plate is applied directly to the posterior or posterolateral aspect of the humerus.
- Conventional or locked screws are then inserted according to standard AO principles. For locked plating, ensure proper drill guide use and cortical screw purchase.
- Start with a compression screw if anatomical reduction is achievable, followed by locked screws to provide angular stability.
- Confirm appropriate screw length by direct measurement or intraoperative fluoroscopy. Avoid overly long screws that might impinge on soft tissues, or short screws lacking sufficient purchase.
- Ensure the radial nerve remains safely retracted and protected during all drilling and screw insertion. After the screws are placed, palpate carefully to ensure the nerve is not impinging on the hardware.

Application of a pre-contoured locking plate to the posterior aspect of the humerus, spanning the fracture site.

Insertion of locking screws through the plate into the humeral shaft, securing the fixation.
7. Definitive Fixation (Retrograde Intramedullary Nailing - Alternative)
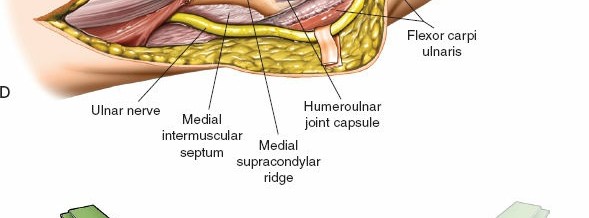
- For retrograde nailing, the entry point is made through the olecranon fossa, usually just proximal to the olecranon, ensuring it is slightly medial to avoid injury to the ulnar nerve proximally and the triceps tendon distally.
- The triceps splitting approach facilitates direct visualization of this entry point.
- The humeral canal is reamed to the appropriate diameter.
- The nail is carefully inserted retrogradely across the fracture site.
- Distal and proximal locking screws are inserted under fluoroscopic guidance, with careful soft tissue protection to avoid iatrogenic nerve or vessel injury during drill pass and screw insertion.
Retrograde intramedullary nail being advanced across the fracture site after reaming.
Precise entry point for retrograde nail insertion in the olecranon fossa, visualized through the posterior approach.

Fluoroscopic image guiding the insertion of distal locking screws for the retrograde humeral nail.
Fluoroscopic image guiding the insertion of proximal locking screws for the retrograde humeral nail.
8. Final Assessment and Wound Closure
- After definitive fixation, confirm stable fixation, anatomical alignment, and assess the range of motion of the elbow and shoulder if possible.
- Re-examine the radial nerve to ensure it is free from entrapment or excessive tension.
- Perform thorough irrigation of the wound.
- The triceps muscle is loosely reapproximated with absorbable sutures.
- The deep fascia is repaired.
- Subcutaneous tissues are closed, and the skin is closed with staples or sutures. A drain may be placed if significant bleeding or dead space is anticipated.
Post-fixation radiograph (or intraoperative image) demonstrating the final construct of the plate and screws in situ, providing stable fixation.

Layered closure of the deep fascia and subcutaneous tissues following plate fixation.
Skin closure using staples or sutures, completing the surgical procedure.
Complications & Management
Despite its effectiveness, the posterior approach to the humerus is associated with potential complications, primarily due to the close proximity of the radial nerve. A thorough understanding of these complications and their management is crucial for optimal patient care.
Common Complications and Management Strategies
| Complication | Incidence | Description | Salvage / Management Strategy |
|---|---|---|---|
| Radial Nerve Palsy | 10-20% (neuropraxia) | Most common complication. Can be pre-existing (fracture-related) or iatrogenic (surgical trauma, entrapment, transection). Manifests as wrist drop, inability to extend MCP joints, and sensory loss in radial distribution. Most iatrogenic palsies are neuropraxic due to traction/contusion and resolve spontaneously. |
Pre-existing:
Observe for spontaneous recovery (up to 6 months). Electromyography (EMG) and nerve conduction studies (NCS) at 3-6 weeks to assess prognosis. If no signs of recovery, consider exploration.
Intraoperative Iatrogenic: If identified during surgery, repair transection immediately. If neuropraxia suspected, ensure no entrapment/compression by hardware. Postoperative Iatrogenic: Observe for 3-6 months. If no recovery, perform EMG/NCS. Consider re-exploration if no signs of reinnervation or worsening symptoms. Tendon transfers (e.g., pronator teres to ECRB, FCR to EDC, palmaris longus to EPL) for persistent wrist/finger extension deficits after 12-18 months. |
| Nonunion / Malunion | 5-10% (nonunion) | Failure of bone healing or healing in an unacceptable alignment. Risk factors include severe comminution, open fractures, infection, poor fixation, smoking, and inadequate soft tissue coverage. |
Nonunion:
Revision surgery with removal of failed hardware, debridement of fibrous tissue, refresh bone ends, strong biological augmentation (autograft, allograft, DBM), and rigid internal fixation (often longer plate, different construct). Consider intramedullary nail conversion. Address underlying factors (e.g., infection).
Malunion: Corrective osteotomy and stable fixation if symptomatic and functionally limiting. |
| Infection | 1-5% | Superficial or deep wound infection. Risk factors include open fractures, prolonged surgery, poor soft tissue handling, and immunocompromise. |
Superficial:
Oral antibiotics, local wound care.
Deep: Surgical debridement, thorough irrigation, intravenous antibiotics based on cultures. May require hardware removal and external fixation for severe cases. Management may involve multiple stages. |
| Hardware Failure | <5% | Breakage of plate or screws, screw pullout, or loosening. Often a sequela of nonunion or inadequate initial fixation. | Revision surgery with removal of failed hardware, address underlying nonunion (if present), and re-fixation with a stronger construct. May involve change in fixation modality (e.g., plate to nail or vice-versa, or dual plating). |
| Hemorrhage / Hematoma | Uncommon (significant) | Intraoperative bleeding or postoperative hematoma formation. Can cause compartment syndrome (rare in arm) or increase infection risk. | Careful intraoperative hemostasis. Postoperative drain if indicated. Evacuation of symptomatic hematomas. Monitor for signs of compartment syndrome (rare but critical). |
| Adhesions / Stiffness | Variable | Formation of scar tissue leading to restricted range of motion, particularly at the elbow or shoulder. | Early, supervised physical therapy to maintain joint mobility. Aggressive range of motion exercises. Surgical release of adhesions if conservative management fails to improve motion after 6-12 months. |
| Refracture | Rare | Fracture occurring through the healed bone or at an implant site after hardware removal. | Treat as a new fracture, often requiring surgical stabilization. Careful consideration of timing for hardware removal, ensuring complete radiographic healing, is important. Gradual return to activity post-hardware removal. |
| Cosmetic Deformity | Low | Prominent hardware, widened scar. | Patient counseling. For prominent hardware, removal after healing. Scar revision if significantly symptomatic. |
Typical post-operative dressing applied after the posterior approach.
Post-Operative Rehabilitation Protocols
Post-operative rehabilitation following a posterior approach to the humerus is critical for optimizing functional recovery, preventing stiffness, and ensuring successful bone healing. Protocols are individualized based on fracture stability, type of fixation, patient comorbidities, and surgeon preference.
Immediate Post-Operative Period (Days 0-14)
-
Immobilization:
- Sling: The arm is typically placed in a sling for comfort and support.
- Functional Brace: In some stable constructs (e.g., highly stable plating, well-locked nailing), a functional humeral brace may be applied immediately or within the first week to provide additional support while allowing some controlled motion.
- Pain Management: Aggressive pain management with multimodal analgesia (opioids, NSAIDs, acetaminophen) to facilitate early mobilization.
- Edema Control: Elevation of the arm, gentle compression, and cryotherapy to minimize swelling.
-
Early Motion (Active Assisted & Passive):
- Hand and Wrist: Immediate active range of motion (ROM) exercises for the hand, wrist, and fingers to prevent stiffness and promote venous return. Radial nerve function (if present pre-op) should be assessed and documented.
- Elbow: Depending on the stability of fixation and fracture location, gentle active-assisted and passive elbow flexion/extension may begin within the first few days, particularly for midshaft fractures that do not involve the distal articular segment. The goal is to prevent elbow stiffness.
- Shoulder: Pendulum exercises and passive shoulder ROM (flexion, abduction, rotation) to tolerance, typically within a pain-free arc to prevent shoulder stiffness. Avoid active external rotation or abduction initially, especially if the approach involved extensive proximal dissection.
- Weight Bearing: Non-weight-bearing through the affected arm is strictly enforced.
Early Rehabilitation Phase (Weeks 2-6)
-
Continued Motion:
- Progressive increase in active and passive ROM for the shoulder and elbow, guided by pain and stability.
- Emphasis on achieving full elbow extension to prevent contracture.
- For humeral shaft fractures, generally aim for full elbow and shoulder ROM by 6-8 weeks.
-
Light Strengthening (Isometric):
- Begin gentle isometric exercises for the shoulder and elbow musculature (e.g., biceps, triceps, deltoid, rotator cuff) if fixation is deemed stable enough.
- Functional Activities: Gradual reintroduction of light, pain-free activities of daily living (ADLs).
-
Radial Nerve Palsy Management:
- If pre-existing or iatrogenic radial nerve palsy is present, continue splinting (dynamic wrist/finger extension splint) to prevent contractures and facilitate function.
- Nerve gliding exercises.
- Regular re-evaluation of nerve function.
Intermediate Rehabilitation Phase (Weeks 6-12)
- Radiographic Assessment: Obtain follow-up radiographs to assess fracture healing and alignment. Progression of rehabilitation is contingent on radiographic evidence of callus formation or early union.
-
Progressive Strengthening:
- As healing progresses, advance to isotonic strengthening exercises for the shoulder, elbow, and wrist.
- Initially with light resistance bands, progressing to light weights.
- Focus on global upper extremity strength and endurance.
- Functional Use: Increased use of the extremity for functional tasks, avoiding heavy lifting or repetitive forceful movements.
- Scar Management: Begin scar massage and desensitization if the wound is well-healed to prevent adhesions and improve pliability.
Advanced Rehabilitation Phase (Weeks 12+)
-
Full Strength & Endurance:
- Continue progressive resistance exercises to restore full strength, power, and endurance.
- Incorporate eccentric and plyometric training as appropriate for the patient's goals.
-
Return to Activity:
- Gradual return to sport-specific or work-specific activities, ensuring full pain-free ROM and adequate strength.
- Contact sports or heavy lifting are typically restricted until complete radiographic union and full strength recovery, often 4-6 months post-operatively.
- Hardware Removal: If hardware removal is planned (e.g., for symptomatic hardware or in younger, highly active individuals), it is typically performed after complete radiographic union, usually 12-18 months post-surgery. A period of protection is required after hardware removal.
Throughout all phases, close collaboration between the surgeon, physical therapist, and occupational therapist is essential to tailor the protocol to individual patient needs and monitor progress effectively.
Summary of Key Literature / Guidelines
The posterior approach to the humerus has a long-standing history as a reliable and effective method for addressing various pathologies of the humeral diaphysis. Modern literature and guidelines consistently emphasize the following key principles:
- Radial Nerve Protection is Paramount: Numerous studies underscore the critical importance of identifying and protecting the radial nerve. While transient iatrogenic radial nerve palsy can occur due to traction or contusion, meticulous surgical technique significantly reduces the risk of permanent injury. A clear understanding of the variable anatomical course of the radial nerve, especially its exit from the spiral groove, is crucial. Intraoperative localization with electrophysiological monitoring (if available) can provide an added layer of safety in complex cases.
- Plate Osteosynthesis as Gold Standard: For most humeral shaft fractures requiring surgical intervention via the posterior approach, plate osteosynthesis, particularly with modern locked plating systems, is considered the gold standard. It provides stable fixation allowing for early mobilization and high union rates (typically >90%). The biomechanical advantages of posterolateral plating for resisting bending and torsional forces are well-documented.
- Intramedullary Nailing as a Viable Alternative: Retrograde intramedullary nailing through the posterior approach is an established alternative, especially for more distal diaphyseal fractures, pathological fractures, or in polytrauma settings. It offers a load-sharing construct and may reduce periosteal stripping. However, concerns regarding potential elbow irritation from the entry point and distal locking remain.
- Management of Radial Nerve Palsy with Fractures: Current guidelines generally advocate for non-operative management of radial nerve palsy associated with closed humeral shaft fractures, observing for spontaneous recovery over 3-6 months. Surgical exploration is indicated for open fractures with nerve deficits, highly displaced fractures with persistent nerve palsy, or lack of recovery after the observation period, particularly if transection is suspected. The posterior approach is ideal for direct visualization and repair.
- Role in Nonunions and Complex Cases: The extensile nature of the posterior approach makes it invaluable for treating humeral shaft nonunions, where extensive debridement, bone grafting, and revision fixation are often required. It also provides excellent access for tumor resection and osteomyelitis debridement.
- Functional Rehabilitation: Early, structured rehabilitation is emphasized across all patient groups to prevent stiffness and optimize functional recovery. Immobilization should be minimized once stable fixation is achieved.
Recent advances in implant design, such as anatomically contoured locking plates, and improved understanding of radial nerve anatomy have further refined the safety and efficacy of the posterior humeral approach. Continued adherence to sound surgical principles, meticulous technique, and comprehensive post-operative care remain the cornerstones for achieving excellent patient outcomes.
Clinical & Radiographic Imaging
You Might Also Like