Minimally Invasive Anterolateral Approach for Proximal Tibia Fractures: Perfecting Soft Tissue Preservation
Key Takeaway
The minimally invasive anterolateral approach for proximal tibia fractures preserves soft tissue integrity through precise incision placement and meticulous handling. It aims to enhance vascularity, reduce infection, and expedite recovery by achieving stable fixation while minimizing risks to critical neurovascular structures like the common peroneal nerve. This optimizes patient outcomes and reduces surgical morbidity.
Minimally Invasive Proximal Tibia: Perfecting the line of the skin
Introduction & Epidemiology
Proximal tibia fractures represent a significant portion of lower extremity trauma, often resulting from high-energy mechanisms, though low-energy falls can also cause them in osteoporotic individuals. The complex anatomy of the proximal tibia, characterized by its load-bearing capacity, articulation with the femur and fibula, and proximity to critical neurovascular structures, renders these injuries challenging to manage. While traditional open approaches offer direct visualization, they are often associated with extensive soft tissue dissection, increased rates of wound complications, infection, and delayed union.
The evolution of surgical techniques has seen a paradigm shift towards minimally invasive approaches, particularly for metaphyseal and select articular fractures of the proximal tibia. These approaches aim to preserve soft tissue integrity, enhance vascularity, reduce infection rates, and facilitate earlier functional recovery, all while achieving stable anatomical reduction and fixation. The anterolateral approach, in particular, offers safe and direct access for open reduction and internal fixation of proximal tibial fractures. It is most beneficial for fractures that do not overtly involve the joint surface, or where the intra-articular component can be reduced and stabilized indirectly without broad arthrotomy.
The goal of "perfecting the line of the skin" in minimally invasive proximal tibia surgery transcends mere cosmesis; it embodies a meticulous understanding of underlying anatomy, fracture mechanics, and soft tissue biology. Precise incision placement and judicious tissue handling are paramount to minimizing soft tissue compromise, reducing surgical morbidity, and optimizing long-term patient outcomes. This comprehensive review will delve into the critical aspects of the minimally invasive anterolateral approach, from meticulous pre-operative planning to post-operative rehabilitation, emphasizing strategies for achieving superior results while mitigating potential complications.
Surgical Anatomy & Biomechanics
A thorough understanding of the regional anatomy is indispensable for the safe and effective application of minimally invasive techniques to the proximal tibia.
Bony Anatomy
The proximal tibia consists of the medial and lateral condyles, the tibial plateau (bearing the articular surface), the tibial tuberosity, and the tibial metaphysis. The lateral condyle is less robust than the medial and is more commonly affected by fracture patterns, often involving the lateral articular surface. The anterolateral aspect of the proximal tibia is relatively subcutaneous, making it accessible but also vulnerable to direct trauma and soft tissue injury.
Soft Tissue Anatomy
The skin and subcutaneous tissue overlying the anterolateral aspect of the proximal tibia are typically thin, particularly distally. This region is supplied by branches of the anterior tibial artery and recurrent genicular arteries. Lymphatic drainage and venous return are also crucial considerations, as compromise can exacerbate swelling.
Musculature
The anterolateral compartment of the leg contains the tibialis anterior, extensor hallucis longus, extensor digitorum longus, and fibularis (peroneus) tertius muscles. The fascial envelope of this compartment is taut, rendering it susceptible to compartment syndrome following trauma or extensive surgery.
The tibialis anterior muscle originates from the lateral condyle and proximal two-thirds of the lateral surface of the tibia, inserting into the medial cuneiform and base of the first metatarsal. Its anterior location makes it a key landmark and potential barrier to direct bony access.
Neurovascular Structures
The most critical neurovascular structures at risk during an anterolateral approach to the proximal tibia include:
*
Common Peroneal Nerve:
Courses posterolateral to the fibular neck, then bifurcates into the superficial and deep peroneal nerves. It is particularly vulnerable during extensive dissection around the fibular head and neck, or with over-retraction.
*
Deep Peroneal Nerve:
Descends within the anterior compartment, running on the interosseous membrane. Distal screw placement, especially with stab incisions, carries a risk of injury to this nerve as it approaches the ankle joint.
*
Anterior Tibial Artery:
Also courses within the anterior compartment on the interosseous membrane. Like the deep peroneal nerve, it is at risk during distal screw placement, particularly if longer than 10-hole plates are utilized and formal dissection of distal windows is not performed.
*
Saphenous Vein and Nerve:
Medial to the approach, but could be injured with overly aggressive medial retraction or misplaced medial incisions.
*
Recurrent Genicular Arteries:
These vessels provide rich vascularity to the knee joint capsule and proximal tibia. They can be encountered and should be cauterized or ligated if transected.
The anterolateral approach itself typically exploits an internervous plane, or more accurately, an intermuscular plane, between the tibialis anterior anteriorly and the extensor digitorum longus/fibularis longus laterally. The anterior tibial artery and deep peroneal nerve generally lie deep to the tibialis anterior, protected by it, but come into proximity with the tibia more distally.
Biomechanics
The proximal tibia is subjected to significant axial and rotational loads. Fractures here often disrupt the normal load-sharing mechanisms, leading to instability. The goal of fixation is to restore articular congruity (if involved) and achieve stable metaphyseal fixation to allow for early motion and gradual weight-bearing, while minimizing strain on the soft tissues. Precontoured plates are designed to match the complex anatomical curvature of the lateral aspect of the proximal tibia, providing robust fixation while minimizing plate prominence.
Indications & Contraindications
The selection of a minimally invasive anterolateral approach requires careful consideration of fracture morphology, patient factors, and soft tissue status.
Indications
- Metaphyseal Fractures: Schatzker type I (pure split), unicondylar fractures primarily involving the lateral plateau without significant displacement of the articular surface that requires direct visualization for reduction.
- Extra-articular Proximal Tibia Fractures: Fractures of the tibial metaphysis or shaft extending into the metaphysis that are amenable to indirect reduction techniques.
- Select Intra-articular Fractures: Where the articular component is minimally displaced and reducible closed, or via arthroscopic assistance, and the primary focus is metaphyseal stability.
- Bridging Fixation: For highly comminuted metaphyseal fractures where anatomical reduction is not feasible, and biologic plating is desired.
- Fractures in Osteoporotic Bone: Where broad exposure might devitalize bone and increase the risk of nonunion.
Contraindications
- Severe Soft Tissue Compromise: Massive swelling, blistering, severe contusion, impending compartment syndrome, or open fractures with significant contamination are absolute contraindications to immediate definitive internal fixation via any approach, including minimally invasive techniques. Initial management with external fixation and delayed definitive fixation once the soft tissue envelope has recovered is essential.
- Fractures Requiring Direct Articular Visualization: Complex intra-articular fractures (e.g., bicondylar fractures, severe depression of the articular surface, Schatzker types IV, V, VI) that cannot be reduced indirectly or arthroscopically, and require direct open exposure for anatomical reduction and articular reconstruction.
- Active Infection: Absolute contraindication to elective internal fixation.
- Polytrauma Patient Instability: Unstable patients requiring damage control orthopedics, where prolonged surgery is contraindicated.
Operative vs. Non-Operative Indications
| Feature | Operative Indications (Minimally Invasive Anterolateral) | Non-Operative Indications |
|---|---|---|
| Fracture Type | Unicondylar metaphyseal (e.g., Schatzker I, III with minimal depression), extra-articular metaphyseal, select bicondylar with primary metaphyseal involvement. | Stable, non-displaced or minimally displaced (≤2 mm step-off or gap) articular fractures without significant instability. |
| Articular Involvement | Minimal or indirect reducibility via ligamentotaxis, percutaneous clamps, or arthroscopic assistance. | Stable articular depression or split that does not compromise joint stability or function, and is unlikely to progress. |
| Displacement | Significant displacement of metaphyseal fragments, rotational or angular deformities not amenable to closed reduction. | Minimally displaced fractures where acceptable alignment can be maintained with bracing/casting. |
| Soft Tissue Status | Recovered from acute injury (no significant swelling, blisters, or open wounds), allowing for safe surgical incision. | Intact soft tissue envelope, patient generally healthy. Contraindication to immediate surgery (e.g., severe soft tissue injury, massive swelling, uncontrolled bleeding, active infection). |
| Patient Factors | Medically fit for surgery, compliant with rehabilitation, functional demands requiring stable fixation and early mobilization. | Significant comorbidities precluding surgery, non-ambulatory status, extremely poor bone quality unsuitable for fixation, patient refusal, or inability to comply with post-operative regimen (e.g., non-weight bearing). Consider for patients with high surgical risk who accept potential functional limitations. |
Pre-Operative Planning & Patient Positioning
Meticulous pre-operative planning is the cornerstone of successful minimally invasive proximal tibia fixation.
Imaging
- Standard Radiographs: Anteroposterior, lateral, and oblique views of the knee and tibia are essential to assess fracture pattern, displacement, and joint involvement.
- Computed Tomography (CT) Scan: Crucial for understanding the three-dimensional fracture morphology, assessing articular involvement (step-off, depression), comminution, and fragment orientation. Three-dimensional reconstructions are particularly valuable for identifying fracture lines, fragment locations, and planning reduction strategies.
- MRI (less common): May be indicated to assess ligamentous injuries (e.g., meniscal tears, collateral ligament ruptures) that might influence the surgical approach or require concomitant treatment.
Soft Tissue Assessment
The condition of the soft tissues is paramount. This includes assessing for:
*
Swelling:
Excessive swelling increases tension, compromises vascularity, and hinders closure.
*
Blistering:
Indicates significant subepidermal shear and devitalization, contraindicating immediate surgery.
*
Abrasion/Contusion:
Can predict areas of compromised tissue viability.
*
Open Wounds:
Requires thorough debridement and often staged management with external fixation.
Surgical timing is often dictated by the "wrinkle sign" or resolution of significant soft tissue edema.
Templating and Implant Selection
- Precontoured Plates: Modern precontoured locking plates are designed to fit the lateral aspect of the proximal tibia. Templating with radiographs and CT scans helps determine the appropriate plate length (number of holes) and anticipate screw trajectory to avoid neurovascular structures.
- Screw Selection: Locking screws provide angular stability, which is advantageous in comminuted fractures or osteoporotic bone. Cortical screws are used for lag fixation where appropriate.
- Ancillary Fixation: Consider the need for percutaneous clamps, external fixators, or specific reduction instruments.
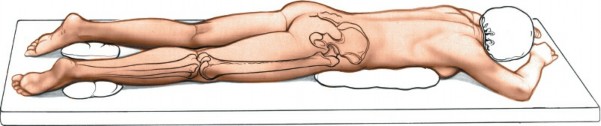
Patient Positioning
The patient is placed supine on a radiolucent table, as for the anterolateral approach to the lateral tibial plateau. This allows for optimal fluoroscopic imaging in both AP and lateral planes without repositioning.
*
Limb Preparation:
The entire limb, from the iliac crest to the foot, is prepped and draped to allow for full range of motion of the knee and ankle, facilitating reduction maneuvers and distal screw placement.
*
Tourniquet:
Exsanguinate the limb and apply a pneumatic tourniquet high on the thigh. Inflation prior to incision helps maintain a bloodless field, crucial for visualization in a minimally invasive setting.
*
Position of the Patient:
Place the patient supine on a radiolucent table, as for the anterolateral approach, to the lateral tibial plateau (see Fig. 11-1). Exsanguinate the limb and apply a tourniquet.
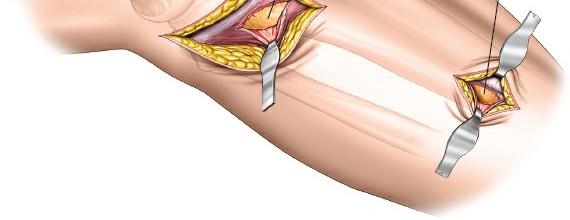
Figure 1: Typical patient positioning for a minimally invasive anterolateral approach to the proximal tibia, demonstrating the supine position on a radiolucent table.
Detailed Surgical Approach / Technique
The minimally invasive anterolateral approach emphasizes indirect reduction and percutaneous plating. The principle is to achieve adequate fracture stabilization while minimizing soft tissue disruption.
Landmarks
Palpate the shaft of the proximal tibia, the anterolateral tubercle of Gerdy, the head of the fibula, and the anterior crest of the tibia.
*
Gerdy's Tubercle:
Located on the lateral aspect of the tibia, it serves as the insertion point for the iliotibial band and a useful anatomical landmark.
*
Fibular Head:
Provides a lateral bony landmark, useful for orienting the incision and identifying the common peroneal nerve posteriorly.
*
Anterior Tibial Crest:
Defines the anterior border of the tibia.
Understanding the relationship of these landmarks to the fracture and neurovascular structures is critical.

Figure 2: Illustration of key anatomical landmarks for the anterolateral approach, including Gerdy's tubercle and the fibular head.
Incision Design
The concept of "perfecting the line of the skin" begins with a well-planned incision.
*
Longitudinal Incision:
A straight longitudinal incision, typically 4-8 cm in length, centered over the fracture site or the proposed proximal end of the plate. It is positioned slightly anterior to the lateral border of the tibia.
*
Alternative (Curved/Oblique):
Some surgeons prefer a slightly curved incision, following Langer's lines, but for plate insertion, a straight incision generally offers better access.
*
Extension:
The incision can be extended proximally or distally if needed, but the goal is to keep it as short as possible. For very long plates, additional small stab incisions or formal mini-incisions will be made distally.
Dissection
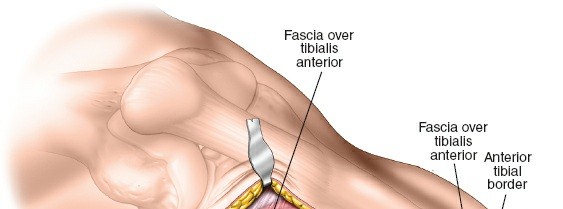
- Skin and Subcutaneous Tissue: Incise the skin and subcutaneous tissue. Meticulous hemostasis is crucial. Raise minimal skin flaps, focusing on direct access to the underlying fascia.
- Fascia Incision: Identify the deep fascia overlying the anterolateral compartment. Incise the fascia longitudinally.
- Muscle Split: The approach generally proceeds through an intermuscular interval. The interval is typically between the tibialis anterior muscle and the extensor digitorum longus/fibularis longus muscles. Retract the muscles gently to expose the lateral surface of the tibia. Alternatively, a direct longitudinal split through the tibialis anterior muscle can be performed, but this is generally avoided to preserve muscle integrity. The critical point is to remain on the lateral aspect of the tibia.
- Periosteal Elevation: Limited periosteal elevation is performed only where necessary for plate placement, preserving the periosteal blood supply to the maximum extent possible. Create a subperiosteal tunnel for the plate if the plate is inserted percutaneously.
Reduction Techniques
Minimally invasive approaches rely heavily on indirect reduction methods.
*
Traction and Ligamentotaxis:
Applying axial traction to the limb can help reduce displaced fragments, particularly in articular fractures, by tensioning intact ligaments and periosteum.
*
Percutaneous Clamps:
Reduction clamps (e.g., Verbrugge, pointed reduction clamps) can be used percutaneously through small stab incisions to manipulate fragments and hold them temporarily.
*
External Fixator as Reduction Aid:
A temporary external fixator can be applied to provide controlled distraction and manipulate fragments.
*
Joystick Maneuvers:
Kirschner wires inserted into fracture fragments can be used as "joysticks" to facilitate reduction.
*
Fluoroscopic Guidance:
Real-time fluoroscopy (AP, lateral, and oblique views) is indispensable for monitoring reduction and ensuring proper plate and screw placement. Articular congruity is confirmed under fluoroscopy, sometimes with an image intensifier tilt to assess joint lines.
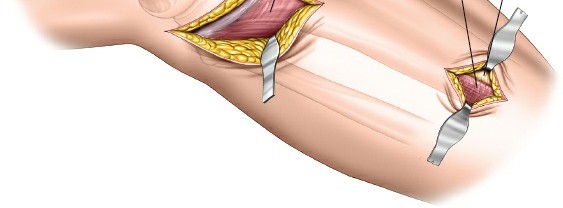
Figure 3: Intraoperative fluoroscopic image demonstrating reduction of a proximal tibia fracture with temporary fixation.
Plate Application and Fixation
- Plate Selection: Choose a precontoured locking plate (e.g., LCP Proximal Lateral Tibia Plate) of appropriate length.
- Submuscular Tunneling: Create a submuscular tunnel over the lateral surface of the tibia for plate insertion. This is often done using a dedicated plate insertion guide or a long curved instrument. Ensure the plate lies directly on the bone.
- Proximal Plate Placement: Position the plate proximally, ensuring its anatomical fit against the lateral aspect of the tibial metaphysis and condyle. Confirm its position with fluoroscopy.
-
Proximal Screw Insertion:
Insert proximal locking screws through the main incision. These screws typically engage the lateral condyle, providing angular stability. Confirm screw length and trajectory with fluoroscopy.
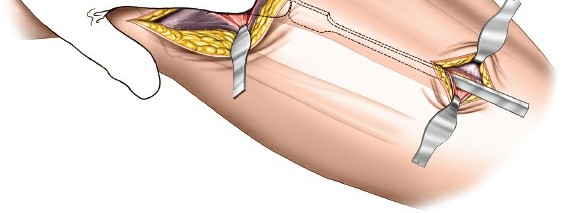
Figure 4: Intraoperative image showing placement of a precontoured locking plate on the lateral aspect of the proximal tibia, with initial proximal screw insertion. -
Distal Screw Insertion:
This is where the risk of neurovascular injury is highest.
- Stab Incisions: For plates up to 8-10 holes, distal screws may be inserted percutaneously through small stab incisions. Care must be taken to ensure instruments are guided directly to the bone and away from the deep peroneal nerve and anterior tibial artery. These structures lie anterior to the interosseous membrane and can be injured by blindly placed stab incisions.
-
Formal Dissection:
If plates longer than 10 holes are needed to treat the fracture, formal dissection of the distal window is required. This involves extending the incision distally or making separate mini-incisions and carefully dissecting down to the bone, identifying and protecting the deep peroneal nerve and anterior tibial artery. This controlled dissection minimizes the risk of iatrogenic injury.
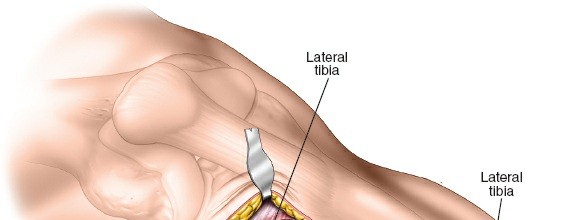
Figure 5: Fluoroscopic image demonstrating distal screw insertion. Note the meticulous trajectory to avoid critical neurovascular structures.
-
Confirmation:
After all screws are inserted, obtain final AP and lateral fluoroscopic images to confirm satisfactory reduction, implant position, and screw lengths. Evaluate for rotational alignment clinically.
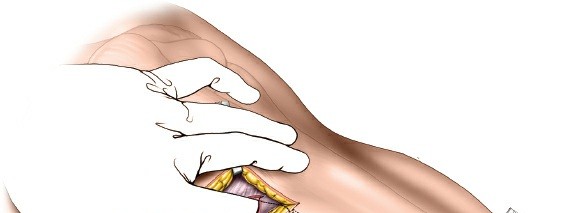
Figure 6: Post-fixation fluoroscopic image demonstrating the final construct with a precontoured plate and locking screws in place, achieving stable fixation.
Closure
- Irrigation: Thoroughly irrigate the wound.
- Hemostasis: Ensure meticulous hemostasis. Consider drain placement only if significant bleeding is anticipated, though generally avoided in MI techniques.
- Fascial Closure: Close the deep fascia, if widely opened, to prevent muscle herniation.
- Subcutaneous and Skin Closure: Close the subcutaneous tissue and skin layers meticulously, paying attention to approximation of the skin edges to optimize wound healing and cosmetic outcome – truly "perfecting the line of the skin." Sterile dressings are applied.
Complications & Management
Despite the benefits of minimally invasive approaches, complications can arise. Awareness and proactive management are key to optimizing patient outcomes.
Common Complications and Salvage Strategies
| Complication | Incidence | Etiology | Salvage Strategy / Management |
|---|---|---|---|
| Soft Tissue Necrosis/Wound Dehiscence | 5-15% | Compromised vascularity, excessive retraction, delayed surgery in severely swollen limb, infection. | Strict adherence to soft tissue principles (timing, gentle handling, minimal stripping). Local wound care, debridement. If severe, rotational flaps (gastrocnemius, soleus) or free tissue transfer. |
| Infection (Superficial/Deep) | 1-5% | Contamination, poor soft tissue envelope, hematoma, patient comorbidities (diabetes, smoking). | Prophylactic antibiotics, meticulous asepsis, wound care. Superficial: oral antibiotics, local care. Deep: surgical debridement, IV antibiotics, implant retention if stable or removal with staged reconstruction. |
| Deep Peroneal Nerve Injury | 1-3% | Direct trauma during distal screw placement (stab incisions), excessive retraction, thermal injury from drilling. | Prevention is paramount: formal dissection for long plates/distal screws. If iatrogenic, observe for recovery. EMG/NCS at 3 months. Nerve exploration and repair/grafting if no recovery. Symptomatic management for foot drop (AFO). |
| Anterior Tibial Artery Injury | <1% | Direct trauma during distal screw placement, thermal injury. | Prevention: formal dissection. Acute injury: vascular surgery consultation, repair/ligation. Monitor for compartment syndrome or acute limb ischemia. |
| Nonunion/Delayed Union | 5-10% | Poor biology (extensive stripping), inadequate reduction/fixation, infection, patient factors (smoking, NSAIDs). | Optimize patient factors. Initial: non-weight bearing, biological adjuncts (BMP, PRP, bone graft). Revision surgery with decortication, bone grafting (autograft/allograft), and/or plate augmentation/exchange. |
| Malunion | 2-5% | Inadequate reduction, loss of reduction post-operatively. | Prevention: meticulous reduction, stable fixation, intraoperative fluoroscopy for alignment. If symptomatic and significant (e.g., >10 degrees varus/valgus, >10 degrees procurvatum/recurvatum, >15 degrees rotation), corrective osteotomy. |
| Hardware Prominence/Irritation | 10-20% | Plate not perfectly contoured, screw heads palpable. | Careful plate contouring, appropriate plate selection. If symptomatic, hardware removal after fracture union (typically 12-18 months post-op). |
| Compartment Syndrome | <1% (acute post-op) | Trauma itself, hemorrhage, reperfusion injury, tight dressings. | Vigilant post-operative monitoring for the 5 P's (Pain, Pallor, Paresthesia, Pulselessness, Paralysis). Emergency fasciotomy. |
| Arthrofibrosis/Stiffness | 5-10% | Prolonged immobilization, aggressive scarring, associated articular injury. | Early, controlled range of motion exercises. Physical therapy. If refractory, manipulation under anesthesia or arthroscopic/open arthrolysis. |
| Deep Vein Thrombosis (DVT)/PE | 0.5-2% | Immobility, surgical trauma, hypercoagulable state. | Pharmacological prophylaxis (LMWH, direct oral anticoagulants), mechanical prophylaxis (compression stockings, SCDs). Early mobilization. Symptomatic DVT: full anticoagulation. PE: emergent management, systemic anticoagulation. |
Post-Operative Rehabilitation Protocols
Post-operative rehabilitation is critical for achieving optimal functional outcomes and minimizing complications following minimally invasive proximal tibia fixation. Protocols are individualized based on fracture stability, bone quality, and concomitant injuries.
Early Post-Operative Period (Weeks 0-2)
- Wound Care: Maintain clean, dry dressings. Monitor for signs of infection or wound dehiscence. Suture removal typically at 10-14 days.
- Pain Management: Multimodal analgesia (opioids, NSAIDs, acetaminophen, nerve blocks) to facilitate early mobilization.
- Swelling Management: Elevation of the limb, cryotherapy, compression stockings to reduce edema.
-
Range of Motion (ROM):
- Knee: Continuous Passive Motion (CPM) machine may be used, or gentle active and passive ROM exercises from day 1, emphasizing knee flexion within pain limits (e.g., 0-90 degrees). Avoid excessive deep flexion early on if there is articular involvement.
- Ankle/Foot: Active ankle pumps and toe curls to minimize stiffness and aid venous return, reducing DVT risk.
- Weight Bearing (WB): Typically strict non-weight bearing (NWB) for the operated limb, using crutches or a walker. Exceptions may include very stable extra-articular fractures in good bone, allowing partial weight bearing (PWB) with surgeon discretion.
- DVT Prophylaxis: Continue pharmacological and mechanical prophylaxis per institutional guidelines.
Intermediate Phase (Weeks 2-8)
- Progressive ROM: Gradually increase knee ROM exercises, aiming for full flexion and extension by 6-8 weeks, as tolerated.
- Strengthening: Initiate isometric quadriceps and hamstring strengthening exercises. Progress to gentle active-assisted and active exercises for hip, knee, and ankle.
-
Weight Bearing:
Progression of weight bearing is guided by radiographic signs of healing and clinical stability.
- Partial Weight Bearing (PWB): Typically initiated at 4-6 weeks (25-50% body weight) if radiographs show early callus formation and no signs of implant failure.
- Full Weight Bearing (FWB): Progressed over the next 2-4 weeks as tolerated, contingent on solid radiographic union.
- Gait Training: Instruction on proper gait with assistive devices, progressing from walker to crutches to single cane.
Advanced Phase (Weeks 8-24 and beyond)
- Full Weight Bearing & Ambulation: Independent ambulation without assistive devices once clinical and radiographic union is confirmed.
- Progressive Strengthening: Advance to isotonic and functional strengthening exercises for the entire lower extremity. Incorporate balance and proprioception training.
- Functional Activities: Gradually return to activities of daily living, light work, and recreational activities.
- Sport-Specific Training: For athletes, a structured return-to-sport program is initiated, focusing on agility, plyometrics, and sport-specific drills, typically after 6-9 months and full restoration of strength, balance, and ROM.
- Hardware Removal: Elective hardware removal may be considered 12-18 months post-operatively if symptoms of hardware prominence or irritation persist, and fracture union is complete.
Summary of Key Literature / Guidelines
The literature consistently supports the benefits of minimally invasive plate osteosynthesis (MIPO) for proximal tibia fractures, particularly for metaphyseal and select articular injuries.
*
Soft Tissue Preservation:
Multiple studies highlight reduced rates of wound complications, infection, and flap requirements compared to traditional open approaches. This is a primary driver for MIPO techniques.
*
Biological Fixation:
MIPO promotes biological healing by minimizing periosteal stripping and preserving the fracture hematoma. This technique, also known as "biological osteosynthesis," is increasingly emphasized in fracture care.
*
Precontoured Locking Plates:
The advent of anatomically precontoured locking plates has significantly advanced MIPO for the proximal tibia. These plates allow for strong, stable fixation with limited exposure, particularly beneficial in osteoporotic bone or comminuted fractures.
*
Indirect Reduction:
The reliance on indirect reduction techniques (ligamentotaxis, percutaneous clamps) and fluoroscopic guidance is a hallmark of MIPO. While demanding, these techniques effectively restore alignment without extensive soft tissue stripping.
*
Complication Profile:
While MIPO reduces soft tissue complications, the risk of neurovascular injury, particularly to the deep peroneal nerve and anterior tibial artery during distal screw placement, remains a concern. The consensus reinforces the need for formal dissection or meticulous fluoroscopic guidance when placing screws far from the main incision, especially with long plates. Studies by various authors have emphasized these risks and the importance of precise surgical technique.
*
Timing of Surgery:
The concept of "damage control orthopedics" and delaying definitive fixation until the soft tissue envelope has recovered (the "window of opportunity") is well-established. This approach significantly reduces the risk of acute soft tissue complications.
*
Functional Outcomes:
Long-term studies indicate that functional outcomes following MIPO for appropriate fracture patterns are comparable to or superior to open techniques, primarily due to fewer soft tissue complications and potentially earlier rehabilitation.
Current guidelines advocate for careful patient selection, meticulous pre-operative planning utilizing advanced imaging (CT scans), and strict adherence to minimally invasive principles. While the "perfecting the line of the skin" metaphor encapsulates the aesthetic aspect, its deeper meaning lies in the surgeon's commitment to optimizing the soft tissue environment for biological healing and minimizing iatrogenic harm, ultimately leading to superior functional and cosmetic outcomes for the patient. Continuous education and refinement of surgical skills, particularly in fluoroscopic interpretation and indirect reduction maneuvers, remain essential for surgeons employing these advanced techniques.
Clinical & Radiographic Imaging
You Might Also Like