Mastering the Minimally Invasive Anterior Humeral Shaft Approach
Key Takeaway
Here are the crucial details you must know about Mastering the Minimally Invasive Anterior Humeral Shaft Approach. The **minimally invasive anterior** approach to the humeral shaft is a surgical technique utilizing proximal and distal soft-tissue windows for internal fixation of humerus fractures. This approach preserves the blood supply to the fracture zone. However, the fracture is not directly exposed, making reduction more difficult to achieve and assess, and increasing radiation exposure for the team.
Mastering the Minimally Invasive Anterior Humeral Shaft Approach
Introduction & Epidemiology
Fractures of the humeral shaft represent approximately 3-5% of all fractures, with a bimodal distribution peaking in young males involved in high-energy trauma and elderly females with osteoporotic fractures from low-energy falls. While non-operative management, primarily with functional bracing, remains a viable and often successful option for many closed, isolated humeral shaft fractures, operative intervention is indicated in a significant subset. The evolution of surgical techniques for humeral shaft fractures has aimed to balance rigid internal fixation with minimal soft tissue disruption, fostering optimal biological healing.
The anterior approach to the humeral shaft, particularly its minimally invasive variant, has gained prominence as an alternative to traditional open plating or intramedullary nailing. This approach leverages the principles of biological fixation, seeking to preserve the periosteal blood supply and fracture hematoma, thereby theoretically reducing rates of non-union and infection. The original seed content accurately highlights its core advantage: "the preservation of the blood supply to the fracture zone." However, it also critically notes the challenges inherent to indirect reduction techniques: "the fracture is not exposed, which makes reduction more difficult to achieve and assess as well as exposing both patient and surgeon to radiation." This necessitates a meticulous understanding of surgical anatomy, advanced fluoroscopic techniques, and specialized instrumentation.
This comprehensive guide will detail the nuances of the minimally invasive anterior humeral shaft approach, encompassing anatomical considerations, indications, meticulous surgical technique, potential complications, and post-operative rehabilitation, offering a high-yield reference for orthopedic surgeons, residents, and medical students.
Surgical Anatomy & Biomechanics
A thorough understanding of the regional anatomy is paramount for safe and effective execution of the minimally invasive anterior humeral shaft approach. The humerus is encircled by several muscular compartments, each containing critical neurovascular structures.
Muscular Anatomy
- Anterior Compartment: Biceps brachii, coracobrachialis, brachialis.
- Medial Compartment: While not distinct, the medial epicondylar region involves the common flexor origin.
- Lateral Compartment: Deltoid (proximally), triceps brachii (distally, posterior aspect).
- Posterior Compartment: Triceps brachii (primarily).
The anterior approach typically utilizes internervous planes to minimize muscle trauma. Proximally, the deltopectoral interval can be used, but for the anterolateral approach described for the minimally invasive technique, the interval is often between the anterior deltoid and the biceps/brachialis. Distally, the plane is between the biceps and brachialis, or more laterally to the biceps, aiming for a submuscular plate placement.
Neurovascular Structures
The most critical neurovascular structures to identify and protect during an anterior humeral shaft approach include:
*
Radial Nerve:
This nerve is the primary concern, coursing obliquely from posterior to anterior in the spiral groove (radial groove) on the posterior aspect of the humerus, typically in the middle third. It then pierces the lateral intermuscular septum to enter the anterior compartment distal to the deltoid insertion. While the classic anterior approach may not directly encounter the radial nerve if kept medial, the anterolateral variation necessary for minimally invasive plating often places the surgeon in close proximity. The nerve is accompanied by the profunda brachii artery. Its vulnerability during screw placement, particularly from lateral to medial, cannot be overstated.
*
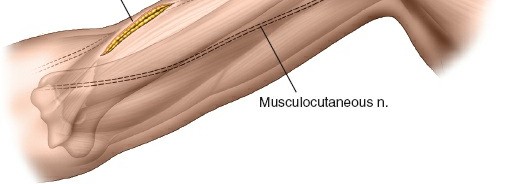
Musculocutaneous Nerve:
This nerve typically pierces the coracobrachialis muscle in the proximal arm and then descends between the biceps and brachialis, providing motor innervation to both. It is at risk during dissection in the distal anterior arm window.
*
Median Nerve and Brachial Artery:
These structures lie medial to the biceps in the medial neurovascular bundle, typically protected during a direct anterior or anterolateral approach, but vigilance is required, particularly with medial retraction.
*
Ulnar Nerve:
Located in the medial intermuscular septum, it is generally not at risk with anterior approaches to the shaft.
Internervous Planes
The minimally invasive anterior approach leverages specific internervous planes for safe access:
*
Proximal Window:
The anterolateral approach segment utilizes an interval between the anterior fibers of the deltoid (innervated by the axillary nerve) and the biceps brachii (innervated by the musculocutaneous nerve), or more specifically, between the deltoid and the brachialis/biceps group.
*
Distal Window:
The interval between the biceps brachii (musculocutaneous nerve) and the brachialis (musculocutaneous and radial nerve supply). More laterally, an interval between the brachialis and the lateral head of the triceps (radial nerve) can be used to approach the bone submuscularly. This submuscular plane is crucial for plate placement, allowing the plate to lie deep to the brachialis, protecting the radial nerve.
Biomechanics
Humeral shaft fractures are subjected to various forces, including bending, torsion, and axial compression. The choice of fixation (plate and screws vs. intramedullary nail) depends on fracture pattern, bone quality, and soft tissue envelope.
*
Plating:
Offers rigid fixation by converting bending and torsional forces into axial compression (compression plating) or by bridging a comminuted segment (bridge plating). Locking compression plates (LCPs) provide angular stability, which is particularly advantageous in osteoporotic bone or comminuted fractures, allowing fixation without direct compression if desired, thus preserving fracture biology.
*
Minimally Invasive Plating (MIPPO - Minimally Invasive Plate Osteosynthesis):
Relies on bridge plating principles, utilizing relatively long plates to span the fracture zone without direct exposure. This technique aims for relative stability, promoting secondary bone healing (callus formation). The submuscular tunnel protects soft tissues and enhances vascularity to the bone.
Indications & Contraindications
The decision for operative versus non-operative management, and then the selection of a specific surgical approach, requires careful consideration of patient factors, fracture characteristics, and surgeon experience. The minimally invasive anterior approach is primarily suited for internal fixation of humeral shaft fractures, as noted in the original content.
Indications for Operative Fixation (General)
- Open fractures
- Segmental fractures
- Polytrauma patients (to facilitate early mobilization and systemic care)
- Associated vascular injury requiring repair
- Pathological fractures
- Failed non-operative management (e.g., progressive deformity, non-union)
- Ipsilateral forearm fractures (floating elbow)
- Brachial plexus injury (to allow for easier rehabilitation and nerve exploration if needed)
- Inability to maintain reduction or unacceptable alignment (e.g., >20° anterior angulation, >30° varus/valgus, >15-20° rotation, >3 cm shortening)
- Intra-articular extension (though this often dictates a more extensive approach)
- Neurological deficit associated with a closed fracture (relative indication for exploration)
Specific Indications for Minimally Invasive Anterior Plating
- Diaphyseal fractures of the humerus, particularly those with simple or moderately comminuted patterns that can be reduced indirectly.
- Fractures in the proximal or distal thirds of the shaft where IM nailing may be less effective or carry higher shoulder/elbow morbidity.
- Oblique or spiral fractures amenable to compression across the fracture if small window allows.
- Patients where preservation of soft tissue envelope and fracture biology is prioritized.
Contraindications for Minimally Invasive Anterior Plating
-
Absolute:
- Active infection in the surgical field.
- Severe soft tissue compromise precluding safe incision and closure.
- Extremely comminuted fractures requiring direct visualization for reduction that cannot be achieved indirectly.
-
Relative:
- Severe osteoporosis where screw purchase might be inadequate for locking constructs, or bone quality necessitates a more robust fixation strategy.
- Pre-existing radial nerve palsy (may complicate intraoperative monitoring or subsequent evaluation).
- Morbid obesity, which can hinder fluoroscopic imaging and deep dissection.
- Surgeon inexperience with the technique.
Table: Operative vs. Non-Operative Indications for Humeral Shaft Fractures
| Indication Type | Operative Management | Non-Operative Management |
|---|---|---|
| Fracture Pattern | Open, segmental, highly comminuted, intra-articular extension | Closed, isolated, stable spiral/oblique/transverse patterns |
| Associated Injury | Vascular injury, floating elbow, brachial plexus injury | Isolated injury, no neurovascular compromise |
| Patient Factors | Polytrauma, pathological fracture, inability to comply with bracing | Compliant patient, good soft tissue envelope, no other contraindications |
| Failure of N/O | Progressive deformity, non-union, malunion | Initial successful reduction and maintenance |
| Specific Approach | Minimally Invasive Anterior Plating: Diaphyseal, indirect reduction feasible, biological preservation desired | Functional bracing, Sarmiento brace |
Pre-Operative Planning & Patient Positioning
Meticulous pre-operative planning is crucial for the success of any complex orthopedic procedure, and the minimally invasive anterior humeral shaft approach is no exception.
Pre-Operative Planning
-
Imaging Review:
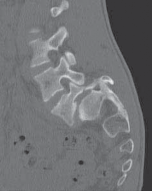
- Standard AP and lateral radiographs of the humerus, including shoulder and elbow joints, are essential to characterize the fracture pattern, identify comminution, and assess joint involvement.
- CT scans can be invaluable for complex or highly comminuted fractures, providing 3D spatial orientation and aiding in templating.
-
Templating:
- Determine appropriate plate length and contour. A general rule for bridge plating is to span at least 2-3 times the length of the comminuted zone, with a minimum of 3-4 bicortical screws proximally and distally.
- Select plate width and screw type (e.g., 3.5 mm or 4.5 mm LCP, cortex vs. locking screws).
- Pre-bend plates as needed to match anticipated humeral bowing, ensuring proper biomechanical alignment and avoiding stress risers.
- Radial Nerve Identification: Review pre-operative imaging to anticipate the general location of the radial nerve relative to the fracture site, especially for mid-diaphyseal fractures.
- Anesthesia: General anesthesia is typically employed. A regional nerve block (e.g., interscalene) can be considered pre-operatively for post-operative pain control, though its use should be discussed with the anesthesiologist due to potential effects on motor function monitoring.
- Equipment: Ensure availability of appropriate MI plating sets, specialized plate passers, reduction clamps (e.g., pointed reduction clamps, small Verbrugge), and readily accessible fluoroscopy unit.
Patient Positioning
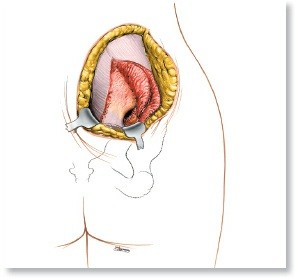
As stated in the seed content, "Place the patient supine on the operating table in the same position as for the anterior approach to the humerus (see Fig. 2-1)." This typically involves:
*
Supine Position:
The patient lies supine on the operating table.
*
Arm Preparation:
The affected arm is positioned on a radiolucent hand table or suspended in traction, allowing full mobility for fluoroscopic imaging in multiple planes (AP, lateral, obliques). Free-draping the arm is often preferred to allow greater maneuverability for reduction and fluoroscopy.
*
Radiation Protection:
"Ensure that you can obtain adequate x-ray images of the pathology to be treated before prepping and draping. Use the best possible radiation protection for the patient and surgical team." This involves lead aprons, thyroid shields, and careful positioning of the C-arm to minimize scatter. The C-arm must have unrestricted access to the entire humeral shaft.
*
No Tourniquet:
"Do not use a tourniquet." This is a critical point for minimally invasive approaches, as maintaining tissue perfusion is paramount for preserving fracture biology and reducing surgical trauma. Hemostasis is managed with judicious electrocautery and local hemostatic agents.
*
Draping:
Sterile draping should allow for examination of the entire upper extremity, from the shoulder to the hand, to facilitate intraoperative manipulation for reduction.
Detailed Surgical Approach / Technique
The minimally invasive anterior approach utilizes two soft-tissue windows, proximal and distal, typically representing extensions of the anterolateral approach. The goal is indirect reduction and submuscular plate application with minimal direct fracture visualization.
Landmarks and Incision
The seed content leaves off at "Landmarks and Incision".
1.
Marking:
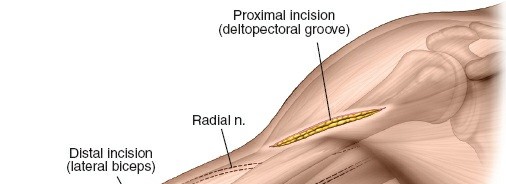
Identify key anatomical landmarks: coracoid process, deltoid insertion, biceps groove, palpable humeral shaft, and the anticipated fracture zone based on pre-operative imaging. Outline the planned proximal and distal incisions. The length of these incisions is typically 3-5 cm, depending on patient body habitus and the required plate size.
This image likely depicts the initial skin markings and planned incisions for the proximal and distal windows, with anatomical landmarks delineated.
2.
Proximal Incision:
Made along the anterolateral aspect of the humerus, typically centered over the proximal third of the shaft. This allows access to the proximal part of the fracture or for placement of proximal plate screws.
3.
Distal Incision:
Made along the anterolateral aspect, centered over the distal third of the humeral shaft, for access to the distal part of the fracture and screw placement.
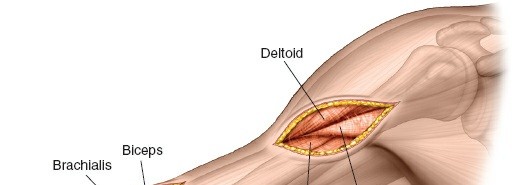
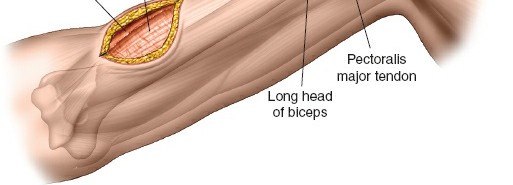
Superficial Dissection and Proximal Window
-
Skin and Subcutaneous Tissue:
Incise skin and subcutaneous tissue. Identify and protect superficial veins and nerves.

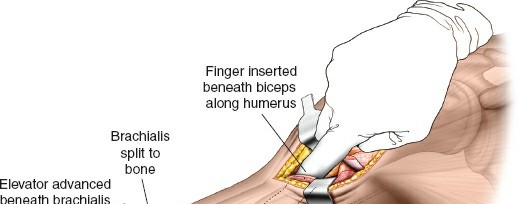
This image likely shows the initial dissection through skin and subcutaneous tissue in one of the windows, possibly identifying superficial vessels. - Muscle Split/Interval: Deepen the dissection, identifying the interval between the anterior deltoid and the biceps brachii. Retract the biceps medially and the deltoid/brachialis laterally to expose the humeral shaft. For a truly anterolateral approach, the interval is often found between the lateral border of the biceps and the medial aspect of the brachialis, allowing access to the anterior surface of the humerus.
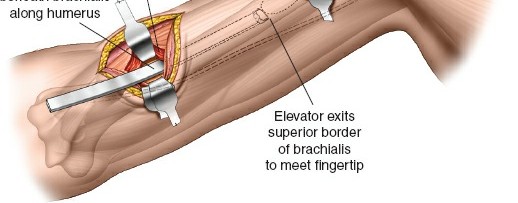
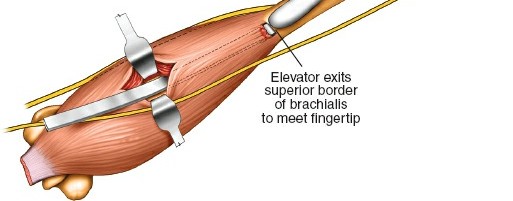
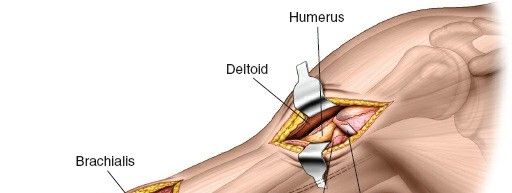
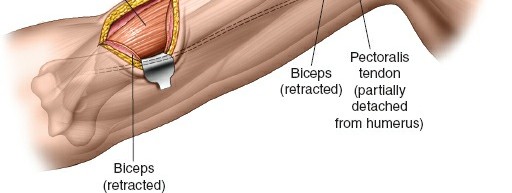
- Submuscular Tunneling (Proximal): Elevate the brachialis muscle from the anterior surface of the humerus subperiosteally or, preferably, submuscularly to create a space for the plate. This maneuver initiates the formation of a tunnel for plate passage.
Distal Window and Radial Nerve Protection
- Deepening the Distal Incision: Incise through skin and subcutaneous tissue. Identify the interval between the biceps and brachialis. The musculocutaneous nerve often lies in this interval or pierces the coracobrachialis more proximally. Protect it by retracting the biceps medially.
- Exposure of Humeral Shaft: Retract the brachialis laterally to expose the anterior surface of the distal humerus.
- Radial Nerve Vigilance: In the distal window, the radial nerve is generally posterior and lateral to the plane of dissection. However, as the plate is passed proximally in the submuscular plane, it is critical to ensure the plate and associated instruments (like plate passers) do not impinge upon or damage the nerve, particularly where it exits the spiral groove more proximally. Some surgeons advocate for direct, limited visualization of the radial nerve if concern for its safety is high, though this compromises the minimally invasive nature.
Plate Passage and Reduction
- Plate Selection and Pre-Contouring: Select an appropriately sized locking compression plate (LCP). Pre-contouring the plate to the anterior bow of the humerus is crucial to minimize reduction difficulty and achieve anatomical alignment. A plate passer or a malleable lead template can be used to assess the contour.
-
Submuscular Plate Passage:
Carefully pass the pre-contoured plate into the submuscular tunnel from one incision (usually distal) to the other (proximal). Ensure the plate lies directly on the bone, beneath the brachialis and biceps. Use a plate passer or a long curved clamp to guide it.
This image likely illustrates the careful passage of the plate through the submuscular tunnel, possibly with the aid of a plate passer. -
Indirect Reduction:
This is the most challenging aspect of MIPPO.
- Traction and Manipulation: Apply longitudinal traction to the arm, along with gentle rotational and translational maneuvers, to align the fracture fragments. The fluoroscopy unit is indispensable here.
- Temporary Fixation: Use percutaneous K-wires or reduction clamps applied through small stab incisions to temporarily stabilize fragments.
-
Plate as a Reduction Aid:
The contoured plate itself can serve as a reduction tool. Temporarily secure one end of the plate to a main fragment with a locking screw. Then, use clamps or controlled manipulation to bring the other fragment to the plate, restoring length, rotation, and alignment.
This image is almost certainly a fluoroscopic view showing fracture reduction, possibly with the plate already in position, confirming alignment.
Fixation with Locking Screws
-
Proximal Fixation:
Once satisfactory reduction is achieved and confirmed with fluoroscopy in multiple planes (AP and lateral), begin inserting locking screws into the proximal fragment through the plate. Use a drill guide to ensure appropriate screw trajectory and length. Aim for at least 3-4 bicortical locking screws.
This image likely shows the drill guide in place for inserting a screw through the plate, demonstrating the initial fixation step. -
Distal Fixation:
Repeat the process for the distal fragment. Ensure adequate screw length without violating the opposite cortex or impinging on neurovascular structures. The number of screws should match the proximal fixation (3-4 bicortical locking screws).

This image probably shows the insertion of a locking screw into the humerus, using a power drill and guide. - Intermediary Screws (Optional): If the fracture pattern allows and fracture fragments are stable, additional locking or non-locking cortex screws can be placed within the comminuted zone for added stability, although the primary goal of MIPPO is bridge plating.
-
Final Fluoroscopic Check:
Confirm final reduction, plate position, and screw lengths in AP and lateral views. Ensure no screw impingement on adjacent joints or neurovascular structures. Assess for appropriate plate length, covering sufficient cortical bone proximally and distally.
A post-fixation fluoroscopic image, crucial for confirming final plate and screw position, reduction, and overall construct integrity.
Another intraoperative fluoroscopic shot, possibly from a different angle, verifying the construct.
This image confirms the final operative result on fluoroscopy, displaying the completed plate fixation.
Wound Closure
- Irrigation: Copiously irrigate the surgical sites.
- Hemostasis: Ensure meticulous hemostasis.
-
Layered Closure:
Close subcutaneous tissue layers and skin in a standard fashion. A drain is usually not necessary.

This image likely depicts the closed incisions after surgery, showing the small, cosmetic nature of the minimally invasive approach. - Dressings: Apply sterile dressings.
Complications & Management
While the minimally invasive anterior approach offers significant advantages, it carries its own distinct set of potential complications. Understanding these and their management strategies is crucial.
Common Complications
-
Radial Nerve Palsy:
This is the most frequently cited complication, with reported incidences varying widely from 0% to 15%.
- Incidence: Often related to the fracture itself (primary palsy, 10-18%) or iatrogenic injury during surgery. Iatrogenic palsies can result from direct trauma during dissection, nerve entrapment by reduction clamps, or thermal injury during drilling/cautery, or direct screw impingement.
-
Management:
- Primary Palsy (pre-op): Most resolve spontaneously. Observation for 3-6 months with serial clinical exams and EMG/NCS studies. Exploration is indicated if no signs of recovery or worsening deficit.
-
Iatrogenic Palsy (post-op):
- Neurapraxia/Axonotmesis: If identified intraoperatively (rare in MI approach without direct visualization), consider exploration. If post-operative, observation, with EMG/NCS at 6 weeks. Most will resolve.
- Transection: Immediate surgical exploration and repair (direct repair or nerve graft).
- Screw Impingement: If suspected on post-op imaging or new palsy, urgent screw removal may be warranted.
-
Non-union/Delayed Union:
Despite the biological advantage, non-union rates can range from 2-10%, influenced by fracture comminution, soft tissue injury, inadequate reduction/fixation, and patient factors (e.g., smoking, poor nutrition).
- Management: Non-operative management (e.g., bone stimulator) for delayed union. For established non-union (>6 months without healing), revision surgery with débridement, bone grafting (autograft or allograft), and re-plating with a more robust construct (e.g., longer plate, locked screws, or IM nail conversion) is often necessary.
-
Malunion:
Incorrect alignment (angulation, rotation, shortening) can occur if reduction is not meticulously assessed with fluoroscopy in multiple planes.
- Management: Minor malunions may be asymptomatic. Symptomatic malunions (e.g., limited ROM, pain, cosmetic deformity) may require corrective osteotomy and re-fixation.
-
Infection:
Superficial infections are uncommon (1-2%); deep infections are rare (<1%) but devastating.
-
Management:
- Superficial: Oral antibiotics, local wound care.
- Deep: Surgical irrigation and debridement, targeted intravenous antibiotics. Hardware retention may be possible if the fracture is well-united and fixation is stable. Otherwise, hardware removal, debridement, and external fixation or staged reconstruction.
-
Management:
-
Hardware Failure:
Plate breakage or screw pullout, typically due to excessive loading of the construct before biological healing, or inadequate initial fixation.
- Management: Revision surgery, often involving plate removal, further débridement, bone grafting, and re-plating with a stronger construct.
-
Vascular Injury:
Brachial artery injury is extremely rare but possible, particularly with displaced fractures or aggressive dissection/retraction.
- Management: Immediate surgical exploration and vascular repair.
-
Increased Radiation Exposure:
A known disadvantage, as highlighted in the original text.
- Management: Experienced fluoroscopy technician, pulsed fluoroscopy, image last-hold, ALARA principles (As Low As Reasonably Achievable), lead shielding for patient and surgical team.
Table: Common Complications, Incidence, and Salvage Strategies
| Complication | Incidence (%) | Salvage Strategy |
|---|---|---|
| Radial Nerve Palsy | 0-15% (iatrogenic) | Observation (if neurapraxia), EMG/NCS, Surgical exploration/repair (if transection or no recovery) |
| Non-union | 2-10% | Débridement, Bone grafting (auto/allograft), Revision plating/nailing |
| Malunion | Variable (minor common, symptomatic less so) | Observation, Corrective osteotomy and re-fixation (for symptomatic cases) |
| Infection | Superficial 1-2%, Deep <1% | Superficial: Oral antibiotics. Deep: I&D, IV antibiotics, +/- hardware removal |
| Hardware Failure | <5% | Revision surgery with débridement, bone graft, more robust fixation |
| Vascular Injury | <0.1% | Urgent surgical exploration, vascular repair |
| Increased Radiation Exposure | Inherent risk | ALARA principles, pulsed fluoro, lead shielding, image last-hold |
Post-Operative Rehabilitation Protocols
Post-operative rehabilitation is critical for optimizing functional outcomes and preventing stiffness while protecting the internal fixation. The protocol typically progresses through phases, guided by the stability of the fixation and radiographic evidence of healing.
Immediate Post-Operative Phase (Days 0-7)
- Pain Management: Administer appropriate analgesia (oral opioids, NSAIDs, regional nerve blocks if applicable).
- Immobilization: The arm is typically placed in a sling for comfort and initial protection. A splint may be used initially for severely comminuted fractures or tenuous fixation, but early motion is generally encouraged.
- Edema Control: Elevation of the extremity, gentle hand, wrist, and elbow active range of motion (AROM) exercises (if not constrained by fracture pattern/fixation) to minimize swelling.
- Patient Education: Instruct the patient on sling use, wound care, and gentle exercises.
Early Mobilization Phase (Weeks 1-6)
- Sling Use: Continue sling for comfort and protection, but remove for exercises.
- Passive Range of Motion (PROM): Initiate gentle pendulum exercises and passive shoulder ROM (forward flexion, abduction, external/internal rotation) within pain-free limits. Gentle passive elbow flexion/extension (if not restricted) and forearm pronation/supination.
- Active-Assisted Range of Motion (AAROM): Progress to active-assisted exercises as tolerated, using the unaffected arm to assist the injured arm.
- Avoid: Active shoulder abduction against gravity, lifting objects, or any forceful movements that could stress the fixation. No direct weight-bearing through the arm.
- Radial Nerve Assessment: Continuously monitor for signs of radial nerve recovery if a pre-operative or intraoperative palsy was noted.
Intermediate Healing Phase (Weeks 6-12)
- Radiographic Assessment: Obtain follow-up radiographs to assess fracture healing and callus formation. The decision to advance activity is heavily dependent on these images.
- Active Range of Motion (AROM): Once radiographic evidence of early healing is present (typically 6-8 weeks), progress to full active range of motion of the shoulder and elbow.
- Gentle Strengthening: Initiate isometric strengthening exercises for the shoulder and elbow, progressing to very light resistance exercises with elastic bands or light weights.
- Functional Activities: Begin incorporating activities of daily living that involve the arm.
- Continue Avoidance: Avoid heavy lifting, pushing, pulling, or sports-specific activities until robust healing is confirmed.
Advanced Strengthening & Return to Activity Phase (Weeks 12+)
- Radiographic Confirmation: Full return to unrestricted activities requires clear radiographic evidence of fracture union.
- Progressive Strengthening: Advance strengthening exercises with increasing resistance and weight, targeting all major muscle groups of the shoulder and arm.
- Proprioceptive Training: Incorporate balance and proprioception exercises.
- Return to Sport/Work: Gradual return to sports, heavy labor, or other demanding activities, based on physician assessment, full range of motion, strength, and confidence. This phase can extend for several months, with full bone remodeling taking up to a year or more.
The protocol should always be individualized, taking into account the patient's age, bone quality, fracture complexity, surgical stability, and overall progress. Close collaboration between the surgeon, physical therapist, and patient is essential.
Summary of Key Literature / Guidelines
The minimally invasive anterior humeral shaft approach, rooted in the principles of biological internal fixation, is supported by a growing body of literature highlighting its advantages and nuances.
Early descriptions of minimally invasive plating techniques for long bones, particularly the work of the AO Foundation, laid the groundwork for modern MIPPO. The concept of "biologic osteosynthesis," emphasizing preservation of soft tissue and periosteal blood supply, gained traction to address the complications associated with extensive open approaches.
- Radial Nerve Safety: Numerous studies have focused on the radial nerve's vulnerability during humeral shaft fracture fixation. While direct open approaches historically carried a risk of iatrogenic radial nerve injury (2-5%), the minimally invasive techniques aim to mitigate this by avoiding direct exposure in the fracture zone. However, the radial nerve remains at risk from indirect trauma during plate passage, reduction maneuvers, or screw placement, especially in the middle third of the humerus. Systematic reviews and meta-analyses suggest that the incidence of iatrogenic radial nerve palsy with MI plating is comparable to open techniques, emphasizing the need for meticulous surgical technique and careful fluoroscopic guidance. Pre-operative assessment of the nerve and intraoperative surveillance (e.g., nerve monitoring in selected cases) are debated but sometimes employed.
- Union Rates and Functional Outcomes: Comparative studies and meta-analyses comparing MIPPO to conventional open plating and intramedullary nailing have demonstrated generally favorable union rates (typically >90-95%) and good functional outcomes for the minimally invasive anterior approach. These studies often highlight advantages such as reduced blood loss, smaller incisions, and potentially lower rates of infection and non-union due to preserved biology.
- Learning Curve and Radiation Exposure: The inherent technical difficulty of indirect reduction and the reliance on fluoroscopy contribute to a notable learning curve for surgeons adopting this technique. Increased radiation exposure for both patient and surgical team is a recognized drawback, requiring strict adherence to ALARA principles and optimized C-arm techniques. Experienced surgeons tend to have lower fluoroscopy times.
- Comparison to Intramedullary Nailing: While intramedullary nailing remains a popular option for humeral shaft fractures due to its load-sharing nature and less extensive soft tissue dissection, it has its own set of potential complications, including shoulder pain (proximal entry nails), elbow stiffness (distal entry nails), and sometimes higher rates of non-union or delayed union in certain fracture patterns. MIPPO with anterior plating provides an alternative with excellent biomechanical stability and potentially superior results for specific fracture patterns or locations (e.g., proximal and distal metaphyseal-diaphyseal junctions).
- AO Principles: The approach strictly adheres to AO principles of biological fixation and indirect reduction for relative stability, promoting secondary bone healing. The use of locking plates provides angular stability, which is advantageous in comminuted fractures or osteoporotic bone.
In conclusion, the minimally invasive anterior humeral shaft approach is a well-established and effective technique for internal fixation of appropriate humeral shaft fractures. Its success hinges on a profound understanding of surgical anatomy, meticulous pre-operative planning, precise surgical execution with diligent attention to radial nerve safety, and judicious use of fluoroscopy. Continuous refinement of techniques and instrumentation, coupled with rigorous surgeon training, will continue to improve outcomes and broaden the applicability of this valuable approach.
Clinical & Radiographic Imaging

You Might Also Like