Midlateral Approach: Precision for Flexor Sheaths Proximal
Key Takeaway
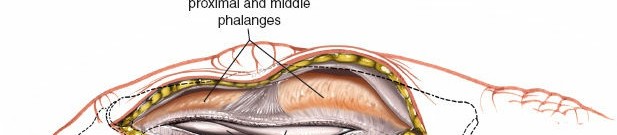
Learn more about Midlateral Approach: Precision for Flexor Sheaths Proximal and how to manage it. The midlateral approach is a surgical technique used to access the **flexor sheaths proximal** and middle phalanges, flexor tendons, and digital nerves in the fingers. This approach involves a dorsolateral incision to expose the fibrous flexor sheath and its contents for procedures such as tendon repair, exploration, or stabilization of phalangeal fractures.
Introduction & Epidemiology
The midlateral approach to the flexor sheaths of the digits, encompassing the proximal and middle phalanges, represents a foundational technique in hand surgery. It provides direct, controlled access to critical volar structures while minimizing morbidity to the dorsal integument and extensor mechanism. Historically, its utility became evident with the advancement of internal fixation techniques for phalangeal fractures and the development of sophisticated flexor tendon repair methodologies requiring meticulous exposure.
Epidemiologically, trauma involving the digits is exceedingly common, ranging from simple lacerations to complex crush injuries, often resulting in phalangeal fractures, flexor tendon disruptions, or neurovascular compromise. Phalangeal fractures constitute a significant proportion of all hand fractures, with varying estimates placing them at 35-50%. Many of these necessitate surgical intervention, particularly displaced or unstable fractures, intra-articular fractures, or those associated with tendon or nerve damage. Furthermore, flexor tendon lacerations, often occurring in Zones 1 and 2, demand precise repair, which the midlateral approach facilitates by offering optimal visualization of the fibrous flexor sheath and its contents. The incidence of digital nerve lacerations requiring repair, often concomitant with other injuries, further underscores the importance of an approach that safely exposes these delicate structures. The midlateral approach stands as a versatile and reliable choice for these indications, allowing for precise surgical manipulation in a confined anatomical space.
Surgical Anatomy & Biomechanics
A thorough understanding of digital anatomy is paramount for the safe and effective execution of the midlateral approach. The operative field encompasses the intricate relationships between bone, tendon, ligament, nerve, and vessel.
Bony Anatomy
The proximal and middle phalanges are long bones with a diaphysis, epiphyses, and articular surfaces. The head of the proximal phalanx articulates with the base of the middle phalanx to form the proximal interphalangeal (PIP) joint, while its base articulates with the metacarpal head to form the metacarpophalangeal (MCP) joint. The distal phalanx articulates with the middle phalanx to form the distal interphalangeal (DIP) joint. These bones provide attachment for intrinsic and extrinsic muscles and form the structural core around which the flexor and extensor mechanisms operate.
Flexor Tendon Sheath & Contents
The fibrous flexor sheath is a crucial retinacular system extending from the metacarpal head to the distal phalanx. It comprises annular (A1-A5) and cruciform (C1-C3) pulleys, essential for maintaining the mechanical advantage of the flexor tendons and preventing bowstringing.
*
A1 Pulley:
Originates from the volar plate of the MCP joint.
*
A2 Pulley:
Located over the proximal phalanx, critical for flexor function.
*
C1 Pulley:
Proximal to the PIP joint.
*
A3 Pulley:
Over the PIP joint, originating from its volar plate.
*
C2 Pulley:
Over the middle phalanx.
*
A4 Pulley:
Over the middle phalanx, also critical for flexor function.
*
C3 Pulley:
Proximal to the DIP joint.
*
A5 Pulley:
Over the distal phalanx, just proximal to the insertion of FDP.
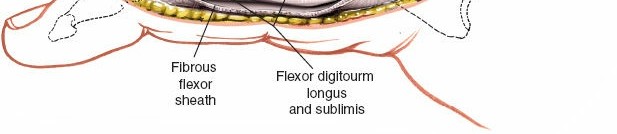
Within this sheath run the flexor digitorum superficialis (FDS) and flexor digitorum profundus (FDP) tendons. The FDS tendon bifurcates at the proximal phalanx, allowing the FDP to pass through, before inserting into the middle phalanx. The FDP tendon continues distally to insert onto the base of the distal phalanx. The precise relationship of these tendons, their chiasma, and the vincula are important considerations.
Neurovascular Bundles
Each digital neurovascular bundle (NVB) consists of a common digital nerve branch, which divides into two proper digital nerves, and the corresponding proper digital artery and vein. These bundles run along the midlateral aspects of the phalanx, volar to the midaxial line, and are deep to the skin and subcutaneous fat but superficial to the flexor sheath. The proper digital nerve provides sensory innervation to the volar aspect of the digit and motor innervation to the lumbricals. The proper digital artery supplies blood to the entire digit. Understanding their exact position relative to the proposed incision is paramount to avoid iatrogenic injury. They are most vulnerable at the level of the PIP joint.
Intrinsic Muscles & Ligaments
The lumbricals originate from the FDP tendons and insert into the extensor hood, contributing to MCP flexion and IP extension. The interossei are located more dorsally and contribute to abduction/adduction and MCP flexion. The collateral ligaments of the MCP, PIP, and DIP joints provide mediolateral stability. The midlateral approach allows for visualization and protection of these structures.
Biomechanical Considerations
The midlateral incision strategically exploits the anatomical planes of the finger. By incising along the midaxial line, it provides direct access to the flexor sheath and neurovascular bundle on the incised side, while protecting the dorsal extensor mechanism and minimizing scar tissue over the crucial palmar flexion creases. This preserves digital function and reduces the risk of flexion contractures. The approach allows for precise management of pulley injuries, tendon repairs, and fracture stabilization, directly impacting the biomechanics of digital motion and grip strength.
Indications & Contraindications
The midlateral approach offers versatility for various surgical interventions involving the digital flexor aspect.
Indications
-
Phalangeal Fractures:
- Displaced or unstable proximal and middle phalangeal shaft fractures requiring open reduction and internal fixation (ORIF).
- Intra-articular fractures of the PIP or DIP joints with significant displacement or articular step-off.
- Fractures with associated flexor tendon or neurovascular injury.
-
Malunion or nonunion requiring corrective osteotomy and fixation.

-
Flexor Tendon Injuries:
- Lacerations of the FDS or FDP tendons within Zones 1, 2, or 3 of the digit.
- Ruptures requiring primary repair or secondary reconstruction.
- Excision of intratendinous lesions or adhesions.
-
Digital Nerve & Artery Procedures:
- Lacerations or transections of proper digital nerves requiring microsurgical repair.
- Neurolysis for nerve compression syndromes in the digit.
- Repair of proper digital artery lacerations.
- Excision of digital neuromas.
-
Fibrous Flexor Sheath Pathology:
- Tumors or cysts arising from the sheath or adjacent structures.
- Release of stenosing tenosynovitis (trigger finger) when volar approaches are contraindicated or for atypical locations.
- Debridement of infected flexor tendon sheath (pyogenic flexor tenosynovitis), though often combined with a volar incision for drainage.
-
Joint Procedures (PIP/DIP):
- Arthrodesis of PIP or DIP joints in specific circumstances.
- Volar plate reconstruction or repair.
Contraindications
- Extensive Dorsal Pathology: If the primary pathology is dorsal (e.g., extensor tendon injury, dorsal fracture fragments requiring direct access), a dorsal approach is preferred.
- Severe Soft Tissue Loss/Infection: Acute, extensive soft tissue loss or active purulent infection directly within the proposed incision line may necessitate alternative approaches or staged reconstruction.
- Pre-existing Scars: A prior surgical incision or traumatic scar directly along the midlateral line may compromise vascularity or necessitate a different approach to avoid further scarring complications.
- Significant Digital Swelling/Edema: While not an absolute contraindication, extreme swelling can distort landmarks and complicate dissection, sometimes warranting a delay.
- Inexperienced Surgeon: Due to the proximity of delicate neurovascular structures, this approach should be performed by surgeons proficient in hand anatomy and microsurgical techniques.
Operative vs. Non-Operative Indications
| Indication Category | Operative Criteria (Midlateral Approach) | Non-Operative Criteria |
|---|---|---|
| Phalangeal Fractures | Displaced or unstable shaft fractures (>20 degrees angulation, >2mm displacement, rotational deformity). Intra-articular fractures with >1mm step-off or gap. Irreducible fractures. Open fractures requiring debridement and internal fixation. Fractures with associated neurovascular or tendon injury. | Stable, non-displaced/minimally displaced shaft fractures. Acceptable angulation/rotation. Closed reduction and splinting/casting sufficient. Stable intra-articular fractures. |
| Flexor Tendon Injuries | Complete lacerations of FDS/FDP. Partial lacerations >50% tendon width. Ruptures requiring primary or secondary repair. | Partial lacerations <50% tendon width (controversial, may require exploration). Minor strains without loss of function. |
| Neurovascular Injuries | Complete transection of proper digital nerve or artery. Significant nerve compression amenable to neurolysis. Traumatic neuroma. | Minor contusions. Nerve stretch injuries without transection (may be observed). |
| Other Pathology | Tumors/cysts requiring excision. Failed conservative management for severe stenosing tenosynovitis (atypical location). Pyogenic flexor tenosynovitis requiring open debridement. | Small, asymptomatic cysts. Mild trigger finger responding to injection. |
Pre-Operative Planning & Patient Positioning
Meticulous pre-operative planning and appropriate patient positioning are critical for successful outcomes.
Pre-Operative Planning
- Clinical Assessment: A comprehensive history and physical examination are essential. This includes evaluation of hand dominance, occupation, mechanism of injury, associated comorbidities, allergies, and current medications. Assess skin integrity, neurovascular status (two-point discrimination, capillary refill), range of motion, and tendon function.
-
Imaging:
- X-rays: Obtain standard posteroanterior, lateral, and oblique views of the affected digit and hand. For intra-articular fractures, dedicated oblique views or stress views may be necessary.
- CT Scan: Indicated for complex intra-articular fractures, comminuted fractures, or when detailed 3D anatomy is required for pre-operative templating.
- MRI/Ultrasound: May be useful for assessing soft tissue injuries such as flexor tendon ruptures or occult masses, though often the decision for exploration is made clinically.
- Surgical Consent: Obtain detailed informed consent, discussing the procedure, potential benefits, risks (e.g., nerve injury, infection, stiffness, nonunion, recurrence), and alternatives.
-
Equipment Preparation:
- Standard hand surgery instrument set, including fine dissecting scissors, microforceps, nerve hooks, vessel loops.
- Magnification (loupes 2.5x to 4.5x) is highly recommended for all cases and essential for neurovascular repair.
- Appropriate fixation devices for fractures (K-wires, miniature screws, mini-plates) should be available.
- Suture material: 5-0 or 6-0 monofilament for skin, 4-0 or 5-0 absorbable for subcutaneous, 4-0 or 5-0 non-absorbable for tendon repair.
- High-speed burr or osteotomes for bony resections.
Patient Positioning
The patient is positioned supine on the operating table. The affected arm is extended onto a specialized hand table or arm board, ensuring comfortable positioning and full access to the operative field for the surgeon and assistant.
Anesthesia
Regional anesthesia (e.g., axillary block or supraclavicular block) with or without conscious sedation is often preferred, providing excellent analgesia and muscle relaxation without the systemic effects of general anesthesia. General anesthesia is an alternative, especially for longer or more complex cases, or if regional techniques are contraindicated.
Tourniquet and Exsanguination
A pneumatic tourniquet is applied to the upper arm (or forearm for forearm blocks) to ensure a bloodless field, which is paramount for visualizing delicate structures. The arm is exsanguinated prior to inflation using either an Esmarch bandage or by elevating the limb for several minutes. Tourniquet pressure should be set at approximately 250 mmHg for normotensive patients or 100 mmHg above systolic blood pressure. Tourniquet time must be carefully monitored, typically not exceeding 90-120 minutes.

Good lighting and an exsanguinating bandage and tourniquet are essential, as depicted in relevant surgical texts.
Detailed Surgical Approach / Technique
The midlateral approach requires meticulous attention to detail at each step to ensure optimal exposure and minimize iatrogenic injury.
Landmarks and Incision
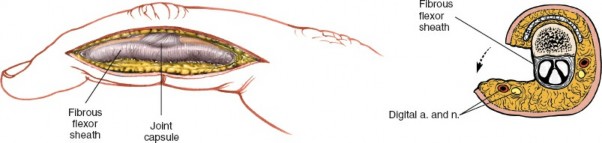
The initial step involves careful identification of anatomical landmarks. The proximal and distal interphalangeal creases are crucial guides for the skin incision. These creases extend around the medial and lateral surfaces of the fingers, terminating slightly nearer the dorsal than the volar surface. It is critical to note that these creases may become indistinct if the finger is significantly swollen or held in full extension. In such scenarios, the surgical landmark for the skin incision becomes the junction between the wrinkled dorsal skin and the smooth volar skin on the side of the finger. This junction approximately represents the midaxial line.
The incision is made along the midlateral line of the involved digit, extending from just distal to the MCP joint to just proximal to the DIP joint, or as dictated by the extent of the pathology. The incision should be curvilinear, gently arcing volarly across the PIP and DIP joints to avoid crossing flexion creases perpendicularly, which could lead to contractures. For procedures requiring access across multiple joints, the incision can be extended proximally or distally as needed, maintaining the midlateral trajectory. The choice of which side (radial or ulnar) of the digit to incise depends on the specific pathology, surgeon preference, and the location of the neurovascular bundle requiring protection or exposure. Typically, the side away from the more critical neurovascular bundle (e.g., ulnar side for thumb, radial side for small finger) is chosen if only one bundle needs to be protected, or if the pathology is biased to one side.
Dissection
- Skin Incision: Use a #15 scalpel blade to make a precise incision through the skin.
- Subcutaneous Tissue: The dissection proceeds through the subcutaneous fat, which contains numerous small vessels and nerve branches. Meticulous hemostasis is maintained with bipolar cautery.
-
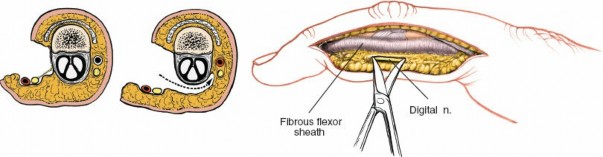
Identification and Protection of Neurovascular Bundle:
This is the most critical step. The proper digital neurovascular bundle lies volar to the midaxial line, deep to the subcutaneous fat. Using fine scissors and nerve hooks, carefully identify and dissect the neurovascular bundle. The bundle on the side of the incision must be identified, gently mobilized, and retracted volarly, usually with a small blunt retractor or vessel loop, to protect it throughout the procedure. If the pathology is on the same side as the NVB, careful isolation and retraction are even more important. The dorsal NVB should be left undisturbed.
Note: The original content mentions "access to the neurovascular bundle on the incised side of the finger." While this is true, the primary goal is often to protect it. For direct NVB repair or neurolysis, direct access is intended. - Exposure of the Flexor Tendon Sheath: Once the neurovascular bundle is safely retracted volarly, the fibrous flexor tendon sheath is exposed. The lateral aspect of the sheath is now clearly visible.
Incision of the Flexor Sheath and Contents Exposure
- Sheath Incision: The flexor sheath is carefully incised longitudinally along its midlateral aspect, between the annular pulleys (A2 and A4 are critical). It is important to preserve at least one intact pulley (ideally A2 and A4) to prevent significant bowstringing, particularly when managing flexor tendon repairs. If a full-length incision is required for extensive pathology, a zigzag or step-cut incision pattern can be considered to minimize scarring and facilitate later closure.
-
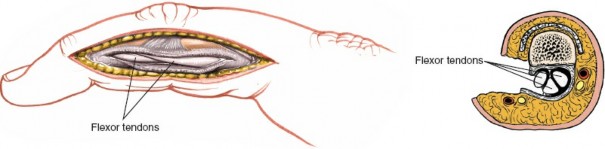
Visualization of Flexor Tendons:
With the sheath opened, the FDS and FDP tendons are visualized. Assess for any lacerations, adhesions, or other pathology. If a tendon repair is indicated, the tendon ends are identified and mobilized.
Management of Specific Pathologies
A. Phalangeal Fractures
- Exposure: The fracture site is exposed by carefully retracting the flexor tendons (after opening the sheath) and the neurovascular bundle. Any intervening soft tissue or hematoma is debrided.
- Reduction: The fracture fragments are anatomically reduced under direct visualization. Temporary fixation can be achieved with K-wires. For intra-articular fractures, precise anatomical reduction of the articular surface is paramount.
-
Internal Fixation:
- K-wires: Suitable for stable, two-part fractures, oblique fractures, or as temporary fixation prior to definitive plating. Wires are inserted to cross the fracture line and engage both cortices.
- Mini-Screws: Used for larger fragments, especially for oblique or spiral fractures. Headless compression screws or conventional cortical screws can be employed.
-
Mini-Plates and Screws:
Indicated for comminuted or unstable shaft fractures, fractures with significant bone loss, or failed K-wire/screw fixation. Plates are typically applied to the non-vascular side (midlateral/dorsolateral) of the bone to minimize interference with soft tissues. The use of low-profile plates is essential.
- Bone Grafting: For fractures with significant bone loss or delayed unions, autogenous or allogenous bone graft may be incorporated.
- Stability Assessment: After fixation, assess the stability of the construct and ensure full range of motion of adjacent joints without impingement or instability.
B. Flexor Tendon Repair
- Tendon End Retrieval: Identify and retrieve the lacerated tendon ends. Proximally retracted tendons may require gentle milking of the forearm or a more proximal incision.
- Repair Technique: A core suture technique (e.g., modified Kessler, double modified Kessler, Lim-Tsai, or cross-stitch) is performed using 3-0 or 4-0 non-absorbable monofilament suture. A peripheral epitendinous suture (e.g., running locking suture with 6-0 monofilament) reinforces the repair and smooths the surface.
- Pulley Management: If a pulley (e.g., A2 or A4) needs to be cut for access, a repair (e.g., using 5-0 absorbable suture) should be considered to restore its function, or at least a significant portion must be preserved.
C. Digital Nerve Repair
- Nerve End Identification: Identify the proper digital nerve ends. Magnification (loupes or operating microscope) is crucial.
- Debridement and Repair: Gently debride any damaged nerve tissue. If a clean transection, perform an epineurial repair with 8-0 or 9-0 monofilament sutures, ensuring no tension at the repair site. Nerve grafting may be required for significant gaps.
Closure
- Irrigation: Copiously irrigate the wound with sterile saline.
- Tendon Sheath Closure: If the flexor sheath was incised, partial closure may be performed using fine absorbable sutures, preserving adequate space for tendon gliding. Complete closure is often not necessary and can lead to adhesions. If an A2 or A4 pulley was incised, re-approximation or repair may be performed if indicated.
- Subcutaneous Closure: Close the subcutaneous tissue loosely with fine absorbable sutures (e.g., 4-0 or 5-0 vicryl) to obliterate dead space.
-
Skin Closure:
Close the skin with non-absorbable monofilament sutures (e.g., 5-0 or 6-0 nylon) using interrupted or running stitches. Ensure eversion of the skin edges.
-
Dressing:
Apply a sterile, non-adherent dressing (e.g., Xeroform or Adaptic), followed by soft gauze and a volar splint to maintain the digit in a position of safety (MCPs flexed 70-90°, IPs extended or slightly flexed, wrist slightly extended) to protect the repair or fixation and prevent stiffness.
Complications & Management
Despite meticulous surgical technique, complications can arise following the midlateral approach. Vigilant post-operative monitoring and prompt intervention are essential for optimal outcomes.
Common Complications
| Complication | Incidence | Management / Salvage Strategies |
|---|---|---|
| Digital Nerve Injury | 2-5% (temporary paresthesia), <1% (permanent deficits) | Prevention: Meticulous dissection under magnification, careful retraction. Acute: If recognized intra-op, immediate microsurgical repair. Post-op: Observe for mild paresthesia. For persistent deficits, consider neurolysis or secondary nerve repair/grafting. |
| Digital Artery Injury | <1% | Prevention: Careful dissection and identification. Acute: If recognized intra-op, primary microvascular repair (if large vessel) or ligation (if smaller collateral present). Post-op: Monitor for digital ischemia; consider re-exploration. |
| Infection | 1-3% | Prevention: Aseptic technique, prophylactic antibiotics. Management: Oral antibiotics for superficial infections. For deep infections (tendon sheath, bone), surgical debridement, IV antibiotics, and possibly hardware removal. |
| Stiffness / Adhesions | 5-15% (highly variable based on injury and compliance) | Prevention: Early, controlled post-operative mobilization; diligent hand therapy. Management: Aggressive hand therapy, dynamic splinting. For recalcitrant cases, tenolysis or capsulotomy. |
| Scar Contracture | 5-10% (more common with poor incision planning) | Prevention: Careful curvilinear incision along midaxial line, avoid crossing creases perpendicularly. Management: Scar massage, silicone gel sheets, steroid injections. Z-plasty or scar revision for severe contractures. |
| Nonunion / Malunion | 2-8% (fractures) | Prevention: Anatomical reduction, stable internal fixation. Management: For nonunion, revision ORIF with bone grafting. For symptomatic malunion, corrective osteotomy. |
| Hardware Failure | 1-3% (fractures) | Prevention: Appropriate implant selection, biomechanically sound fixation. Management: Revision surgery with removal of failed hardware, re-fixation, potentially bone grafting. |
| CRPS (Type 1) | 1-5% | Prevention: Minimizing tissue trauma, early mobilization, adequate pain control. Management: Aggressive hand therapy, pain management (NSAIDs, gabapentin, tricyclic antidepressants), regional nerve blocks, sympathetic blocks. |
| Tendon Bowstringing | <1% (if pulleys are adequately preserved) | Prevention: Preserve A2 and A4 pulleys; repair if extensively divided. Management: Reconstruction of pulley system (e.g., free tendon graft) for symptomatic bowstringing. |
Post-Operative Rehabilitation Protocols
Post-operative rehabilitation is integral to maximizing functional recovery and mitigating complications such as stiffness and adhesions. Protocols vary based on the specific pathology managed, but general principles apply.
General Principles
- Pain Management: Adequate analgesia allows for better patient compliance with therapy.
- Edema Control: Elevation, gentle compression, and ice packs help minimize swelling.
- Wound Care: Daily dressing changes as instructed, monitoring for signs of infection. Sutures are typically removed at 10-14 days.
- Scar Management: Once the wound is healed, gentle scar massage, silicone gel sheeting, and desensitization techniques are initiated.
Specific Protocols
A. Phalangeal Fractures (ORIF)
-
Immobilization Phase (0-3 weeks):
- Splinting: Volar splint, extending from the forearm to the fingertips, holding the MCP joints in 70-90° flexion, IP joints in full or nearly full extension, and the wrist in slight extension (position of safety). This maintains collateral ligament length.
- Early Motion (if stable fixation): If fixation is deemed stable intra-operatively, gentle active and passive range of motion (ROM) of adjacent uninvolved joints (e.g., wrist, elbow) is encouraged immediately. For the operated digit, very gentle active DIP/PIP flexion/extension may be initiated under therapist guidance as early as 1 week post-op, avoiding stress on the fracture site.
- Buddy Taping: For stable proximal phalanx fractures, buddy taping to an adjacent digit may be initiated early to allow protected motion.
-
Mobilization Phase (3-6 weeks):
- Splint Removal: The static splint is typically discontinued around 3-4 weeks.
- Active/Passive ROM: Aggressive active and passive ROM exercises for all digital joints are initiated. Dynamic splinting may be introduced to address flexion or extension deficits.
- Strengthening: Gentle grip strengthening exercises are started.
-
Return to Activity (6-12+ weeks):
- Progressive Strengthening: Advance strengthening exercises with resistance.
- Functional Activities: Incorporate activities of daily living (ADLs) and work-specific tasks.
- Return to Sport/Work: Gradual return to strenuous activities, typically after 10-12 weeks, contingent on radiographic healing and clinical stability.
B. Flexor Tendon Repairs
-
Immobilization/Protected Motion Phase (0-6 weeks):
- Dorsal Blocking Splint: Applied immediately post-op, holding the wrist in 20-30° flexion, MCP joints in 70-90° flexion, and IP joints in full extension. This prevents active digital extension, protecting the repair.
- Early Passive Motion (Duran Protocol): Within the dorsal blocking splint, passive flexion and extension exercises of the IP joints are performed multiple times daily by the patient or therapist, often with controlled active extension within the splint.
- Controlled Active Motion (Kleinert Protocol): A dynamic splint incorporating a rubber band traction system allows passive flexion via the rubber band and active extension to the limits of the dorsal block.
-
Intermediate Phase (6-8 weeks):
- Splint Discontinuation: The dorsal blocking splint is gradually weaned.
- Active Motion: Full active ROM exercises are initiated for all digital joints.
- Light Strengthening: Very gentle strengthening exercises begin.
-
Advanced Strengthening & Return to Activity (8-12+ weeks):
- Progressive Strengthening: Advance strengthening, grip, and pinch exercises.
- Functional Training: Return to ADLs and light work. Heavy labor or sport-specific activities are gradually introduced after 12 weeks.
C. Digital Nerve Repairs
-
Immobilization Phase (0-3 weeks):
- Protective Splint: A static volar splint to maintain the digit in a position that minimizes tension on the nerve repair. This usually involves mild flexion of adjacent joints.
-
Mobilization & Sensory Re-education (3+ weeks):
- Gentle ROM: Begin gentle active and passive ROM to prevent joint stiffness, ensuring no undue tension on the nerve.
- Sensory Re-education: Initiate sensory re-education programs to facilitate nerve regeneration and cortical reorganization. This includes desensitization, discriminative sensory re-education, and tactile stimulation.
- Progressive Strengthening: Introduce strengthening as nerve recovery progresses.
- Long-Term Follow-up: Continued sensory re-education and functional training may be necessary for several months to a year, depending on the extent of nerve injury and regeneration.
Summary of Key Literature / Guidelines
The midlateral approach, while a fundamental technique, has evolved with advancements in hand surgery. Key literature and guidelines emphasize precision, respect for tissue planes, and comprehensive post-operative management.
- Historical Context: Early descriptions of digital approaches by Bunnell, Littler, and then Bruner laid the groundwork for modern incisions. While Bruner's zigzag volar incision became popular for direct flexor sheath access due to its ability to prevent contractures, the midlateral approach maintained its niche for specific indications where lateral access or dorsal extensor mechanism preservation was prioritized.
- Anatomical Texts: Classic anatomical treatises by Brand & Hollister ("Clinical Mechanics of the Hand") and Kapandji ("The Physiology of the Joints, Vol. 1: Upper Limb") provide foundational understanding of digital biomechanics, crucial for appreciating the impact of surgical approaches. Comprehensive surgical atlases (e.g., Green's Operative Hand Surgery, Campbell's Operative Orthopaedics) detail the indications and techniques.
- Fracture Fixation Principles: The literature consistently supports anatomical reduction and stable internal fixation for displaced or intra-articular phalangeal fractures. Studies by Eaton and others demonstrated the long-term benefits of precise articular reduction in preventing post-traumatic arthritis. The use of low-profile plates and screws is advocated to minimize soft tissue irritation and preserve tendon gliding.
- Flexor Tendon Repair: The paradigm for flexor tendon repair shifted from prolonged immobilization to early, controlled motion protocols (e.g., Duran, Kleinert, modified protocols) following seminal work by Verdan, Kleinert, and Merritt. These protocols are supported by extensive biomechanical and clinical studies demonstrating improved outcomes with reduced adhesions and increased ROM. The importance of maintaining pulley integrity, particularly A2 and A4, is a consistent theme, with literature supporting partial pulley excision or reconstruction when necessary for access.
- Neurovascular Repair: Microsurgical principles, as elucidated by surgeons like Millesi and Sunderland, are paramount for digital nerve repair, emphasizing tension-free coaptation and meticulous epineurial or fascicular repair. Outcomes are significantly influenced by the level of injury, patient age, and associated trauma. Guidelines stress the importance of early identification and repair.
- Rehabilitation Guidelines: The American Society of Hand Therapists (ASHT) provides evidence-based guidelines for rehabilitation protocols for various hand injuries, including phalangeal fractures and flexor tendon repairs. These guidelines continually evolve, integrating new research on optimal timing and intensity of therapy.
- Current Trends: Modern hand surgery places increasing emphasis on minimally invasive techniques when appropriate, but the open midlateral approach remains a gold standard for complex digital pathology requiring direct visualization and robust fixation or repair. Advanced imaging, intraoperative fluoroscopy, and specialized micro-instrumentation further refine the precision and safety of this approach. The understanding of scar biology and strategies for prevention and management of adhesions also continue to advance, complementing surgical technique.
