Operative Management of Septic Arthritis: Tarsal, Ankle, and Knee Joints
Key Takeaway
Septic arthritis of the lower extremity requires emergent surgical intervention to prevent irreversible chondral damage. This comprehensive guide details the operative management of the tarsal, ankle, and knee joints. It covers essential techniques including joint aspiration, open arthrotomy, and arthroscopic irrigation. By mastering these anterolateral, posteromedial, and posterior approaches, orthopedic surgeons can effectively eradicate loculated purulence, debride fibrinous exudate, and optimize postoperative functional recovery in adult and pediatric populations.
INTRODUCTION TO LOWER EXTREMITY SEPTIC ARTHRITIS
Bacterial infection of a joint space represents an orthopedic emergency. The rapid accumulation of purulent exudate, rich in polymorphonuclear leukocytes, leads to the release of proteolytic enzymes, matrix metalloproteinases, and lysosomal degradation agents. If left untreated, this enzymatic cascade causes irreversible destruction of articular cartilage within 24 to 48 hours.
The primary objective of surgical intervention is the immediate and thorough evacuation of purulent material, disruption of fibrinous loculations, and copious irrigation of the joint space to decrease the bacterial load and enzymatic concentration. While antibiotic therapy is a critical adjunct, mechanical drainage remains the cornerstone of treatment. This chapter details the operative techniques for managing septic arthritis in the tarsal joints, the ankle, and the knee, providing evidence-based approaches for orthopedic residents, fellows, and practicing consultants.
TARSAL JOINTS
Primary hematogenous septic arthritis of the isolated tarsal joints (e.g., subtalar, talonavicular, calcaneocuboid) is exceedingly rare in immunocompetent adults. It is more frequently encountered secondary to direct inoculation from penetrating trauma, advanced diabetic foot infections, or contiguous spread from adjacent osteomyelitis. Because of the complex, interconnected synovial anatomy of the midfoot and hindfoot, an uncontrolled infection in the tarsal joints requires aggressive and wide surgical drainage to prevent rapid joint destruction and systemic sepsis.
Surgical Drainage of the Tarsal Joints
🚨 Surgical Warning
The complex architecture of the tarsal joints means that infection can easily track along fascial planes and tendon sheaths. Preoperative advanced imaging (MRI with contrast) is highly recommended to identify the exact extent of synovial involvement and any associated osteomyelitis or soft-tissue abscesses.
Surgical Technique 17-1: Open Drainage
- Incision and Exposure: Make a medial or lateral longitudinal incision, approximately 5 to 7.5 cm in length, centered over the point of maximum fluctuance or radiographic involvement. The choice of a medial versus lateral approach is dictated by the specific joint involved and the location of the primary abscess.
- Deep Dissection: Carefully deepen the incision through the subcutaneous tissues. Protect the superficial neurovascular structures (e.g., the sural nerve laterally or the saphenous nerve medially). Retract the extensor or flexor tendons as necessary to expose the underlying joint capsules.
- Capsulotomy: Open the joint capsules widely. A limited capsulotomy will result in inadequate drainage and recurrent infection.
- Evacuation and Culture: Before initiating irrigation, obtain representative samples of synovial fluid and inflamed synovial tissue for Gram stain, aerobic, anaerobic, acid-fast bacilli (AFB), and fungal cultures.
- Irrigation: Evacuate the frank pus and perform copious irrigation using at least 3 to 6 liters of sterile normal saline. Pulsatile lavage may be used cautiously, ensuring it does not drive purulent material deeper into uninfected tissue planes.
- Closure: Do not close the capsule. Close the subcutaneous tissue and skin loosely over large-bore closed-suction drains, or leave the wound open to heal by secondary intention if tissue viability is questionable.
Postoperative Protocol
Apply a well-padded posterior plaster splint with the foot in a strictly neutral position and the ankle at 90 degrees to prevent equinus contracture. The splint is worn continuously until the surgical wound has healed and the acute inflammatory phase has resolved. Once clinical and serological markers (CRP, ESR) normalize, graduated weight-bearing and active range-of-motion (ROM) exercises are initiated.
THE ANKLE JOINT
The ankle joint is a tight, highly congruent hinge joint. The accumulation of even a small volume of purulent fluid can cause severe pain and rapid capsular distension.
Ankle Joint Aspiration
Swelling and periarticular edema around the ankle often obscure bony landmarks, making the location of fluctuance difficult to palpate. Blind aspiration carries the risk of iatrogenic injury to the anterior neurovascular bundle (deep peroneal nerve and anterior tibial artery).
To safely aspirate the ankle joint, the needle is inserted 2.5 cm proximal and 1.3 cm anterior to the tip of the lateral malleolus. This trajectory places the needle just lateral to the peroneus tertius tendon, safely avoiding the central neurovascular structures.
Open Drainage of the Ankle
The ankle joint capsule can be accessed and drained through four primary approaches: anterolateral, anteromedial, posterolateral, and posteromedial. The choice of approach depends on the location of the loculated pus and the surgeon's preference. Often, a combined anterior and posterior approach is required for complete through-and-through drainage.
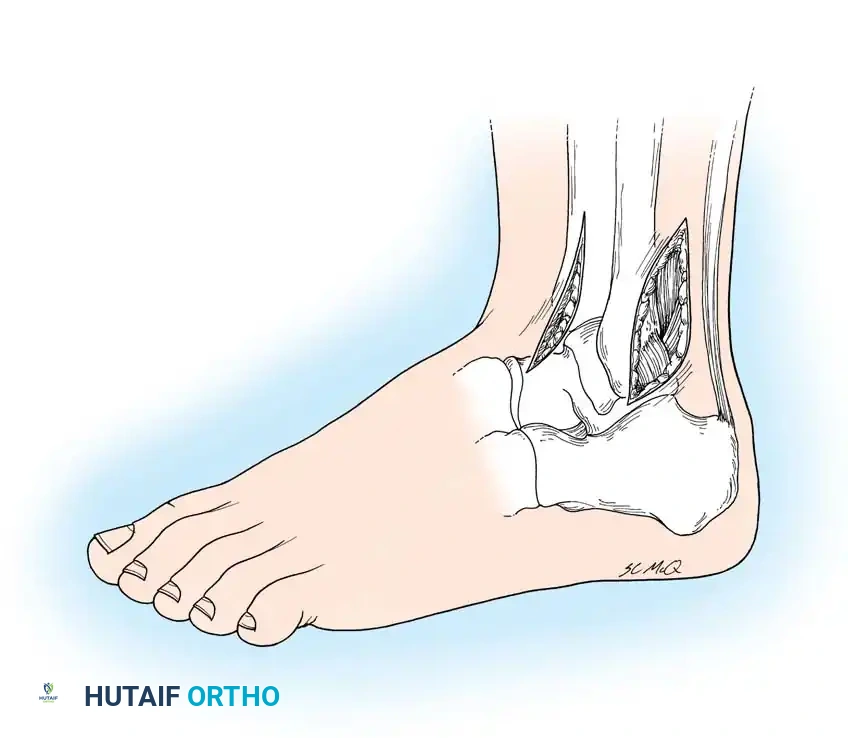
Fig. 17-2 Anterolateral and posterolateral approaches to drain ankle.
Anterolateral Drainage (David)
Surgical Technique 17-2
- Incision: Make a longitudinal incision 5 to 7.5 cm long over the anterior aspect of the joint, positioned 1.3 to 2.5 cm anterior to the lateral malleolus.
- Dissection: Carry the dissection through the extensor retinaculum and deep fascia just lateral to the sheath of the extensor digitorum longus tendons and the peroneus tertius tendon.
- Capsulotomy: Identify the anterior joint capsule and incise it longitudinally. Evacuate the purulence and irrigate copiously.
Posterolateral Drainage
According to David, the posterolateral approach is often considered safer and more effective than other approaches because it provides dependent drainage when the patient is supine and avoids the major anterior and medial neurovascular bundles.
💡 Clinical Pearl
Holding the foot in forced dorsiflexion during a posterolateral approach obliterates the anterior capsular compartment and forces purulent material into the posterior compartment, allowing for a more thorough evacuation of the joint space.
Surgical Technique 17-3
- Positioning: Hold the foot in dorsiflexion.
- Incision: Begin the incision 5 cm proximal to the tip of the lateral malleolus, positioned just lateral to the Achilles tendon. Extend the incision distally to the calcaneus, curving it gently along the superior border of the calcaneus for 2.5 cm.
- Neurovascular Protection: Identify and carefully retract the sural nerve and the small saphenous vein laterally.
- Deep Dissection: Press the thick pad of adipose tissue over the posterior aspect of the capsule distally against the subtalar joint to protect it from inadvertent arthrotomy. Retract the peroneal tendons laterally.
- Capsulotomy: Incise the posterior joint capsule proximal to the shining, cordlike posterior talofibular ligament. It is imperative to incise the posterior capsule under direct vision to avoid iatrogenic injury to the articular cartilage. This approach is also excellent for extending drainage into the subtalar joint if concomitant infection is present.
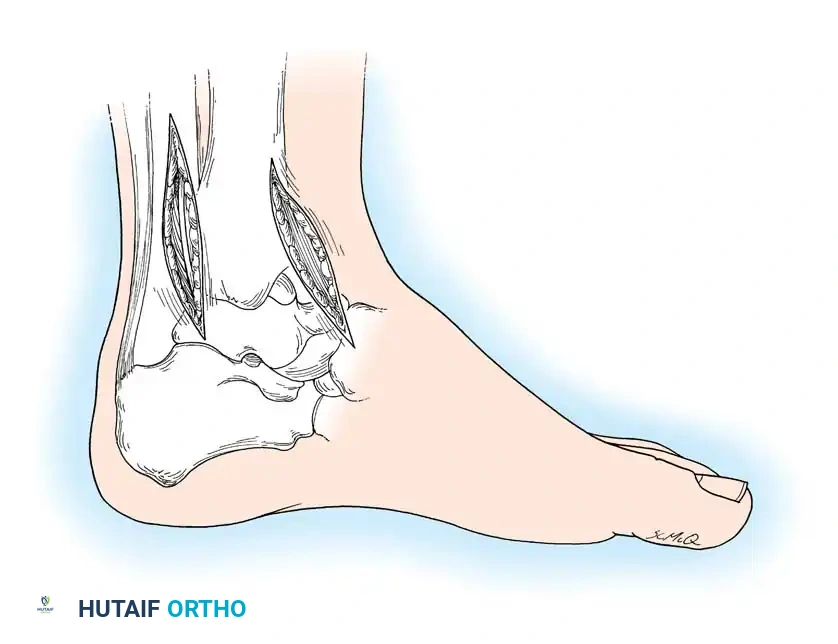
Fig. 17-3 Anteromedial and posteromedial approaches to drain ankle.
Anteromedial Drainage
Surgical Technique 17-4
- Incision: Make a 7.5 cm longitudinal incision on the anterior aspect of the ankle, running parallel to the medial border of the tibialis anterior tendon.
- Dissection: Carry the dissection directly down to the anterior joint capsule. Take great care to identify and protect the great saphenous vein and saphenous nerve in the superficial tissues.
- Capsulotomy: Incise the capsule longitudinally. Do not disturb or open the adjacent tendon sheaths unless there is clear evidence of concomitant tenosynovitis, as opening clean sheaths can spread the infection.
Posteromedial Drainage
Surgical Technique 17-5
- Incision: Make a 7.5 to 10 cm longitudinal incision medial to and parallel with the Achilles tendon.
- Dissection: Deepen the incision through the fascia. Identify the flexor hallucis longus (FHL) tendon.
- Neurovascular Protection: Retract the FHL tendon and the entire posteromedial neurovascular bundle (posterior tibial artery, tibial nerve) medially.
- Capsulotomy: Continue the dissection directly anteriorly down to the posterior ankle joint capsule and incise it.
🚨 Surgical Warning
During the posteromedial approach, the dissection must remain strictly lateral to the flexor hallucis longus tendon. The FHL serves as a critical anatomical barrier; staying lateral to it ensures that the tibial nerve, posterior tibial vessels, and medial tendons are completely protected.
Postoperative Protocol for Ankle Drainage
Following capsulotomy and irrigation via any of the aforementioned approaches, the wound is closed loosely over closed-suction drains. A posterior plaster splint is applied with the foot in a neutral position (ankle at 90 degrees). The splint is maintained until the surgical wound demonstrates early healing. Subsequently, graduated weight-bearing and active range-of-motion exercises are initiated to facilitate cartilage nutrition and prevent arthrofibrosis.
THE KNEE JOINT
The knee joint is the most frequently affected large joint in cases of bacterial septic arthritis, with an overall incidence of approximately 2 in 100,000 individuals per year. Due to its large synovial volume, the knee can sequester a massive amount of purulent exudate, leading to rapid cartilage degradation if not addressed emergently.
Knee Joint Aspiration
Because the knee is a superficial joint, it can be aspirated easily in the emergency department or clinic setting.
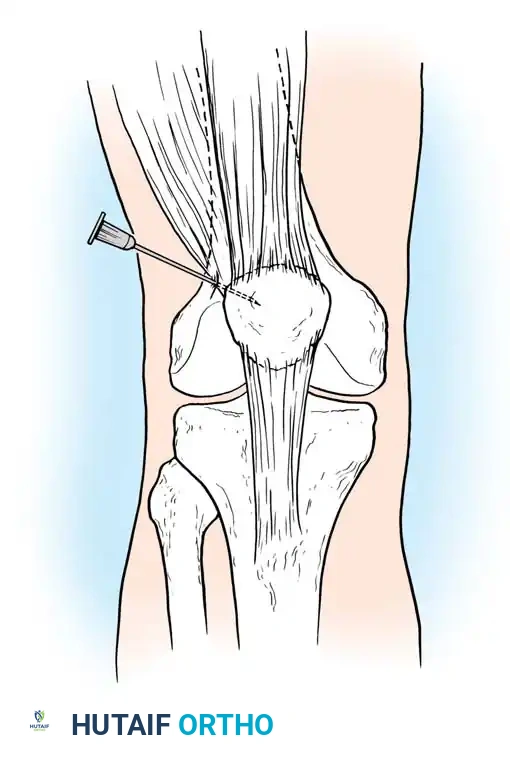
Fig. 17-4 Aspiration of knee, anteroposterior view.
Technique: The needle is inserted on the lateral side of the knee at the level of the superior pole of the patella. It is advanced medially and slightly inferiorly through the lateral retinaculum directly into the suprapatellar pouch. Aspiration from the superolateral approach avoids the infrapatellar fat pad, which can clog the needle and yield a dry tap.
Arthroscopic Drainage of the Knee
Arthroscopic drainage is currently the gold standard and preferred treatment for acute septic arthritis of the knee in adults. Extensive literature supports its efficacy, as it combines the diagnostic superiority of direct visualization with the therapeutic benefits of thorough mechanical debridement, while avoiding the morbidity of a large open arthrotomy.
Advantages of Arthroscopy:
1. Complete visualization of all compartments, including the medial and lateral gutters and the posterior compartments.
2. Ability to mechanically disrupt fibrinous loculations and adhesions using a motorized shaver.
3. Targeted partial synovectomy in areas of severe hypertrophy.
4. Significantly less postoperative pain, allowing for immediate continuous passive motion (CPM) and accelerated rehabilitation.
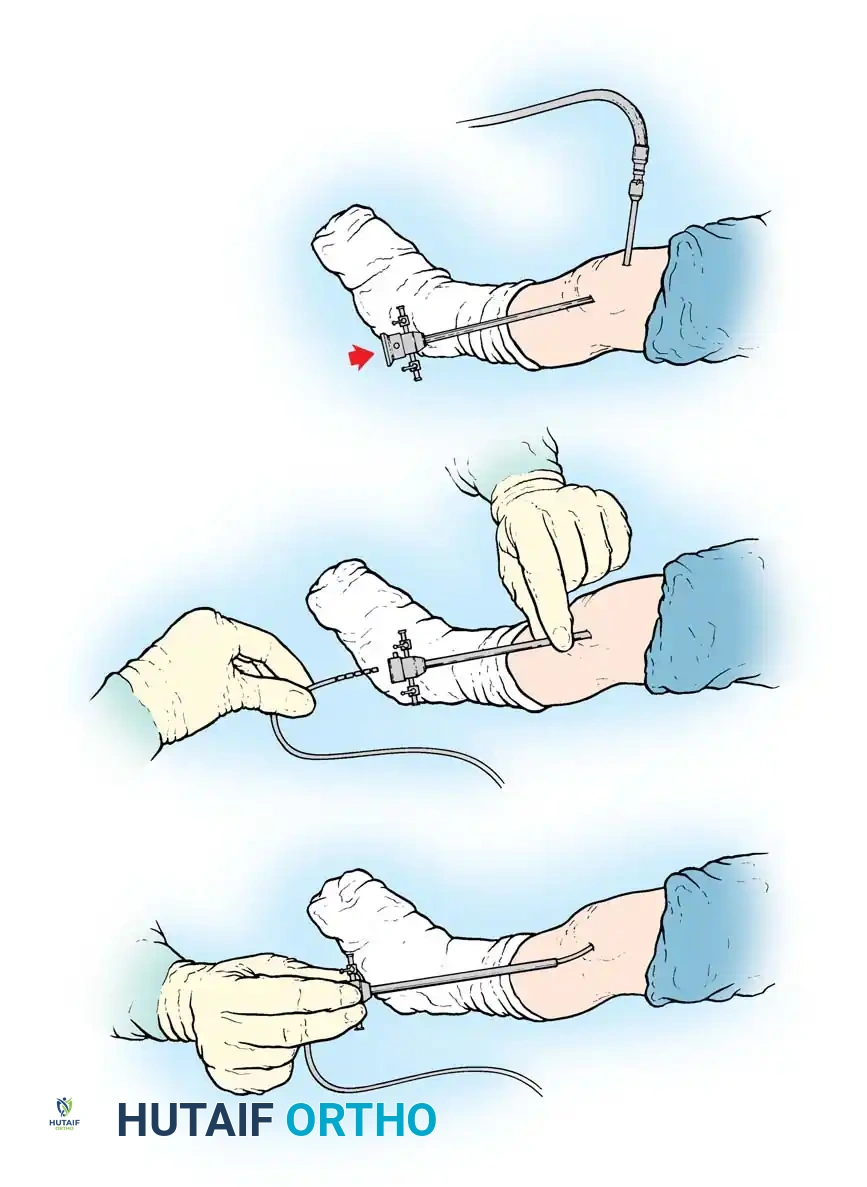
Fig. 17-5 Arthroscopic irrigation of septic knee. A, Cannula is inserted in suprapatellar pouch for outflow, and knee is irrigated through arthroscopic sheath. B, Small suction drain is inserted through arthroscopic sheath. C, Sheath is removed as drain is held in place.
Surgical Technique 17-6: Arthroscopic Management
- Preparation: After standard sterile preparation and draping under general or regional anesthesia, insert a large-bore inflow cannula into the suprapatellar pouch (Fig. 17-5A). This allows for high-volume, high-flow irrigation.
- Portal Placement: Establish a standard anterolateral viewing portal. Introduce the arthroscope and immediately begin irrigating the joint with sterile normal saline or lactated Ringer's solution until the effluent fluid runs completely clear.
- Diagnostic Sweep: Systematically inspect the joint. Note the condition of the articular cartilage (e.g., chondromalacia, full-thickness loss) and identify any fibrinous debris, purulent loculations, or synovial hypertrophy.
- Debridement: Establish an anteromedial working portal. Use a motorized shaver to debride fibrinous exudate and perform a limited synovectomy if the synovium is severely inflamed and trapping purulence. Ensure the posteromedial and posterolateral compartments are visualized and flushed.
- Drain Placement: After thorough debridement and irrigation (typically 6 to 9 liters), remove the arthroscope. Insert a small closed-suction drain through the arthroscopic sheath into the joint (Fig. 17-5B). Remove the sheath while holding the drain securely in place (Fig. 17-5C).
- Closure: Close the portal sites loosely and splint the knee in a functional position.
Open Drainage of the Knee
While arthroscopy is preferred for acute cases, open arthrotomy remains necessary for delayed presentations with thick, organized abscesses, cases with extensive extra-articular extension, or when arthroscopic equipment is unavailable.
Anterior Drainage (Technique 17-7)
- Incision: Make parallel anterior longitudinal incisions, 7.5 to 10 cm long, on each side of the patella (medial and lateral parapatellar approaches).
- Capsulotomy: Incise the retinaculum, capsule, and synovium. Evacuate the purulent material and manually break up any loculations. Use copious saline irrigation.
- Closure: Leave the synovium open to prevent re-accumulation of fluid under tension. Loosely close the capsule using absorbable sutures, and close the skin over large drains.
- Postoperative Care: If this approach is used, patients must spend significant time in the prone position to allow gravity-assisted dependent drainage, or they must be placed on a Continuous Passive Motion (CPM) machine immediately to pump the fluid out of the joint.
Posterior Compartment Drainage
If the posterior compartment of the knee is massively distended and a popliteal abscess is well established, anterior approaches alone are insufficient. In these complex cases, parallel anterior incisions must be combined with posterolateral and posteromedial incisions.
🚨 Surgical Warning
A direct posterior midline approach should never be used to drain an infected knee. A midline approach exposes the critical popliteal neurovascular bundle to purulent exudate and direct pressure from surgical drains. Furthermore, it creates a vertical scar across the flexion crease, leading to severe, potentially irreversible flexion contractures.
The posterior compartment is anatomically divided by a median septum into medial and lateral halves. These must be drained independently using the Henderson, Klein, or Kelikian approaches.
Posterolateral and Posteromedial Drainage (Henderson)
Surgical Technique 17-8
- Posterolateral Approach: With the knee flexed, make a 7.5 cm incision on the posterolateral aspect of the knee, just anterior to the fibular head and the biceps femoris tendon. This specific placement avoids the common peroneal nerve, which runs parallel to the posteromedial border of the biceps tendon before wrapping around the fibular neck. Deepen the incision through the iliotibial band to expose and incise the posterolateral joint capsule (Fig. 17-6).
- Posteromedial Approach: Make a similar 7.5 cm posteromedial incision anterior to the relaxed tendons of the semimembranosus, semitendinosus, sartorius, and gracilis muscles (Fig. 17-7). Carry the dissection through the deep fascia and incise the capsule longitudinally, just posterior to the posterior margin of the tibial collateral ligament, entering the medial half of the posterior compartment.
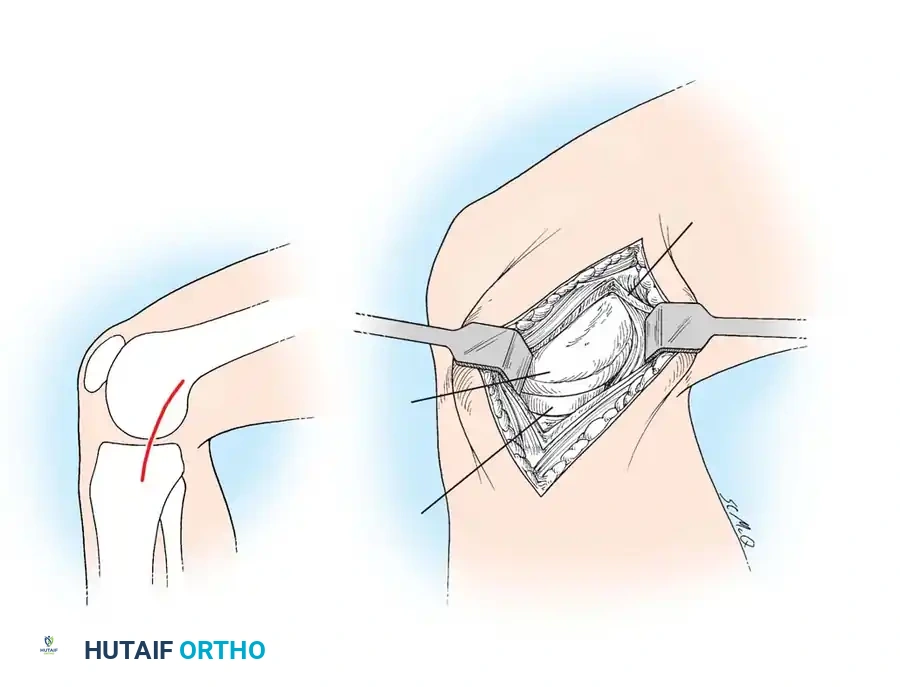
Fig. 17-7 Henderson posteromedial approach to knee joint.
Posteromedial Drainage (Klein)
Klein’s approach elegantly utilizes the natural anatomical communication that often exists between the knee joint and the bursa located between the semimembranosus tendon and the medial head of the gastrocnemius.
Surgical Technique 17-9
- Incision: With the knee slightly flexed, make a 10 cm longitudinal incision centered over the joint line, located just lateral to the semimembranosus tendon.
- Dissection: Incise the superficial fascia to expose the medial hamstring tendons. Identify the interval between the medial head of the gastrocnemius and the semimembranosus.
- Capsulotomy: Follow the gastrocnemius proximally to its insertion on the medial femoral condyle. Expose the capsule in this interval and incise it, entering the joint through the bursal communication.
Posteromedial and Posterolateral Drainage (Kelikian)
Kelikian described a more aggressive approach for severe, recalcitrant posterior compartment infections, involving the excision of the posterior meniscal horns to ensure unobstructed drainage.
Surgical Technique 17-10
- Posteromedial Stage: Make a 7.5 to 10 cm posterior longitudinal incision centered over the semimembranosus tendon. Develop the interval between this tendon and the medial head of the gastrocnemius. Divide the semimembranosus tendon and suture its proximal stump to the deep fascia to keep it retracted. Create a generous window in the posteromedial joint capsule and excise the posterior horn of the medial meniscus.
- Posterolateral Stage: If the lateral compartment also requires drainage, make a 7.5 to 10 cm longitudinal incision over the biceps femoris tendon. Incise the deep fascia anterior and lateral to the tendon. Free the biceps tendon from the fibular head and the popliteus tendon from the lateral femoral condyle. Suture both free ends to the deep fascia. Window the posterolateral capsule and excise the posterior horn of the lateral meniscus.
- Postoperative Management: Kelikian advised against the use of indwelling drains for this specific radical approach. Instead, he recommended the application of skeletal traction (via a distal tibial pin) to distract the joint surfaces, preventing cartilage-on-cartilage pressure necrosis while allowing the open posterior windows to drain dependently.
Postoperative Rehabilitation for the Knee
Regardless of the surgical approach (arthroscopic or open), postoperative rehabilitation must begin immediately to preserve joint function. An active exercise regimen, starting with straight leg raises and isometric quadriceps sets, is initiated in the recovery room.
Active range of motion (ROM) or Continuous Passive Motion (CPM) is started as soon as the patient's pain allows, generally within 24 hours after surgery. Early motion is critical; it prevents the formation of intra-articular adhesions and facilitates the diffusion of synovial fluid, which is essential for chondrocyte nutrition. Intra-articular drains are typically removed 24 to 48 hours postoperatively once output becomes minimal and serous. Functional splinting is maintained for the first week to provide comfort, but the splint must be removed multiple times daily to ensure compliance with the ROM exercise protocol.
You Might Also Like

