Biceps Tendon Lesions: Surgical Management & SLAP Repair

Key Takeaway
Biceps tendon lesions encompass a spectrum of inflammatory, degenerative, and traumatic pathologies affecting the superior labrum anterior-posterior (SLAP) complex and bicipital arch. Effective surgical management requires a deep understanding of glenohumeral biomechanics, precise arthroscopic anchor placement to neutralize peel-back forces, and tailored postoperative rehabilitation. This guide details evidence-based operative techniques, including SLAP repair, biceps tenodesis, and tenotomy, ensuring optimal functional recovery for both elite athletes and degenerative populations.
Pathophysiology and Biomechanics of Biceps Tendon Lesions
Biceps tendon lesions represent a complex continuum of shoulder pathology that may be inflammatory, degenerative, or traumatic in origin. These lesions frequently result from repetitive microtrauma—commonly seen in overhead athletes—or acute macrotrauma. The pathological cascade can affect multiple anatomical sites, including the attachment to the supraglenoid tubercle, the superior labrum anterior-posterior (SLAP) complex, the tendon proper (both intraarticular and extraarticular segments), and the bicipital arch.
The bicipital arch is a critical anatomical conglomerate responsible for the stabilization of the long head of the biceps tendon (LHBT) as it exits the glenohumeral joint. It consists of the superior glenohumeral ligament (SGHL) and the coracohumeral ligament (CHL) attachment at the superior bicipital groove. This ligamentous sling is dynamically and statically reinforced anteriorly by the subscapularis tendon attachment and posteriorly by the supraspinatus attachment. Disruption of this arch leads to medial subluxation or dislocation of the biceps tendon, often accompanied by significant rotator cuff pathology.
Clinical Pearl: A tight posteroinferior capsule is a primary initiator of the pathological cascade leading to a SLAP lesion. The resulting obligate posterosuperior shift of the humeral head during abduction and external rotation dramatically increases the "peel-back" forces on the biceps anchor.
The Peel-Back Mechanism
In the late cocking phase of throwing (abduction and maximal external rotation), the vector of the biceps tendon shifts posteriorly. If the posteroinferior capsule is contracted (glenohumeral internal rotation deficit, or GIRD), the humeral head translates posterosuperiorly, twisting the base of the biceps and transmitting a torsional, peel-back force to the superior labrum. Neutralizing this force is the primary biomechanical objective of surgical SLAP repair.
Classification of Biceps Subluxation and Instability
Biceps instability is rarely an isolated entity; it is intimately associated with lesions of the rotator interval, subscapularis, and supraspinatus. The classification system below delineates the progressive failure of the bicipital pulley system and the associated rotator cuff tears.
Figure 1: Normal anatomy of the bicipital arch and rotator interval.
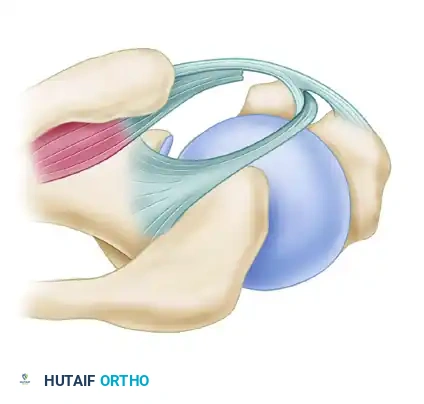
Figure 2: Type 1 Instability. Characterized by tears of the subscapularis without involvement of the medial head of the coracohumeral ligament.

Figure 3: Type 2 Instability. Occurs without tears of the subscapularis but involves the medial head of the coracohumeral ligament.

Figure 4: Type 3 Instability. Involves tears of the subscapularis combined with involvement of the medial head of the coracohumeral ligament.

Figure 5: Type 4 Instability. Characterized by tears of the supraspinatus and the lateral head of the coracohumeral ligament.
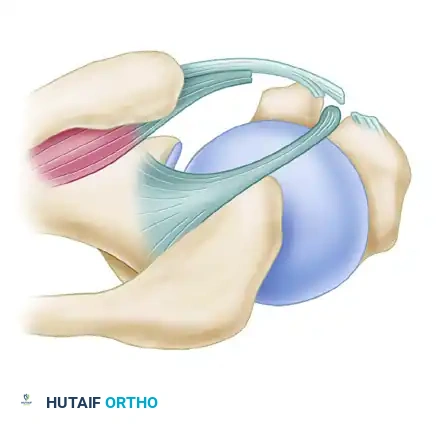
Figure 6: Type 5 Instability. A massive disruption involving tears of the subscapularis, both the medial and lateral heads of the coracohumeral ligament, and the leading edge of the supraspinatus tendon.
Clinical Evaluation and Evidence-Based Decision Making
Dynamic arthroscopic evaluation is paramount. Lafosse et al. demonstrated in a study of 200 consecutive patients undergoing arthroscopic cuff repair that 45% exhibited anterior, posterior, or combined biceps instability. Larger rotator cuff tears directly correlated with a higher incidence and severity of biceps instability.
Surgical Warning: Lafosse recommends dynamic evaluation of the biceps by internally and externally rotating the humerus in 0 to 30 degrees of abduction, followed by meticulous probing to evaluate static stability. Failure to address occult biceps instability during cuff repair is a primary cause of persistent postoperative pain.
Boileau et al. described an "hourglass-shaped" biceps deformity associated with chronic inflammation, hypertrophy, and mechanical triggering through the proximal pulley during joint motion. Persistence of this triggering inevitably results in pulley instability and structural failure.
Indications for Tenodesis vs. Tenotomy vs. SLAP Repair
The treatment algorithm for biceps pathology depends heavily on patient age, activity level, and the morphological state of the tendon:
* SLAP Repair: Indicated for young, active patients (especially overhead athletes) with a healthy biceps tendon and a detachable superior labrum (Type II or IV SLAP lesions).
* Biceps Tenodesis: Indicated for patients with chronic impingement, persistent bicipital tendinitis, >50% structural disruption of the tendon, biceps subluxation, or an hourglass deformity. In younger, active patients, arthroscopic or mini-open tenodesis using a biotenodesis screw or suture anchors provides robust fixation that resists cyclic displacement. For middle-aged patients, soft tissue tenodesis may suffice.
* Biceps Tenotomy: Indicated for older patients (>50 years) with lower functional demands or those who do not perform heavy manual labor. Osbahr et al. compared arthroscopic tenotomy (average age 58) with tenodesis (average age 54) and found no significant difference in cosmesis, muscle spasms, or anterior shoulder pain. Walch et al. reported an 87% satisfaction rate in 307 patients undergoing tenotomy. Poor outcomes in tenotomy are typically associated with a preoperative high-riding humerus and advanced fatty infiltration of the rotator cuff.
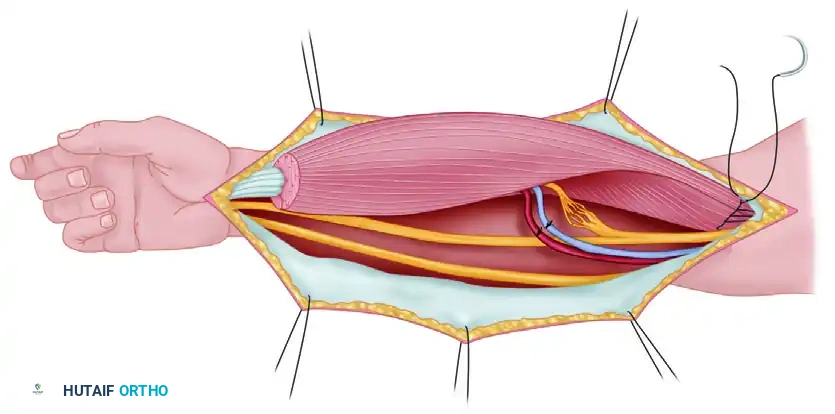
Arthroscopic SLAP Repair: Step-by-Step Surgical Technique
The critical element in a mechanically effective SLAP repair is neutralizing the peel-back forces. This is achieved by positioning a tight suture loop just posterior to the root of the biceps, attached to a suture anchor placed directly beneath the biceps root.
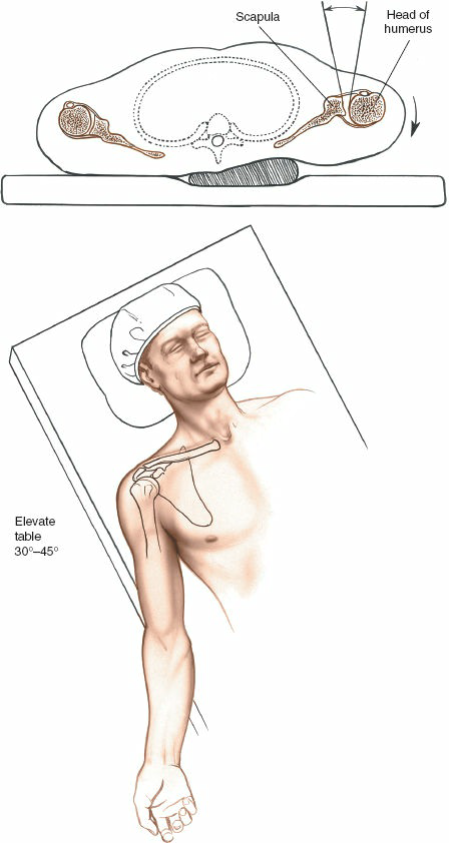
1. Portal Placement and Preparation
Standard posterior and anterior viewing portals are established. For superior labral lesions that extend posteriorly to overlie the posterosuperior quadrant, a specialized posterolateral portal (Portal of Wilmington) is required.
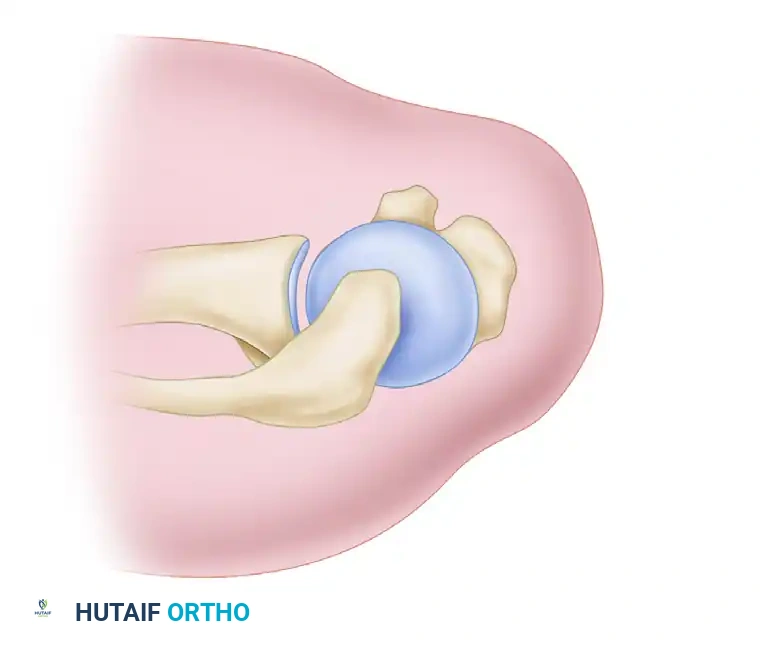
Figure 7: The Posterolateral Portal (Portal of Wilmington) is located 1 cm lateral and 1 cm anterior to the posterior acromial angle. It provides the optimal trajectory for anchor placement in the posterosuperior quadrant.
To minimize iatrogenic damage to the rotator cuff, pass a 3.5-mm Spear Guide through the musculotendinous junction of the infraspinatus. Because of its small diameter, the Spear Guide is vastly preferred over a standard 7-mm arthroscopy cannula for this specific approach. This portal is used strictly for anchor placement; suture passage and knot-tying for the posterior anchor are accomplished through the anterosuperior portal.
2. Anchor Insertion
Prepare the superior glenoid rim with an arthroscopic rasp or burr to create a bleeding bone bed, ensuring optimal soft-tissue healing. Insert a double-loaded 3-mm suture anchor at the base of the biceps.
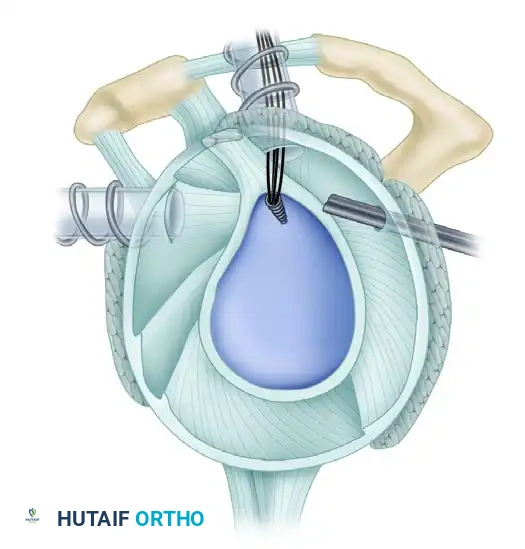
Figure 8: A double-loaded 3-mm anchor prepared for insertion.

Figure 9: Precise anchor placement at the base of the biceps root.
3. Suture Passage
Suture management is critical to prevent postoperative knot impingement on the articular cartilage. A vertical suture through the labrum or a horizontal suture passed behind the biceps is highly effective. Laboratory studies confirm that the biomechanical strength of these different suture configurations is comparable. Knotless suture anchors are an excellent modern alternative to eliminate knot impingement entirely.
Use Birdbeak suture passers (Arthrex, Naples, FL) to penetrate the labrum from superior to inferior.
* The 45-degree Birdbeak is ideal for passing sutures posterior to the biceps through the anterosuperior cannula.
* The 22-degree Birdbeak is optimal for passing sutures anterior to the biceps through the anterior cannula.
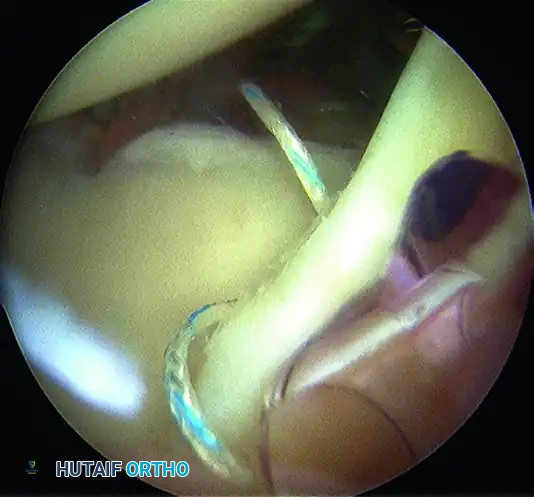
Figure 10: Anterior cannula positioning for optimal trajectory.
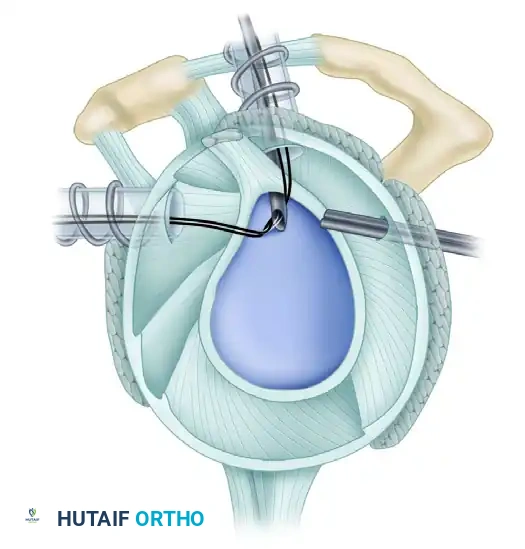
Figure 11: Sutures passed through the biceps anchor complex.
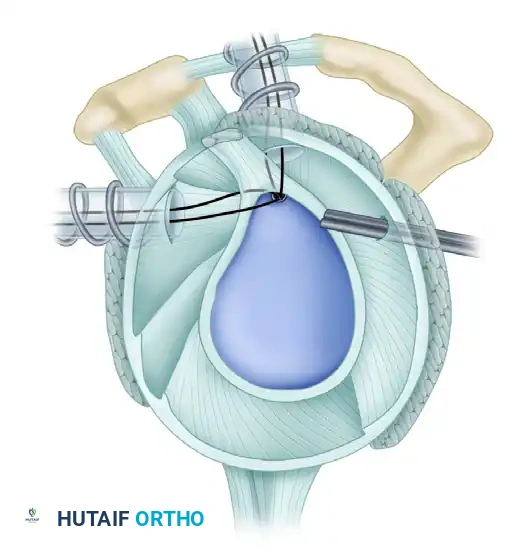
Figure 12: Suture retrieved posterior to the biceps tendon to neutralize peel-back.

Figure 13: Suture retrieved anterior to the biceps tendon.
Alternatively, a suture shuttle device allows for highly precise placement with minimal soft tissue trauma.
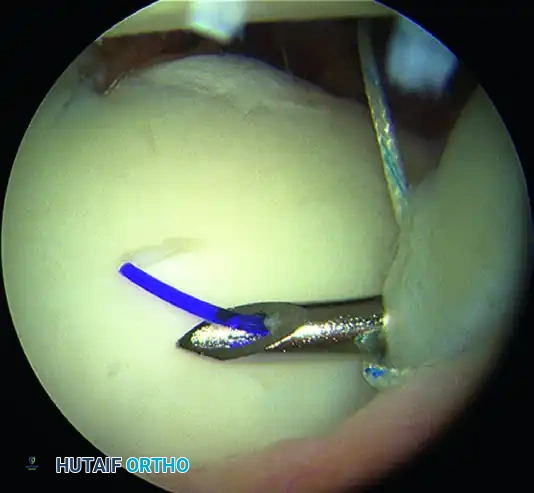
Figure 14: Passage of a suture shuttle at the base of the biceps.
If the SLAP lesion extends anteriorly beyond the 1-o’clock position, a separate suture anchor must be placed in that position to secure the anterior extension of the labral tear.
4. Knot Tying and Biomechanical Testing
Securely tie the arthroscopic knots. The sutures must create simple loops around the labrum that are tensioned aggressively to neutralize peel-back forces. Use stacked reversing half-hitches tied with a knot pusher, or complex sliding knots backed up with three reversing half-hitches for maximum knot security.
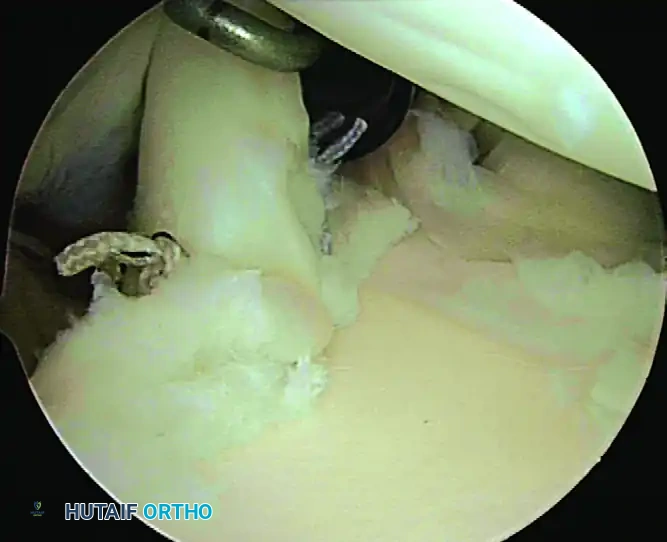
Figure 15: The completed SLAP repair, demonstrating a secure, anatomic restoration of the superior labrum.
Surgical Pearl: After the repair is complete, you must perform the dynamic "peel-back" and "drive-through" tests again. A negative test indicates that the pathological biomechanics have been corrected. If the drive-through sign remains positive, adjunctive measures for capsular tightening (e.g., capsular plication) must be strongly considered.
Postoperative Rehabilitation Protocol (SLAP Lesions)
Rehabilitation is dictated by the type of lesion. Types I and III are typically treated with simple debridement; because the biceps anchor remains stable, rehabilitation progresses as tolerated. Types II and IV involve an unstable biceps anchor requiring formal repair, necessitating strict adherence to the following phased protocol to protect the repair while restoring kinematics.
Phase I: Immediate Postsurgical (Weeks 0–2)
The operated arm is placed in a sling with a small pillow.
* Goals: Protect the repair, initiate early protected motion.
* Exercises:
* Passive/Active-Assisted ROM (P/AAROM): Flexion < 120 degrees; ER/IR < 30 degrees (arm at the side, not in abduction).
* Table slides in flexion, pendulums.
* Scapular mobility exercises (retraction/depression).
* Passive elbow flexion; active elbow extension to 30 degrees.
* Active hand/wrist ROM and gripping.
* Submaximal pain-free isometrics (IR/ER, ABD/ADD).
* Precautions: Strict sling compliance. NO active biceps contraction. Full active elbow extension is prohibited to avoid tensioning the repair.
* Capsular Stretching: Patients requiring a posteroinferior capsulotomy begin "sleeper stretches" on postoperative day 1.
Phase II: Graded AROM & Strengthening (Weeks 3–11)
Weeks 3–6:
* Goals: Discontinue sling (weeks 3-4), restore scapulohumeral rhythm.
* Exercises:
* Progress PROM to tolerance in all planes.
* Initiate sleeper stretches in patients who did not have a capsulotomy.
* Glenohumeral joint mobilizations (Grades I and II).
* Elbow flexion with no resistance.
* Theraband ER/IR isometrics in neutral.
* Rhythmic stabilization and PNF diagonals with light resistance.
* Precautions: No lifting. No ER with abduction > 90 degrees.
Weeks 7–9:
* Goals: AROM within normal limits, able to reach behind back.
* Exercises:
* Progress joint mobilizations (Grades III and IV if needed).
* Elbow flexion with light weights (1-5 lbs).
* Progress isotonic strengthening (Theraband/light weights).
* Closed-chain exercises (wall push-ups).
* Precautions: No lifting > 5 lbs.
Weeks 10–11:
* Goals: Normal manual muscle testing (MMT 4/5) for shoulder musculature.
* Exercises:
* Theraband ER/IR at 45 to 90 degrees of abduction (must be pain-free).
* Closed-chain scapular stability (quadruped, tripod).
* Proprioceptive training on unstable surfaces.
* Precautions: No unilateral overhead lifting > 5 lbs.
Phase III: Advanced Strengthening & Return to Sport (Weeks 12–24)
Weeks 12–15:
* Goals: MMT 5/5, able to place ≥ 10 lbs overhead.
* Exercises:
* Progress isotonics (lunges, throwing motions).
* Plyoball exercises (chest pass, overhead throw, one-handed wall ball).
* Advanced shoulder strengthening (lat pull-downs, rows).
* Isokinetic strengthening.
Weeks 16–24 (Months 4–6+):
* Goals: Return to sport/activity.
* Progression:
* Month 4: Athletes begin an interval throwing program on a level surface.
* Month 6: Pitchers may begin throwing at full speed.
* Month 7: Full-velocity throwing from the mound is permitted
You Might Also Like