Anterolateral Acromial Approach for Proximal Humerus
Key Takeaway
The anterolateral acromial approach provides direct, extensile access to the proximal humerus for open reduction and internal fixation. By exploiting the internervous plane between the anterior and middle deltoid heads, surgeons can achieve optimal lateral plate positioning. Strict adherence to safe dissection zones is mandatory to protect the axillary nerve. This approach is highly effective for complex tuberosity fractures and locking plate osteosynthesis.
INTRODUCTION TO THE ANTEROLATERAL ACROMIAL APPROACH
The management of displaced proximal humeral fractures remains a complex challenge in orthopedic trauma. While the classic deltopectoral approach has historically been the workhorse for proximal humerus surgery, it frequently requires excessive soft tissue retraction to access the lateral and posterior aspects of the greater tuberosity. To circumvent these limitations, the anterolateral acromial approach (often popularized by Gardner et al.) has emerged as a highly effective alternative, particularly for the application of lateral locking plates and intramedullary nails.
This approach provides direct, orthogonal access to the lateral aspect of the proximal humerus, facilitating optimal plate positioning and direct visualization of greater tuberosity reductions. By utilizing a deltoid-splitting technique through the raphe between the anterior and middle heads of the deltoid, surgeons can achieve excellent exposure while minimizing the need for aggressive soft tissue stripping. However, this approach demands a rigorous understanding of the regional neurovascular anatomy—specifically the trajectory of the axillary nerve—to prevent devastating iatrogenic complications.
This comprehensive guide details the indications, surgical anatomy, step-by-step operative technique, and postoperative protocols for the anterolateral acromial approach in the internal fixation of proximal humeral fractures.
SURGICAL ANATOMY AND BIOMECHANICS
A profound understanding of the proximal humeral anatomy is non-negotiable when utilizing the anterolateral approach. The primary structures of concern are the deltoid musculature, the axillary nerve, and the vascular supply to the humeral head.
The Deltoid Muscle and the Internervous Plane
The deltoid muscle is composed of three distinct heads: anterior (clavicular), middle (acromial), and posterior (spinal). The anterolateral approach exploits the avascular raphe between the anterior and middle heads.
* Anterior Head: Originates from the lateral third of the clavicle.
* Middle Head: Originates from the lateral margin of the acromion.
* The Raphe: The fascial intersection between these two heads is relatively avascular and serves as the primary entry window. Because both heads are innervated by the axillary nerve, this is technically an intermuscular rather than a true internervous plane.
The Axillary Nerve: The "Danger Zone"
The axillary nerve originates from the posterior cord of the brachial plexus, passes through the quadrangular space, and wraps around the surgical neck of the humerus from posterior to anterior.
* It lies on the deep surface of the deltoid muscle.
* The nerve typically crosses the humerus at an average distance of 5 to 7 cm distal to the lateral edge of the acromion.
* Protecting this nerve is the paramount safety objective of this approach. Dissection distal to the 5 cm mark from the acromion must be performed with extreme caution, utilizing a "sub-nervous" or "window" technique for plate insertion.
Surgical Warning: Never split the deltoid raphe further than 5 cm distal to the acromion without directly visualizing and protecting the axillary nerve. Iatrogenic axillary nerve palsy results in catastrophic loss of shoulder abduction and profound functional impairment.
Vascular Supply and the "Bare Spot"
The blood supply to the humeral head is primarily derived from the posterior circumflex humeral artery (PCHA) and the anterior circumflex humeral artery (ACHA). The ascending branch of the ACHA (the arcuate artery) runs parallel to the lateral aspect of the bicipital groove.
When placing a lateral locking plate, the implant must be positioned on the "bare spot" of the lateral cortex, located immediately posterior to the bicipital groove. Staying within this footprint prevents iatrogenic injury to the penetrating vessels that supply the humeral head, thereby mitigating the risk of postoperative osteonecrosis (avascular necrosis).
INDICATIONS AND CONTRAINDICATIONS
Indications
- Displaced 2-part, 3-part, and select 4-part proximal humeral fractures requiring open reduction and internal fixation (ORIF).
- Fractures with significant greater tuberosity displacement or comminution.
- Application of lateral proximal humeral locking plates (e.g., PHILOS).
- Antegrade intramedullary nailing of proximal humeral fractures.
- Minimally Invasive Plate Osteosynthesis (MIPO) techniques.
Contraindications
- Fractures requiring extensive access to the anterior glenohumeral joint (e.g., fracture-dislocations requiring open joint reduction), where a deltopectoral approach is superior.
- Pre-existing axillary nerve palsy (relative contraindication).
- Severe medial calcar comminution extending distally into the shaft, requiring extensive medial visualization.
PREOPERATIVE PLANNING AND PATIENT POSITIONING
Imaging
Standard trauma series radiographs (True AP, Scapular Y, and Axillary lateral views) are mandatory. A preoperative CT scan with 3D reconstruction is highly recommended to assess tuberosity comminution, articular surface involvement, and the integrity of the medial calcar hinge.
Patient Positioning
The patient may be positioned in either the beach chair or supine semilateral position, depending on surgeon preference and the planned fixation modality (plate vs. nail).
- Beach Chair Position: The patient is seated at a 30- to 45-degree angle. The operative arm must be completely free and draped to allow full manipulation. A mechanical arm positioner (e.g., Spider arm) can be highly beneficial.
- Fluoroscopy Setup: The C-arm should be brought in from the contralateral side or from the head of the bed. Ensure that unobstructed AP and axillary orthogonal views can be obtained before making the incision.
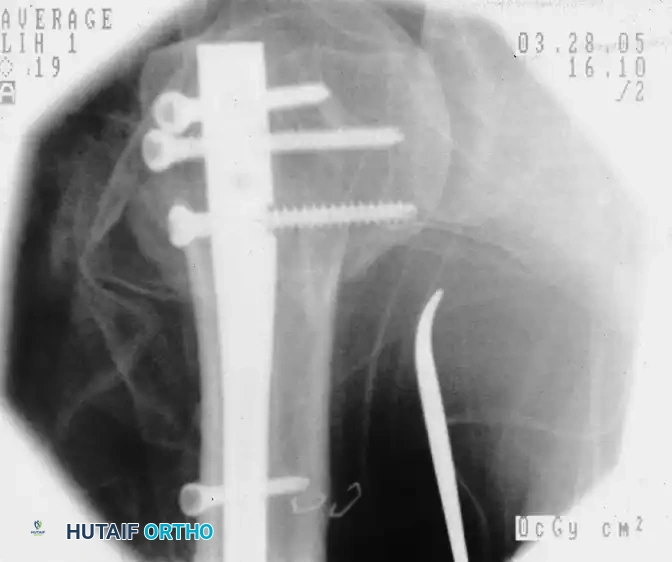
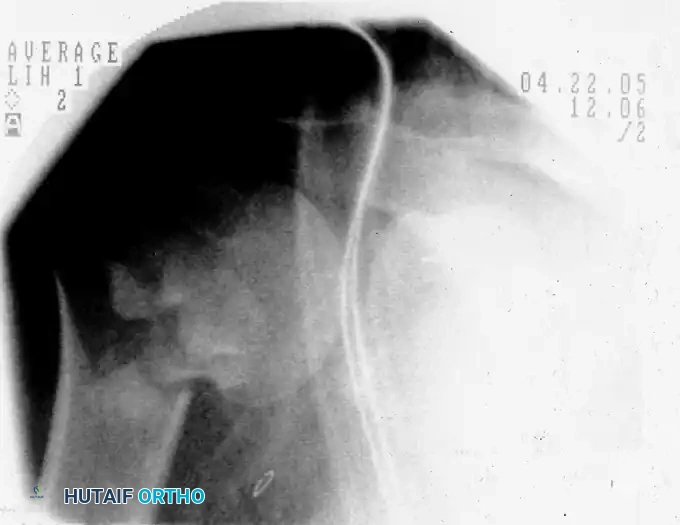
Preoperative fluoroscopic evaluation demonstrating a two-part surgical neck fracture of the proximal humerus, an ideal candidate for the anterolateral approach.
SURGICAL TECHNIQUE: STEP-BY-STEP
1. Incision and Superficial Dissection
- Palpate the anterolateral edge of the acromion.
- Make a 10-cm longitudinal skin incision starting exactly at the palpable anterolateral edge of the acromion and extending distally, perfectly in line with the fibers of the deltoid muscle.
- Incise the subcutaneous tissues to expose the underlying deltoid fascia. Maintain meticulous hemostasis.
2. Identifying and Splitting the Deltoid Raphe
- Identify the anterior deltoid raphe, which appears as a thin, white fascial line separating the anterior and middle heads of the deltoid.
- Split the raphe longitudinally in line with its fibers.
- Maximal Proximal Exposure: You may split the deltoid all the way up to the margin of the acromion. If necessary, a small portion of the deltoid origin can be sharply elevated off the acromion to facilitate nail entry or proximal plate positioning, though this should be minimized.
- Distal Limitation: Do not split the deltoid distally more than 5 cm from its acromial origin.
Clinical Pearl: To absolutely prevent inadvertent distal propagation of the deltoid split (which would endanger the axillary nerve), place a heavy, non-absorbable stay suture at the inferior apex of the split (the 5 cm mark) immediately after opening the raphe.
3. Axillary Nerve Management
- Once the subdeltoid bursa is entered, clear the bursal tissue to visualize the proximal humerus and the rotator cuff.
- If the fracture line extends distally, or if a long plate is required, the axillary nerve must be identified.
- Gently sweep a blunt retractor or a finger distally along the deep surface of the deltoid to palpate the nerve.
- If the nerve is in close proximity to a fracture line, gently explore it. If it is tethered by hematoma or incarcerated within the fracture fragments, carefully free it using blunt dissection.
4. Fracture Reduction Techniques
Achieving anatomic reduction prior to definitive fixation is critical. The anterolateral approach allows for excellent indirect and direct reduction techniques.
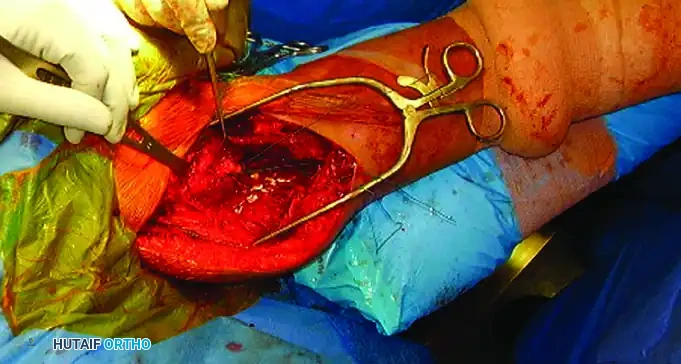
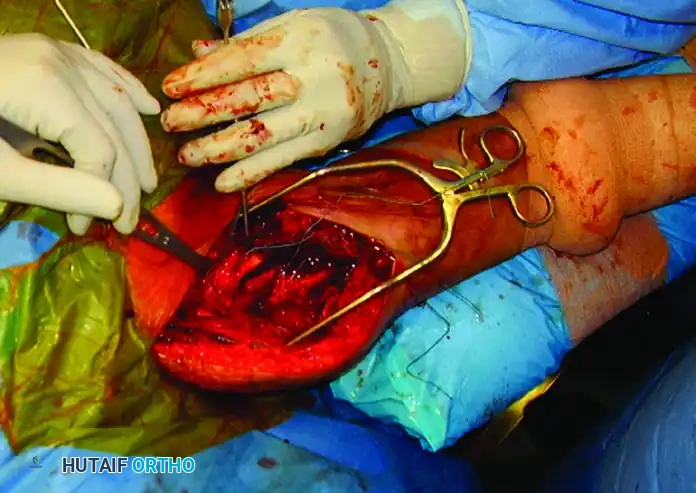
- Tuberosity Control: Place heavy, non-absorbable sutures (e.g., #2 or #5 FiberWire) through the rotator cuff tendons at their insertion sites on the greater and lesser tuberosities. These sutures act as traction tags to manipulate the tuberosity fragments out of the subacromial space and reduce them to the shaft.
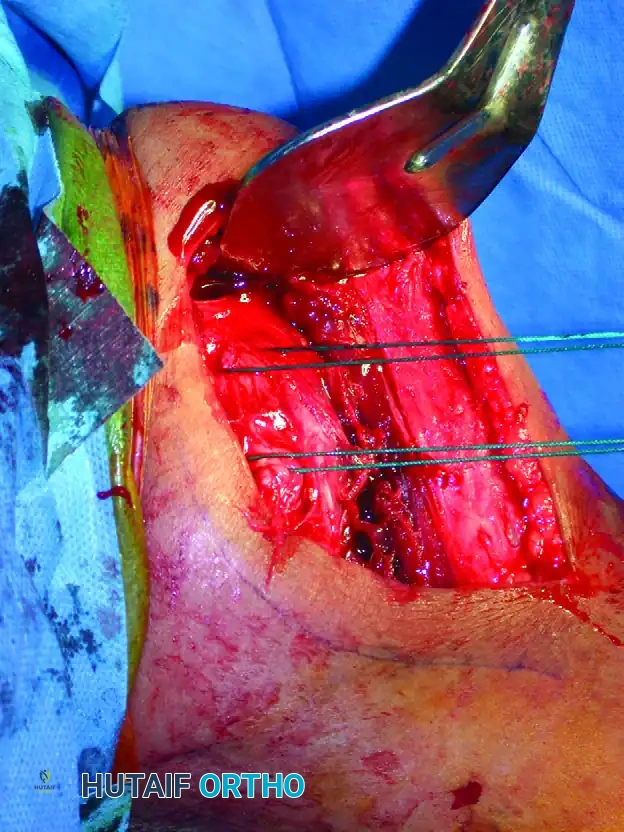
Open reduction and internal fixation of a proximal humeral shaft fracture. Sutures placed in the rotator cuff are actively used to assist in the reduction of the tuberosities.
Sutures utilized for the precise reduction and provisional fixation of comminuted tuberosity fragments.
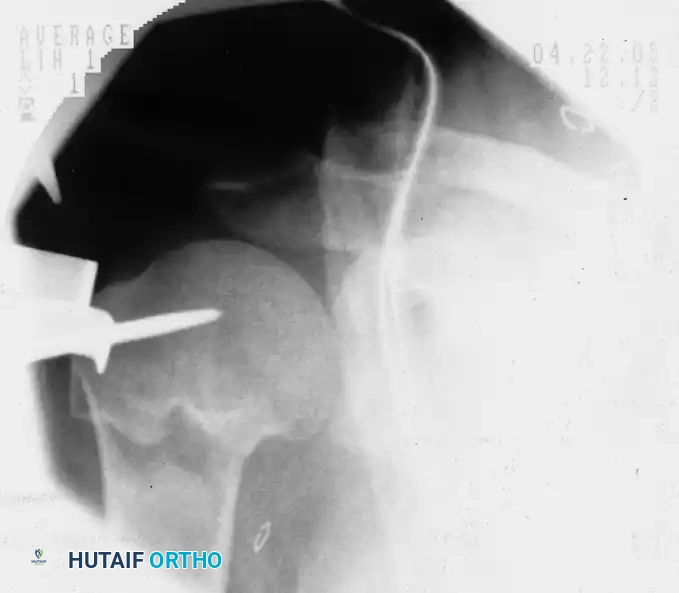
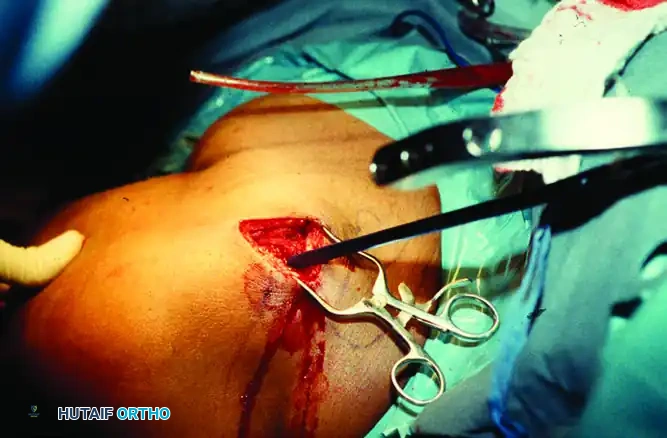
- Joystick Technique: Threaded pins (Schanz pins or heavy Kirschner wires) can be inserted into the humeral head or shaft fragments to act as "joysticks" for multi-planar manipulation.
A threaded pin is inserted into the humeral head fragment, serving as a "joystick" to manipulate and reduce the fracture prior to definitive fixation.
5. Implant Insertion: Intramedullary Nailing
If an intramedullary nail is chosen, the anterolateral approach provides direct access to the greater tuberosity entry point.
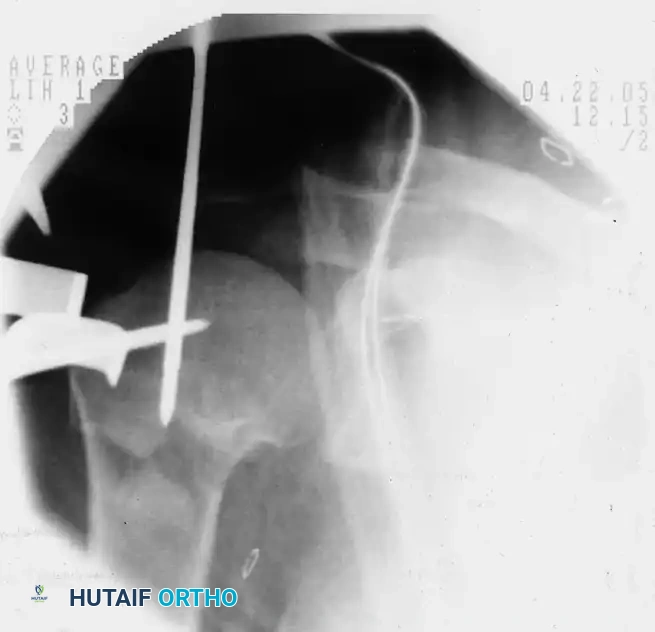
- Once the fracture is provisionally reduced, place the initial guidewire just medial to the greater tuberosity footprint.
Placement of the initial guidewire into the proximal humerus, ensuring the correct entry trajectory for antegrade nailing.
- Ream the proximal segment and insert the nail. Ensure the nail is countersunk beneath the articular cartilage to prevent subacromial impingement.
- Place proximal locking screws through the nail to secure the humeral head and tuberosities.
Fluoroscopic confirmation after nail insertion and the placement of multi-planar proximal locking screws.
6. Implant Insertion: Locking Plate Osteosynthesis
When utilizing a lateral locking plate, the implant must be carefully navigated around the axillary nerve.
- The "Slide" Technique: With the fracture reduced and the axillary nerve protected, slide the locking plate from proximal to distal underneath the axillary nerve.
- The plate should be positioned such that the axillary nerve overlies the junction of the head and the shaft of the plate.
Clinical photograph demonstrating the proximal exposure. The plate is prepared to be slid distally beneath the axillary nerve.
- Positioning on the Bare Spot: While positioning the plate, ensure it rests strictly on the "bare spot" of the lateral cortex, located posterior to the bicipital groove. This avoids injury to the ascending branch of the anterior circumflex humeral artery.
- Distal Fixation: Secure the plate to the humeral shaft through a lower soft tissue window created distal to the axillary nerve.
The plate is successfully secured to the humeral shaft. The axillary nerve is clearly visible, safely crossing over the plate at the head-shaft junction.
7. Final Fixation and Rotator Cuff Repair
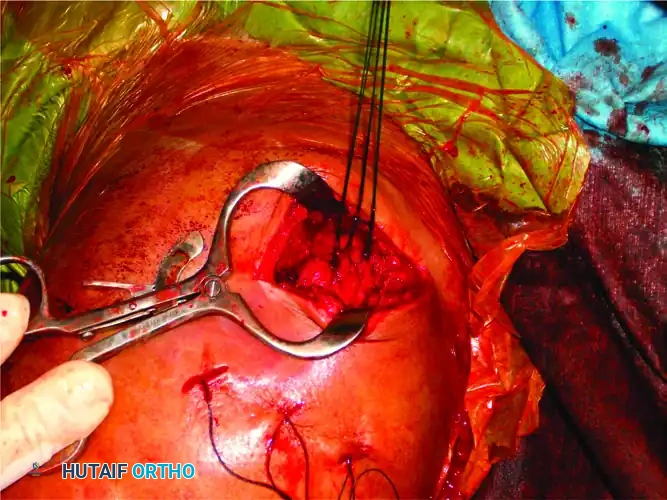
Regardless of whether a plate or a nail is used, the heavy sutures previously placed in the rotator cuff must be tied down to the implant or the humeral shaft to neutralize the deforming forces of the rotator cuff muscles.
Meticulous repair of the rotator cuff and tuberosity fragments after nail insertion, utilizing heavy non-absorbable sutures to ensure construct stability.
8. Irrigation and Closure
- Perform thorough irrigation of the surgical site to remove bone debris and hematoma.
- Close the deltoid raphe and the deltoid fascial layers meticulously with absorbable sutures (e.g., 1-0 or 2-0 Vicryl). Ensure the stay suture protecting the axillary nerve is removed.
- Place a subfascial suction drain if significant bleeding is anticipated.
- Close the subcutaneous tissue in layers, followed by a cosmetic skin closure (e.g., subcuticular Monocryl or surgical staples).
POSTOPERATIVE CARE AND REHABILITATION
The postoperative protocol is heavily dependent on the security of the osseous fixation and the quality of the patient's bone.
- Phase I (0-4 Weeks): The shoulder is immobilized in a sling. Pendulum exercises and passive range of motion (PROM) in forward elevation and external rotation are initiated immediately, provided the fixation is stable. Active elbow, wrist, and hand exercises are mandatory.
- Phase II (4-8 Weeks): As radiographic evidence of early callus formation appears, active-assisted range of motion (AAROM) is commenced. The sling is gradually weaned.
- Phase III (8-12 Weeks): Progression to active range of motion (AROM) and light isotonic strengthening.
- Phase IV (>12 Weeks): Advanced strengthening and return to functional activities.
COMPLICATIONS AND MANAGEMENT
Despite meticulous surgical technique, proximal humeral fractures carry a significant risk of complications.
1. Loss of Motion (Stiffness)
Stiffness is the most common complication following proximal humeral fractures. While early physical therapy is associated with improved motion, many patients do not recover full, symmetric range of motion. Subacromial scarring or impingement from high-riding, malreduced greater tuberosities can severely limit abduction and forward elevation.
2. Nonunion and Malunion
Nonunion is fairly common in osteoporotic bone, though rates have decreased significantly with the advent of fixed-angle locking plates and improved intramedullary nails.
Malunion typically results from unstable fixation, delayed surgery, poor bone quality, or technical errors during reduction. While older, low-demand patients may tolerate a malunion well, it can be debilitating in younger patients, leading to severe impingement, altered shoulder kinematics, and secondary rotator cuff tears.
3. Osteonecrosis (Avascular Necrosis)
Osteonecrosis is relatively uncommon after nondisplaced or unoperated two-part fractures, but the risk increases exponentially with three- and four-part fractures, particularly those with a disrupted medial calcar hinge (Hertel's criteria).
Interestingly, the presence of radiographic osteonecrosis does not always correlate with a poor clinical outcome; many patients remain minimally symptomatic if the proximal humeral anatomy (tuberosity position and head height) was accurately restored during surgery.
Surgical Warning: Because late, secondary hemiarthroplasty or reverse total shoulder arthroplasty (RTSA) for post-traumatic arthritis/AVN yields poorer functional results than primary arthroplasty, surgeons must critically evaluate whether ORIF can adequately stabilize complex four-part fractures before committing to joint preservation.
4. Axillary Nerve Injury
Iatrogenic injury to the axillary nerve is the most feared complication specific to the anterolateral approach. Adherence to the 5 cm safe zone, the use of a distal stay suture in the raphe, and the careful "sliding" of plates beneath the nerve are mandatory steps to prevent neurapraxia or transection. If a postoperative nerve palsy is identified, baseline EMG/NCS should be obtained at 6 weeks, with consideration for nerve exploration if no recovery is noted by 3 to 6 months.
📚 Medical References
- anterolateral acromial approach allows minimally invasive access to the proximal humerus, Clin Orthop Relat Res 434:123, 2005.
- Gardner MJ, Voos JE, Wanich T, et al: Vascular implications of minimally invasive plating of proximal humerus fractures, J Orthop Trauma 20:602, 2006.
- Gerber C, Werner CML, Vienne P: Internal fi xation of complex fractures of the proximal humerus, J Bone Joint Surg 86B:848, 2004.
- Gibson JNA, Handoll HHG, Madhok R: Interventions for treatment of proximal humeral fractures in adults, Cochrane Database Syst Rev 4:CD000434, 2003.
- Goss TP: Proximal humeral fractures revisited, Orthop Rev 16:805, 1987.
- Hägg O, Lundberg BJ: Aspects of prognostic factors in comminuted and dislocated proximal humerus fractures. In Bateman JE, Welsh RP, eds: Surgery of the shoulder, Philadelphia, 1984, Decker. Hawkins RJ, Kiefer GN: Internal fi xation techniques for proximal humeral fractures, Clin Orthop Relat Res 223:77, 1987.
- Hawkins RJ, Switlyk P: Acute prosthetic replacement for severe fractures of the proximal humerus, Clin Orthop Relat Res 289:156, 1993.
- Hersche O, Gerber C: Iatrogenic displacement of fracture-dislocations of the shoulder: a report of seven cases, J Bone Joint Surg 76B:30, 1994.
- Hertel R, Hempfi ng A, Stiehler M, et al: Predictors of humeral head ischemia after intracapsular fracture of the proximal humerus, J Shoulder Elbow Surg 13:427, 2004.
- Jaberg H, Warner JJP, Jakob RP: Percutaneous stabilization of unstable fractures of the humerus, J Bone Joint Surg 74A:508, 1992.
- Jakob RP, Kristiansen T, Mayo K, et al: Classifi cation and aspects of treatment of fractures of the proximal humerus. In Bateman JE, Welsh RP, eds: Surgery of the shoulder, Philadelphia, 1984, Decker. Jakob RP, Miniaci A, Anson PS, et al: Four-part valgus impacted fractures of the proximal humerus, J Bone Joint Surg 73B:295, 1991.
- Koukakis A, Apostolou CDM, Taneja T, et al: Fixation of proximal humerus fractures using the PHILOS plate: early experience, Clin Orthop Relat Res 442:115, 2006.
- Kristiansen B: External fi xation of proximal humerus fracture: clinical and cadaver study of pinning technique, Acta Orthop Scand 58:645, 1987.
- Kristiansen B, Kofoed H: External fi xation of displaced fractures of the proximal humerus: technique and preliminary results, J Bone Joint Surg 69B:643, 1987.
- Kristiansen B, Kofoed H: Transcutaneous reduction and external fi xation of displaced fractures of the proximal humerus: a controlled clinical trial, J Bone Joint Surg 70B:821, 1988.
- Kyle RF, Conner TN: External fi xation of the proximal humerus, Orthopedics 11:163, 1988.
- Lau TW, Leung F, Chan CF, Chow SP: Minimally invasive
You Might Also Like