Arthroscopic Posterior Shoulder Stabilization: Surgical Technique and Rehabilitation
Key Takeaway
Arthroscopic posterior shoulder stabilization is the gold standard for addressing recurrent posterior instability. This comprehensive surgical guide details the Kim et al. technique, emphasizing precise portal placement, capsulolabral mobilization, and secure suture anchor fixation. It outlines critical biomechanical considerations, absolute contraindications such as excessive glenoid retroversion, and a phased postoperative rehabilitation protocol designed to optimize return to play for athletic and nonathletic patients.
Introduction to Posterior Shoulder Instability
Arthroscopic posterior shoulder stabilization has rapidly gained favor in recent years, establishing itself as the gold standard for managing recurrent posterior glenohumeral instability. Historically, the results of open posterior stabilization procedures were less than adequate, often complicated by excessive postoperative stiffness, hardware complications, and unacceptably high recurrence rates. The evolution of advanced arthroscopic techniques has revolutionized the approach to this pathology, proving highly effective in both athletic and nonathletic patient populations.
The arthroscopic approach affords the surgeon unparalleled, panoramic visualization of the glenohumeral joint. This allows for the full exposure and precise correction of intra-articular pathology, enabling the identification of hidden pathological lesions—such as subtle chondrolabral delaminations or capsular stretch injuries—that are frequently not evident on preoperative magnetic resonance imaging (MRI).
In a landmark study by Bradley et al., comprising 100 shoulder procedures for posterior recurrent shoulder instability, the clinical efficacy of arthroscopic management was definitively demonstrated. The American Shoulder and Elbow Surgeons (ASES) score improved dramatically from a preoperative mean of 50.36 to 85.66 at a mean follow-up of 27 months. Furthermore, the return-to-play metrics were exceptional: overall, 89% of patients were able to return to sports, and 67% successfully returned to the exact same level of athletic competition as their preoperative baseline.
Clinical Indications and Contraindications
While arthroscopic posterior stabilization is highly successful for the majority of patients with recurrent posterior subluxation or dislocation, careful patient selection is paramount. The procedure described by Kim et al. is the preferred technique, often incorporating a rotator interval closure in contact athletes or in any patient demonstrating an inferior component to their posterior instability (multidirectional instability with a dominant posterior vector).
Surgical Warning: Relative and Absolute Contraindications
As with anterior instability, the success of arthroscopic soft tissue techniques is heavily dependent on the integrity of the osseous architecture and the quality of the native collagen. Failure to recognize critical bone loss or anatomical variants will result in inferior clinical outcomes and high recurrence rates.
The following conditions are considered relative or absolute contraindications to isolated arthroscopic soft tissue posterior stabilization:
* Excessive Glenoid Bone Loss: Posterior glenoid bone loss exceeding 25% of the total glenoid surface area.
* Large Anterior (Reverse) Hill-Sachs Lesion: A significant engaging defect on the anteromedial humeral head that requires osseous augmentation (e.g., McLaughlin procedure or modified subscapularis transfer).
* Excessive Glenoid Retroversion: Native glenoid retroversion measuring greater than 15 degrees, which may necessitate a posterior opening wedge glenoid osteotomy.
* Pathological Collagen Deficiency Syndromes: Conditions such as Ehlers-Danlos or Marfan syndrome, where the inherent viscoelastic creep of the capsular tissue precludes durable soft-tissue plication.
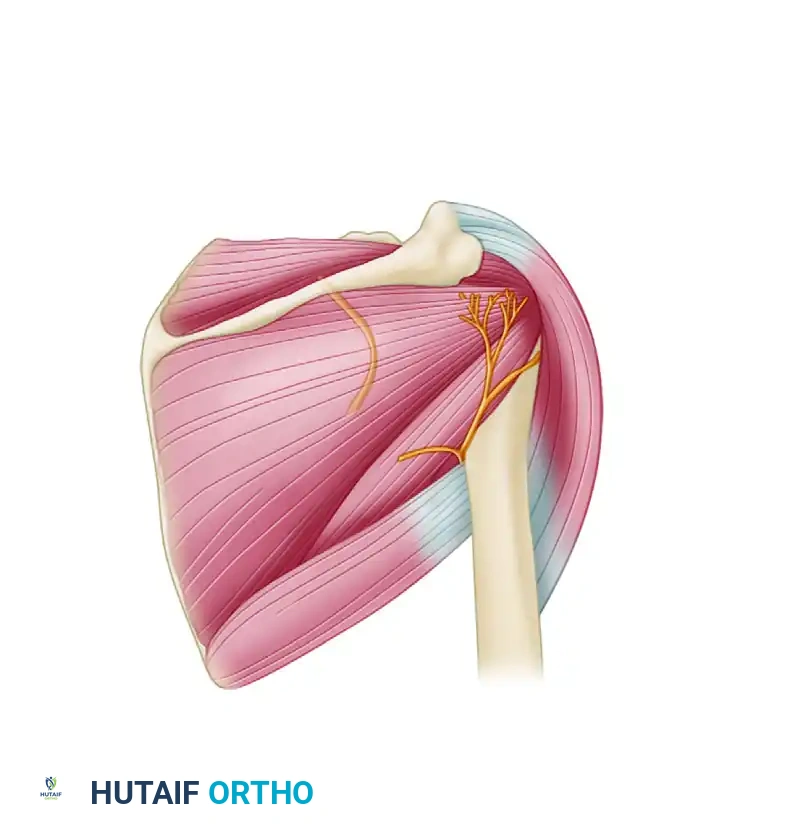
Surgical Anatomy and Biomechanics
Successful posterior stabilization requires a deep understanding of the posterior capsulolabral complex. The primary static restraint to posterior translation with the arm in forward flexion, adduction, and internal rotation is the posterior band of the inferior glenohumeral ligament (IGHL) and the posterior capsule.
During the surgical repair, it is critical to incorporate the posterior band of the IGHL into the capsulolabral shift. By shifting this tissue superiorly and securing it to the glenoid rim, the surgeon effectively eliminates the redundant capsular recess and restores the physiological bumper effect of the posterior labrum.
Patient Positioning and Setup
- Anesthesia: The procedure is typically performed under general anesthesia, often supplemented with an interscalene regional nerve block for optimal postoperative pain control.
- Positioning: Place the patient in the lateral decubitus position. Ensure all bony prominences are meticulously padded to prevent neurapraxia.
- Preparation: Prepare and drape the shoulder in a standard sterile fashion.
- Traction: Maintain the operative arm with lateral traction. The ideal spatial orientation for posterior access is 30 degrees of glenohumeral abduction and 10 degrees of forward flexion. This position relaxes the posterior capsule slightly, allowing for easier mobilization and shift.
Arthroscopic Posterior Stabilization: Step-by-Step Surgical Technique (Kim et al.)
Portal Placement and Diagnostic Arthroscopy
Precise portal placement is the most critical step in posterior shoulder arthroscopy. Improper portal trajectory will result in skiving of suture anchors and inadequate capsular plication.
- Standard Portals: Establish a standard posterior viewing portal and an anterior midglenoid working portal.
- Accessory Anterior Portals: Create two anterior portals just distal to the acromioclavicular joint and proximal to the leading edge of the subscapularis. Maintain at least 1 cm of distance between them to prevent skin bridge necrosis and instrument crowding.
- Accessory Posterior Portal (7 O'Clock Portal): Create a dedicated posterior working portal 2 cm inferior to the posterolateral acromial angle. This position is approximately 1 cm lateral and inferior to the standard posterior glenohumeral portal. This specific trajectory is mandatory to improve access to the posteroinferior aspect of the glenoid labrum and capsule, ensuring the suture anchors can be inserted at the correct "deadman's angle" (45 degrees to the articular surface).
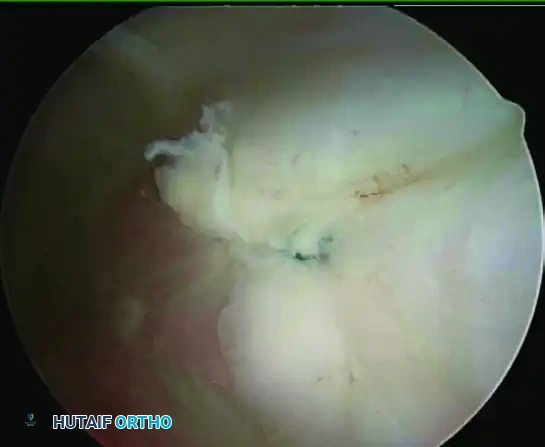
Tissue Preparation and Mobilization
Thorough tissue preparation dictates the biological healing response of the repair.
- Debridement: Viewing through the anterosuperior portal, evaluate the posteroinferior labrum. If a loose, degenerative flap of the posteroinferior labrum is encountered, debride it meticulously to stable tissue.
- Abrasion: Introduce a small meniscal rasp (e.g., Linvatec, Largo, FL) through the posterior portal. Vigorously abrade the incomplete tear of the posteroinferior labrum, the corresponding glenoid neck, and the inferior/posterior aspects of the capsule to induce bleeding and enhance biological healing.
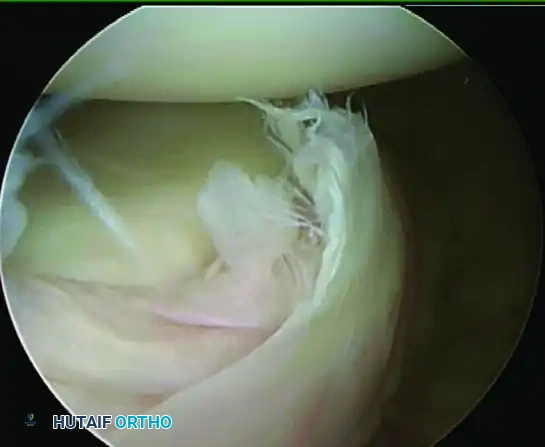
- Labral Detachment (If Necessary): If the posteroinferior labrum is stretched and incompetent but the junction between the labrum and the glenoid articular cartilage remains intact (a concealed lesion), it must be completely detached to allow for a superior shift. Use a Liberator knife or an arthroscopic elevator to sharply detach the labrum from the inner surface down to the 6 o'clock position.
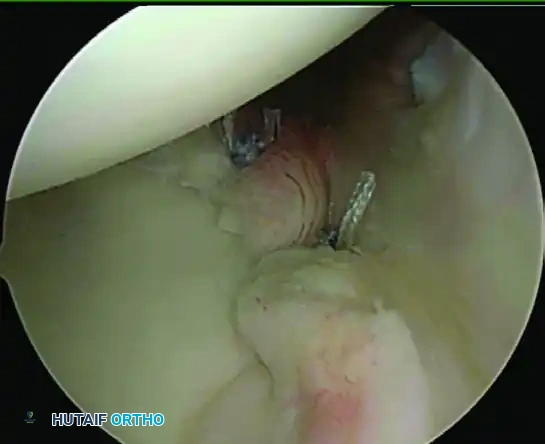
Suture Anchor Placement
- First Anchor: Place a suture anchor at the posteroinferior glenoid surface (typically at the 7 o'clock position for a right shoulder), strictly within 2 mm of the articular margin of the glenoid.
- Trajectory: Insert the anchor through the accessory posterior portal. If a proper angle for insertion cannot be achieved, use a spinal needle to localize a new percutaneous entry point that maintains a downward, 45-degree angle toward the posteroinferior glenoid to prevent articular cartilage penetration.
Suture Passing and Capsulolabral Shift
- Suture Retrieval: Retrieve one limb of the anchor suture through the anterior midglenoid portal to clear the posterior working space.
- Tissue Penetration: Introduce a 90-degree angle suture hook, loaded with a Shuttle Relay (e.g., Linvatec, Largo, FL), through the posterior portal.
- Capturing the IGHL: Pierce the posterior capsule and the posterior band of the inferior glenohumeral ligament at the same level as the glenoid surface. Crucial Step: The posterior band of the IGHL must always be incorporated into this first, most inferior suture to ensure adequate tensioning.
- Superior Shift: Once the capsule is pierced, shift the suture hook approximately 1 cm superiorly, and pass the tip under the mobilized posteroinferior labrum.
- Relay Retrieval: Advance the Shuttle Relay and retrieve it through the anterior midglenoid portal.
- Knot Tying: Load the suture into the Shuttle Relay, pull it back out of the posterior portal, and tie a secure, low-profile sliding knot (e.g., SMC knot) backed up by alternating half-hitches.
Repeat this process, placing and tying sutures successively to achieve a progressive superior capsular shift. Continue until the most superior suture is placed at the level of the posterior biceps insertion. In general, three to four suture anchors are required for a robust repair.
Management of the Intact but Incompetent Labrum
If the diagnostic arthroscopy reveals a posterior labral lesion characterized by chondrolabral erosion with an intact, unyielding attachment (and no frank detachment), a posterior capsular shift without suture anchors may be indicated.
* Introduce the suture hook through the posterior portal and pass it through the posterior band of the IGHL.
* Shift the hook proximally about 1 cm and pass it under the intact labrum.
* Pass a No. 2 nonabsorbable suture using the Shuttle Relay and tie a knot, effectively plicating the capsule directly to the labral tissue.
Postoperative Care and Rehabilitation Protocol
The postoperative rehabilitation following posterior shoulder stabilization requires a delicate balance between protecting the healing capsulolabral tissues and preventing adhesive capsulitis.
Clinical Pearl: Posterior vs. Anterior Precautions
While the foundational phases of rehabilitation share similarities with anterior Bankart repairs, the biomechanical restrictions are fundamentally different. For posterior stabilization, the arm must be maintained posterior to the longitudinal axis of the trunk. Internal rotation with the arm elevated (the cross-body adduction position) places maximum stress on the posterior repair and is strictly prohibited until 6 weeks postoperatively.
Immediate Postoperative Immobilization
The shoulder is immobilized in a specialized abduction sling equipped with an external rotation pillow for 6 weeks. This orthosis maintains the arm in neutral to slight external rotation and slight abduction, removing tension from the posterior capsule.
Phase I: Maximum Protection (Weeks 1–6)
Weeks 1–2:
* No formal Physical Therapy (PT) if the patient is independent with their home exercise program.
* Pendulum exercises.
* Active Range of Motion (AROM) of the elbow, forearm, and wrist.
* Wrist isotonics and grip exercises.
* Precaution: Sling must be worn at all times.
Weeks 3–4 (PT 3-4 times/week):
* Initiate formal PT at approximately 15 days postoperatively.
* Passive Range of Motion (PROM) with strict restrictions:
* Flexion (FL) < 160 degrees.
* Scaption < 150 degrees.
* External Rotation (ER) in neutral: up to 30 degrees at week 3; 40 degrees at week 4.
* Internal Rotation (IR) in 45 degrees of scaption: < 60 degrees.
* Gentle Active-Assisted Range of Motion (AAROM) with a cane (FL < 160 degrees).
* Scapular mobility exercises (protraction/retraction, elevation/depression).
* Precaution: No true abduction PROM. No ER with the arm abducted away from the body. Internal rotation behind the back may be gently initiated at 4 weeks.
Weeks 5–6 (PT 3-4 times/week):
* Progress PROM restrictions:
* FL < 170 degrees.
* Scaption < 160 degrees.
* ER at 45 degrees scaption: < 60 degrees.
* IR at 45 degrees scaption: to 60 degrees.
* Initiate submaximal (25%) isometrics at the side for IR, ER, and Abduction (ABD).
* AROM: Prone extension and rows, supine protraction.
* Precaution: Continue sling use during sleep and in crowds. Cross-body adduction remains prohibited.
Phase II: Graded AROM and Strengthening (Weeks 7–10)
Weeks 7–8 (PT 2 times/week):
* Discontinue the sling completely, provided there is no increased pain.
* Progress PROM to Within Normal Limits (WNL) for Flexion, Scaption, and IR.
* ER in 90 degrees of scaption progressed to 70 degrees by week 8.
* Initiate AROM for flexion and scaption to 90 degrees with proper scapulothoracic mechanics.
* Initiate light isotonics (1-2 lbs) for FL, scaption, ER, and IR.
* Proprioceptive training (e.g., ball wall dribbles, submaximal manual resistance PNF).
* Precaution: Avoid terminal ER/ABD stretching. Use only light-weight/high-repetition isotonics.
Weeks 9–10 (PT 2 times/week):
* Progress all AROM to Within Functional Limits (WFL).
* Initiate the Jobe rotator cuff strengthening program.
* Advance isotonics: lateral pull-downs to the chest, wall push-ups (elbows tight to the side), step-ups.
* Advance proprioceptive training to include progressive weight-bearing on unstable surfaces.
* Precaution: Continuously evaluate for posterior capsular tightness; initiate gentle cross-body stretching only if necessary and cleared by the operative surgeon.
Phase III: Advanced Strengthening and Return to Play (Weeks 11–14+)
Weeks 11–14 (PT 2 times/month):
* Progress isotonic resistance.
* Progress ER and IR isotonics toward 90 degrees of abduction using Therabands and free weights.
* Initiate plyometric exercises (chest passes, sideways throws, overhead throws) if appropriate for the patient's athletic demands.
* Isokinetic strengthening as needed.
* Precaution: No heavy bench pressing or pectoral fly exercises until a minimum of 6 months postoperatively to protect the anterior structures and prevent excessive posterior translation under heavy loads.
Return to Sports Criteria:
Sports activities are generally permitted after 4 to 6 months. Clearance is heavily dependent on objective isokinetic measurements (e.g., utilizing a Cybex dynamometer). Return to unrestricted athletic activity can be safely resumed when the strength in forward elevation, external rotation at the side, and internal rotation in 90 degrees of abduction reaches greater than 80% of the values measured on the contralateral, uninjured side.
Conclusion
Arthroscopic posterior shoulder stabilization is a highly reproducible and effective procedure when executed with meticulous attention to detail. By adhering to strict indications, utilizing precise portal placements to achieve the correct angle of approach, ensuring robust capsulolabral mobilization, and following a biologically respectful, phased rehabilitation protocol, orthopedic surgeons can reliably restore joint stability and facilitate a high rate of return to elite-level sports.
You Might Also Like