Arthroscopic Distal Clavicle Resection: Mumford Procedure Guide
Key Takeaway
The arthroscopic Mumford procedure, or distal clavicle resection, is a highly effective surgical intervention for acromioclavicular joint pathology. This comprehensive guide details the Tolin and Snyder technique, emphasizing precise patient positioning, meticulous subacromial decompression, and controlled bony resection while preserving the superior acromioclavicular capsule. Proper execution ensures optimal joint decompression, pain relief, and restoration of shoulder kinematics.
INTRODUCTION TO THE ARTHROSCOPIC MUMFORD PROCEDURE
The arthroscopic resection of the distal end of the clavicle, widely known as the arthroscopic Mumford procedure, represents a cornerstone in the surgical management of acromioclavicular (AC) joint pathology. Originally described as an open procedure by Mumford and Gurd in 1941, the technique has evolved significantly. The arthroscopic approach, particularly the technique popularized by Tolin and Snyder, offers profound advantages over its open predecessor, including the preservation of the superior AC joint capsule and the deltotrapezial fascia, accelerated postoperative rehabilitation, and the ability to simultaneously diagnose and treat concomitant glenohumeral and subacromial pathology.
This comprehensive guide details the postgraduate-level execution of the arthroscopic distal clavicle resection, focusing on biomechanical principles, meticulous patient positioning, step-by-step surgical execution, and evidence-based postoperative care.
INDICATIONS AND CONTRAINDICATIONS
Primary Indications
Surgical intervention is indicated only after the exhaustion of conservative management modalities, including non-steroidal anti-inflammatory drugs (NSAIDs), activity modification, physical therapy, and targeted intra-articular corticosteroid injections.
* Acromioclavicular Joint Osteoarthritis: Primary or post-traumatic degeneration of the AC joint causing mechanical impingement and localized pain, particularly during cross-body adduction.
* Distal Clavicular Osteolysis: Often seen in weightlifters and overhead athletes, characterized by microfractures and subsequent resorption of the distal clavicular subchondral bone.
* Impingement Syndrome: Where a hypertrophic inferior AC joint osteophyte contributes to secondary subacromial impingement and rotator cuff mechanical abrasion.
Contraindications
- Acromioclavicular Joint Instability: High-grade AC joint separations (Rockwood Types III-VI) require stabilization (e.g., coracoclavicular ligament reconstruction) rather than isolated resection, which would exacerbate instability.
- Active Infection: Localized or systemic active infectious processes.
- Inadequate Conservative Trial: Failure to attempt at least 3 to 6 months of non-operative management.
RELEVANT ANATOMY AND BIOMECHANICS
A profound understanding of AC joint anatomy is non-negotiable for the operating surgeon. The AC joint is a diarthrodial joint stabilized by both static and dynamic restraints.
- Static Stabilizers: The AC ligaments (superior, inferior, anterior, and posterior) control horizontal (anteroposterior) translation. The superior AC ligament is the most robust and critical for horizontal stability. The coracoclavicular (CC) ligaments (conoid and trapezoid) control vertical translation. The trapezoid inserts approximately 3 cm medial to the distal clavicle, while the conoid inserts approximately 4.5 cm medially.
- Dynamic Stabilizers: The anterior deltoid and the trapezius muscles interdigitate over the superior aspect of the joint, forming the deltotrapezial fascia.
Surgical Pearl: The primary biomechanical goal of the Mumford procedure is to resect enough bone to prevent bony abutment during maximal cross-body adduction (typically 6 to 8 mm total space), while strictly avoiding resection beyond 10 to 15 mm. Excessive resection compromises the trapezoid ligament, leading to iatrogenic posterior and superior clavicular instability.
PREOPERATIVE PLANNING AND ANESTHESIA
Imaging Protocol
Standard radiographic evaluation must include:
* Anteroposterior (AP) View: Evaluates general glenohumeral joint space.
* Zanca View: A 10- to 15-degree cephalad tilt AP view, specifically penetrating the AC joint to assess joint space narrowing, cystic changes, and osteophyte formation.
* Axillary Lateral View: Essential for evaluating os acromiale and dynamic anteroposterior alignment.
* Magnetic Resonance Imaging (MRI): Highly recommended to evaluate the integrity of the rotator cuff, labrum, and the presence of subchondral cysts or bone marrow edema in the distal clavicle.
Anesthesia
The procedure is typically performed under general endotracheal anesthesia. This is routinely supplemented with a regional interscalene nerve block to provide profound intraoperative muscle relaxation and preemptive postoperative analgesia, significantly reducing the requirement for systemic narcotics.
PATIENT POSITIONING AND SETUP
Proper positioning is critical for optimal visualization and fluid management. The Tolin and Snyder technique utilizes the lateral decubitus position.
- Positioning: Place the patient in the lateral decubitus position. Tilt the patient backward approximately 30 degrees to bring the glenoid parallel to the floor.
- Torso Support: Secure the patient using an inflatable beanbag and standard kidney rests. Ensure all bony prominences (peroneal nerve, greater trochanter) are meticulously padded.
- Arm Suspension: Utilize a sterile foam-padded traction device (e.g., STAR Sleeve; Arthrex, Naples, FL).
- For Glenohumeral Arthroscopy: Suspend the arm in 70 degrees of abduction and 15 degrees of forward flexion with 10 lbs of longitudinal traction.
SURGICAL TECHNIQUE: STEP-BY-STEP
Phase 1: Diagnostic Glenohumeral Arthroscopy
Before addressing the subacromial space, a thorough evaluation of the glenohumeral joint is mandatory to rule out or treat concomitant pathology.
- Establish standard posterior and anterior viewing portals.
- Perform a complete, systematic 15-point anatomical review of the glenohumeral joint.
- Evaluate and meticulously repair any intra-articular pathological processes. Pay specific attention to the long head of the biceps tendon, the superior labrum (SLAP lesions), and the articular surface of the rotator cuff.
Phase 2: Subacromial Bursoscopy and Decompression
Transitioning to the subacromial space requires a critical adjustment in arm positioning to relax the deltoid and open the subacromial space.
- Repositioning: Change the shoulder position to 20 degrees of abduction and 5 degrees of forward flexion. This reduction in traction and abduction is vital for subacromial bursoscopy.
- Bursal Evaluation: Using the standard anterior and posterior portals, examine the subacromial bursa, the undersurface of the acromion, the coracoacromial (CA) ligament, the bursal surface of the rotator cuff, and the inferior aspect of the AC joint.
- Selective Subacromial Decompression (SAD): Perform a selective SAD based on the presence of impingement.
- If impingement is present: Perform a formal acromioplasty.
- If no impingement lesion is present: Limit the intervention to beveling the acromial facet of the AC joint and excising the CA ligament directly beneath the acromion. Beveling the acromial facet through the posterior subacromial portal is crucial to expose a tight or medially inclined AC joint.
Phase 3: Preparation of the Acromioclavicular Joint
The decision to proceed with a complete distal clavicle resection must be definitively made prior to initiating this phase, based on preoperative planning and intraoperative findings.
- Portal Setup: Maintain the arthroscope in the posterior subacromial portal. Insert a 6-mm internal diameter outflow cannula connected to gravity drainage into the anterior subacromial portal. This ensures high-flow, low-pressure fluid management, maintaining a clear visual field.
- Capsular Ablation: Insert a radiofrequency (RF) electrosurgical tool with a subacromial electrode through an insulated cannula in the lateral portal.
- Morcellization: Use the RF electrode to systematically transect and morcellize the inferior capsule and periosteum from the undersurface of the AC joint and the distal end of the clavicle.
- Debridement: Remove the electrosurgical tool and insert a mechanical shaver through the lateral portal cannula. Excise the soft tissue debris and periosteal remnants to clearly define the bony margins of the distal clavicle.
Surgical Pitfall: Failure to adequately clear the inferior capsule and periosteum will result in a "snowstorm" effect when the burr is introduced, severely compromising visualization and increasing the risk of iatrogenic injury to the superior capsule.
Phase 4: Bony Resection of the Distal Clavicle
Bony resection must be methodical, symmetrical, and strictly controlled to preserve the superior capsular restraints.
- Posterior Resection: Insert a 4.0-mm or 5.5-mm motorized burr through the posterior portal. Begin by removing the posterior facet and any posterior osteophytes on the clavicle. Clear the resulting bony debris via gravity drainage through the anterior outflow cannula.
- Note: If a massive inferior spur is present, it may be ergonomically favorable to place the arthroscope in the lateral portal and introduce instrumentation from the posterior portal.
- Anterior to Posterior Resection: Relocate the 4.0-mm or 5.5-mm burr, equipped with a hooded acromionizer sheath to protect surrounding soft tissues, through the anterior portal directly into the AC joint.
- Systematic Burring: Start the clavicular resection anteriorly and work systematically toward the posterior extent of the AC joint capsule.
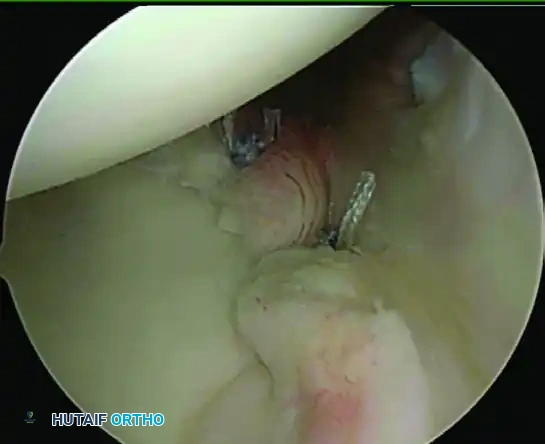
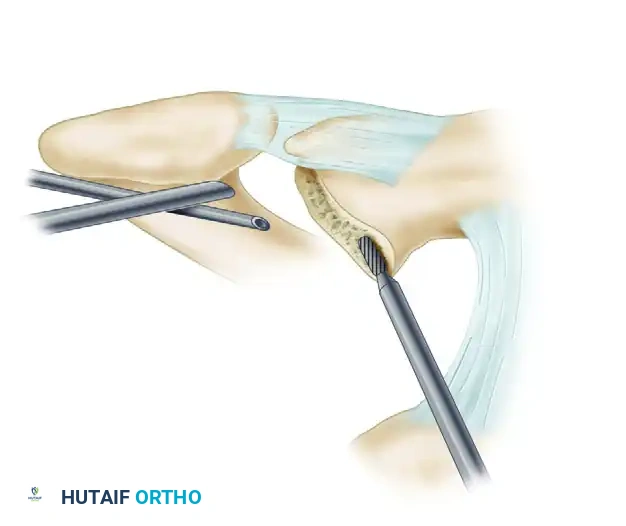
- Superior Margin Preservation: Carefully observe and preserve the superior capsule. Use the burr to resect the remaining superior margin of the distal clavicle, strictly avoiding penetration or thermal injury to the superior capsular ligaments. Resect the superior aspect of the clavicle and any associated subchondral cysts, ensuring the resection is perfectly symmetrical to that of the inferior clavicle.
FIGURE 52-51A: Tolin and Snyder arthroscopic resection of the distal head of the clavicle. The superior cortical rim of the clavicle is carefully removed using a motorized burr while preserving the overlying superior AC joint capsule.
Phase 5: Verification and Measurement
Ensuring adequate, but not excessive, resection is the final critical intraoperative step.
- Visual Inspection: Insert the arthroscope into the anterior portal to gain a direct, en face view of the newly resected AC joint space.
- Final Contouring: Resect any remaining peripheral spurs or bony irregularities from either a lateral or posterior portal. Slightly bevel the undersurface of the clavicle to eliminate any sharp cortical edges that could abrade the underlying rotator cuff.
- The Two-Pin Measurement Technique: Estimate the exact width of the resected AC space using the two-pin technique to ensure a 6 to 8 mm gap is achieved.
- With the arthroscope in the anterior portal, advance a spinal needle or smooth pin vertically through the skin, parallel to and resting at the midsection of the resected distal end of the clavicle.
- Place a second pin perpendicular to the medial border of the acromion and parallel to the central portion of the acromial facet.
- The distance between these two pins, measured externally at the skin level, accurately corresponds to the width of the bony resection.
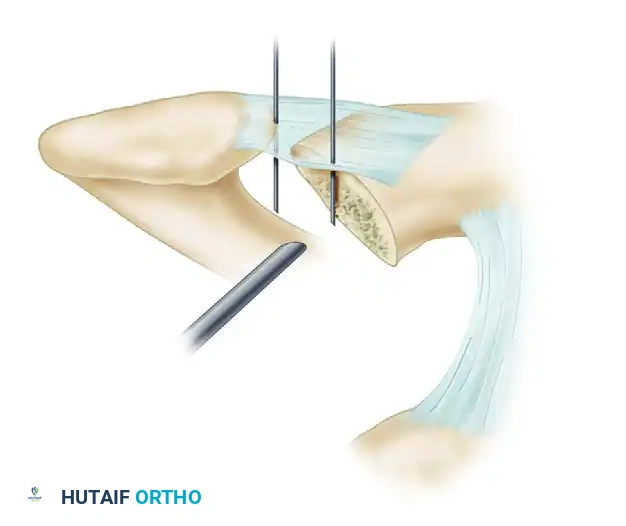
FIGURE 52-51B: The two-pin technique used to accurately measure the width of the distal clavicle resection. The target resection width is 6 to 8 mm to prevent abutment while maintaining ligamentous stability.
ADDRESSING CONCOMITANT PATHOLOGY: CALCIFIC TENDINITIS
During the subacromial evaluation, the surgeon may encounter concomitant calcific tendinitis of the rotator cuff. Anteroposterior radiographs with the shoulder in internal and external rotation, alongside an axillary lateral view, are highly sensitive in identifying the area of calcification preoperatively. The supraspinatus and subscapularis tendons are most commonly involved.
If surgical intervention for the calcific deposit is deemed necessary during the Mumford procedure, arthroscopic release and lavage of the calcification can be highly beneficial.
Clinical Pearl: The use of subacromial corticosteroid injections in the presence of calcific tendinitis is controversial. While it may provide temporary relief, evidence suggests it may actually prolong the painful resorptive phase of the disease. If acute pain is severe, oral narcotics may be necessary during the acute phase rather than relying solely on local corticosteroid administration.
POSTOPERATIVE CARE AND REHABILITATION PROTOCOL
The arthroscopic approach allows for an accelerated rehabilitation protocol compared to open techniques, as the deltotrapezial fascia remains intact.
Phase I: Immediate Postoperative (Weeks 0-2)
- Immobilization: The patient is placed in a standard clinical sling (e.g., Ultrasling) primarily for comfort.
- Range of Motion (ROM): General passive range-of-motion (PROM) and pendulum exercises are initiated immediately on postoperative day one.
- Distal Activation: Exercises of the forearm, wrist, and hand are begun on the first postoperative day, often with the aid of therapy putty to promote venous return and prevent distal stiffness.
- Restrictions: Overhead lifting, pulling, pushing, and cross-body adduction activities are strictly restricted for the first 1 to 2 weeks to allow acute soft tissue healing and minimize hemarthrosis.
Phase II: Intermediate Rehabilitation (Weeks 2-6)
- Sling Weaning: The sling is progressively discontinued as pain allows.
- Active Range of Motion (AROM): Active-assisted and active range of motion exercises are introduced.
- Scapular Stabilization: Focus shifts to scapulothoracic kinematics and periscapular strengthening.
- Restrictions: Heavy lifting and resisted overhead motion are avoided for 6 weeks.
Phase III: Advanced Strengthening (Weeks 6-12+)
- Overhead Motion: Unrestricted overhead motion is officially permitted starting at 6 weeks.
- Strengthening: Resisted isotonic strengthening of the rotator cuff and deltoid is initiated at 10 weeks postoperatively.
- Return to Play/Work: A return to heavy manual labor, overhead sports, and contact sporting activities is generally allowed 2 to 3 months postoperatively, contingent upon the restoration of symmetrical strength and pain-free full range of motion.
COMPLICATIONS AND PITFALLS
While highly successful, the arthroscopic Mumford procedure carries specific risks that the meticulous surgeon must actively mitigate:
- Inadequate Resection: Leaving posterior or superior bony ridges is the most common cause of persistent postoperative pain. The two-pin measurement technique and thorough visualization from multiple portals are essential to prevent this.
- Over-Resection and Instability: Resecting more than 10-15 mm of the distal clavicle risks violating the insertion of the conoid and trapezoid ligaments, leading to iatrogenic horizontal and vertical AC joint instability.
- Heterotopic Ossification: Inadequate lavage of bone debris can lead to heterotopic ossification within the AC joint space, recreating the impingement. Copious fluid irrigation through the 6-mm outflow cannula during burring is mandatory.
- Superior Capsular Violation: Aggressive superior burring can destroy the superior AC ligament, destabilizing the clavicle. The use of a hooded burr and careful spatial awareness are critical.
By adhering to these rigorous academic and biomechanical standards, the orthopedic surgeon can consistently achieve excellent clinical outcomes, providing patients with durable pain relief and restored shoulder function following the arthroscopic Mumford procedure.
You Might Also Like