Advanced Principles & Strategies for Well-Fixed Orthopedic Implant Removal
Key Takeaway
Removing well-fixed orthopedic implants is challenging due to robust osseointegration or cement mantle integrity. Key principles include minimizing host bone destruction, ensuring complete component removal, facilitating future reconstructive options, and optimizing OR efficiency. A deep understanding of surgical anatomy, particularly the bone-implant interface, and implant biomechanics is crucial for successful and safe extraction.
Introduction & Epidemiology
The increasing longevity of patients and the expansion of indications for total joint arthroplasty have led to a substantial rise in primary procedures. Concurrently, this trend predicts a proportional increase in the demand for revision arthroplasty. A critical challenge in revision surgery is the removal of well-fixed implants, a procedure often more demanding and complex than primary implantation. The objective is not merely to remove the failed component but to do so in a manner that preserves host bone stock, facilitates subsequent reconstructive options, and minimizes iatrogenic damage, all while optimizing operating room efficiency.
The principles guiding implant removal techniques are paramount:
*
Minimize host bone destruction:
Preservation of the remaining bone is critical for achieving durable fixation of revision components.
*
Allow complete component and cement removal:
Residual implant material or cement can serve as a nidus for infection or compromise the integrity of the new implant-bone interface.
*
Facilitate subsequent reconstructive options:
The method of removal must consider the potential for advanced reconstruction, including the use of modular implants, structural allografts, or custom components.
*
Efficiently utilize operating room time:
While precision is non-negotiable, undue prolongation of surgical time increases risks to the patient and demands on resources.
Epidemiologically, revision rates for hip and knee arthroplasty are projected to increase by over 100% in the coming decades. This underscores the necessity for orthopedic surgeons to master advanced techniques for challenging implant removals, especially as newer, highly porous or biologically integrated implants achieve increasingly robust fixation. The inherent difficulty stems from the very success of primary implantation: robust osseointegration or a well-formed cement mantle that previously ensured stability now poses a significant barrier to extraction.
Surgical Anatomy & Biomechanics
Successful implant removal necessitates a profound understanding of the specific surgical anatomy surrounding the implant and the biomechanical principles governing implant fixation and bone remodeling. This section will focus on generalized anatomical considerations and biomechanical responses pertinent to well-fixed implants across various joints.
Anatomy of the Bone-Implant Interface
The primary anatomical consideration is the interface between the implant and host bone. In cementless fixation, this involves direct bone ingrowth into porous or textured surfaces. This bone is often mature, load-bearing lamellar bone, forming a strong mechanical interlock. The quality and extent of osseointegration vary along the implant length and depend on factors such as initial stability, implant design, surface characteristics, and patient biology. For example, the metaphyseal-diaphyseal junction in long bones often exhibits dense cortical bone, making separation of well-ingrown implants particularly challenging. The vascularity of the periosteum and surrounding soft tissues is also vital; extensive dissection for exposure can compromise this, potentially affecting bone healing after removal.
In cemented constructs, the cement mantle serves as the interface, transferring load from the implant to the bone. The quality of this mantle and its interdigitation into cancellous bone dictates the strength of fixation. Over time, particularly in well-fixed components, the cement-bone interface can become remarkably robust, sometimes exceeding the strength of the adjacent cancellous bone.
Specific anatomical challenges include:
*
Femoral Canal:
The curvature and progressively thicker cortical bone distally make long, well-fixed femoral stems difficult to access and remove without iatrogenic fracture. The isthmus often represents the area of densest ingrowth.
*
Acetabulum:
The hemispherical shape and varying cortical thickness of the pelvis, combined with the proximity to major neurovascular structures (e.g., obturator nerve, external iliac vessels) and the true pelvis, demand meticulous dissection.
*
Tibial Metaphysis:
The cancellous nature of the proximal tibia can be advantageous for removal, but dense ingrowth into porous surfaces or a robust cement mantle around a tibial keel or pegs can still be problematic.
*
Modular Junctions:
The taper lock mechanism, while critical for achieving a strong connection between modular components (e.g., femoral head to stem, tibial tray to stem), can develop cold welding or corrosion, making disassembly challenging.
Biomechanics of Implant Fixation and Failure
The "well-fixed" status of an implant is a testament to successful primary biomechanical principles:
*
Osseointegration:
The direct structural and functional connection between ordered, living bone and the surface of a load-carrying implant. This process is governed by Wolff's Law, where bone adapts to mechanical stresses. Well-fixed cementless implants have achieved extensive osseointegration, forming a powerful bond that must be mechanically disrupted during revision.
*
Stress Shielding:
The phenomenon where the stiffer implant carries a disproportionate amount of load, leading to reduced stress on the surrounding bone and subsequent bone remodeling and resorption. While sometimes considered a "pitfall" of long-term fixation, the areas
not
significantly stress-shielded may develop even denser bone-implant interfaces due to sustained physiological loading.
*
Cement Mantle Integrity:
A well-distributed cement mantle provides uniform load transfer and prevents micromotion. The elastic properties of polymethylmethacrylate (PMMA) allow for some energy absorption, but its ultimate strength depends on its thickness, porosity, and interdigitation into bone.
Modes of failure that still involve a well-fixed component typically do not involve primary loosening at the bone-implant interface. Instead, they relate to:
*
Component Malposition:
Leading to abnormal joint kinematics, impingement, or early wear despite stable fixation.
*
Aseptic Osteolysis:
Bone resorption due to particulate wear debris, often remote from the primary fixation interface but causing structural compromise.
*
Infection:
Bacteria adhere to the implant surface, forming a biofilm. The host response often involves a robust interface, but the underlying infection necessitates implant removal.
*
Modular Component Failure:
Fretting corrosion at taper junctions, fracture of modular components (e.g., polyethylene liner wear, metal-on-metal wear, ceramic head fracture) where the main implant body remains solidly fixed.
Removing these well-fixed components requires overcoming these powerful biomechanical bonds while preserving the remaining, often compromised, host bone. This delicate balance forms the core of the surgical challenge.
Indications & Contraindications
The decision to proceed with the demanding task of removing a well-fixed implant is based on a clear set of indications, balanced against potential contraindications. The goals of removal, as outlined previously, must be achievable and outweigh the risks.
Indications for Well-Fixed Implant Removal
- Presence of Chronic Infection: This is a primary indication. A well-fixed implant can harbor a biofilm, making eradication of infection impossible without its removal. This often involves a staged procedure, with initial implant removal and debridement followed by reimplantation.
- Malposition of Components Leading to Pain or Failure: Despite solid fixation, incorrect alignment (e.g., excessive anteversion/retroversion of a femoral component, malrotation of a tibial tray, steep acetabular cup inclination) can lead to chronic pain, recurrent dislocation, impingement, accelerated wear, or limited range of motion, necessitating revision.
- Ligamentous Instability Requiring Increased Prosthetic Constraint: In cases of chronic instability post-arthroplasty, and if soft tissue balancing is insufficient, a well-fixed primary implant may need to be exchanged for a more constrained design.
- Severe Osteolysis: Extensive bone loss due to particulate wear debris, even in the presence of a well-fixed implant, can compromise the long-term integrity of the reconstruction or lead to periprosthetic fracture. Removal is necessary for debridement of granulomatous tissue and bone grafting or structural reconstruction.
- Failure of Modular Implant without Suitable/Compatible Polyethylene Insert: This refers to situations where a modular component, such as a polyethylene liner, has worn out or fractured, but a compatible replacement is unavailable or the modularity itself is compromised, necessitating exchange of the entire implant.
- Significant Damage to Metal Articular Surfaces: This can occur in metal-on-metal articulations (severe wear, adverse local tissue reaction) or due to direct trauma or impingement causing damage to non-articulating metal surfaces (e.g., acetabular shell, femoral head taper).
- Recurrent Dislocation: If non-operative measures fail, recurrent dislocation can be an indication, particularly if component malposition is identified as a contributing factor.
- Mechanical Failure of the Implant: Fracture of the implant itself (e.g., stem fracture, locking mechanism failure) necessitates removal.
- Persistent Pain without Obvious Cause (Painful Arthroplasty): After thorough investigation to rule out infection, loosening, or other pathology, revision may be considered, particularly if component malposition or soft tissue irritation is suspected.
Contraindications
- Severe Medical Comorbidities: Patients with significant cardiac, pulmonary, or systemic health issues that preclude major surgery may be deemed unsuitable for extensive revision procedures.
- Insufficient Bone Stock for Revision: If preoperative imaging suggests that implant removal would result in catastrophic bone loss precluding any reasonable reconstructive option, surgery may be deferred or a palliative approach chosen.
- Uncontrolled Active Infection: In some scenarios, immediate implant removal in the presence of an uncontrolled systemic infection might be contraindicated until the patient's general health improves or source control is achieved elsewhere.
- Patient Refusal: An informed patient's decision to decline surgery.
- High Risk of Catastrophic Iatrogenic Damage: If the perceived risk of intraoperative neurovascular injury or irreparable bone loss is exceptionally high, particularly in complex cases or with limited surgical expertise, a conservative approach may be preferred.
Operative vs. Non-Operative Indications
| Indication/Contraindication | Operative Rationale | Non-Operative Considerations/Contraindications |
|---|---|---|
| Chronic Infection | Eradication of biofilm, source control. Essential for long-term resolution. | None, unless patient unfit for surgery or palliative care. |
| Component Malposition | Restore joint kinematics, alleviate pain, prevent further wear/dislocation. | Minor malpositions without significant symptoms. High surgical risk. Patient refusal. |
| Ligamentous Instability | Provide increased constraint, restore joint stability. | Physical therapy, bracing, activity modification for mild instability. Significant medical comorbidities. |
| Severe Osteolysis | Debride granulomatous tissue, reconstruct bone defects, prevent fracture. | Asymptomatic, stable osteolysis in non-critical areas, monitored with serial imaging. High surgical risk. |
| Modular Implant Failure | Restore integrity of articulating surfaces, prevent further damage. | Incompatible components where only the modular insert is worn, and suitable replacements exist (not applicable if the entire implant is considered "well-fixed" and must be removed). |
| Metal Articular Surface Damage | Eliminate pain, prevent further soft tissue damage or wear debris generation. | Minor, asymptomatic damage. High surgical risk. |
| Recurrent Dislocation | Restore stability, improve quality of life. | Non-operative management (bracing, activity modification, physical therapy) in mild cases or patients unfit for surgery. |
| Mechanical Implant Failure (Fracture) | Restore structural integrity, alleviate pain. | None, if functional impairment or pain is significant. |
| Persistent Pain (idiopathic) | Explore potential underlying causes not visible on routine imaging, revise if malposition or irritation is confirmed. | Thorough diagnostic workup must precede. If no clear cause and high surgical risk, pain management. |
| Severe Medical Comorbidities | N/A (contraindication) | Palliative care, medical optimization. |
| Insufficient Bone Stock | N/A (contraindication) | Consideration of non-operative management, limb salvage, or alternative less invasive procedures if viable. |
| Uncontrolled Active Systemic Infection | N/A (contraindication for immediate surgery) | Medical management of infection (antibiotics) until systemic control is achieved; subsequent staged removal. |
Pre-Operative Planning & Patient Positioning
Thorough pre-operative planning is the cornerstone of successful, safe, and efficient revision arthroplasty, particularly when dealing with well-fixed implants. It minimizes surprises, anticipates potential challenges, and allows for the appropriate allocation of resources and surgical strategy.
Pre-Operative Planning
- Patient History and Physical Examination: A detailed history is crucial to understand the original implant details, previous surgeries, complications, and the current symptoms. A focused physical exam assesses limb alignment, range of motion, stability, neurovascular status, and soft tissue envelope.
- Infection Workup: If infection is a possibility, a comprehensive workup including inflammatory markers (ESR, CRP), aspiration of the joint (with cell count, differential, and cultures), and possibly nuclear imaging (leukocyte scintigraphy) is mandatory. If infection is confirmed, a staged approach is typically planned.
-
Detailed Radiographic Assessment:
-
Plain Radiographs:
Anteroposterior (AP) and lateral views of the affected joint, including views of the entire length of any stemmed components (e.g., full-length femur for hip stems). These are critical for:
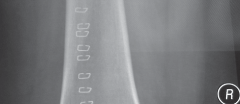
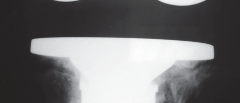
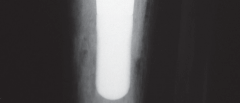
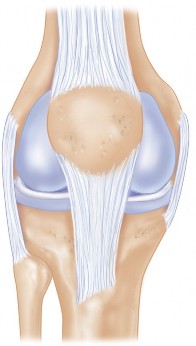
- Implant Identification: Identifying the type, design, and manufacturer of the implant(s) is paramount. This dictates the availability of specific removal tools, drivers, and potential modularity issues. Many manufacturers provide detailed surgical guides online or upon request. Preoperative radiographs should allow the surgeon to identify the type and manufacturer of the implant(s) to be removed (Fig. 1).
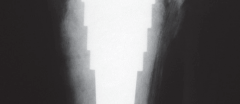
- Fixation Interfaces: Close inspection for signs of loosening, osteolysis, stress shielding patterns, and areas of dense bone ingrowth. Cement lines should be evaluated for integrity. Fixation interfaces should be closely inspected to reveal areas that may be particularly difficult to reach with extraction tools. This includes the stem-bone interface, the cup-bone interface, and areas around screws or pegs.
- Bone Stock Assessment: Evaluation of cortical thickness, canal dimensions, existing bone defects, and any signs of impending fracture.
- Deformity Assessment: Limb length discrepancy, angular deformities.
-
Advanced Imaging:
- Computed Tomography (CT) Scan: Highly valuable for assessing osteolysis, defining bone defects, evaluating implant orientation in 3D, and measuring cortical thickness, especially around well-fixed stems. CT can also delineate the extent of bone ingrowth.
- Magnetic Resonance Imaging (MRI): While often hampered by artifact from metallic implants, specialized sequences can be useful for evaluating soft tissue pathology, pseudotumors (in metal-on-metal cases), or subtle signs of infection. Metal artifact reduction sequences (MARS-MRI) are increasingly utilized.
- Digital Templating: Using digital radiographs or CT scans, templating for both implant removal and subsequent revision component selection is essential. This helps anticipate the size and type of revision components (e.g., modular stems, augments, structural allografts, cages) and predict potential bone loss or reconstructive challenges.
-
Plain Radiographs:
Anteroposterior (AP) and lateral views of the affected joint, including views of the entire length of any stemmed components (e.g., full-length femur for hip stems). These are critical for:
-
Instrumentation and Implants:
- Revision Sets: Ensure the availability of comprehensive revision instrument sets from the original implant manufacturer, if known, and universal revision sets.
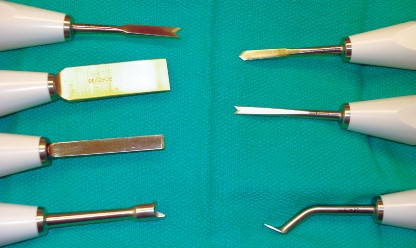
- Specialized Removal Tools: This includes universal femoral stem extractors, various osteotomes (curved, flexible, straight), high-speed burrs, ultrasonic cement removal tools, specific drivers for screws, Gigli saws, and potential oscillating saw blades for osteotomies.
- Backup Implants: Have a wide range of revision components, including different sizes, modularity options, augments, allografts, and possibly custom implants, readily available in the operating room.
- Bone Grafting Materials: Autograft and allograft (particulate, structural) should be prepared.
-
Surgical Team Preparation: An experienced surgeon, first assistant, and scrub nurse are vital. The scrub team should be intimately familiar with the revision sets and be able to anticipate instruments.
Patient Positioning
Patient positioning is critical for maximizing exposure, ensuring stability, and allowing unimpeded access for instrument manipulation, especially for extended exposures.
-
Total Hip Arthroplasty (THA) Revision:
- Lateral Decubitus: Often preferred for posterior or posterolateral approaches, providing excellent access to the posterior acetabulum and femoral canal. The patient must be securely padded and stabilized.
- Supine with a Bony Bump: Used for anterior approaches, or if a global exposure via trochanteric osteotomy is planned, allowing access to both anterior and posterior aspects of the hip. A bean bag can be used for stability.
-
Total Knee Arthroplasty (TKA) Revision:
- Supine: The standard position. A tourniquet is typically applied to the proximal thigh. The leg can be flexed to 90 degrees or extended as needed. A lateral post can aid in valgus stress and femoral component exposure.
-
Shoulder Arthroplasty Revision:
- Beach Chair Position: Common for deltopectoral approach, allows good access to the humeral head and glenoid.
- Lateral Decubitus: Can be used for specific approaches, though less common for primary revision.
Regardless of the specific joint, key principles include:
*
Pneumatic Tourniquet:
For knee and ankle revisions, a tourniquet is routinely used to minimize blood loss and improve visibility.
*
Neurovascular Protection:
Careful padding of pressure points and vigilance for nerve compression.
*
Adequate Exposure:
Positioning should permit necessary extended exposures (e.g., extended trochanteric osteotomy for hip, quadriceps snip or osteotomy for knee).
*
Fluoroscopy Access:
Ensure the operating table and positioning allow for intraoperative fluoroscopy if needed.
Detailed Surgical Approach / Technique
The removal of well-fixed implants is a technically demanding procedure requiring a systematic and often prolonged approach. The overarching goal is to achieve complete implant and cement removal while preserving host bone stock and minimizing iatrogenic damage.
General Principles of Implant Removal
- Extended Exposure: Often necessary to gain adequate visualization and maneuverability, particularly for complex or long-stemmed implants. This may involve extensile approaches, osteotomies (e.g., trochanteric osteotomy, quadriceps snip, tibial tubercle osteotomy), or cortical windows.
- Soft Tissue Protection: Meticulous dissection to protect neurovascular structures and maintain soft tissue integrity, crucial for healing and future stability.
- Sequential Disassembly: Whenever possible, remove modular components (e.g., femoral head, polyethylene liner) first to improve access and reduce bulk.
- Bone Preservation: This is paramount. Techniques should prioritize controlled bone resection or separation rather than aggressive, uncontrolled extraction.
- Specialized Instrumentation: Rely heavily on dedicated revision instrument sets, which include a variety of osteotomes, burrs, extractors, and cutting guides.
Removing Well-Fixed Implants
A. Cemented Components
The challenge with cemented implants is removing both the component and the intimately bonded cement mantle without damaging the underlying bone.
-
Femoral Stems (Cemented):
- Initial Disassembly: Dislocate the hip, remove the femoral head.
- Cement Mantle Access: The cement mantle is typically exposed. Small osteotomes or a high-speed burr can be used to create a gutter around the proximal stem.
-
Stem Loosening:
- Impactors and Extractors: If there is any motion, reverse impactors or slap hammers can be attached to the stem to attempt extraction.
- Cement Removal: If the stem is well-fixed by cement, focus shifts to removing the cement. Small, thin osteotomes (curved and straight) are used to carefully separate the cement from the bone interface.
- Ultrasonic Devices: Ultrasonic cement removal tools (e.g., Mectron Piezosurgery) can precisely fragment cement without damaging bone. This is particularly useful for thin cement mantles or in tight anatomical areas.
- Flexible Osteotomes: Can be passed down the femoral canal alongside the stem to loosen the cement bond.
- Fenestration: If distal cement interdigitation is exceptionally robust, a small cortical window may be made distally to remove cement, though this is less common for femoral stems where the cement is usually within the canal.
- Stem Extraction: Once the cement bond is sufficiently weakened, a universal femoral stem extractor or slap hammer can be used.
-
Acetabular Components (Cemented):
- Liner Removal: Remove the polyethylene liner first.
- Peripheral Cement Debonding: Use thin osteotomes, often curved, to meticulously separate the cement from the acetabular bone at the periphery of the cup.
- Cup Extraction: Once the peripheral bond is broken, a cup extractor can be used.
- Residual Cement: After cup removal, any remaining cement must be meticulously removed from the acetabular bone. This can be achieved with curettes, burrs, or ultrasonic devices. Careful attention is needed to preserve the acetabular rim and floor.
-
Tibial Components (Cemented):
- Polyethylene Liner Removal: Remove the liner.
- Peripheral Debonding: Use thin osteotomes, oscillating saw, or burr to cut or separate the cement-bone interface around the periphery of the tibial tray and along the keel/pegs.
- Tray Extraction: A specialized tibial tray extractor or broad osteotomes can then be used to lift the component.
- Cement Removal: As with the acetabulum, thorough removal of residual cement from the tibial metaphysis is essential for subsequent stable fixation.
B. Cementless Components
Cementless components rely on bone ingrowth, which presents a unique and often more formidable challenge than cemented removal.
-
Femoral Stems (Cementless):
- Stemmed implants warrant particular attention due to the potential difficulty of reaching the binding interface. This is especially true for long, porous-coated stems.
-
Initial Disassembly:
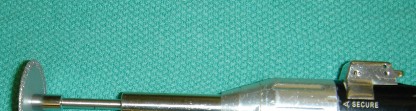
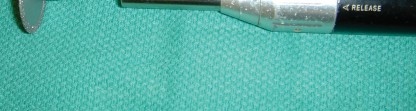
Dislocate the hip, remove the femoral head. If the head is seized or corroded onto the taper, specialized head extractors or even a specific osteotomy around the taper may be needed.
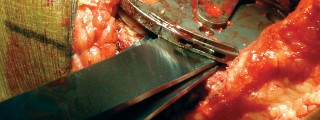
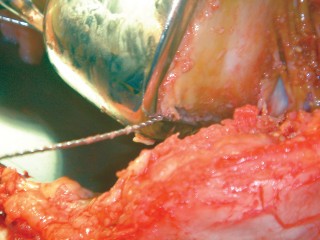
 This image shows a femoral head extractor being used to separate the head from the femoral stem taper.
- Tapered Stems (Fit-and-Fill): These stems achieve proximal fixation and often can be removed with forceful reverse impaction using a universal stem extractor, provided the osseointegration is primarily proximal.
-
Porous-Coated Stems (Extensive Ingrowth):
These are the most challenging.
-
Cortical Windows:
-
Extended Trochanteric Osteotomy (ETO):
This is a versatile and often preferred technique for well-fixed, extensively porous-coated femoral stems. It involves osteotomizing a segment of the greater trochanter and lateral femoral cortex, which is then reflected anteriorly (or posteriorly) with its muscle attachments. This provides direct access to the cement-bone interface, allowing it to be burred, chiseled, or osteotomized under direct vision.
 This schematic illustrates the approach for an Extended Trochanteric Osteotomy, which provides wide access to the femoral canal for removal of well-fixed stems.
After stem removal, the osteotomized fragment is reattached with cables or wires.
This schematic illustrates the approach for an Extended Trochanteric Osteotomy, which provides wide access to the femoral canal for removal of well-fixed stems.
After stem removal, the osteotomized fragment is reattached with cables or wires.
- Anterior Cortical Window: A longitudinal window can be created in the anterior cortex of the femur to provide direct access to the stem. This is generally reserved for situations where an ETO is contraindicated or insufficient.
-
Extended Trochanteric Osteotomy (ETO):
This is a versatile and often preferred technique for well-fixed, extensively porous-coated femoral stems. It involves osteotomizing a segment of the greater trochanter and lateral femoral cortex, which is then reflected anteriorly (or posteriorly) with its muscle attachments. This provides direct access to the cement-bone interface, allowing it to be burred, chiseled, or osteotomized under direct vision.
- Burring the Interface: A high-speed burr can be used to meticulously debride bone from the implant surface, typically along the anterior, posterior, and lateral aspects of the stem, carefully working down the length of the ingrown portion. This is done incrementally to preserve as much host bone as possible.
- Flexible Osteotomes/Trephines: These thin, flexible instruments can be inserted down the canal alongside the stem to break the bone-implant interface. Trephines, specifically designed for this purpose, can be used to core around a stem, though they remove substantial bone.
- Longitudinal Osteotomy: In highly challenging cases, a longitudinal osteotomy of the femur can be performed along the implant. This requires careful planning and fixation post-removal.
- Stem Fracture: If all else fails, the stem can be intentionally fractured to allow removal of segments, though this is a salvage technique.
-
Cortical Windows:
-
Acetabular Cups (Cementless):
- Liner Removal: Remove the polyethylene liner.
- Screw Removal: If the cup is augmented with screws, these must be removed first using specific drivers. Note that corroded or stripped screws can be problematic.
- Peripheral Debonding: Thin, curved osteotomes are meticulously advanced between the cup and the acetabular bone, working circumferentially. Care must be taken to avoid penetrating the medial wall or damaging neurovascular structures. A specialized Gigli saw can sometimes be passed around the cup for circumferential separation.
-
Cup Extraction:
Once the peripheral ingrowth is significantly disrupted, a cup extractor or impaction tools can be used to separate the cup from the acetabulum.
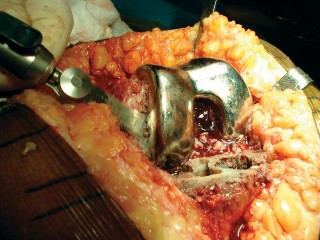
 This image depicts a specialized acetabular cup removal tool, often incorporating impaction to break osseointegration.
-
Difficult Cups:
Some cups have extensive porous coating on the dome, making separation particularly challenging. Sequential smaller osteotomes, burring around the periphery, or specialized cutting instruments may be required.
 This image shows an example of a reamer being used during acetabular cup removal or preparation for revision.
-
Managing Acetabular Defects:
After cup removal, bone defects are common and must be meticulously assessed and reconstructed using augments, structural allografts, or cages.
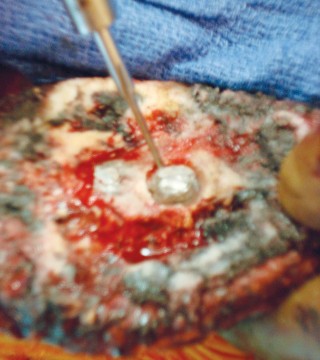
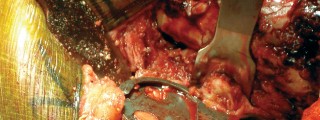
 This image displays the acetabulum after initial cup removal, revealing bone defects that require further management.
-
Grasping Tools for Fragments:
 This demonstrates a specific grasping instrument useful for retrieving small fragments of bone or implant debris during complex revisions.
-
Meticulous Debridement:
 This visual emphasizes the importance of meticulous debridement of the acetabulum to remove any residual fibrous tissue or debris, crucial for promoting new bone growth.
-
Managing Tantalum Implants:
 This image highlights the unique properties and challenges of tantalum implants, often used for bone ingrowth, requiring specific removal strategies.
-
Tibial Components (Cementless):
- Liner Removal: Remove the polyethylene liner.
- Screw Removal: Remove any fixation screws.
- Peripheral Debonding: Similar to cemented components, thin osteotomes or a narrow oscillating saw blade are used to cut or separate the bone-implant interface around the periphery and along the keels or pegs.
- Tray Extraction: A specialized tibial tray extractor or broad osteotomes are used. If a modular tibial stem is present, it must be addressed separately.
-
Challenges with Keels/Stems:
Some cementless tibial components have long, porous-coated stems or prominent keels that can be extensively ingrown. These may require burring around the ingrown areas or even a limited anterior cortical window in the proximal tibia.
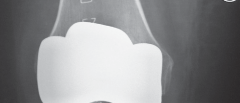
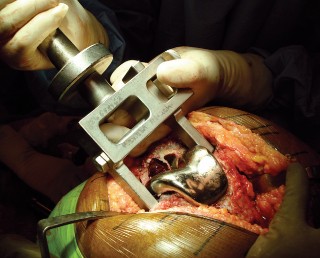
 This image showcases a well-fixed tibial component, emphasizing the extensive bone ingrowth at the tray and keel, making removal challenging.
-
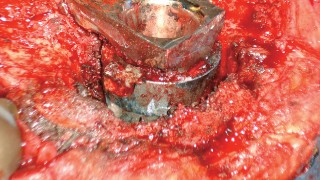
Preparation for Stem Removal:
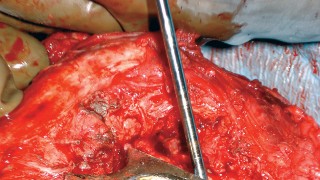
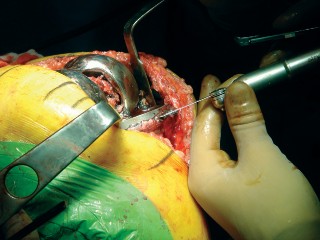
 This image details the preparation of the tibial plateau, highlighting the necessity of removing all surrounding soft tissue and bone ingrowth to free the component.
-
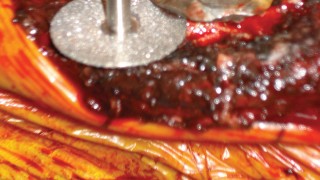
Progressive Loosening:
 This shows a step in the progressive loosening of a tibial component, perhaps with osteotomes or a specialized device.
-
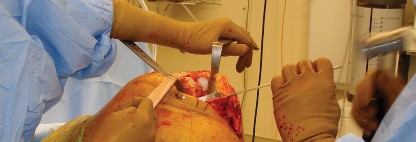
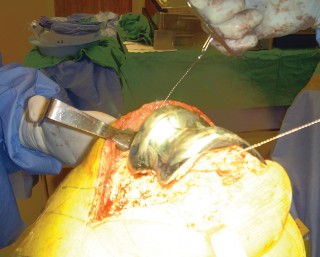
Final Extraction:
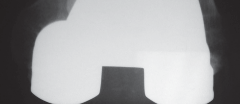
 This illustrates the final extraction of a well-fixed tibial component, often requiring significant force and controlled technique.
C. Modular Component Removal (e.g., Femoral Head, Taper)
Modular components, while designed for easy assembly, can become challenging to remove due to cold welding, corrosion (fretting or crevice), or fracture.
*
Femoral Head Removal:
*
Head Extractor:
Standard head extractors are typically used.
*
Corrosion/Cold Welding:
If the head is "stuck" due to cold welding or significant corrosion at the taper junction, a more aggressive head extractor, a specialized cutting jig, or even a circumtaper osteotomy using a small burr can be performed to release the head from the stem.
*
 This schematic illustrates the potential for taper corrosion, a common issue making femoral head removal difficult.
*
 This image shows severe taper corrosion after head removal, highlighting the damage it can cause.
*
 This demonstrates the visual appearance of a well-fixed femoral stem with a corroded taper after the head has been removed.
*
 This image provides a close-up of the damaged taper, emphasizing the extent of corrosion that can occur.
*
 This image depicts the use of a specialized reamer or cleaner designed to address issues at the femoral stem taper after head removal.
*
 This illustrates the appearance of a cleaned and prepared femoral stem taper, ready for a new femoral head.
*
 This image shows an alternative specialized tool for femoral head removal, potentially for cases with significant taper bonding.
*
 This image further demonstrates advanced instrumentation for handling difficult femoral head-stem interfaces, emphasizing the need for robust and precise tools.
D. Complete Cement Removal
- After implant removal, meticulous attention must be paid to complete removal of all residual cement and fibrous tissue. This is crucial for infection control and ensuring optimal fixation for the revision implant.
- Tools: Curettes, burrs, ultrasonic debridement tools, pulsatile lavage.
- Image Guidance: Intraoperative fluoroscopy can help identify retained fragments.
- Visual Inspection: Careful direct visualization of the entire bone cavity is necessary.
E. Facilitating Subsequent Reconstructive Options
- Throughout the removal process, the future reconstruction must be kept in mind.
- Bone Preservation: Avoid iatrogenic fractures and unnecessary bone loss.
- Anatomical Landmarks: Preserve anatomical landmarks to aid in component positioning.
- Addressing Defects: Immediately address any bone defects created during removal (e.g., contained defects, cortical windows) with grafting or specific revision components.
Complications & Management
The removal of well-fixed implants carries a higher risk of complications compared to primary arthroplasty due to the complex nature of the pathology, compromised bone stock, and the aggressive techniques often required.
Common Complications
-
Periprosthetic Fractures:
This is one of the most common and feared intraoperative complications. The femur, acetabulum, and tibia are susceptible.
- Femoral Fractures: Intraoperative femoral shaft fractures are common during stem removal, especially with extensively coated or bowed stems. Fractures can be classified by location and pattern (e.g., Vancouver classification for hip).
- Acetabular Fractures: Can occur during cup removal, particularly of well-fixed cementless cups or those with screws, leading to dome or column fractures.
- Tibial Fractures: Less common than femoral, but can occur with aggressive tibial tray or stem removal.
- Neurovascular Injury: Proximity of major nerves (e.g., sciatic, femoral, peroneal) and vessels (e.g., femoral, external iliac, popliteal) to the surgical field, especially with extensile exposures or deep instrument penetration, increases risk.
- Uncontrolled Hemorrhage: Extensive dissection and large bone defects can lead to significant blood loss.
- Difficulty Removing Implant Fragments: If an implant breaks during removal, retrieving all fragments can be exceptionally challenging.
- Bone Loss: Even with meticulous technique, some degree of bone loss is almost inevitable, potentially compromising subsequent revision fixation.
- Infection: Despite careful aseptic technique, revision surgery has an inherently higher risk of periprosthetic joint infection (PJI).
- Aseptic Loosening: While removing a well-fixed implant, the revision implant itself can subsequently loosen due to compromised bone stock, inadequate fixation, or persistent underlying pathology.
- Instability: Post-revision instability can result from inadequate soft tissue balancing, component malposition, or residual bone defects affecting constraint.
- Heterotopic Ossification: Increased risk, particularly with extensive dissection or osteotomies.
- Non-Union of Osteotomies: Extended trochanteric osteotomies or other cortical windows may fail to heal.
- Prolonged Wound Healing/Seroma: Larger incisions and extensive soft tissue dissection can lead to delayed wound healing, dehiscence, or seroma formation.
Complications & Management Table
| Complication | Incidence (Approximate Range) | Salvage Strategy/Management |
|
1. Periprosthetic Fractures
| 1-10% | Immediate: Assessment of fracture pattern (e.g., Vancouver, Orthopaedic Trauma Association classification system). Open reduction internal fixation (ORIF) with cables, wires, plates, or a combination. Consideration for alternative stem designs (e.g., extensively coated, cone-shaped, revision stems) to bypass the fracture site. Allograft-prosthesis composite in severe cases. |
|
2. Neurovascular Injury
| <1% |
Intraoperative:
Immediate repair by a vascular surgeon.
Postoperative:
Symptomatic management (bracing, physical therapy) for nerve deficits. Surgical exploration if neurological deficit is worsening or non-recovering. |
|
3. Uncontrolled Hemorrhage
| Variable |
Intraoperative:
Direct pressure, cauterization, ligatures, use of topical hemostatic agents (e.g., fibrin sealants, thrombin), cell saver. Consider packing and delayed closure. |
|
4. Difficulty Removing Fragments
| Variable | Specialized grasping forceps, small osteotomes, high-speed burrs, ultrasonic devices. Intraoperative fluoroscopy or radiographs to confirm complete removal. |
|
5. Significant Bone Loss
| Variable, depends on implant type/duration | Bone grafting (autograft/allograft), structural allografts, porous metal augments, impaction bone grafting, custom implants. |
|
6. Periprosthetic Joint Infection (PJI)
| 1-5% |
Early PJI:
Debridement, antibiotics, implant retention (DAIR) in selected cases.
Late/Chronic PJI:
Two-stage exchange arthroplasty (implant removal, spacer placement, systemic antibiotics, reimplantation) is the gold standard. Single-stage exchange in select cases. Suppressive antibiotic therapy or resection arthroplasty in unfit patients. |
|
7. Aseptic Loosening (of Revision Implant)
| 5-15% (higher than primary) | Depends on cause: Re-revision with different implant design/fixation, augments, bone grafting. |
|
8. Instability (Post-Revision)
| 5-10% | Non-operative (bracing, physical therapy) initially. If persistent, revision with more constrained components, liner exchange, or re-orientation of components. |
|
9. Heterotopic Ossification (HO)
| 10-30% | Prophylaxis with NSAIDs or radiation therapy. If symptomatic and mature, surgical excision. |
|
10. Non-Union of Osteotomies
| 5-15% (e.g., ETO) |
Aseptic Non-union:
ORIF with additional fixation, bone grafting, bone stimulators.
Septic Non-union:
Debridement, antibiotics, stable fixation. |
|
11. Prolonged Wound Healing/Seroma
| Variable | Meticulous closure, drains. Seroma: Aspiration or surgical drainage. Wound dehiscence: Local wound care, débridement, re-closure. |
|
12. Nerve Palsy (post-op)
| <5% | Conservative management initially with bracing and physical therapy. Neurological consultation. Exploration if no recovery or worsening. |
This image shows various complex revision cases, indicative of the severe pathology that often leads to complications during implant removal.
This schematic highlights potential failure modes and complications related to implants, emphasizing areas prone to issues during removal.
This image likely depicts an intraoperative scenario where a fracture has occurred during removal, requiring immediate fixation.
This illustrates a periprosthetic fracture that might occur during implant removal or be a pre-existing condition, requiring careful surgical planning.
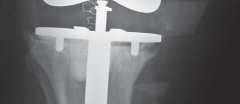
This image displays a specific type of surgical technique for managing a fracture, possibly involving a cerclage wire, common in revision arthroplasty.
This schematic emphasizes the critical bone stock considerations and potential fracture patterns encountered during challenging implant removal.
This image shows a more complex fracture fixation strategy, potentially involving a plate and wires, which might be needed after extensive bone loss or fracture during removal.
Post-Operative Rehabilitation Protocols
Post-operative rehabilitation following the removal of well-fixed implants is highly variable and directly dependent on the extent of bone loss, the presence and stability of any osteotomies, the chosen reconstruction method, and the overall stability achieved during the revision surgery. Unlike primary arthroplasty, these protocols are frequently modified based on intraoperative findings.
General Principles
-
Weight-Bearing Restrictions:
- Protected Weight-Bearing: Most common. Patients are typically placed on partial weight-bearing (e.g., toe-touch, 25% weight-bearing) for 6-12 weeks, especially if significant bone loss occurred, bone grafts were used, or osteotomies (e.g., extended trochanteric osteotomy) were performed.
- Non-Weight-Bearing: Mandated for cases with unstable fractures, large structural allografts, or concerns about implant stability.
- Full Weight-Bearing: Allowed only in cases with minimal bone loss, no osteotomies, and excellent implant stability (less common in challenging removals).
- Progression is guided by clinical assessment (pain, swelling), radiographic healing, and surgeon discretion.
-
Range of Motion (ROM) Limitations:
- Hip: If a trochanteric osteotomy was performed, hip abduction may be restricted initially to protect the repair. Flexion and external rotation may also be limited to prevent dislocation, especially if instability was a primary concern.
- Knee: Early, controlled range of motion is generally encouraged to prevent stiffness, but care is taken not to overstress the revision components or any osteotomy sites. Continuous Passive Motion (CPM) may be used.
- Shoulder: Dependent on deltoid integrity and rotator cuff repair.
-
Physical Therapy:
- Early Phase (0-6 weeks): Focus on pain management, edema control, gentle ROM within prescribed limits, isometric exercises, and instruction on protected weight-bearing. Transfers and activities of daily living are emphasized.
- Intermediate Phase (6-12 weeks): Progress ROM and strength, often introducing light resistance exercises. Gait training with appropriate assistive devices. Gradual increase in weight-bearing as tolerated and confirmed by radiographs.
- Advanced Phase (12+ weeks): Focus on functional strengthening, balance, proprioception, and return to light recreational activities. Full weight-bearing is gradually permitted.
- Activity Restrictions: Patients are advised to avoid high-impact activities, heavy lifting, and extreme ranges of motion indefinitely.
- Monitoring: Regular clinical follow-up and serial radiographs are essential to monitor implant stability, bone healing, and identify early complications like infection or loosening.
Specific Considerations
- Extended Trochanteric Osteotomy (ETO): These require strict non-weight-bearing or protected weight-bearing for 6-12 weeks, with abduction precautions, to allow for osteotomy healing. Radiographic union is a prerequisite for advancing weight-bearing.
- Cortical Windows: Generally require protected weight-bearing, similar to osteotomies, until radiographic evidence of cortical healing.
- Massive Bone Defects/Structural Allografts: These often necessitate prolonged protected weight-bearing (up to 3-6 months) to allow for allograft incorporation and host bone healing.
- Periprosthetic Fractures: Post-operative protocols are dictated by the stability of the fracture fixation. Non-weight-bearing is often prolonged.
- Infection: If the revision was a staged procedure for infection, rehabilitation for the first stage focuses on mobility and maintaining soft tissue envelope until reimplantation. After reimplantation, protocols are similar to complex revision, often with cautious progression due to prior infection.
Clear communication between the surgeon, physical therapist, and patient is paramount to optimize outcomes and minimize the risk of complications during the rehabilitation phase.
Summary of Key Literature / Guidelines
The literature on removing well-fixed implants primarily exists within the broader context of revision arthroplasty, emphasizing techniques and outcomes. While specific, large-scale randomized controlled trials on removal techniques alone are scarce due to the varied nature of cases, consensus and best practices have emerged from extensive clinical experience, retrospective studies, and expert guidelines.
-
Evolution of Techniques and Instrumentation:
- Early revision surgery often involved aggressive bone removal or stem fracture. The advent of specialized instruments, such as flexible osteotomes, high-speed burrs, and universal extractors, has significantly improved the ability to remove implants with greater bone preservation.
- Ultrasonic cement removal devices (e.g., Mectron Piezosurgery, BoneScalpel) have shown promise in selectively removing cement while sparing bone, reducing operative time and host bone damage, particularly for cemented components.
- For well-fixed cementless femoral stems, the Extended Trochanteric Osteotomy (ETO) , popularized by Gross and Paprosky, is a well-established and effective technique. Studies consistently report high union rates (85-95%) and provide unparalleled access to the femoral canal for complete stem and cement removal, facilitating complex reconstructions. While complications like delayed union or non-union can occur, the benefits of improved visualization and bone preservation often outweigh these risks. (e.g., Paprosky, et al., 1999; Whiteside, 2005).
- Alternative approaches for femoral stem removal, such as cortical windows (anterior or posterolateral), have also been described, offering direct access in specific situations but generally associated with higher fracture rates if not meticulously performed.
- For acetabular components, the use of thin, curved osteotomes and specialized cup extractors remains standard. The challenge lies in meticulous separation of the osseointegrated interface without violating the medial wall or causing column fractures. Studies on tantalum acetabular shells suggest their porous nature can lead to exceptionally robust ingrowth, requiring even greater caution during removal.
-
Importance of Pre-operative Planning:
- Multiple studies highlight the critical role of comprehensive pre-operative planning, including detailed radiographs and advanced imaging (CT scans), for anticipating difficulties and selecting appropriate tools and revision implants. Identifying the original implant manufacturer for specific removal tools is a recurring recommendation (e.g., Saleh, et al., 2011).
- Digital templating is considered indispensable for managing bone defects and planning the size and type of revision components, thereby streamlining the intraoperative process and reducing OR time.
-
Complication Rates:
- Revision arthroplasty, by nature, has higher complication rates than primary surgery. Periprosthetic fracture is a dominant concern, with reported incidences ranging from 1-10% for the femur during stem removal. Neurovascular injury, infection, and excessive blood loss are also consistently reported, underscoring the demanding nature of these procedures. The choice of removal technique significantly impacts the incidence of iatrogenic fractures.
-
Guidelines and Consensus Statements:
-
Orthopedic societies (e.g., AAOS, EFORT) regularly publish guidelines on revision arthroplasty, often including sections on implant removal. While not prescriptive on every micro-technique, they generally advocate for:
- Bone stock preservation as the paramount objective.
- Meticulous removal of all foreign material (implant and cement).
- Consideration of extensile exposures when necessary to ensure safety and completeness.
- Comprehensive pre-operative planning to anticipate challenges.
-
Orthopedic societies (e.g., AAOS, EFORT) regularly publish guidelines on revision arthroplasty, often including sections on implant removal. While not prescriptive on every micro-technique, they generally advocate for:
In conclusion, the literature confirms that removing well-fixed implants requires a combination of detailed anatomical knowledge, biomechanical understanding, advanced planning, and mastery of specialized surgical techniques and instrumentation. The evolution of tools and approaches has significantly improved outcomes, but the inherent complexity mandates careful execution to minimize iatrogenic damage and facilitate successful subsequent reconstruction.
Clinical & Radiographic Imaging
You Might Also Like


