Extended Trochanteric Osteotomy for Complex Total Hip Arthroplasty: An Intraoperative Masterclass
Key Takeaway
This intraoperative masterclass meticulously details Extended Trochanteric Osteotomy for complex Total Hip Arthroplasty. We'll navigate precise surgical steps, critical anatomical landmarks, and neurovascular considerations. Learn expert techniques for osteotomy creation, prosthesis implantation, and reattachment, emphasizing complication avoidance and optimal patient recovery. Gain invaluable insights into managing challenging hip reconstructions and ensuring superior functional outcomes.
Comprehensive Introduction and Patho-Epidemiology
The art of complex hip reconstruction requires a surgeon to seamlessly blend biomechanical engineering with meticulous soft-tissue management. In the realm of revision total hip arthroplasty (THA), the extended trochanteric osteotomy (ETO) stands as one of the most powerful and indispensable techniques in the reconstructive armamentarium. Originally popularized by Younger, Paprosky, and others in the mid-1990s, the ETO revolutionized the approach to the multiply revised femur. Unlike the traditional standard or sliding trochanteric osteotomies, which were fraught with high rates of nonunion and proximal migration, the ETO maintains the continuity of the abductor complex with the vastus lateralis. This critical modification preserves the vascularized musculoperiosteal sleeve, dramatically improving healing rates while providing unparalleled, extensile exposure to the femoral diaphysis and the acetabulum.
The epidemiology of revision THA highlights a growing burden of highly complex cases driven by increased life expectancy and the expanding indications for primary arthroplasty in younger, more active patients. Aseptic loosening remains the leading cause of revision, frequently accompanied by massive osteolysis and severe proximal femoral bone loss. In these scenarios, the native architecture is often distorted beyond recognition, and standard endofemoral approaches are insufficient for safe implant extraction or subsequent rigid fixation. Furthermore, the rising incidence of periprosthetic joint infection (PJI) and periprosthetic femur fractures necessitates surgical techniques that allow for complete removal of well-fixed cement mantles or extensively porous-coated stems without causing catastrophic iatrogenic destruction of the remaining bone stock.
From a patho-mechanical standpoint, the ETO addresses the inherent challenges of the compromised femur. By hinging open the lateral cortex, the surgeon gains direct, orthogonal access to the endosteal surface. This direct visualization is paramount for the meticulous debridement of fibrous membranes, the safe extraction of broken hardware, and the precise preparation of the distal diaphysis for a bypass stem. The technique relies on the principle of diaphyseal fixation, utilizing fluted, tapered titanium stems that achieve axial and rotational stability independent of the compromised proximal metaphysis. The ETO fragment itself, once reduced and cabled around the new implant, acts as a vascularized bone graft, reconstituting the proximal femoral tube and restoring the abductor lever arm.
Ultimately, the goal of an ETO is not merely to facilitate the removal of a failed implant, but to lay the biological and mechanical foundation for a durable, lifelong reconstruction. Every decision made during this procedure—from the precise length of the osteotomy to the tensioning of the final cerclage cables—carries significant implications for the patient's ultimate functional outcome. A flawlessly executed ETO ensures stable hardware integration, robust trochanteric healing, and the restoration of optimal hip biomechanics, thereby returning the patient to a pain-free and functional state.
Detailed Surgical Anatomy and Biomechanics
A profound understanding of the surgical anatomy is the bedrock upon which a successful extended trochanteric osteotomy is built. The superficial anatomy is dominated by the fascia lata and the underlying muscular envelope. The greater trochanter serves as the primary bony landmark, acting as the insertion site for the Gluteus medius and Gluteus minimus—the primary abductors of the hip. These muscles are absolutely crucial for maintaining pelvic stability during the single-leg stance phase of gait. Distally, the Vastus lateralis originates from the intertrochanteric line, the greater trochanter, and the lateral lip of the linea aspera. The genius of the ETO lies in preserving the functional continuity between the gluteal insertions proximally and the vastus lateralis origin distally, thereby maintaining a continuous, tension-band effect across the osteotomy site.
The deep anatomy requires careful navigation of both osteology and critical neurovascular structures. Deep to the gluteal muscles lie the short external rotators (piriformis, superior and inferior gemelli, obturator internus, and quadratus femoris), which are often attenuated or previously resected in revision scenarios. The sciatic nerve, emerging from the greater sciatic foramen and traversing posterior to the short external rotators, is the most critical structure at risk. While the direct lateral approach inherently protects the sciatic nerve compared to a posterior approach, the extensive mobilization and extreme limb positioning required during an ETO can subject the nerve to significant traction. Surgeons must remain hyper-vigilant regarding sciatic nerve tension, particularly when correcting severe leg-length discrepancies or addressing profound flexion contractures.
Vascularly, the proximal femur and the ETO fragment rely on a delicate arterial network. The medial and lateral circumflex femoral arteries provide the primary blood supply to the proximal femur. The ETO fragment's viability is maintained through the rich periosteal blood supply derived from the attached Vastus lateralis muscle belly. Furthermore, a comprehensive understanding of the lower extremity's vascular tree is essential for the master surgeon. For instance, the lateral superior genicular artery, a key component of the genicular anastomosis around the knee, highlights the interconnected nature of the limb's perfusion. While seemingly distant from the hip, compromised proximal flow or extensive distal dissection can impact the entire leg's vascular health, influencing wound healing and the viability of potential salvage flaps.
Biomechanically, the hip joint is a complex ball-and-socket mechanism susceptible to various impingement syndromes, such as pincer impingement (acetabular over-coverage), cam impingement (femoral head-neck asphericity), or combined impingement. While these are often the primary pathologies leading to early osteoarthritis and the initial need for arthroplasty, understanding them is vital during revision surgery. When trialing the new components post-ETO, the surgeon must ensure that no residual bony prominences or malpositioned implants recreate these impingement mechanics, which could lead to restricted range of motion, accelerated wear, or catastrophic dislocation. Additionally, the surgeon must consider the entire kinetic chain; the function of the Vastus medialis, the quadriceps tendon, and the patellar ligament are integral to knee extension and overall lower limb strength, which directly impacts the patient's ability to rehabilitate effectively after a massive proximal femoral reconstruction.
Exhaustive Indications and Contraindications
The decision to proceed with an extended trochanteric osteotomy must be based on a rigorous assessment of the clinical scenario, weighing the profound benefits of exposure against the surgical morbidity and potential complications. The primary indication for an ETO is the need to remove a well-fixed femoral stem—whether cemented or extensively porous-coated—in the setting of revision arthroplasty. Attempting to extract such stems via standard endofemoral techniques often results in catastrophic fracturing of the proximal femur, massive bone loss, and the creation of uncontained defects that severely complicate subsequent reconstruction. The ETO provides direct, controlled access to the implant-bone or cement-bone interface, allowing for the meticulous use of high-speed burrs, ultrasonic tools, and flexible osteotomes to disrupt the fixation without compromising the remaining diaphyseal bone stock.
Beyond implant extraction, the ETO is highly indicated for correcting severe proximal femoral deformities. In cases of significant varus remodeling, malunions from previous trauma, or profound osteolysis resulting in a mechanically incompetent proximal tube, the ETO allows the surgeon to essentially bypass the deformity. By opening the femur, the surgeon can achieve true axial alignment with the distal diaphysis, preparing a straight, uncompromised canal for a long, diaphyseal-engaging stem. Furthermore, in cases of massive acetabular bone loss (Paprosky Type III or IV defects), an ETO is frequently utilized purely for exposure. Elevating the trochanteric-abductor complex superiorly provides an unmatched, en face view of the acetabulum, facilitating the placement of complex augments, cup-cage constructs, or custom triflange components that would be nearly impossible to insert through a standard surgical window.
However, the ETO is not without its contraindications, and patient selection is paramount. The most absolute contraindication is the lack of sufficient distal diaphyseal bone stock to support the revision implant. Because the ETO neutralizes the proximal femur's ability to provide fixation, the revision stem must achieve rigid rotational and axial stability in the intact diaphysis distal to the osteotomy. A minimum of 4 to 6 centimeters of healthy, cylindrical cortical bone—often referred to as the "scratch fit" zone—is required distal to the planned osteotomy site. If the patient's bone loss extends deep into the femoral metadiaphysis, an ETO may be contraindicated, and alternative strategies, such as a total femoral replacement or an impaction bone grafting technique, must be considered.
Relative contraindications include severe osteopenia or heavily irradiated bone, where the structural integrity of the osteotomy fragment is so poor that cerclage cables would simply pull through the cortex during tensioning, leading to immediate failure of fixation. Additionally, in cases of active, fulminant periprosthetic joint infection where the viability of the surrounding soft tissue envelope is highly compromised, the creation of a massive bony fragment that relies on precarious periosteal blood supply may increase the risk of sequestration and persistent infection. In such scenarios, a careful risk-benefit analysis must be performed, often favoring a more conservative approach to explantation if possible.
| Parameter | Indications for Extended Trochanteric Osteotomy | Contraindications for Extended Trochanteric Osteotomy |
|---|---|---|
| Implant Status | Well-fixed cemented stems requiring removal | Loose stems easily extracted endofemorally |
| Implant Type | Extensively porous-coated cementless stems | Modular stems where the distal sleeve is loose |
| Bone Quality | Severe proximal deformity or varus remodeling | Inadequate distal diaphyseal bone stock (< 4-6 cm) |
| Acetabular Factors | Massive acetabular defects requiring extensile exposure | Simple acetabular revisions with adequate standard exposure |
| Complications | Retrieval of broken, well-fixed distal stem segments | Severe osteopenia precluding cable fixation |
| Infection | Two-stage revision for PJI requiring cement mantle removal | Fulminant infection with compromised soft tissue envelope (Relative) |
Pre-Operative Planning, Templating, and Patient Positioning
The success of an extended trochanteric osteotomy is heavily predicated on exhaustive preoperative planning. The battle is truly won or lost before the skin is incised. A comprehensive imaging suite is mandatory, beginning with high-quality, calibrated orthogonal radiographs: an anteroposterior (AP) view of the pelvis, a cross-table lateral of the hip, and full-length AP and lateral views of the entire femur. These plain films provide a macroscopic overview of the existing hardware, the extent of osteolysis, and the overall coronal and sagittal alignment. However, plain radiography is often insufficient for complex revisions. A high-resolution computed tomography (CT) scan with metal artifact reduction (MARS) and 3D reconstructions is invaluable. The CT scan allows for precise quantification of bone stock, identification of occult cortical defects or stress risers, and a detailed assessment of the distal diaphyseal geometry where the new stem will ultimately achieve fixation.
Digital templating is a non-negotiable step in the preoperative workflow. The surgeon must meticulously plan both the osteotomy dimensions and the implant parameters. First, the length of the ETO must be determined. The osteotomy must extend distally enough to clear the tip of the existing stem or the most distal extent of the cement mantle, ensuring complete, unhindered access. However, it must not extend so far distally that it compromises the 4 to 6 centimeters of intact diaphyseal bone required for the scratch fit of the revision stem. The surgeon must template the anticipated revision stem—typically a modular, fluted, tapered titanium component—ensuring that its distal diameter matches the intramedullary canal of the intact diaphysis and that its length provides adequate bypass of the osteotomy site (usually two cortical diameters distal to the cut).
Patient positioning is critical for optimizing exposure and facilitating the use of intraoperative fluoroscopy. The patient is placed in the lateral decubitus position on a radiolucent operating table. Rigid pelvic fixation is achieved using a beanbag or a specialized peg-board system, ensuring the pelvis remains strictly perpendicular to the floor throughout the procedure. This strict lateral positioning is vital for accurately assessing component version and leg length during trial reduction. Meticulous padding must be applied to all dependent bony prominences, including the axilla, the contralateral fibular head, and the ankles, to prevent devastating pressure sores or peripheral nerve palsies during what is often a lengthy and physically demanding operation.
The fluoroscopy setup and draping protocol must be executed with precision. The C-arm is positioned on the anterior side of the patient, draped sterilely, and must be capable of freely arcing to obtain true AP and lateral views of the entire femoral shaft without compromising the sterile field. The entire lower extremity is prepped and draped free, from the iliac crest to the toes. This "free leg" draping is essential, as it allows the surgeon to manipulate the limb through a full range of motion, flexing the knee to 90 degrees and rotating the hip to assess stability, impingement, and soft-tissue tension post-implantation. A restricted drape will severely hamper the surgeon's ability to perform a dynamic assessment of the reconstruction.
Step-by-Step Surgical Approach and Fixation Technique
Incision and Superficial Dissection
The surgical approach begins with a generous, straight lateral incision centered over the greater trochanter. Depending on the templated length of the osteotomy and the anticipated diaphyseal fixation, this incision frequently extends 15 to 25 centimeters, coursing proximally toward the iliac crest and distally along the lateral axis of the thigh. The scalpel is carried sharply through the epidermis and dermis, followed by meticulous hemostasis of the subcutaneous fat using electrocautery. Maintaining a dry field from the outset is crucial for identifying tissue planes and preventing postoperative hematoma formation, which is a significant risk factor for deep periprosthetic infection.
Deep to the subcutaneous tissue lies the fascia lata and the iliotibial band. A longitudinal incision is made through this tough, fibrous structure, perfectly in line with the skin incision. The fascial split is extended proximally to split the fibers of the Gluteus maximus and distally to expose the entire lateral compartment of the thigh. During this superficial dissection, the surgeon must be mindful of the lateral femoral cutaneous nerve (LFCN) and its variable branches. While the main trunk of the LFCN is typically anterior to the standard lateral approach, its superficial branches can arborize into the surgical field. Careful retraction and avoidance of reckless electrocautery in the anterior subcutaneous tissues can help mitigate the risk of meralgia paresthetica.
Once the fascia is incised, Charnley or self-retaining retractors are placed to maintain tension on the fascial edges. The subfascial plane is developed bluntly, sweeping the Gluteus maximus posteriorly to reveal the underlying Gluteus medius, the greater trochanter, and the vastus lateralis. This exposure must be wide and unhindered; attempting to perform an ETO through a keyhole incision is an invitation for catastrophic intraoperative complications, including maldirected saw cuts and iatrogenic fractures.
Deep Dissection and Defining the Osteotomy
With the superficial structures retracted, the surgeon's focus shifts to defining the boundaries of the osteotomy fragment. The Vastus lateralis is identified originating from the vastus ridge and the lateral femur. Using a Cobb elevator or electrocautery, the vastus lateralis is gently elevated off the posterior linea aspera, moving from posterior to anterior. Crucially, the surgeon must leave a generous cuff of muscle attached to the anterior and lateral aspects of the planned bony fragment. This muscle cuff contains the vital perforating vessels that provide the periosteal blood supply to the ETO; stripping the fragment circumferentially will devascularize the bone and virtually guarantee a nonunion.
The anterior, superior, and posterior borders of the greater trochanter are then defined using sharp and blunt dissection. The insertion footprint of the Gluteus medius and minimus is carefully preserved. Based on the preoperative templating, the exact dimensions of the osteotomy are marked on the bone using electrocautery. The anterior border of the osteotomy typically lies just anterior to the vastus ridge, while the posterior border is marked just anterior to the linea aspera. The goal is to create a fragment that encompasses approximately one-third of the femoral circumference, providing a broad, flat surface of cancellous bone for optimal healing when reattached.
To ensure absolute precision, two or three Kirschner wires (K-wires) are driven into the lateral cortex along the planned longitudinal axis of the osteotomy. These wires act as a visual and mechanical guide for the oscillating saw. Intraoperative fluoroscopy is brought in at this stage to confirm that the K-wires are perfectly parallel to the femoral shaft in both the coronal and sagittal planes, and that the planned distal transverse cut extends safely beyond the tip of the existing hardware. This fluoroscopic time-out is a critical safety check before committing to the bone cuts.
Executing the Osteotomy and Fragment Reflection
The execution of the osteotomy demands a steady hand and a deep respect for the underlying anatomy. Using a high-speed oscillating saw with a narrow blade, the surgeon begins the longitudinal cuts along the path defined by the K-wires. The saw blade must penetrate the lateral cortex and enter the cancellous bone, but it is imperative to avoid plunging completely through the medullary canal and scoring the medial cortex. Damaging the medial cortex creates a massive stress riser that can lead to a catastrophic transverse fracture of the entire femoral shaft during stem insertion. The surgeon makes the anterior longitudinal cut first, followed by the posterior longitudinal cut, maintaining a consistent depth and a slight medial angulation to create a wedge-shaped fragment.
Once the longitudinal cuts are complete, a transverse cut is made at the distal extent of the planned fragment. This cut can be straight or step-cut; a step-cut provides enhanced rotational stability upon closure but is technically more demanding. With all cortical cuts made, a series of broad, thin, flexible osteotomes are sequentially impacted into the longitudinal osteotomy lines. The surgeon gently levers the osteotomes, feeling for the yielding of the cancellous bone. The objective is not to completely detach the fragment, but to create a controlled, greenstick fracture along the anterior periosteal hinge.
As the fragment begins to mobilize, broad laminar retractors or a specialized ETO retractor are used to slowly reflect the entire bony segment, along with its attached Gluteus medius and Vastus lateralis, anteriorly—much like opening the cover of a book. This maneuver requires patience; forceful or rapid elevation can snap the periosteal hinge or fracture the trochanteric fragment itself. Once fully reflected, the underlying femoral canal, the failed implant, and the cement mantle are completely exposed, transforming a blind, dangerous extraction into a controlled, visually guided procedure.
Femoral Preparation and Implant Extraction
With the femur open, the extraction of the existing hardware proceeds. If a cemented stem is present, the stem is often easily disimpacted, leaving the cement mantle behind. Under direct visualization, the surgeon uses high-speed burrs, ultrasonic cement removal systems, and delicate cement osteotomes to segment and extract the mantle. Every fragment of cement and fibrous membrane must be meticulously debrided to expose healthy, bleeding cortical bone. If a fully porous-coated stem is present, specialized trephines and flexible osteotomes are used to disrupt the bone-ingrowth interface along the medial and posterior cortices, which are now accessible.
Following complete hardware removal, the femoral canal is prepared for the revision stem. This begins with sequential, rigid reaming of the intact distal diaphysis. The surgeon starts with a small reamer and gradually increases the diameter until firm, continuous cortical chatter is felt over a distance of at least 4 to 6 centimeters. This prepares the "scratch fit" zone. The proximal femur is then prepared using conical broaches or reamers, depending on the specific implant system, to accommodate the proximal body of the modular stem.
A trial reduction is then performed. The trial stem is inserted, and a trial neck and head are applied. The hip is reduced, and the surgeon rigorously assesses leg length, offset, and stability. The hip is taken through a full range of motion, specifically checking for any residual pincer impingement from retained anterior osteophytes or cam impingement from a mismatched head-neck ratio. The surgeon must ensure that the hip does not subluxate in deep flexion and internal rotation (assessing posterior stability) or in extension and external rotation (assessing anterior stability). Any instability or impingement identified during this trial phase must be corrected before opening the definitive implants.
Acetabular Preparation and Final ETO Fixation
While the femur is addressed, the ETO provides phenomenal exposure for acetabular reconstruction. With the femur retracted, the entire acetabular rim and fossa are visualized. Retained hardware is removed, and the acetabulum is sequentially reamed using hemispherical reamers. The goal is to achieve a concentric, bleeding hemisphere. Depending on the Paprosky defect classification, the surgeon impacts a highly porous, multi-hole titanium shell, supplementing it with multiple screws for rigid primary fixation. If massive defects are present, trabecular metal augments or structural allografts are utilized to restore the center of rotation and provide a stable foundation for the cup.
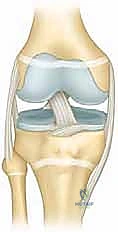
Once the acetabular component is secured and the definitive femoral stem is firmly impacted into the distal diaphysis, the focus returns to closing the ETO. The osteotomy fragment is carefully reduced over the lateral aspect of the new stem. The surgeon must ensure intimate bone-to-bone contact between the fragment and the medial femoral host bone. Any intervening fibrous tissue or cement debris must be cleared. Fixation is typically achieved using three to four multifilament titanium or cobalt-chrome cerclage cables.
The cables are passed circumferentially around the femur and the ETO fragment using specialized cable passers, taking extreme care not to capture the sciatic nerve posteriorly or the femoral vessels medially. The cables are spaced evenly, with at least two cables placed distal to the lesser trochanter and one or two placed proximally. The cables are sequentially tensioned using a calibrated tensioning device, ensuring the fragment is compressed rigidly against the host bone without crushing the cortex. Some surgeons prefer to use specialized trochanteric grip plates in conjunction with cables to prevent proximal migration, particularly if the fragment is fragmented or osteopenic. Once final tension is achieved, the cables are crimped, cut, and the soft tissue envelope is meticulously closed in layers over a subfascial drain.
Complications, Incidence Rates, and Salvage Management
Despite its biomechanical advantages and high success rates, the extended trochanteric osteotomy is a massive surgical insult and carries a distinct profile of severe complications. The most dreaded biological complication is nonunion of the osteotomy fragment. While the ETO boasts union rates exceeding 95% in modern literature, nonunion can occur due to devascularization of the fragment during dissection, inadequate cable tensioning, or poor bone-to-bone contact. A nonunion often leads to proximal migration of the trochanteric fragment, resulting in a profound abductor lurch, intractable lateral hip pain, and recurrent instability.
Intraoperative fractures are a significant mechanical risk. The ETO fragment itself can fracture during the levering process or during cable tensioning, particularly in severely osteoporotic bone. More catastrophically, the intact distal femur can fracture during the impaction of the diaphyseal-engaging stem. This usually occurs if the distal reaming was inadequate or if the surgeon failed to recognize a medial cortical defect created during the saw cuts. Such fractures immediately compromise the stability of the revision construct and require immediate intraoperative salvage, often necessitating the use of longer stems, strut allografts, or extensive cerclage cabling.
Neurologic injuries, particularly to the sciatic nerve, are a constant threat. The sciatic nerve can be injured via direct trauma from errant cable passers, compression from postoperative hematomas, or, most commonly, from excessive traction. When an ETO is
