Lateral Decubitus Hip Arthroscopy: Comprehensive Surgical Technique and Portal Anatomy
Key Takeaway
The lateral decubitus position for hip arthroscopy offers distinct advantages, particularly in obese patients and those with large anterolateral osteophytes. By utilizing gravity to retract adipose tissue and optimizing the traction vector, surgeons can achieve excellent joint distraction. This guide details the precise biomechanics, anatomical landmarks, and step-by-step portal placement required to safely execute lateral position hip arthroscopy while minimizing neurovascular complications and optimizing intra-articular visualization.
INTRODUCTION TO LATERAL POSITION HIP ARTHROSCOPY
Hip arthroscopy has evolved into a highly efficacious, minimally invasive intervention for the management of intra-articular and extra-articular hip pathology, including femoroacetabular impingement (FAI), labral tears, and chondral defects. While the supine position remains popular, the lateral decubitus position offers profound anatomical and biomechanical advantages. Pioneered and popularized by Dr. J.M. Glick, the lateral approach is particularly intuitive for reconstructive surgeons accustomed to performing total hip arthroplasty (THA) in the lateral decubitus position.
The lateral position leverages gravity to displace redundant adipose tissue away from the surgical field, making it exceptionally advantageous in obese patients. Furthermore, the lateral orientation alters the trajectory of instrument insertion, providing superior access to the posterior and lateral compartments of the joint. In patients presenting with massive anterolateral osteophytes or complex cam lesions, the joint can be seamlessly accessed through the posterior peritrochanteric portal, bypassing anterior osseous obstructions.
INDICATIONS AND PATIENT SELECTION
The decision to utilize the lateral decubitus position over the supine position is multifactorial and should be tailored to the patient's morphotype and specific intra-articular pathology.
- High Body Mass Index (BMI): In obese patients, the pannus and subcutaneous adipose tissue of the thigh naturally fall anteriorly and medially due to gravity. This significantly reduces the soft-tissue depth required to reach the joint capsule, facilitating easier portal establishment and instrument maneuverability.
- Anterolateral Osseous Deformities: Patients with prominent anterolateral bone spurs or massive cam lesions present a challenge for anterior portal entry. The lateral position allows for primary entry via the posterior peritrochanteric portal, avoiding the anterior obstruction.
- Posterior Pathology: Access to the posterior labrum, posterior capsule, and ischiofemoral ligaments is biomechanically simplified in the lateral position.
- Surgeon Preference and Ergonomics: Surgeons who routinely perform lateral THA often find the spatial orientation of the acetabulum and proximal femur more familiar in this position.
💡 Clinical Pearl: The Obesity Advantage
Do not underestimate the mechanical advantage of gravity in the lateral position for patients with a BMI > 35. The reduction in anterior soft-tissue tension not only aids in portal placement but also significantly reduces the risk of fluid extravasation into the abdominal cavity, a known complication of prolonged supine hip arthroscopy in obese individuals.
BIOMECHANICS OF TRACTION AND JOINT DISTRACTION
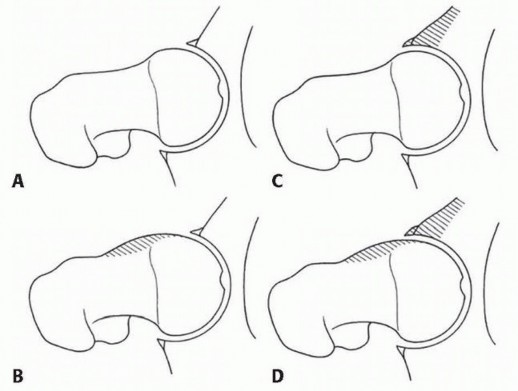
The hip is a highly constrained ball-and-socket joint stabilized by a robust capsuloligamentous complex (iliofemoral, pubofemoral, and ischiofemoral ligaments) and a negative intra-articular pressure (the "vacuum seal"). Successful hip arthroscopy requires overcoming these forces to achieve a minimum of 8 to 10 mm of joint distraction, allowing safe introduction of a 5-mm arthroscope without causing iatrogenic scuffing of the articular cartilage or labral avulsion.
Breaking the Vacuum Seal
If excessive traction force is required to distract the joint, the surgeon must avoid applying greater mechanical load, which exponentially increases the risk of sciatic or pudendal nerve neuropraxia. Instead, the intra-articular vacuum seal must be broken.
Under fluoroscopic guidance, an 18-gauge spinal needle is advanced into the joint space. Once intra-articular placement is confirmed, a small volume of air (or sterile fluid) is injected. This eliminates the negative pressure, instantly reducing the mechanical force required to achieve the requisite 8 to 10 mm of distraction.
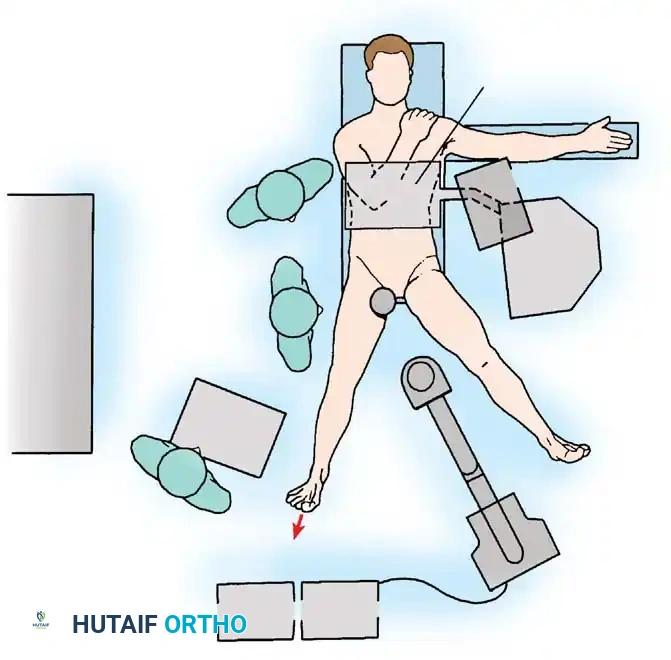
OPERATING ROOM SETUP AND PATIENT POSITIONING
Meticulous patient positioning is the most critical step in lateral hip arthroscopy. Improper setup compromises visualization and drastically increases the risk of devastating neurovascular complications.
Step-by-Step Positioning Protocol
- Anesthesia and Initial Setup: Following the induction of general anesthesia (with profound muscle relaxation to aid distraction), the patient is rolled into the lateral decubitus position with the operative hip facing superiorly.
- Table Selection: A specialized fracture table or a dedicated hip distraction apparatus is utilized.
- Perineal Post Placement: A well-padded, oversized perineal post is installed.
- CRITICAL STEP: The post must be positioned as far laterally as possible against the medial thigh of the operative leg, rather than resting directly in the perineal crease. This lateralization directs the counter-traction vector against the robust musculature of the medial thigh, protecting the delicate pudendal nerve and perineal soft tissues from ischemic crush injury.
- Leg Positioning: The foot of the operative extremity is secured firmly in the traction boot.
- Hip Angulation: The hip is initially abducted between 20 and 45 degrees. To optimize capsular relaxation and joint volume, the hip is placed in mild flexion (10° to 20°), mild abduction, and slight external rotation. This specific orientation relaxes the dense iliofemoral ligament (the strongest ligament in the human body), facilitating easier femoral head distraction.
- Fluoroscopic Verification: An image intensifier (C-arm) is brought into the field. It is positioned to provide an unobstructed anteroposterior (AP) view of the hip joint to evaluate the traction vector and guide subsequent instrument placement.
⚠️ Surgical Warning: Pudendal Nerve Protection
Pudendal neuropraxia is a devastating complication characterized by perineal numbness and sexual dysfunction. It is directly correlated with traction time and perineal post pressure. Always ensure the post is lateralized, heavily padded, and limit continuous traction to less than 120 minutes.
SURFACE ANATOMY AND LANDMARK IDENTIFICATION
Before sterile preparation, precise identification and marking of surface anatomy are mandatory to ensure safe portal placement and avoidance of neurovascular structures.
- Greater Trochanter (GT): Outline the anterior, posterior, and superior borders of the greater trochanter. This is the primary reference point for the peritrochanteric portals.
- Anterior Superior Iliac Spine (ASIS): Palpate and mark the ASIS.
- Femoral Artery: Palpate the femoral pulse anteriorly and mark its course. All portals must remain lateral to this neurovascular bundle.
- Inguinal Ligament: Draw a line connecting the ASIS to the pubic tubercle.
The surgical field is then prepped and draped in a routine sterile manner, ensuring access extends as far anteriorly as the femoral artery and slightly posterior to the posterior aspect of the greater trochanter.
SURGICAL TECHNIQUE: ESTABLISHING PORTALS
The lateral approach typically utilizes three primary portals: the Anterior Peritrochanteric, Posterior Peritrochanteric, and Direct Anterior portals. The sequence of portal establishment relies heavily on fluoroscopic guidance and tactile feedback.
1. The Initial Access Portal (Anterior Peritrochanteric)
The anterior peritrochanteric portal is frequently established first. It is located slightly anterior and superior to the anterior tip of the greater trochanter.
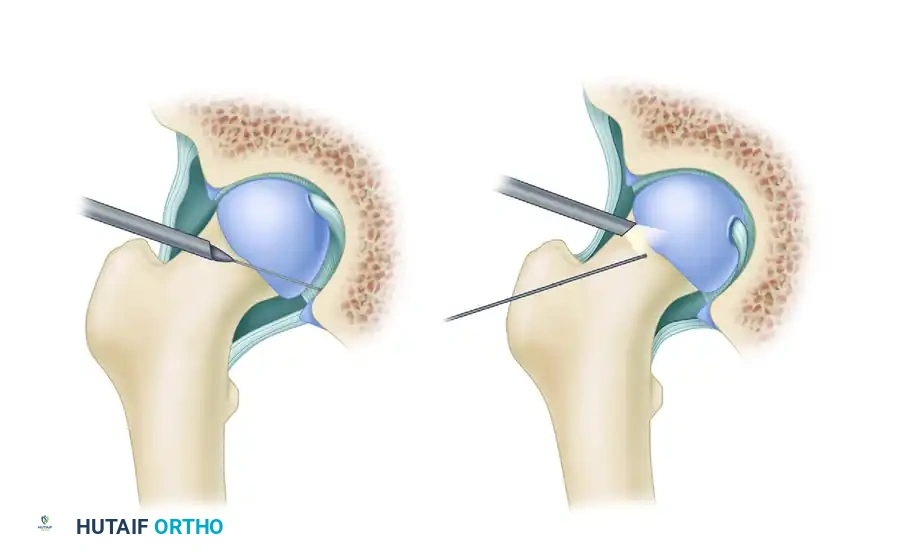
- Needle Insertion: Under continuous C-arm guidance, insert a 6-inch, 18-gauge spinal needle starting just anterior to the anterior edge of the greater trochanter.
- Trajectory: Direct the needle toward the central compartment of the hip joint. The surgeon must aim for the "safe zone" between the femoral head and the acetabular rim, taking extreme care not to penetrate or skewer the acetabular labrum.
- Distention: Once the capsule is breached and the needle is intra-articular, inject air or sterile saline to distend the joint and break the vacuum seal.
- Guidewire Placement: Introduce a flexible Nitinol guidewire through the spinal needle into the joint space. Confirm its position fluoroscopically.
- Cannula Insertion: Make a small, full-thickness skin incision at the needle entry site. Pass a cannulated obturator and the arthroscope cannula over the Nitinol wire. Use a twisting motion to penetrate the dense hip capsule. Caution: Avoid bending or kinking the Nitinol wire, which can lead to intra-articular breakage.
2. Establishing Ancillary Portals and Redirection
Depending on the pathology, the original anterior and anterolateral portals may need to be redirected onto the femoral neck to address peripheral compartment pathology (e.g., cam osteochondroplasty). Alternatively, an ancillary portal may be established 4 to 5 cm distal to the anterolateral portal.
As demonstrated in the technique above, fluoroscopy is strictly utilized to guide the placement of the spinal needle onto the femoral neck, ensuring precise access for osteophyte resection while avoiding iatrogenic damage to the retinacular vessels.
3. The Direct Anterior Portal
The anterior portal is essential for fluid inflow and for visualizing the anterior corners of the hip joint, including the anterior labrum and the ligamentum teres.
- Landmarks: Identify the intersection where a sagittal line drawn distally from the ASIS meets a horizontal line drawn medially from the proximal tip of the greater trochanter.
- Needle Trajectory: Insert a spinal needle at this intersection. Angle the needle approximately 45 degrees in the cephalad direction and 20 degrees medially.
- Direct Visualization: Unlike the first portal, this needle must enter the joint under direct arthroscopic visualization from the peritrochanteric portal. This ensures absolute protection of the anterior labrum and the femoral articular cartilage.
- Incision and Dissection: Make a small skin incision. Crucial Step: The branches of the Lateral Femoral Cutaneous Nerve (LFCN) are highly variable and lie in close proximity to this portal. To avoid iatrogenic neuroma or meralgia paresthetica, incise only the epidermis and dermis. Use a hemostat to bluntly dissect through the subcutaneous fat down to the capsule.
- Cannula Placement: Insert a 5.25-inch inflow cannula. The blunt trocar and sheath will safely push the LFCN branches aside as they traverse the tissues.
💡 Clinical Pearl: Protecting the LFCN
The Lateral Femoral Cutaneous Nerve is at its highest risk during the establishment of the Direct Anterior portal. Never use a scalpel deep to the dermis in this region. Blunt dissection with a Kelly clamp down to the capsular level is mandatory.
4. The Posterior Peritrochanteric Portal
This portal provides excellent visualization of the posterior labrum, posterior capsule, and the posterior femoral neck.
- Location: Begin at the posterior tip of the greater trochanter.
- Establishment: Using the same technique as the anterior peritrochanteric portal, introduce a spinal needle under fluoroscopic and direct arthroscopic visualization.
- Trajectory: Aim slightly anterior and cephalad to enter the joint space safely, avoiding the sciatic nerve which lies posterior to the portal trajectory.
CAPSULOTOMY AND JOINT MANEUVERABILITY
Once the portals are established, the native hip capsule often restricts the mobility of the arthroscope and surgical instruments. The capsule is exceptionally thick, particularly anteriorly (iliofemoral ligament).
To achieve adequate maneuverability, capsulotomies must be performed where each portal penetrates the capsule. Using an arthroscopic scalpel or a radiofrequency ablation wand, the surgeon connects the portal entry sites via an interportal capsulotomy.
This controlled release of the capsule allows the surgeon to seamlessly alternate the camera and working instruments between the anterior, anterior peritrochanteric, and posterior peritrochanteric portals. This triangulation is essential for complex procedures such as labral repair, focal chondral debridement, and comprehensive osteochondroplasty of the femoral head-neck junction.
Note: Depending on the extent of the capsulotomy and the patient's baseline laxity, capsular closure with high-strength sutures may be required at the conclusion of the procedure to prevent postoperative iatrogenic microinstability.
POSTOPERATIVE PROTOCOL
Following lateral position hip arthroscopy, traction is released, and the joint is copiously irrigated to remove any remaining osseous debris from osteochondroplasty. The portals are closed with non-absorbable sutures or surgical staples.
Rehabilitation protocols are dictated by the specific intra-articular procedures performed (e.g., labral repair vs. simple debridement). However, general principles include:
* Weight-Bearing: Typically restricted to 20 lbs flat-foot weight-bearing for 2 to 4 weeks to protect labral repairs and prevent microfracture overload.
* Range of Motion: Immediate passive range of motion (often utilizing a Continuous Passive Motion or CPM machine) is initiated to prevent intra-articular adhesions.
* Bracing: An abduction brace may be utilized to limit excessive extension and external rotation, protecting the healing anterior capsule.
CONCLUSION
Lateral position hip arthroscopy is a highly effective technique that offers distinct spatial and biomechanical advantages, particularly in obese patients and those with complex anterolateral osseous morphology. Mastery of this technique requires a profound understanding of hip biomechanics, meticulous attention to patient positioning to mitigate neurovascular risks, and precise, fluoroscopically guided portal placement. When executed correctly, it provides unparalleled access to the hip joint for comprehensive joint preservation surgery.
You Might Also Like