Arthroscopic Treatment of Pincer Femoroacetabular Impingement: A Comprehensive Surgical Guide
Key Takeaway
Pincer femoroacetabular impingement (FAI) results from focal or global acetabular overcoverage, leading to labral degeneration and chondral damage. Arthroscopic management involves precise acetabuloplasty to resect the bony prominence and restore normal morphology, followed by anatomic labral refixation. This guide details the step-by-step surgical technique, including portal placement, labral takedown, fluoroscopically guided rim resection, and suture anchor repair, ensuring optimal biomechanical restoration and impingement-free range of motion.
INTRODUCTION TO PINCER FEMOROACETABULAR IMPINGEMENT (FAI)
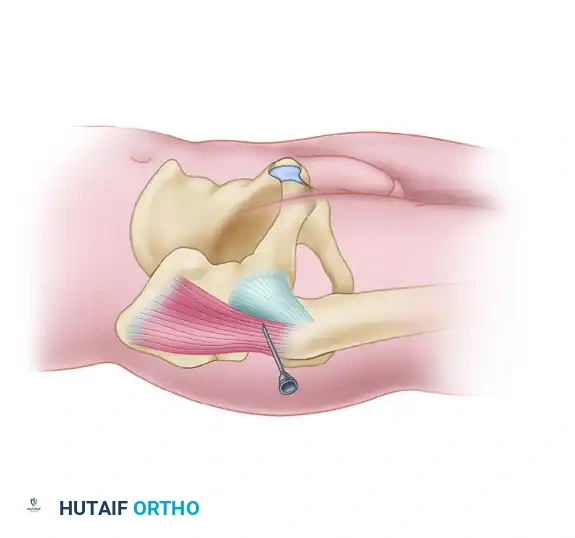
Femoroacetabular impingement (FAI) is a dynamic, pathomechanical process characterized by abnormal contact between the proximal femur and the acetabular rim. Pincer impingement specifically arises from focal or global overcoverage of the femoral head by the acetabulum. Unlike cam impingement, which is driven by an aspherical femoral head-neck junction, pincer impingement is an acetabular-sided pathology.
This overcoverage leads to a "nutcracker" effect during terminal hip motion—particularly in flexion and internal rotation. The acetabular labrum is repetitively crushed between the prominent acetabular rim and the femoral neck. Over time, this repetitive microtrauma results in labral degeneration, ossification of the labral base, and eventual failure of the chondrolabral junction. Furthermore, the levering of the femoral head within the deep acetabulum can cause a "contrecoup" chondral lesion in the posteroinferior acetabulum.
Arthroscopic treatment of pincer impingement aims to restore impingement-free range of motion by resecting the offending acetabular overcoverage (acetabuloplasty) and anatomically repairing or reconstructing the damaged labrum.
PREOPERATIVE EVALUATION AND BIOMECHANICS
Pathoanatomy of Pincer Lesions
Pincer lesions can be classified into two broad categories based on the extent of overcoverage:
1. Focal Overcoverage: Most commonly seen as cranial or anterosuperior acetabular retroversion. The anterior wall over-covers the femoral head, while the posterior wall may be deficient.
2. Global Overcoverage: Conditions such as coxa profunda (the acetabular fossa touches or crosses the ilioischial line) or protrusio acetabuli (the femoral head crosses the ilioischial line).
Radiographic Assessment
A meticulous radiographic evaluation is paramount for surgical planning. Standard imaging includes an anteroposterior (AP) pelvis, Dunn 45-degree view, and a false profile view.
* The Crossover Sign: On a perfectly positioned AP pelvis radiograph, the anterior wall of the acetabulum should project medially to the posterior wall. If the anterior wall line crosses the posterior wall line, cranial retroversion (a focal pincer lesion) is present.
* The Ischial Spine Sign: Visibility of the ischial spines into the pelvic basin on an AP radiograph indicates global pelvic retroversion.
* The Posterior Wall Sign: If the posterior wall line descends medial to the center of the femoral head, it indicates posterior wall deficiency, often accompanying anterior overcoverage.
Clinical Pearl: Always ensure the AP pelvis radiograph is standardized. The distance between the tip of the coccyx and the superior border of the pubic symphysis should be 1 to 2 cm. Pelvic tilt or rotation can create a false-positive or false-negative crossover sign.
SURGICAL SETUP AND PATIENT POSITIONING
Positioning and Distraction
The procedure is typically performed with the patient in the supine position on a specialized hip distraction table, though the lateral decubitus position is an acceptable alternative depending on surgeon preference.
1. A well-padded, oversized perineal post is positioned to lateralize the vector of traction, minimizing the risk of pudendal nerve neuropraxia.
2. The operative leg is placed in slight flexion (10° to 15°), neutral rotation, and slight abduction to relax the anterior capsule.
3. Traction is applied under fluoroscopic guidance. A joint distraction of 10 to 15 mm is required to safely access the central compartment without causing iatrogenic scuffing of the femoral head or labrum.
Portal Placement
Accurate portal placement is the foundation of successful hip arthroscopy.
* Anterolateral (AL) Portal: Established first under fluoroscopic guidance. It is located 1 cm superior and 1 cm anterior to the tip of the greater trochanter. This serves as the primary viewing portal for the central compartment.
* Midanterior Portal (MAP): Established under direct arthroscopic visualization. It is located approximately 5 to 7 cm distal and slightly anterior to the AL portal, entering the capsule at the "safe zone" to avoid the lateral femoral cutaneous nerve (LFCN) and ascending branch of the lateral circumflex femoral artery.
* Anterior Portal (AP): Occasionally used for specific instrumentation trajectories, located slightly lateral to the intersection of a sagittal line drawn distally from the anterior superior iliac spine (ASIS) and a transverse line from the tip of the greater trochanter.
DIAGNOSTIC ARTHROSCOPY AND CAPSULOTOMY
Once the AL and MAP portals are established, an interportal capsulotomy is performed using a beaver blade or radiofrequency wand. The capsulotomy connects the AL and MAP portals, running parallel to the acetabular rim, approximately 5 to 8 mm distal to the labrum. This allows adequate visualization of the peripheral compartment and the acetabular rim.
A systematic diagnostic sweep of the central compartment is performed:
1. Labral Assessment: Inspect for erythema, tearing, detachment, or intrasubstance degeneration. Pincer impingement often presents with a flattened, ossified, or crushed labrum.
2. Chondral Assessment: Evaluate the acetabular cartilage, particularly at the chondrolabral junction. Look for the "wave sign" (delamination of the cartilage from the subchondral bone) which is highly indicative of underlying FAI.
3. Ligamentum Teres: Inspect for fraying or tearing, which may indicate microinstability.
SURGICAL TECHNIQUE: PINCER RESECTION (ACETABULOPLASTY)
The goal of acetabuloplasty is to resect the bony overcoverage, eliminating the impingement while preserving a stable, anatomic foundation for labral refixation.
Scenario 1: Intact Labral-Chondral Junction (Over-the-Top Resection)
If the pincer lesion can be clearly visualized and the labral-chondral junction remains intact and healthy, an "over-the-top" or sublabral approach may be utilized.
* Leave the labral-chondral junction intact.
* Introduce a motorized burr (typically 4.0 mm or 5.5 mm round) through the MAP or AL portal.
* Carefully resect the bony prominence of the acetabular rim superior to the labral attachment. This decompresses the pincer lesion without destabilizing the labrum.
Scenario 2: Labral Takedown for Extensive Pincer Lesions
In most cases of significant pincer impingement, the labrum is already compromised, or the bony overcoverage is too extensive to address without detaching the labrum.
- Labral Detachment: If exposure of the acetabular rim is needed to access the pincer lesion, place a banana blade or radiofrequency wand through the anterior portal. Carefully take down the labrum at the labral-chondral junction in the area of the lesion. Preserve as much healthy labral tissue as possible.
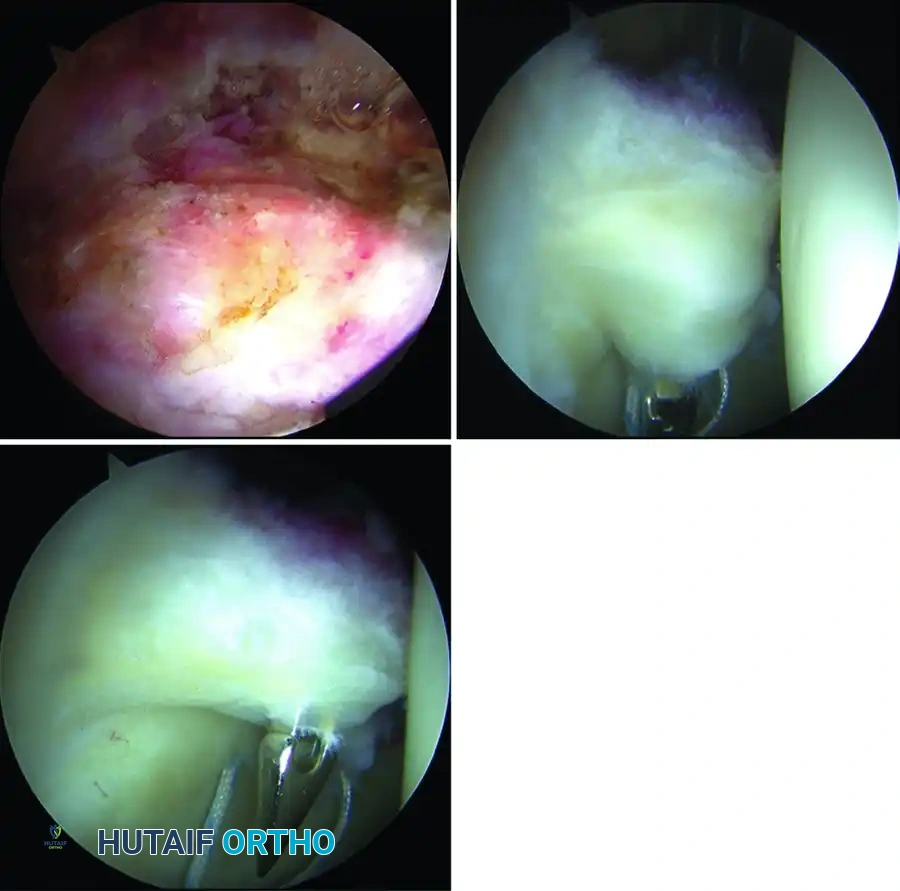
- Rim Preparation: Once the labrum is reflected, the underlying pincer lesion is exposed.
- Burr Placement and Resection: Place a burr in the midanterior portal and position it on the anterior wall at the level of the acetabular overcoverage.
- Fluoroscopic Validation: Confirm with fluoroscopy that the burr is positioned just distal to the crossover sign. Resect the rim to the appropriate level (usually 2 to 4 mm of bone, depending on preoperative planning).
- Confirming Resection: Intermittently check fluoroscopy to confirm the complete resection of the crossover sign, ensuring the anterior wall now projects laterally to the posterior wall.
- Superior Rim Access: The camera can be switched to the anterior portal and the burr to the anterolateral portal to complete the more superior rim resection, ensuring a smooth, continuous contour of the acetabular rim.
Surgical Warning: Avoid over-resection of the acetabular rim. Excessive acetabuloplasty can lead to iatrogenic dysplasia, loss of the suction seal, and catastrophic postoperative microinstability. Always correlate the arthroscopic resection depth with the preoperative radiographic plan.
SURGICAL TECHNIQUE: LABRAL REFIXATION
Following the acetabuloplasty, the labrum must be securely refixed to the newly contoured acetabular rim to restore the hip's vital suction seal.
Anchor Placement
- Trajectory Planning: Refix the labrum to the rim with suture anchors. The trajectory of the drill is critical to avoid penetrating the articular cartilage. The drill should be angled approximately 10 to 15 degrees away from the articular surface.
- First Anchor Insertion: Place the first anchor superiorly through the anterolateral portal. Use continuous fluoroscopy and direct arthroscopic observation to ensure that the joint is not penetrated by the drill bit or the anchor.
- Subsequent Anchors: With the camera in the anterolateral portal, place the remaining anchors (typically spaced 1.5 to 2.0 cm apart) through the midanterior portal in a similar fashion, working from superior to anterior.
Suture Passing and Tying
The goal of suture passing is to evert the labrum slightly, restoring its triangular cross-section and ensuring a tight seal against the femoral head.
- Suture Retrieval: Pass one suture limb into the joint between the labrum and the newly resected rim.
- Piercing the Labrum: Pass a bird beak or other penetrating grasper through the substance of the labrum at the chondrolabral junction. Retrieve the suture limb from the joint space and pull it through the labrum.
- Looping Alternative: Alternatively, if the labral tissue is friable or narrow, loop the suture around the labrum instead of piercing the tissue. This creates a simple cerclage or "base stitch" that compresses the labrum against the rim without violating its substance.
- Knot Tying: Tie the sutures using a sliding locking knot (e.g., Weston knot or SMC knot) followed by alternating half-hitches. Ensure the knot sits away from the articular surface to prevent iatrogenic chondral abrasion. Knotless anchor constructs are also highly effective and increasingly popular for this step.
Clinical Pearl: When tying the labral sutures, observe the labrum's behavior. It should uniformly compress against the acetabular rim and slightly evert. If the labrum inverts into the joint, the suture pass was likely too close to the capsular side, which can compromise the suction seal.
DYNAMIC ASSESSMENT AND CLOSURE
Once the labral refixation is complete, the mechanical success of the procedure must be verified dynamically.
- Traction Release: Remove traction from the leg. Observe the central compartment as the femoral head reduces into the acetabulum. The repaired labrum should form a tight, continuous seal around the femoral head.
- Dynamic Range of Motion Testing: Move the hip through a full range of motion—specifically focusing on flexion to 90 degrees combined with internal rotation (the classic impingement position).
- Visual Confirmation: Ensure there is no residual impingement between the femoral neck and the repaired acetabular rim. The labrum should not be crushed or pinched during terminal motion.
- Capsular Closure: Depending on the extent of the capsulotomy and the patient's risk factors for instability (e.g., borderline dysplasia, generalized hyperlaxity), a partial or complete capsular closure is performed using high-strength sutures.
- Portal Closure: The portals are closed with non-absorbable sutures, and sterile dressings are applied.
POSTOPERATIVE REHABILITATION PROTOCOL
The postoperative protocol is designed to protect the labral repair while preventing intra-articular adhesions.
Phase 1: Protection (Weeks 0-4)
- Weight-Bearing: Flat-foot touch weight-bearing (approx. 20 lbs) with crutches for 3 to 4 weeks to protect the labral repair and prevent excessive compressive forces.
- Range of Motion: ROM is restricted to prevent stress on the repair. Flexion is typically limited to 90°, extension to 0°, and external rotation to 0° for the first 3 weeks.
- Therapy: Continuous passive motion (CPM) machines or stationary biking (with high seat and low resistance) are initiated immediately to promote cartilage nutrition and prevent adhesions.
Phase 2: Early Mobilization (Weeks 4-8)
- Weight-Bearing: Transition to full weight-bearing as tolerated. Wean off crutches once a non-antalgic gait is achieved.
- Range of Motion: Gradually progress to full, unrestricted ROM.
- Strengthening: Initiate isometric and gentle isotonic strengthening of the gluteus medius, core, and quadriceps. Avoid aggressive hip flexor strengthening to prevent tendinitis.
Phase 3: Advanced Strengthening (Weeks 8-12)
- Focus on closed-kinetic-chain exercises, proprioception, and dynamic balance.
- Progressive resistance training for the entire lumbopelvic-hip complex.
Phase 4: Return to Sport (Months 3-6)
- Initiate plyometrics, agility drills, and sport-specific training.
- Clearance for full return to sport is typically granted between 4 and 6 months postoperatively, contingent upon symmetrical strength, full pain-free ROM, and successful completion of functional testing.
COMPLICATIONS AND PITFALLS
While arthroscopic treatment of pincer impingement is highly successful, surgeons must be vigilant regarding potential complications:
- Iatrogenic Cartilage Damage: Scuffing of the femoral head or acetabular cartilage can occur during portal placement or instrumentation if distraction is inadequate.
- Nerve Injury: Pudendal nerve neuropraxia (from the perineal post) and LFCN neuropraxia (from portal placement) are the most common neurological complications. Strict adherence to traction time limits (ideally < 90 minutes) and proper post padding mitigate this risk.
- Under-Resection: Failure to adequately resect the pincer lesion will result in persistent impingement, ongoing pain, and likely failure of the labral repair. Dynamic intraoperative testing is crucial to prevent this.
- Over-Resection: Excessive removal of the acetabular rim can lead to iatrogenic dysplasia and microinstability. Always utilize fluoroscopy to gauge the depth of resection relative to the crossover sign.
- Articular Penetration by Anchors: Improper drill trajectory can cause the suture anchor to breach the articular cartilage, leading to rapid chondrolysis. Always drill 10-15 degrees away from the joint surface under direct visualization.
By adhering to strict preoperative planning, precise arthroscopic technique, and structured postoperative rehabilitation, the arthroscopic management of pincer FAI yields excellent long-term outcomes, restoring joint mechanics and preserving the native hip.
You Might Also Like