Mastering Gait Biomechanics & Lower Limb Deformity Correction with Paley Principles
Key Takeaway
This masterclass explores pathological gait caused by lower limb deformities, detailing biomechanical consequences and compensatory mechanisms. It applies Dr. Dror Paley's principles—Mechanical Axis Deviation, CORA, and joint orientation angles—to analyze and precisely correct deformities, aiming for pain-free, energy-efficient ambulation and restored dynamic function.
Introduction to Pathological Gait and Deformity Correction
In the realm of advanced orthopedic reconstruction, understanding the static alignment of bones on a radiograph is only a fraction of the clinical picture. The true test of a lower limb deformity correction lies in the restoration of dynamic function, specifically the human gait cycle. This masterclass delves deep into the biomechanical consequences of lower limb deformities on gait, exploring the intricate compensatory mechanisms patients adopt, the inevitable failure of these mechanisms, and the downstream pathological consequences on adjacent joints.
Pathologically abnormal gait can stem from a myriad of musculoskeletal and neurological conditions. However, the foundational root causes are relatively few and primarily include structural deformity, pain, muscle weakness, and altered neuromuscular control. As reconstructive surgeons, our primary focus is on the structural deformities that lead to malalignment and malorientation of the hip, knee, ankle, and foot joints.
By applying the principles pioneered by Dr. Dror Paley, specifically the analysis of Mechanical Axis Deviation, the Center of Rotation of Angulation, and standardized joint orientation angles, we can decode these complex gait deviations and plan precise surgical interventions. The ultimate goal is not merely a straight radiograph, but a biomechanically optimized lower extremity capable of pain-free, energy-efficient ambulation.
Decoding the Normal Gait Cycle as a Biomechanical Baseline
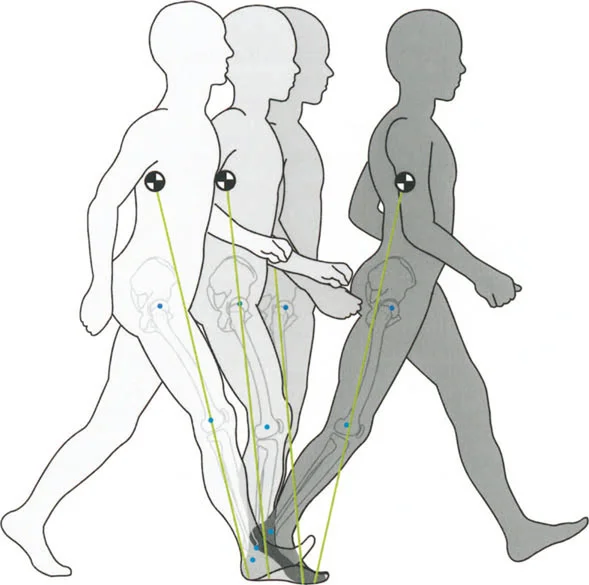
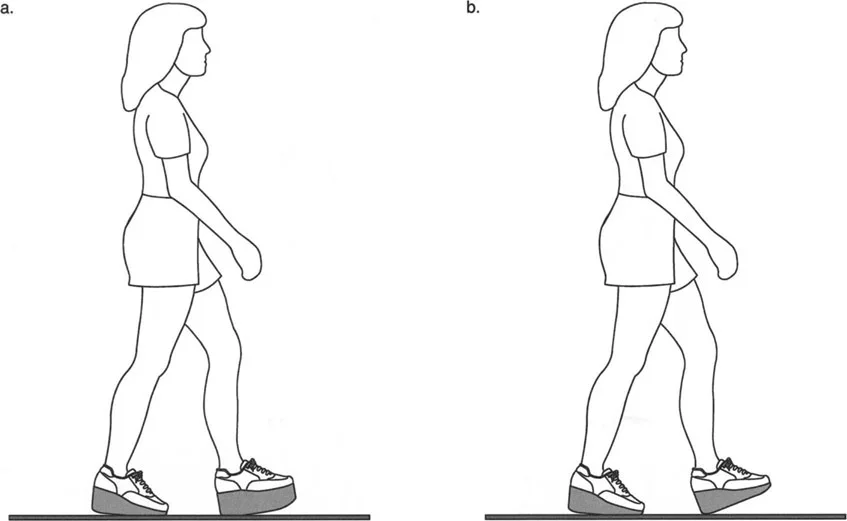
To recognize pathology, the reconstructive surgeon must intimately understand the normal baseline. With a normal, highly efficient gait pattern, step lengths are perfectly equal, and time-distance parameters are symmetrical between the bilateral lower extremities. The body minimizes energy expenditure by keeping the center of mass moving in a smooth, sinusoidal path, minimizing vertical and lateral excursions.
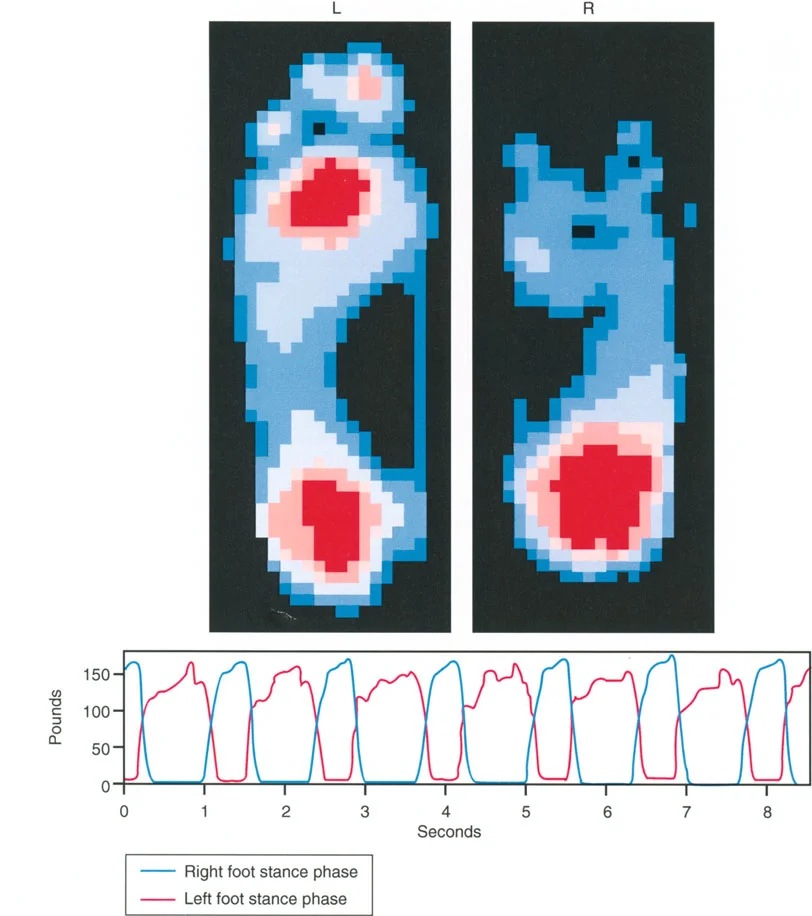
A single gait cycle is defined strictly as the interval from the heel strike of one leg to the subsequent heel strike of that exact same leg. Understanding the temporal and spatial distribution of forces during this cycle is paramount for predicting how a deformity will alter joint reaction forces.
Phases of the Normal Gait Cycle
Each normal gait cycle is divided into two primary phases that dictate the loading environments of the lower extremity joints.
- Stance Phase This accounts for 62 percent of the normal gait cycle. It is the period when the foot is in contact with the ground, actively bearing weight, absorbing shock, and propelling the body forward.
- Swing Phase This accounts for the remaining 38 percent of the cycle. It is the period when the foot is advancing through the air to prepare for the next initial contact.
The stance phase is further subdivided into critical weight-bearing events. At the very beginning and the very end of the stance phase, both feet are on the ground simultaneously. This is known as the Double Stance Phase, which accounts for 12 percent of the cycle at each end, totaling 24 percent. Consequently, each leg is in Single Limb Stance for exactly 38 percent of the gait cycle.
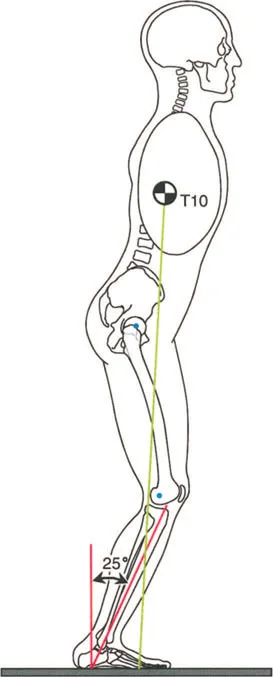
It is during this 38 percent single stance phase that the maximum loading of the hip, knee, and ankle joints occurs. The entire body weight, plus the accelerative forces of gravity and forward momentum, are transmitted entirely through the articular cartilage of a single limb. Any deviation in the mechanical axis during this phase results in exponential increases in focal joint stress according to Wolffs Law and basic principles of statics and dynamics.
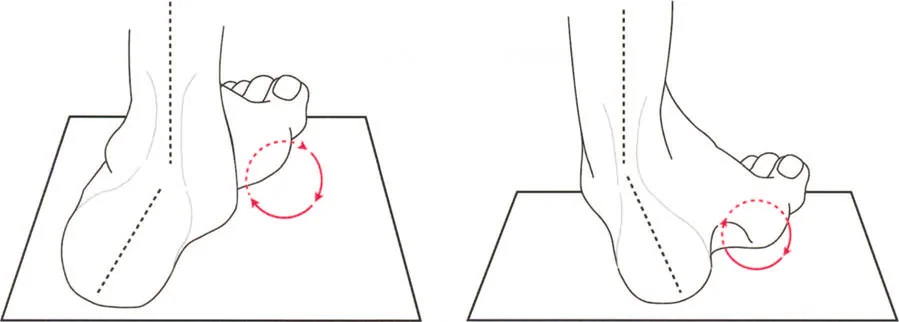
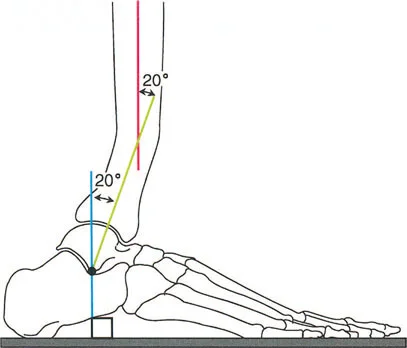
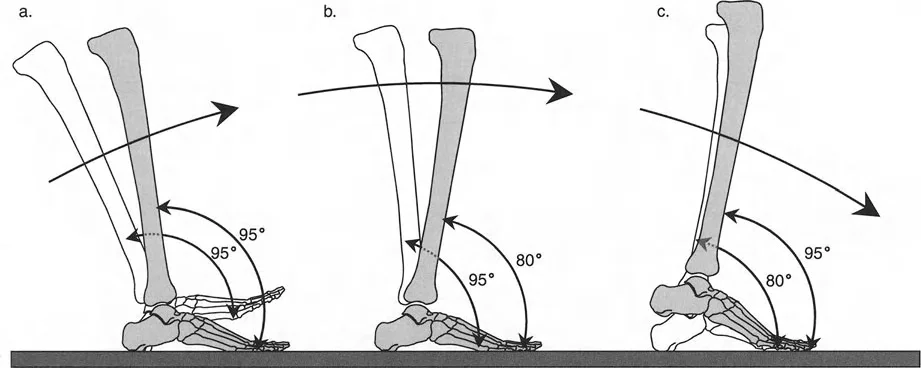
The Three Rockers of the Foot and Ankle
During the stance phase, the foot and ankle act as a dynamic lever system, utilizing three distinct rocker mechanisms to allow the smooth progression of the bodys center of mass over a stationary foot.
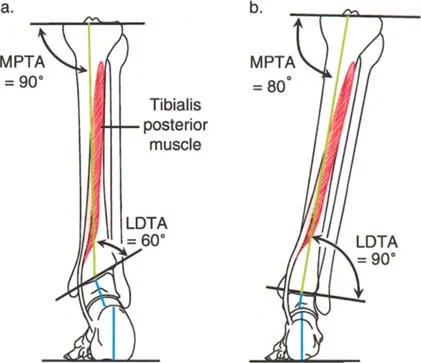
- Heel Rocker This occurs from initial contact to load acceptance. As the heel strikes the ground, the foot is typically at 95 degrees to the tibia, representing 5 degrees of plantarflexion. A highly controlled, eccentric contraction of the ankle dorsiflexors, primarily the tibialis anterior, smoothly lowers the forefoot to the ground, preventing foot slap and absorbing impact forces.
- Ankle Midfoot Rocker This occurs during midstance. The foot is now completely flat on the ground. The tibia must translate forward over the stationary talus, moving into dorsiflexion. This phase is critical for the forward progression of the body in space. By the end of this second rocker, the foot is at an 80 degree angle to the tibia, representing 10 degrees of dorsiflexion.
- Forefoot Rocker This occurs from terminal stance to pre swing. Weight is rapidly transferred to the metatarsal heads. The heel rises, the plantar fascia engages via the Windlass mechanism, and the limb is actively propelled into the swing phase by the concentric contraction of the triceps surae. The foot transitions from 80 degrees back to 95 degrees relative to the tibia.
When structural deformities exist, these delicate rocker mechanisms are the first to be compromised, leading to profound kinematic chain reactions that travel proximally up the limb, affecting the knee, hip, and lumbar spine.
The Triad of Deformity Induced Gait Pathology
Lower limb deformities disrupt normal gait through three primary mechanical failures. Understanding this triad is essential for any surgeon planning an osteotomy or utilizing a hexapod external fixator.
Sacrifice of Joint Motion
The human body is an incredibly adaptable machine. When a bone is deformed, the body attempts to compensate by sacrificing the available range of motion in the joints immediately adjacent to the deformity to maintain a functional posture and a forward line of progression.
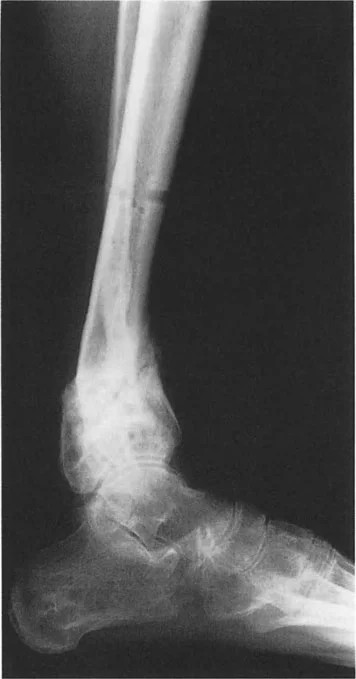
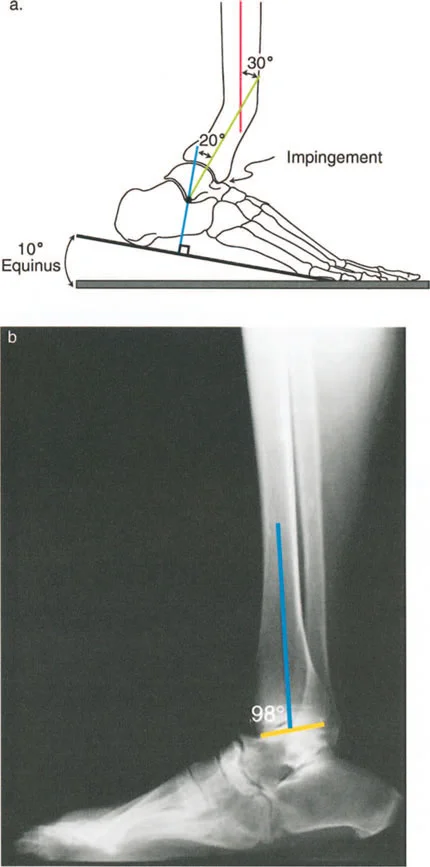
Consider a procurvatum deformity of the distal tibia measuring 20 degrees. In a procurvatum deformity, where the apex is anterior, the distal articular surface of the tibia is tilted dorsally. To achieve a plantigrade foot during the stance phase, the patient must use up their available ankle dorsiflexion simply to get the foot flat on the ground. Consequently, they lose the ability to progress the tibia over the talus during the ankle rocker phase. This premature exhaustion of dorsiflexion leads to early heel rise, a shortened stride length, and compensatory knee flexion during midstance.
Creation of Fixed Joint Positions
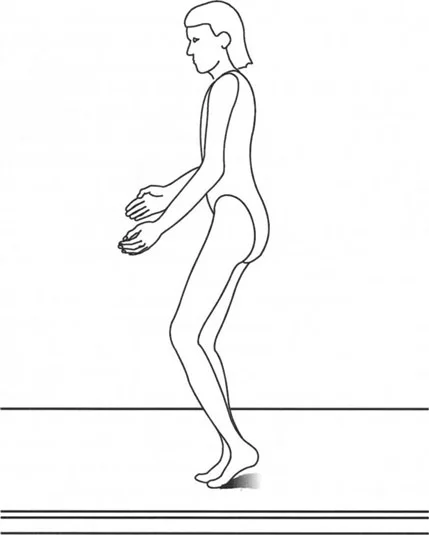
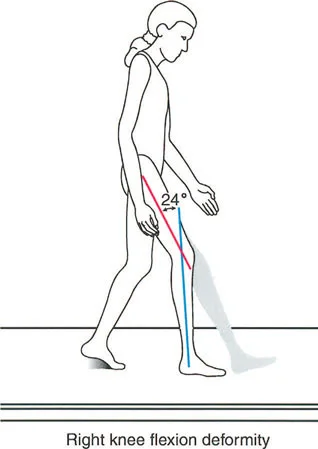
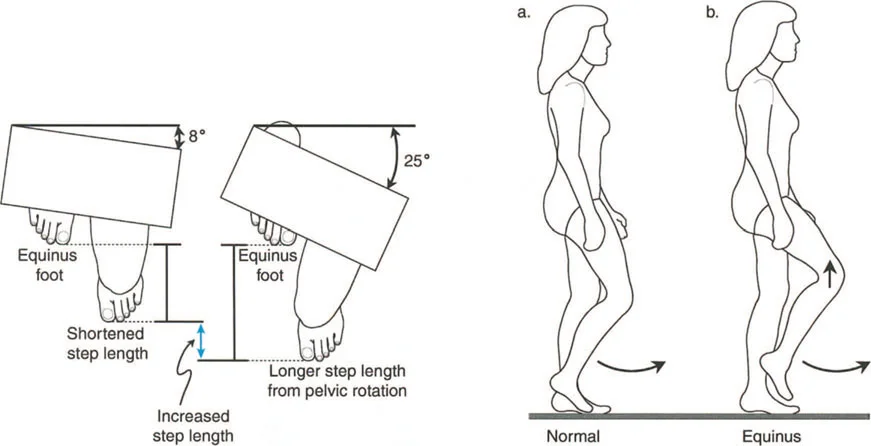
When deformities are severe or long standing, the continuous sacrifice of joint motion leads to soft tissue contractures and eventual bony remodeling, creating fixed joint positions. A fixed equinus contracture, for example, completely obliterates the heel rocker. The patient makes initial contact with the forefoot, sending abnormal retrograde shockwaves through the knee and hip. To clear the foot during the swing phase, the patient must adopt a steppage gait, excessively flexing the hip and knee, drastically increasing the energy expenditure of ambulation.
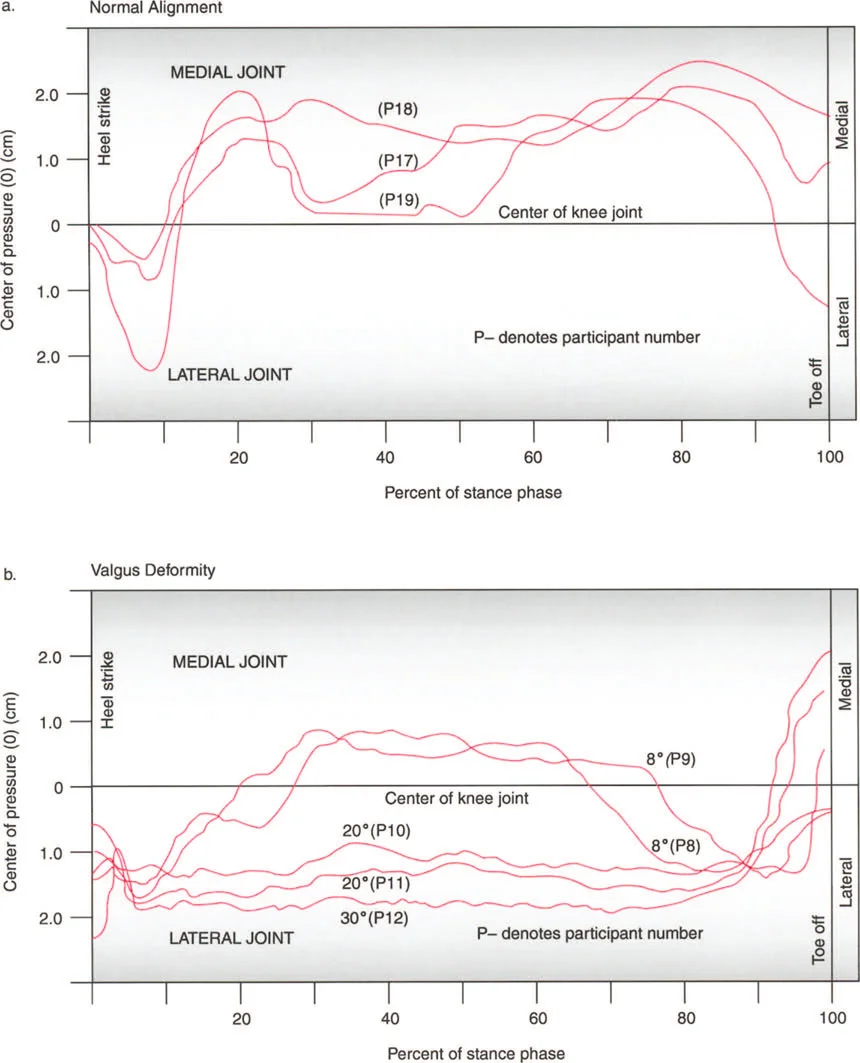
Induction of Abnormal Joint Loading
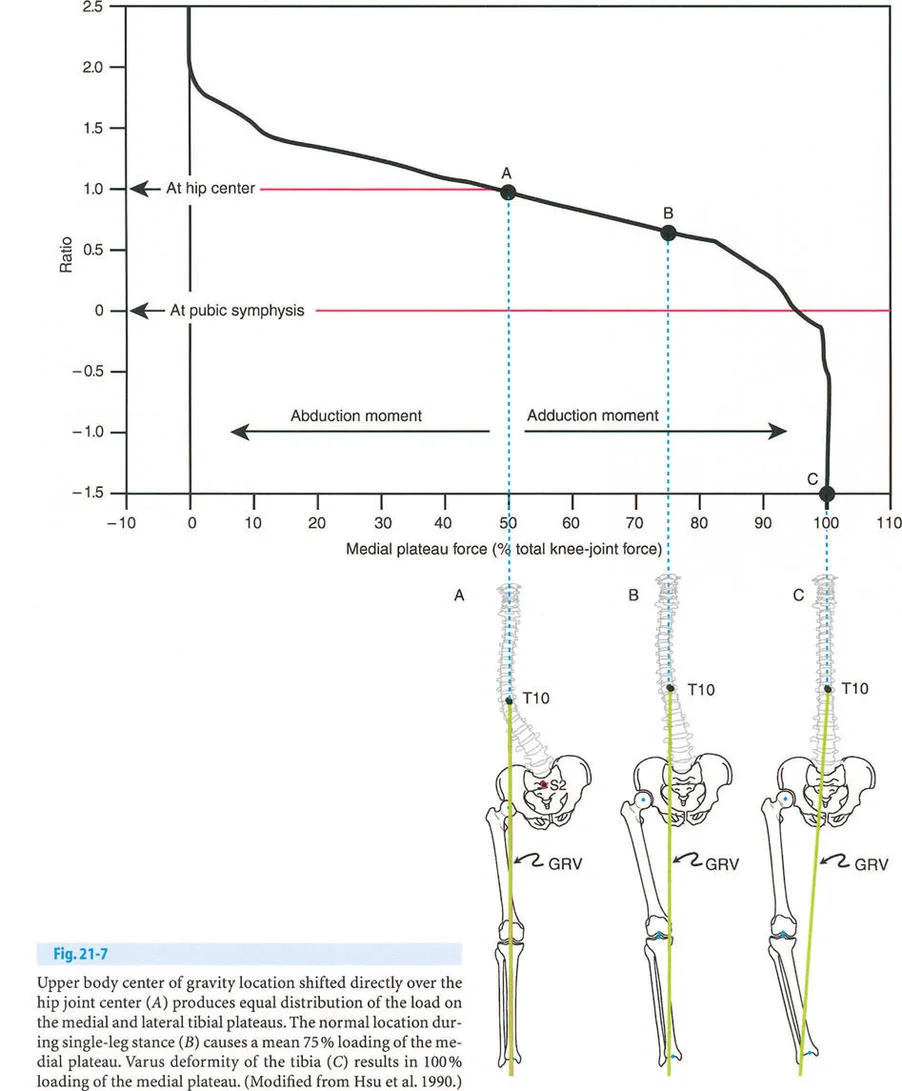
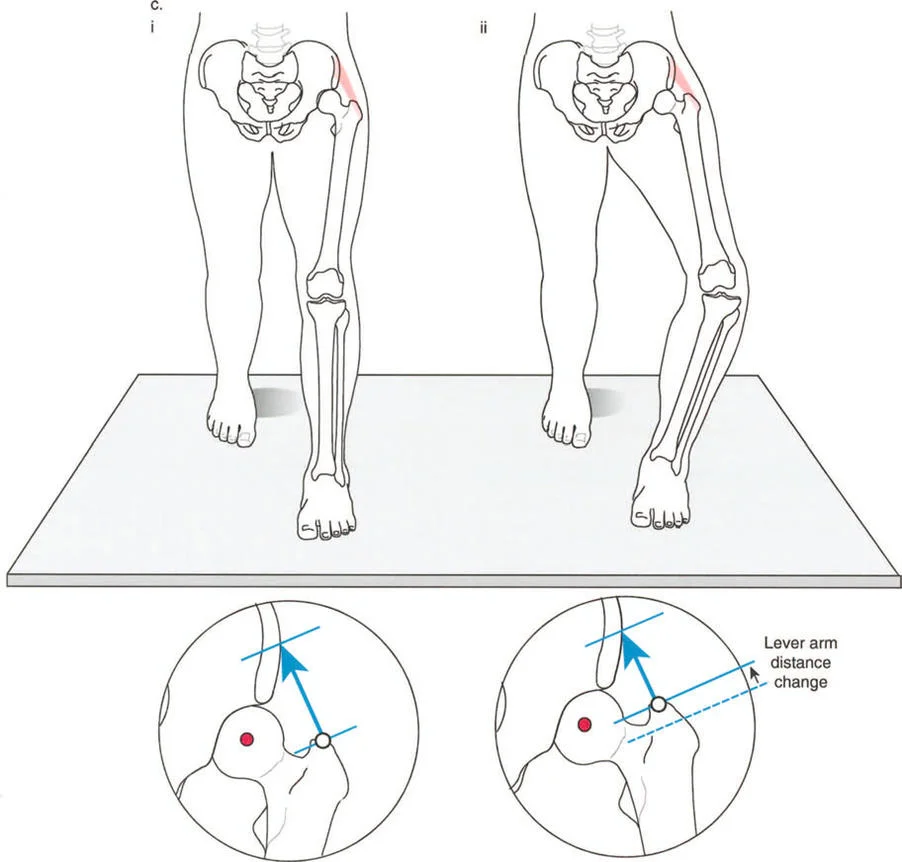
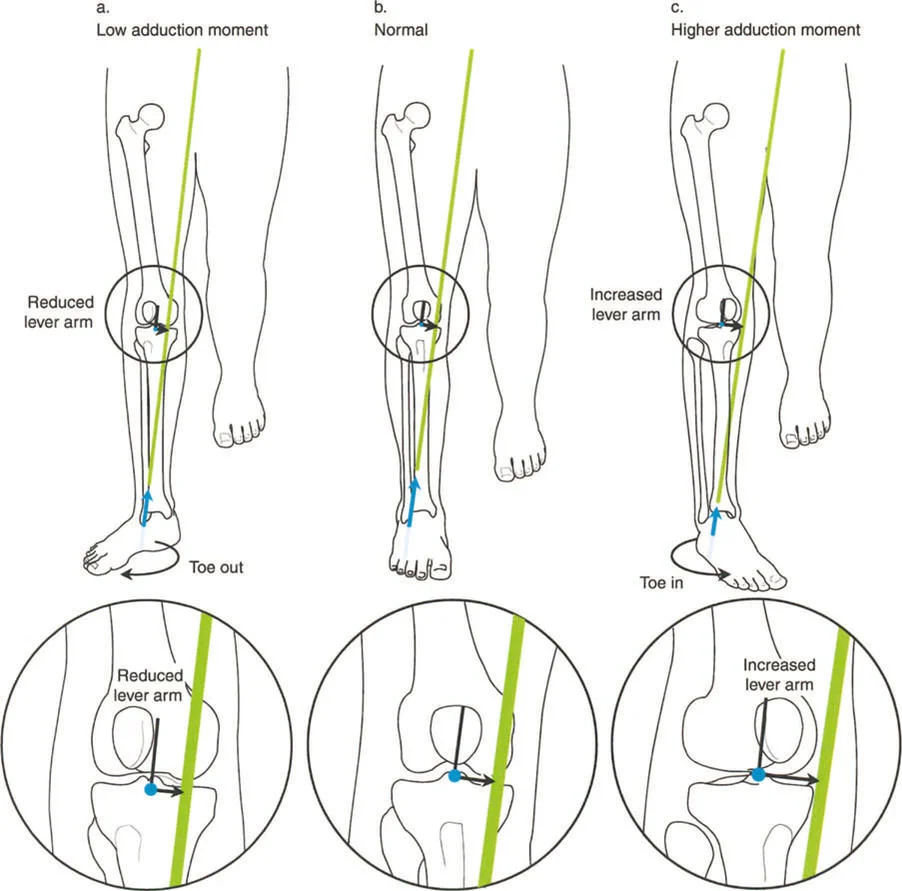
The most insidious component of the triad is the induction of abnormal joint loading. The articular cartilage of the lower extremity is designed to accept loads perfectly perpendicular to the joint surface. When a deformity shifts the mechanical axis, it creates a lever arm that multiplies the forces on one compartment of the joint while unloading the other.
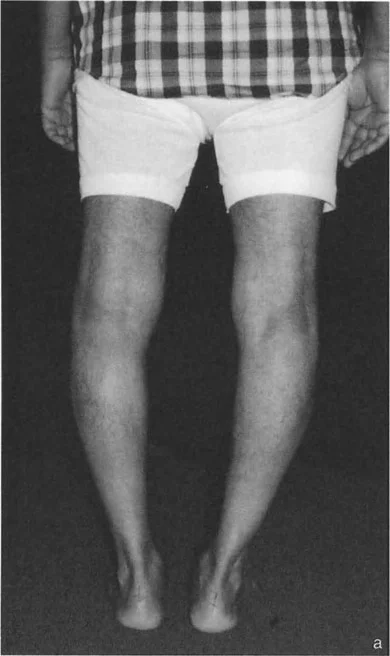
A varus deformity of the proximal tibia shifts the mechanical axis medially. During single limb stance, the ground reaction force passes medial to the center of the knee. This creates an adductor moment, drastically increasing the compressive forces on the medial compartment cartilage and placing tensile strain on the lateral collateral ligament complex. Over time, this abnormal loading pattern leads to asymmetric cartilage wear, subchondral sclerosis, and the inevitable onset of unicompartmental osteoarthritis.
Core Paley Principles for Deformity Analysis
To correct these pathological gait patterns, the surgeon must transition from qualitative observation to quantitative geometric analysis. Dr. Dror Paley established the definitive framework for analyzing lower limb deformities, relying on precise radiographic measurements to dictate surgical planning.
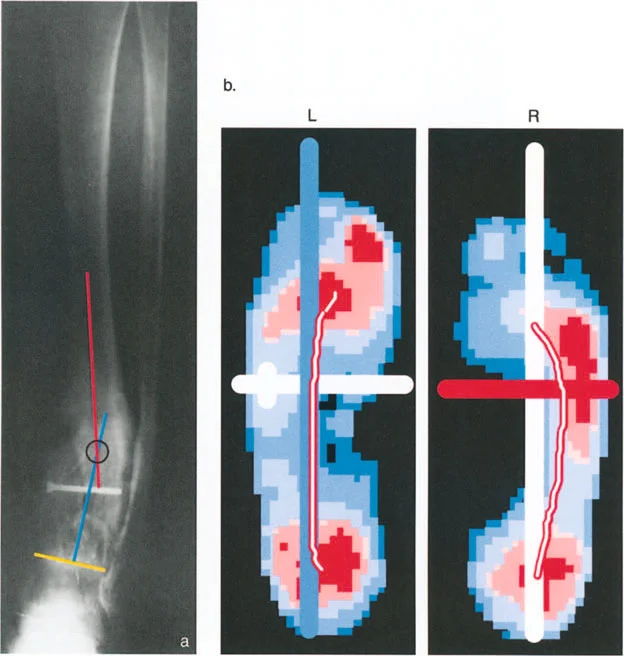
Analyzing Mechanical Axis Deviation
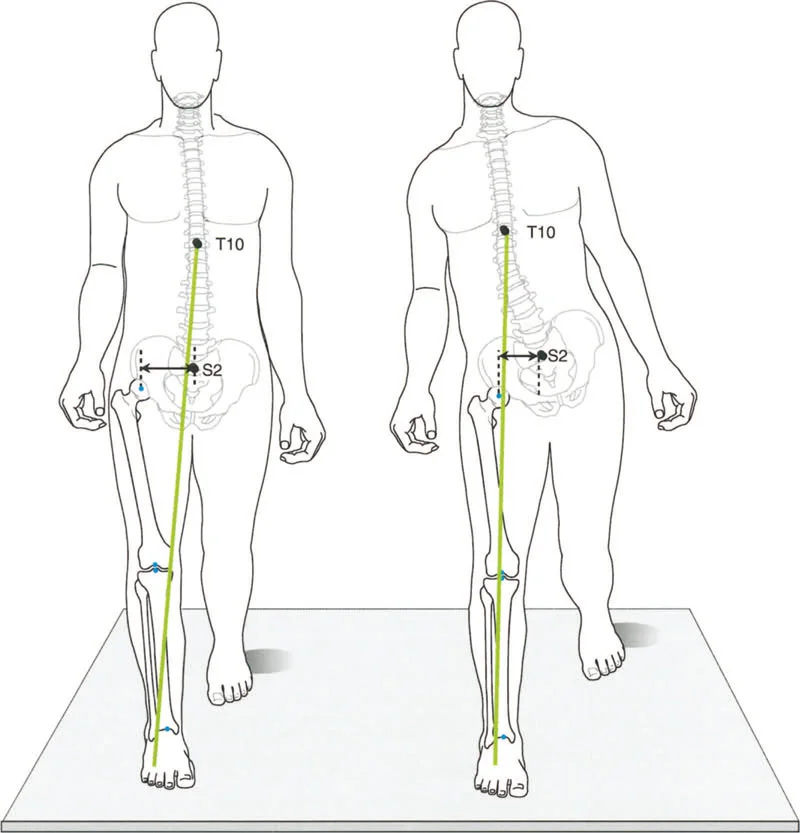
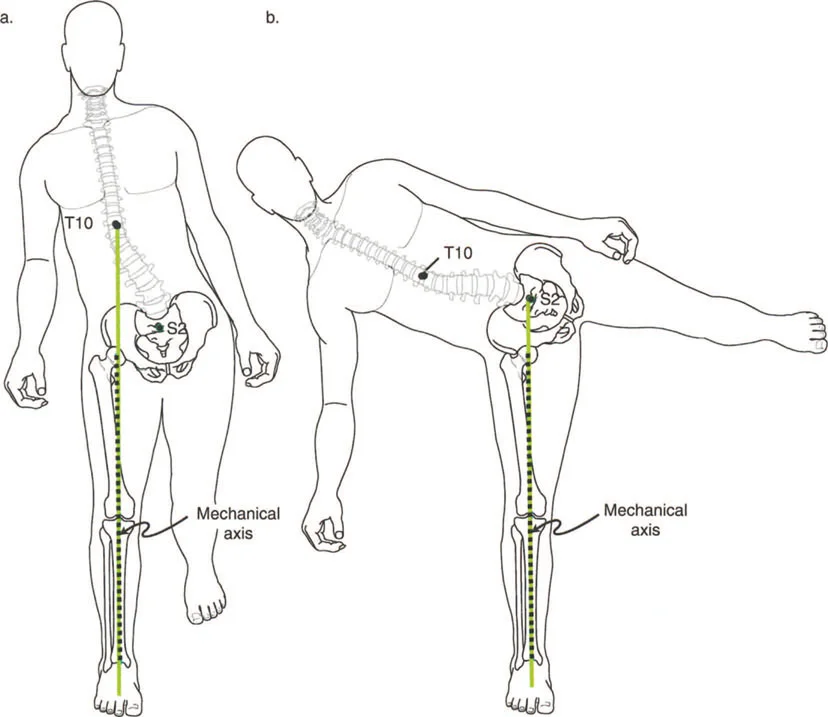
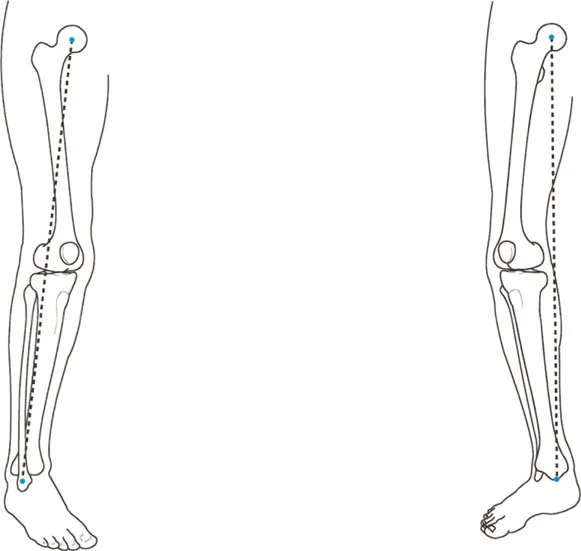
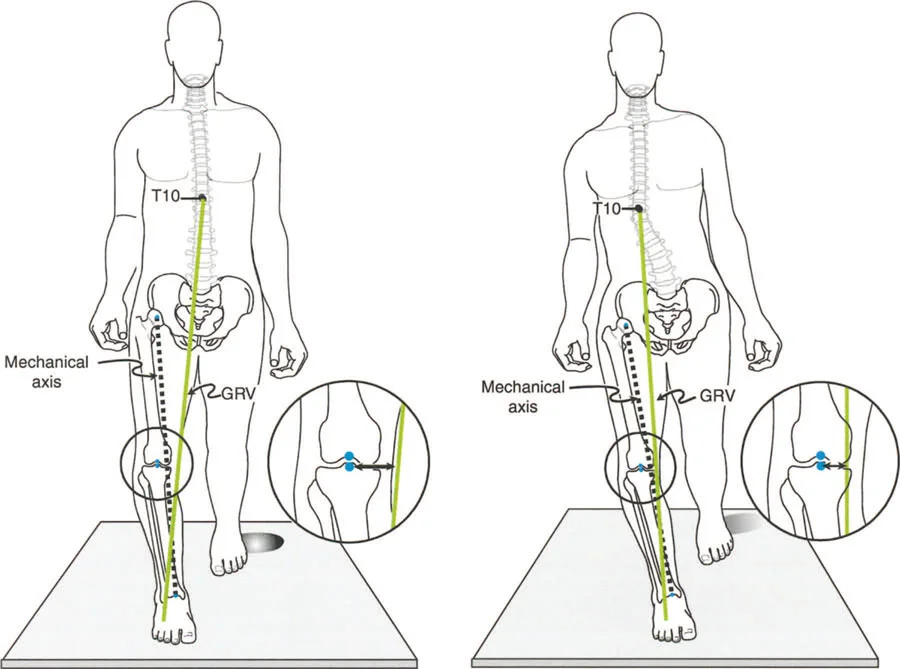
The Mechanical Axis Deviation is the starting point of all deformity analysis. The mechanical axis of the lower extremity is a straight line drawn from the center of the femoral head to the center of the ankle joint (the center of the tibial plafond). In a normal, well aligned limb, this line should pass precisely through the center of the knee joint, or slightly medial to it, specifically between the center and the medial tibial spine.
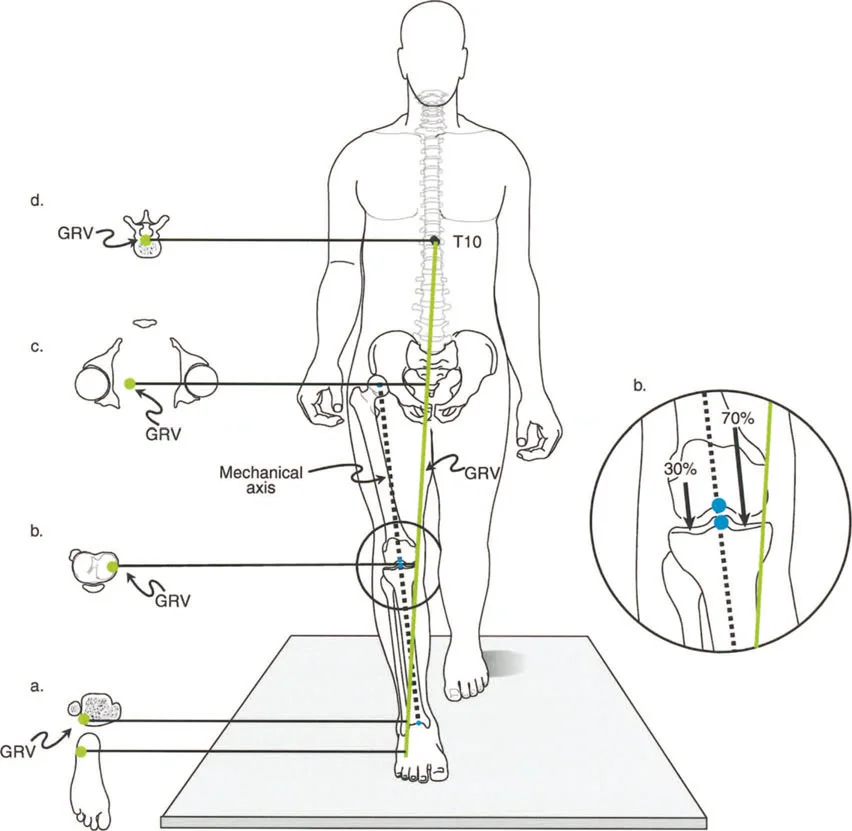
When the mechanical axis line falls outside this narrow normal zone, Mechanical Axis Deviation is present.
* Medial MAD Indicates a varus overall alignment. The axis passes through the medial compartment or entirely medial to the knee joint.
* Lateral MAD Indicates a valgus overall alignment. The axis passes through the lateral compartment or entirely lateral to the knee joint.
Quantifying the MAD in millimeters allows the surgeon to understand the magnitude of the abnormal bending moments acting on the knee during the stance phase of gait.
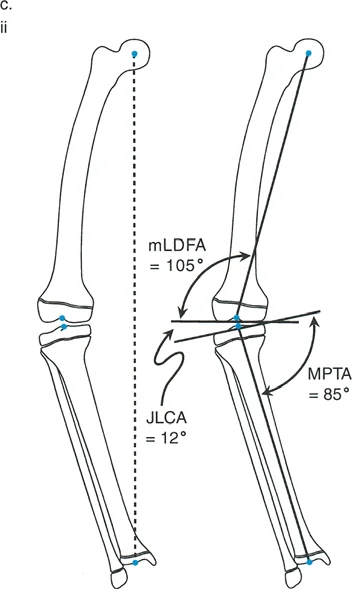
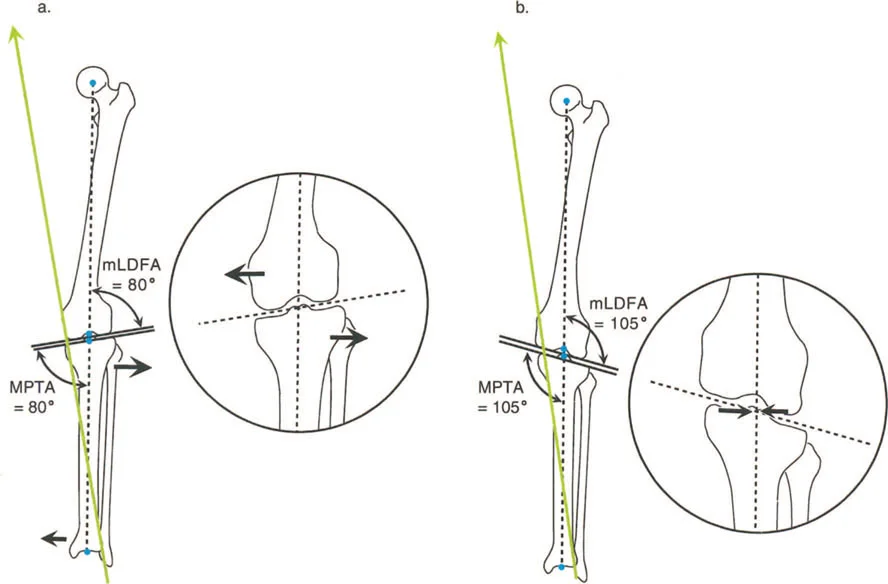
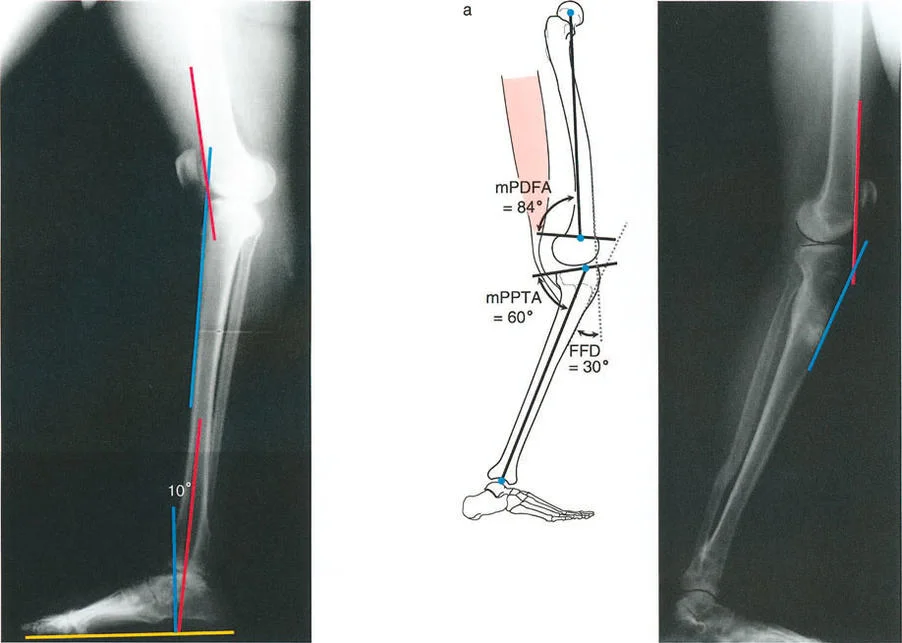
Essential Joint Orientation Angles
Identifying MAD tells the surgeon that a deformity exists, but it does not specify where the deformity is located. To localize the pathology, the surgeon must measure the joint orientation angles. These angles define the relationship between the mechanical or anatomical axes of the bones and their respective articular surfaces.
The Paley method relies on a specific nomenclature, utilizing prefixes like m for mechanical and a for anatomical, followed by the location (Lateral, Medial, Anterior, Posterior) and the bone segment (Proximal Femoral, Distal Femoral, Proximal Tibial, Distal Tibial).
| Angle Abbreviation | Full Name | Normal Range | Clinical Significance |
|---|---|---|---|
| mLDFA | Mechanical Lateral Distal Femoral Angle | 85 to 90 degrees | Determines distal femoral coronal alignment. Abnormal values indicate femoral varus or valgus. |
| MPTA | Medial Proximal Tibial Angle | 85 to 90 degrees | Determines proximal tibial coronal alignment. Crucial for planning High Tibial Osteotomies. |
| LDTA | Lateral Distal Tibial Angle | 86 to 92 degrees | Determines ankle joint orientation. Critical for preventing asymmetric ankle wear. |
| mLPFA | Mechanical Lateral Proximal Femoral Angle | 85 to 95 degrees | Evaluates the femoral neck shaft relationship relative to the mechanical axis. |
| JLCA | Joint Line Convergence Angle | 0 to 2 degrees | Measures ligamentous laxity or intra articular deformity. Values over 2 degrees suggest collateral ligament incompetence or cartilage loss. |
By comparing the patients measured angles against these established normative values, the surgeon can definitively pinpoint whether the deformity resides in the femur, the tibia, or both, and whether it is intra articular or extra articular.
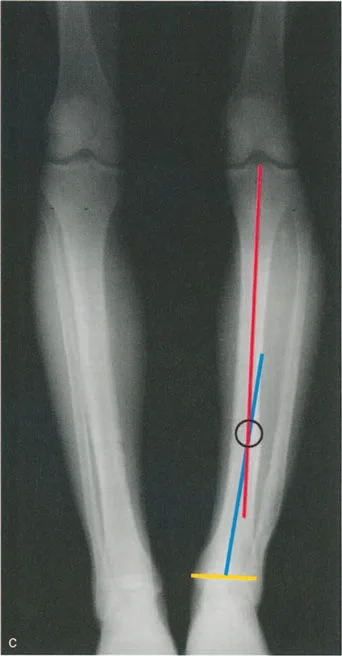
Identifying the Center of Rotation of Angulation
Once the deformed bone is identified, the exact apex of the deformity must be located. This is the Center of Rotation of Angulation, or CORA.
To find the CORA, the surgeon draws the mid diaphyseal line of the proximal bone segment and the mid diaphyseal line of the distal bone segment. The point where these two lines intersect is the CORA. The angle formed by their intersection represents the true magnitude of the angular deformity.
In complex cases, a bone may have multiple deformities, resulting in multiple CORAs. Identifying the CORA is the most critical step in preoperative planning, as its location dictates the placement of the osteotomy and the hinge of the fixation device.

The Paley Osteotomy Rules
The true genius of the Paley principles lies in the geometric rules governing osteotomy placement relative to the CORA. Adhering to these rules ensures that correcting the angular deformity does not inadvertently create a secondary translational deformity, which would further disrupt the mechanical axis and gait mechanics.
Osteotomy Rule One
Rule One states that if the osteotomy and the hinge are both located at the CORA, the correction will result in pure angulation without any translation.
This is the ideal scenario for deformity correction. By cutting the bone exactly at the apex of the deformity and rotating the distal segment around a hinge placed at that exact same apex, the anatomical axis of the proximal and distal segments will perfectly align. The joint surfaces will be restored to their normal orientation, and the mechanical axis will be corrected without creating any zigzag effect in the bone.

Osteotomy Rule Two
Rule Two states that if the hinge is located at the CORA, but the osteotomy is performed at a different level, the correction will result in both angulation and translation.
In many clinical scenarios, cutting the bone exactly at the CORA is impossible or inadvisable. The CORA might be located within the joint space (intra articular deformity), in a region of poor soft tissue coverage, or in an area of diseased bone. In these cases, the surgeon must perform the osteotomy away from the CORA.
However, as long as the hinge of the external fixator or the virtual hinge of the internal plate is placed exactly at the CORA, the mechanical axis will still be perfectly restored. The trade off is that the bone ends at the osteotomy site will translate relative to one another. The surgeon must anticipate this translation and ensure that there is adequate bone contact for healing.
Osteotomy Rule Three
Rule Three states that if the osteotomy and the hinge are both located away from the CORA, the correction will result in a secondary translational deformity.
This is generally the scenario that reconstructive surgeons actively try to avoid. If you hinge the bone around a point that is not the true apex of the deformity, you will create a new, iatrogenic deformity. The proximal and distal anatomical axes will not align, creating a step off. While the joint orientation angles might be corrected, the overall mechanical axis of the limb will remain deviated, and the pathological gait mechanics will persist.
Preoperative Planning for Deformity Correction
Mastery of gait biomechanics and Paley principles culminates in meticulous preoperative planning. A surgeon should never enter the operating room without a comprehensive, drawn out plan detailing the exact location of the CORA, the magnitude of the correction, and the precise level of the osteotomy.

Step by Step Guide to Deformity Planning
- Obtain High Quality Imaging The foundation of planning is a full length, standing, weight bearing anteroposterior radiograph of both lower extremities. The patellae must be facing strictly forward to control for rotation. Dedicated lateral views of the affected segments are also mandatory to assess sagittal plane deformities.
- Perform the Malalignment Test Draw the mechanical axis line from the center of the femoral head to the center of the ankle. Measure the MAD in millimeters. If the MAD is zero, the limb is aligned. If the MAD is abnormal, proceed to the next step.
- Perform the Malorientation Test Measure the mLDFA, MPTA, and LDTA. Compare these to the normative values. This isolates the deformity to the femur, the tibia, or both.
- Assess the Joint Line Convergence Angle Measure the JLCA. If it is greater than 2 degrees, you must account for ligamentous laxity or cartilage loss in your correction plan. Failing to do so will result in undercorrection or overcorrection once the patient bears weight.
- Locate the CORA Draw the proximal and distal anatomical axes of the deformed bone segment. Mark their intersection. Measure the angle of deformity.
- Apply Osteotomy Rules Decide where to place the osteotomy based on bone quality, soft tissue envelope, and hardware constraints. Apply Rule One or Rule Two to ensure the hinge is placed at the CORA.
- Select Fixation Strategy Choose between internal fixation (plates, intramedullary nails) or external fixation (Ilizarov, hexapod frames). Hexapod frames offer the distinct advantage of allowing postoperative, software driven adjustments in all six degrees of freedom, making them ideal for complex, multiplanar deformities.
Clinical Pearls for the Reconstructive Surgeon
To elevate your practice and minimize complications, consider these high yield clinical pearls derived from decades of applying Paley principles to complex lower limb reconstructions.
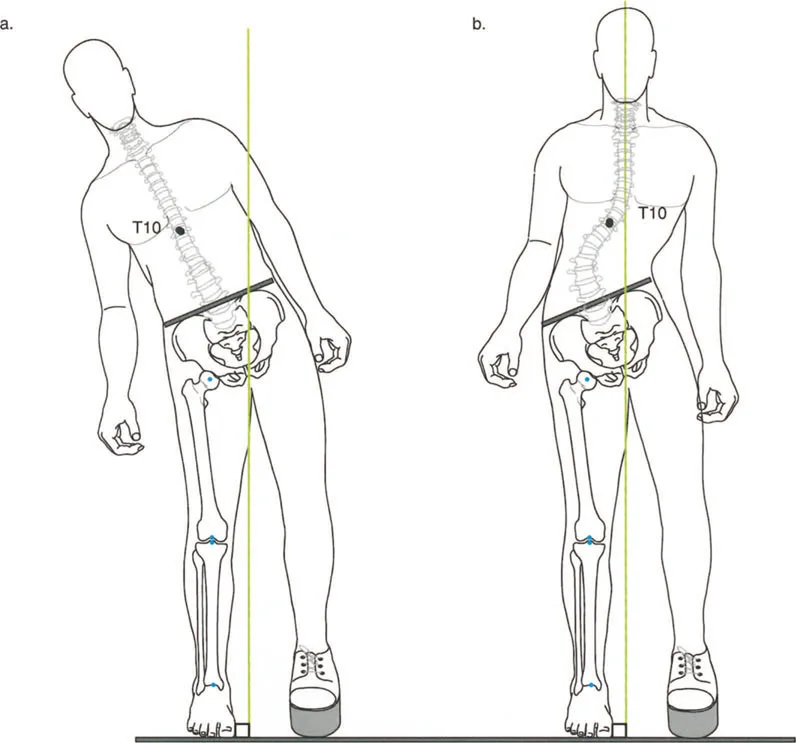
- Respect the Sagittal Plane Coronal plane deformities (varus and valgus) are obvious on AP radiographs, but sagittal plane deformities (procurvatum and recurvatum) are equally destructive to gait mechanics. Always plan in orthogonal planes. An uncorrected procurvatum deformity will severely limit ankle dorsiflexion and ruin the ankle rocker.
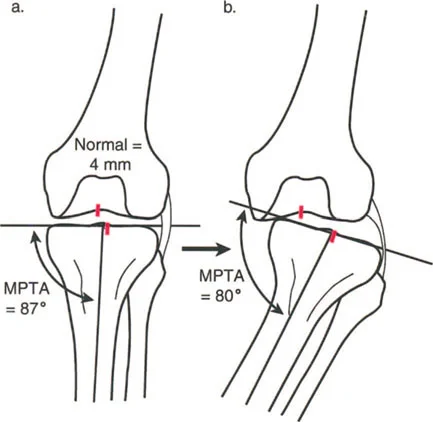
- Beware of the JLCA Illusion A wide JLCA can mimic a structural bone deformity. If a patient has severe medial compartment osteoarthritis with cartilage loss and lateral ligament stretching, they will present with a varus thrust during gait and a medial MAD. However, the mLDFA and MPTA might be completely normal. In this case, the deformity is intra articular, not diaphyseal, and an osteotomy might be contraindicated.
- Account for Leg Length Discrepancy Angular deformities rarely exist in isolation. They are frequently accompanied by limb shortening. When planning an osteotomy, consider whether an opening wedge technique (which adds length) or a closing wedge technique (which subtracts length) is more appropriate for restoring equal leg lengths and optimizing the swing phase of gait.
- The Fibula is Not a Bystander When performing a tibial osteotomy, the intact fibula acts as a tether. Failing to release the fibula or perform a concurrent fibular osteotomy will lead to delayed union, nonunion, or asymmetric correction of the tibia. Always plan your fibular management carefully.
- Dynamic Assessment is Mandatory Radiographs are static, but gait is dynamic. Always watch your patient walk down the hallway before looking at their x rays. Observe their foot progression angle, their knee kinematics during the stance phase, and their pelvic obliquity. The clinical gait exam will often reveal rotational deformities and compensatory mechanisms that are invisible on a 2D radiograph.
Mastering lower limb deformity correction requires a paradigm shift from simple bone carpentry to advanced biomechanical engineering. By intimately understanding the normal gait cycle, recognizing how deformities disrupt the kinematic chain, and rigorously applying the geometric principles of Dr. Dror Paley, the orthopedic surgeon can execute precise, predictable corrections.
The
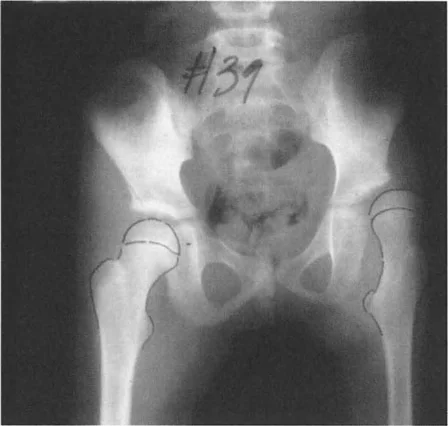
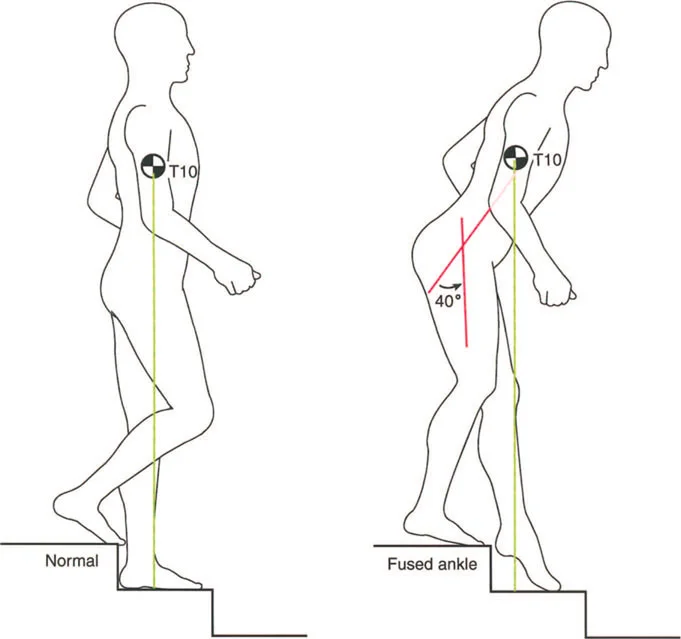
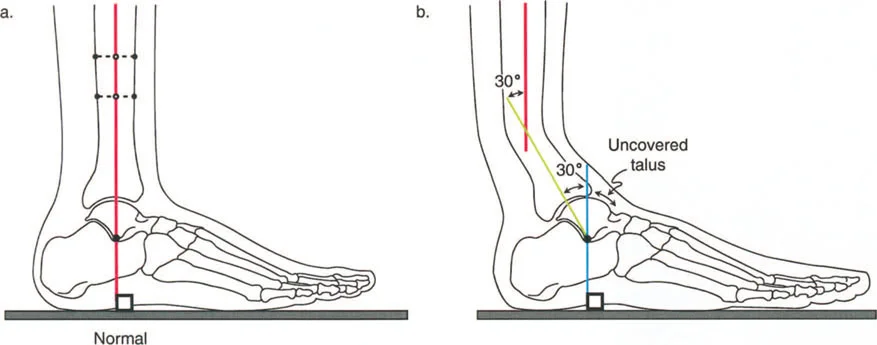
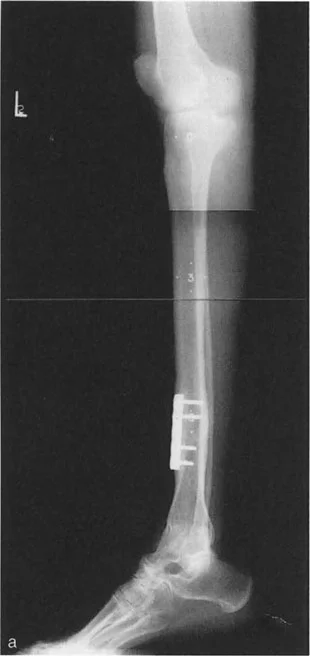
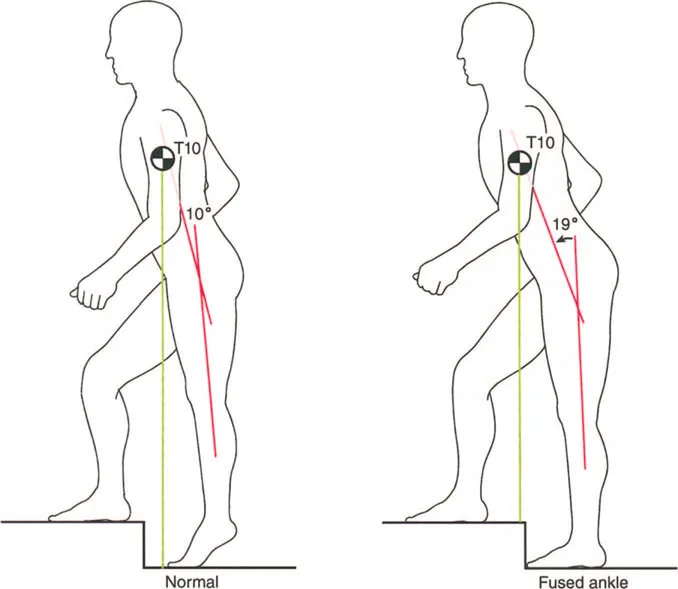
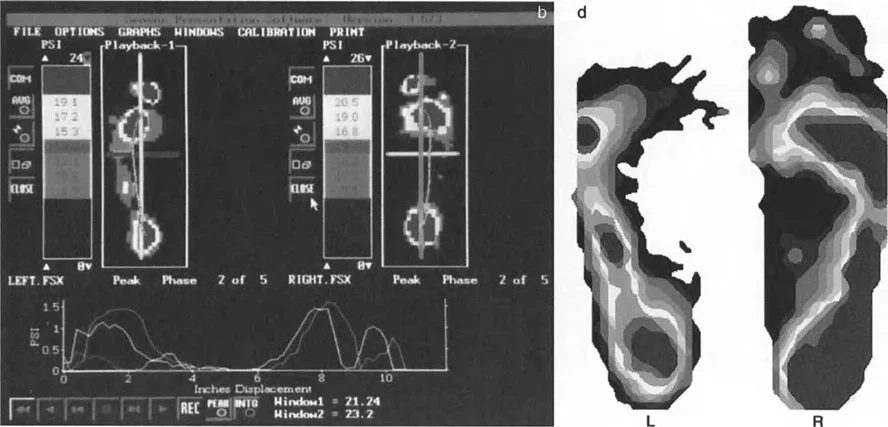
Appendix: Clinical & Radiographic Imaging
!!! info "Academic Resource & Medical Review"
This academic resource was prepared and medically reviewed by Prof. Dr. Mohammed Hutaif, Consultant Orthopedic & Spine Surgeon. It is formulated specifically for medical students, orthopedic residents, and surgeons preparing for high-stakes board examinations (AAOS, FRCS Tr & Orth, Arab Board).
!!! warning "Disclaimer"
The surgical techniques, classifications, and clinical guidelines presented herein are for educational and academic review purposes only. They are not intended to replace institutional protocols or independent clinical judgment.
You Might Also Like