Mastering Sagittal Knee Deformities: Paley Principles & Judet Quadricepsplasty
Key Takeaway
Sagittal plane knee deformities (procurvatum, recurvatum) are corrected using Paley Principles. This involves precise biomechanical analysis of angles (PDFA, PPTA), identifying the Center of Rotation of Angulation (CORA), and applying specific osteotomy rules. Judet Quadricepsplasty addresses knee extension contractures.
Introduction to Sagittal Plane Knee Biomechanics
Understanding sagittal plane knee deformities is a critical cornerstone of advanced limb reconstruction and orthopedic surgery. While coronal plane deformities frequently dominate standard orthopedic training and literature, sagittal plane malalignment can be equally, if not more, devastating to knee kinematics, ligamentous stability, and overall patient function. Deformities in this plane specifically manifest as procurvatum and recurvatum.
Based on the foundational biomechanical principles pioneered by Dr. Dror Paley, correcting these complex deformities requires a rigorous, mathematical understanding of angular relationships. The surgeon must master the Center of Rotation of Angulation, the Posterior Proximal Tibial Angle, and the Posterior Distal Femoral Angle. Furthermore, the Mechanical Axis Deviation must be evaluated not just in the anteroposterior view, but meticulously in the lateral view.
Failure to respect these native angles during osteotomy planning leads to catastrophic consequences. These include compensatory joint subluxation, accelerated articular cartilage degeneration, and severe patellofemoral complications, most notably iatrogenic patella baja or alta.
This comprehensive masterclass provides an exhaustive, high yield breakdown of sagittal plane knee considerations. We will explore the nuanced management of complex recurvatum with posterior subluxation, dissect the pathophysiology of knee extension contractures, and provide a definitive step by step surgical guide to the Paley modification of the Judet Quadricepsplasty.
Paley Principles and Biomechanical Foundations in the Sagittal Plane
Before addressing specific deformities, the surgeon must understand the normal radiographic parameters of the knee in the sagittal plane. Deformity correction is fundamentally an exercise in restoring normal joint orientation and mechanical alignment.
Sagittal Mechanical Axis Deviation
In the coronal plane, the mechanical axis is a straight line from the center of the femoral head to the center of the ankle joint. In the sagittal plane, the mechanical axis is similarly defined but interacts differently with the knee joint. A normal sagittal mechanical axis passes slightly anterior to the center of the knee joint.
When joint orientation angles deviate from the norm, the mechanical axis of the lower extremity shifts either anteriorly or posteriorly. This shift drastically alters the load bearing mechanics of the knee joint. An anterior shift of the mechanical axis places immense tensile strain on the posterior capsule and cruciate ligaments, while a posterior shift overloads the patellofemoral joint and extensor mechanism.
Key Radiographic Parameters and Normal Values
Accurate preoperative planning relies on precise measurements taken from a true lateral radiograph of the entire lower extremity. The x-ray beam must be perfectly perpendicular to the sagittal plane to avoid rotational artifact, which can artificially distort angular measurements.
| Radiographic Parameter | Definition | Normal Range | Clinical Significance of Deviation |
|---|---|---|---|
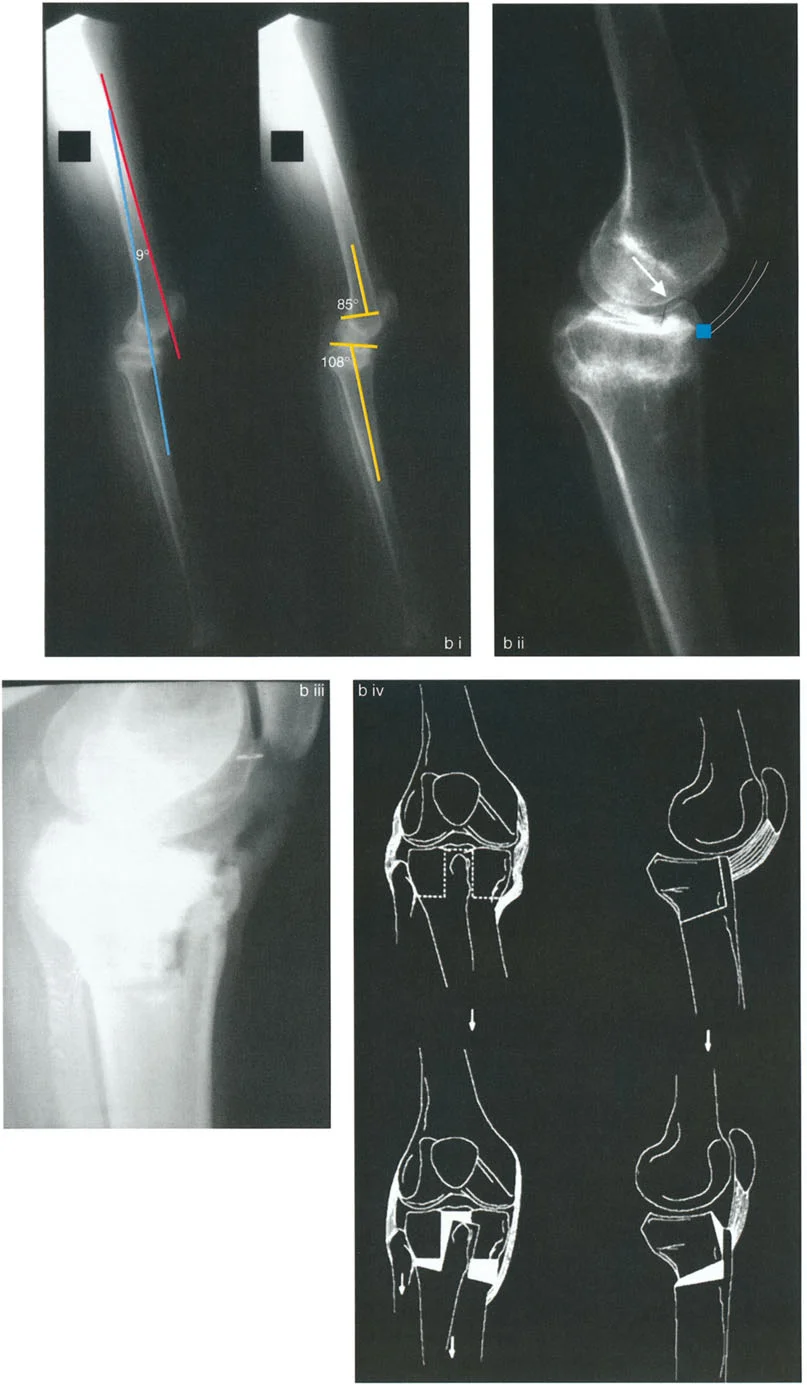
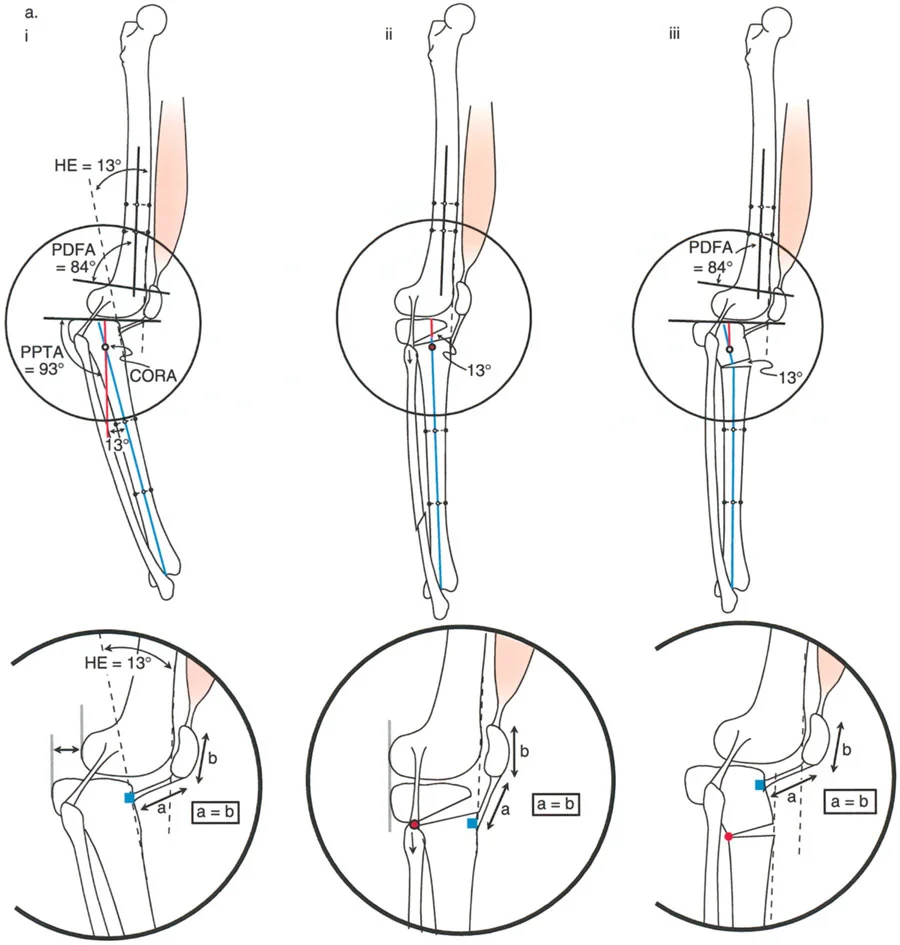
| PDFA | Posterior Distal Femoral Angle | 83 degrees | Decreased angle indicates procurvatum. Increased angle indicates recurvatum. |
| PPTA | Posterior Proximal Tibial Angle | 81 to 84 degrees | Decreased angle indicates procurvatum. Increased angle indicates recurvatum. |
| aLDFA | Anterior Lateral Distal Femoral Angle | 81 to 84 degrees | Used as an alternative to PDFA depending on anatomical landmarks. |
| Sagittal MAD | Sagittal Mechanical Axis Deviation | 0 to 5 mm anterior | Anterior deviation stresses posterior structures. Posterior deviation stresses the patellofemoral joint. |
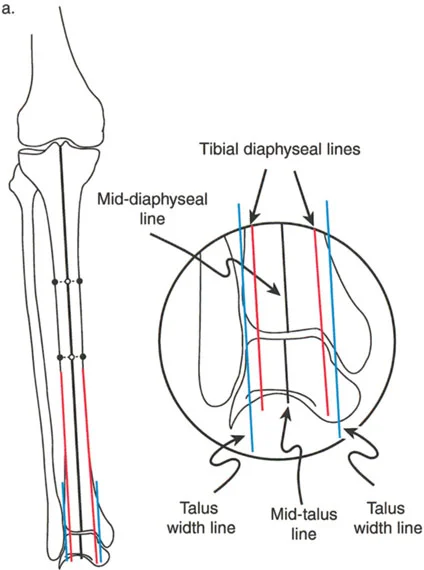
Proper planning requires identifying the diaphyseal lines and calculating the exact apex of the deformity. Establishing the mid-diaphyseal lines relative to the joint orientation lines is the first step in locating the apex of the deformity.
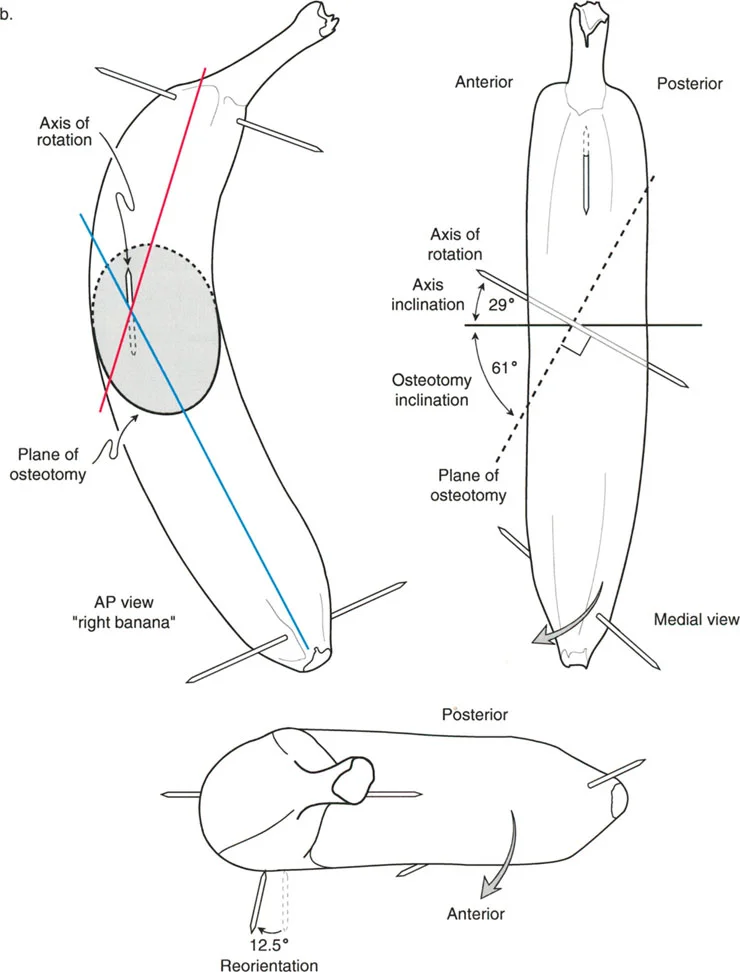
Center of Rotation of Angulation and Sagittal Osteotomy Rules
Dr. Dror Paley revolutionized deformity correction by formalizing the concept of the Center of Rotation of Angulation. The Center of Rotation of Angulation is the point at which the proximal and distal anatomical or mechanical axes intersect.
Applying Paley Osteotomy Rules to the sagittal plane is non-negotiable for achieving a plantigrade foot and a stable knee without inducing secondary translation.
- Osteotomy Rule 1 When the osteotomy and the hinge axis are placed exactly at the Center of Rotation of Angulation, the bone ends will angulate without translation. This is the ideal scenario for pure angular correction.
- Osteotomy Rule 2 When the osteotomy is placed away from the Center of Rotation of Angulation, but the hinge axis remains at the Center of Rotation of Angulation, the bone ends will angulate and translate. This translation is a necessary geometric consequence to realign the mechanical axis perfectly.
- Osteotomy Rule 3 When both the osteotomy and the hinge axis are placed away from the Center of Rotation of Angulation, a secondary translation deformity is created. This rule is generally avoided unless a deliberate translation is required to correct a pre-existing translational deformity.
Surgical Pearls for Sagittal Plane Planning
* Always obtain full length standing lateral radiographs. Supine films mask the true compensatory mechanisms of the patient.
* Account for fixed flexion contractures of the hip or ankle, as these will artificially alter the apparent sagittal alignment of the knee.
* Remember that the posterior femoral condyles are curved. The joint orientation line for the distal femur in the sagittal plane is drawn tangent to the most distal points of the medial and lateral condyles.
Pathophysiology of Sagittal Plane Deformities
Sagittal plane deformities around the knee typically manifest as either a procurvatum or recurvatum. It is vital to differentiate between a bony deformity and a soft tissue contracture, though long standing bony deformities will inevitably lead to secondary soft tissue adaptations.
Differentiating Bony Deformity from Soft Tissue Contracture
A bony procurvatum deformity involves an actual bending of the diaphysis or metaphysis of the femur or tibia. Radiographically, the diaphyseal lines will intersect at an abnormal angle. Clinically, the patient may lack full extension or exhibit a flexed knee gait.
Conversely, a soft tissue flexion contracture occurs when the posterior capsule, hamstrings, or gastrocnemius muscles become fibrotic and shortened. Radiographically, the individual bones may have normal morphology, but the joint itself cannot reach 0 degrees of extension.
Biomechanical Consequences of Uncorrected Deformities
The knee is a complex hinge joint that relies on a delicate balance of ligamentous tension and bony geometry. When a sagittal plane deformity is left uncorrected, the joint undergoes rapid, asymmetric wear.
In the presence of a severe procurvatum deformity, the line of gravity falls posterior to the knee joint center. To maintain an upright posture, the quadriceps must fire continuously, leading to rapid muscle fatigue, anterior knee pain, and eventual patellofemoral arthrosis.
In recurvatum deformities, the line of gravity falls excessively anterior to the knee joint. This forces the posterior capsule and the anterior cruciate ligament to act as the primary restraints against hyperextension. Over time, these soft tissue structures stretch out, leading to dynamic instability and a characteristic back knee thrust during the stance phase of gait.
Comprehensive Management of Procurvatum Deformities
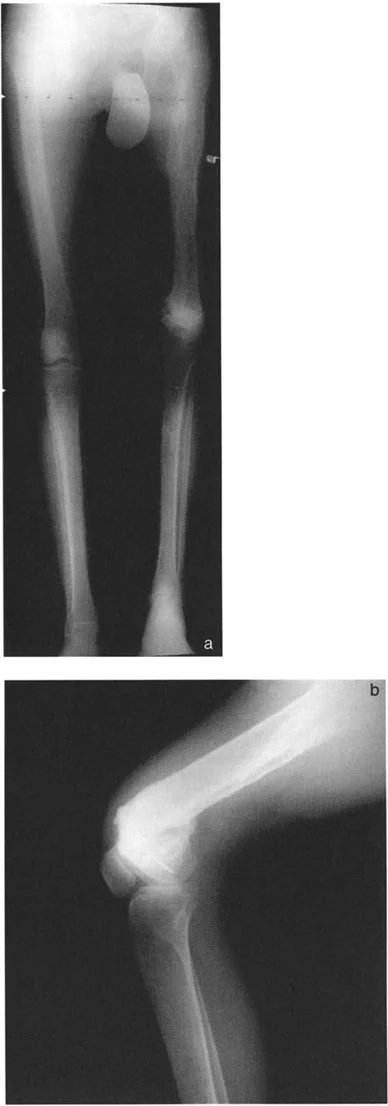
Procurvatum of the distal femur typically results in a compensatory loss of knee extension or a secondary recurvatum thrust during the stance phase of gait. Because the distal femur is bowed anteriorly, the joint line is tilted, forcing the tibia to hyperextend simply to allow the patient to stand upright with a plantigrade foot.
Distal Femoral Procurvatum
When correcting a procurvatum deformity, the surgeon must carefully calculate the Center of Rotation of Angulation. Often, the deformity is juxta-articular, making fixation extremely challenging. The distal segment may be too short to accommodate standard intramedullary nails or plates, requiring the use of circular external fixation or specialized locking plates.
For instance, consider a patient presenting with a severe procurvatum deformity of the femur and a compensatory proximal tibial deformity. A staged, multi-level approach is often necessary to restore normal kinematics.
Surgical Correction Strategies for Procurvatum
Correcting a distal femoral procurvatum requires meticulous preoperative templating. The goal is to restore the Posterior Distal Femoral Angle to approximately 83 degrees.
Step by Step Surgical Approach for Femoral Procurvatum
1. Patient Positioning and Exposure The patient is positioned supine on a radiolucent table. A lateral or subvastus approach is utilized to expose the distal femur.
2. Identifying the Center of Rotation of Angulation Using fluoroscopy, the pre-calculated apex of the deformity is identified. Guide pins are placed parallel to the joint line and perpendicular to the proximal mechanical axis.
3. Executing the Osteotomy A closing wedge or opening wedge osteotomy of the femur is executed at the apex. An anterior closing wedge is common for procurvatum, as it avoids stretching the neurovascular bundle posteriorly.
4. Stabilization The osteotomy is stabilized with an intramedullary nail or a heavy duty locking plate. If the distal segment is less than 3 centimeters, a circular external fixator may be required to achieve adequate purchase.
5. Assessing the Tibia A secondary procedure may involve an osteotomy distal to the tibial tuberosity to correct the proximal tibia compensatory deformity.
6. Patellar Transport If secondary patella baja is present due to prolonged altered mechanics, the patella can be transported proximally using an external fixator to restore normal extensor mechanism tension.
Comprehensive Management of Recurvatum Deformities
Recurvatum of the proximal tibia is a uniquely challenging deformity. Unlike simple angular deviations, proximal tibial recurvatum frequently leads to true posterior subluxation of the knee.
Proximal Tibial Recurvatum and Knee Subluxation
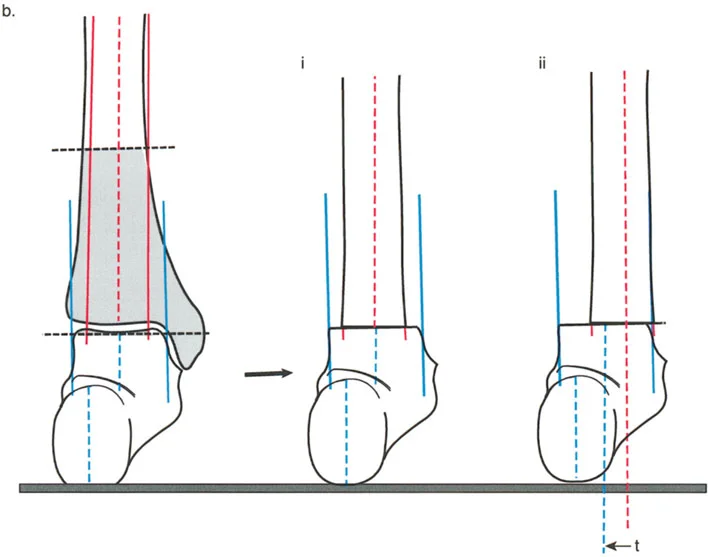
As the tibial plateau tilts posteriorly, resulting in an abnormally high Posterior Proximal Tibial Angle, the anatomical slope is reversed. The femur tends to slide anteriorly down this reversed slope, or conversely, the tibia subluxes posteriorly relative to the femoral condyles.
This creates profound instability, a positive posterior drawer sign, and severe anterior knee pain due to extensor mechanism overload. The quadriceps must work overtime to pull the posteriorly subluxated tibia forward during the swing phase of gait.
The Role of the Tibial Tuberosity in Osteotomy Planning
When planning an osteotomy for tibial recurvatum, the position of the bone cut relative to the tibial tuberosity is the single most critical decision a surgeon will make. The biomechanical consequences of this choice dictate whether the knee subluxation is corrected or worsened.
If the osteotomy is performed proximal to the tibial tuberosity, the tibial plateau is tilted anteriorly to restore the normal slope. However, this does not change the position of the tibial tuberosity relative to the distal tibia.
If the osteotomy is performed distal to the tibial tuberosity, an anterior opening wedge will tilt the entire proximal segment, including the tuberosity, anteriorly. This effectively lengthens the extensor mechanism and can induce a severe patella baja if not carefully managed.
Surgical Pearls for Tibial Tuberosity Management
* For pure bony recurvatum without patella alta, perform the osteotomy proximal to the tuberosity to preserve extensor mechanism kinematics.
* If performing an osteotomy distal to the tuberosity for an opening wedge correction, consider a simultaneous Z-lengthening of the patellar tendon to prevent iatrogenic patella baja.
* Always assess the integrity of the Posterior Cruciate Ligament. Chronic recurvatum often attenuates the Posterior Cruciate Ligament, and a bony correction alone may not fully restore sagittal stability.
Surgical Correction Strategies for Recurvatum
Correcting proximal tibial recurvatum requires an anterior opening wedge osteotomy or a posterior closing wedge osteotomy.
Step by Step Surgical Approach for Tibial Recurvatum
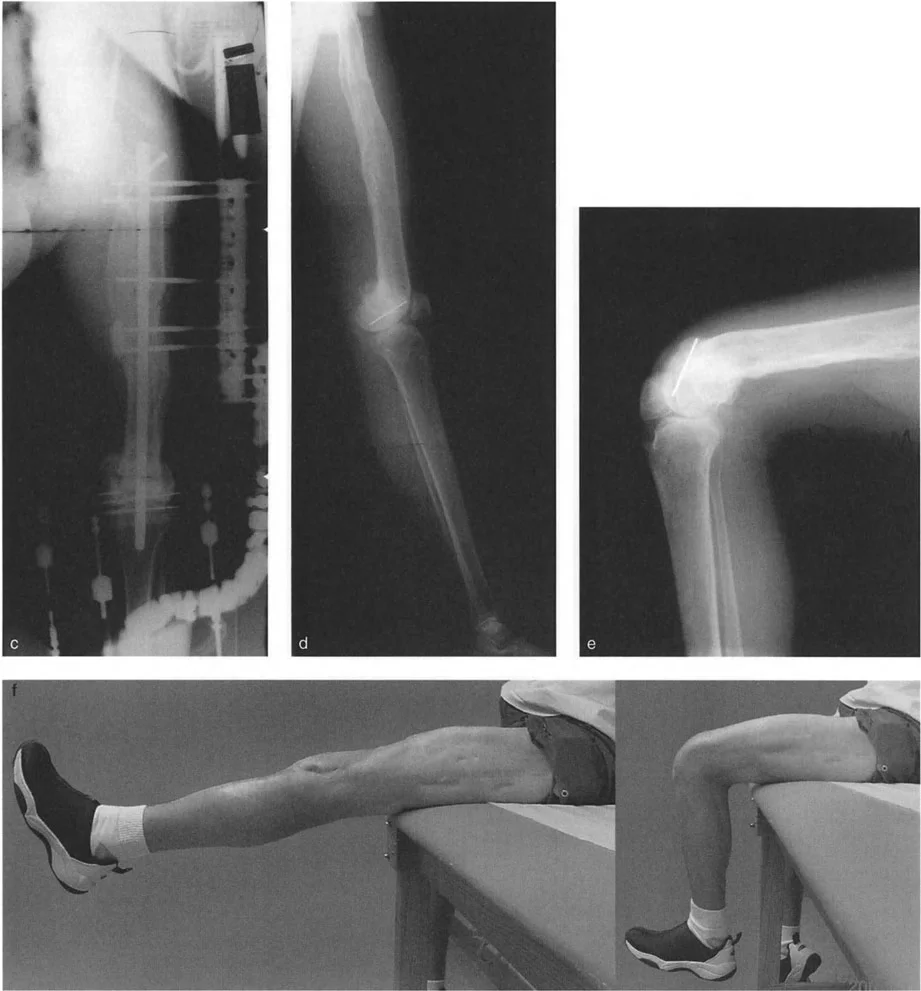
1. Preoperative Templating Calculate the required angle of correction to restore the Posterior Proximal Tibial Angle to 81 degrees. Determine the relationship of the osteotomy to the tibial tuberosity.
2. Fibular Osteotomy Because the fibula acts as a strut, a fibular osteotomy is mandatory to allow angular correction of the tibia. This is typically performed at the junction of the middle and distal thirds to avoid the common peroneal nerve.
3. Tibial Exposure An anterior incision is made. The patellar tendon is identified and protected.
4. Executing the Osteotomy An anterior opening wedge osteotomy is performed. The posterior cortex is carefully preserved to act as a hinge.
5. Gradual Opening The osteotomy is slowly opened using lamina spreaders. Care must be taken not to fracture the posterior cortical hinge, which would lead to translation and instability.
6. Grafting and Fixation The resulting anterior void is filled with structural allograft or autograft. The construct is stabilized with a proximal tibial locking plate.
Knee Extension Contractures and the Extensor Mechanism
While bony deformities dictate the skeletal architecture of the sagittal plane, soft tissue contractures of the extensor mechanism present an equally formidable challenge. Severe knee extension contractures completely eliminate the swing phase of gait, forcing the patient to circumduct the affected limb.
Etiology of Knee Extension Contractures
Knee extension contractures typically arise from severe femoral trauma, prolonged immobilization, or multiple prior surgical interventions. The pathophysiology involves dense, fibrotic adhesions binding the quadriceps muscle to the underlying femoral diaphysis, obliterating the normal gliding planes.
Furthermore, the medial and lateral gutters of the knee joint become scarred, the patellofemoral joint space is replaced by fibrous tissue, and the rectus femoris undergoes adaptive shortening.
Preoperative Assessment of the Extensor Mechanism
Before attempting surgical release, a thorough clinical and radiographic evaluation is required.
- Clinical Assessment Determine the absolute maximum degrees of active and passive flexion. Assess patellar mobility. A completely immobile patella indicates severe intra-articular and extra-articular adhesions.
- Radiographic Assessment Evaluate for patella alta or baja. Obtain a CT scan to rule out bony blocks to flexion, such as heterotopic ossification or malunited femoral fractures protruding anteriorly.
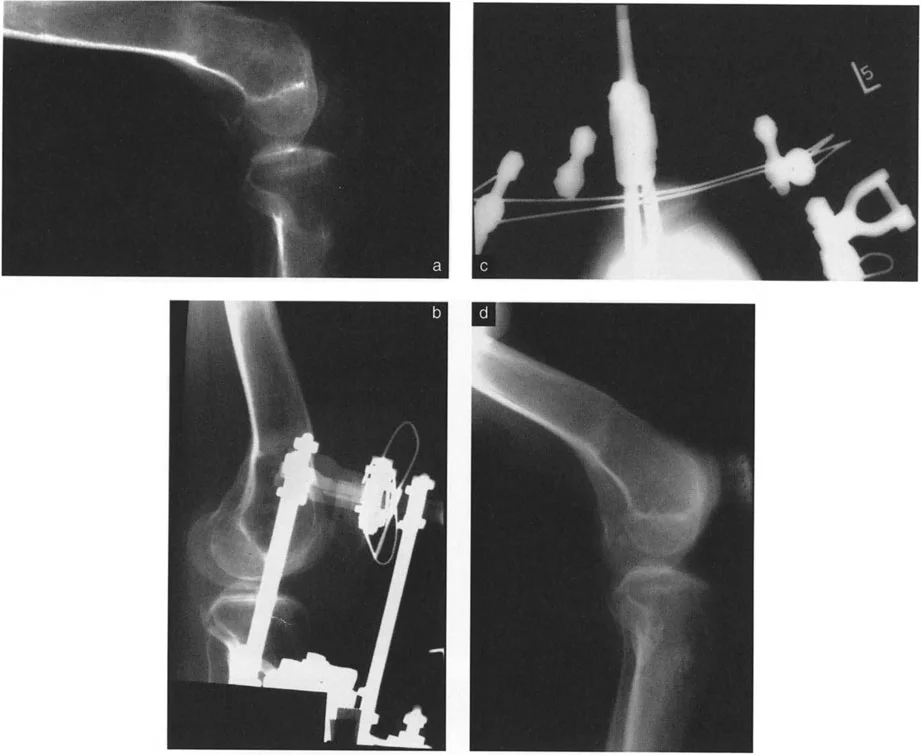
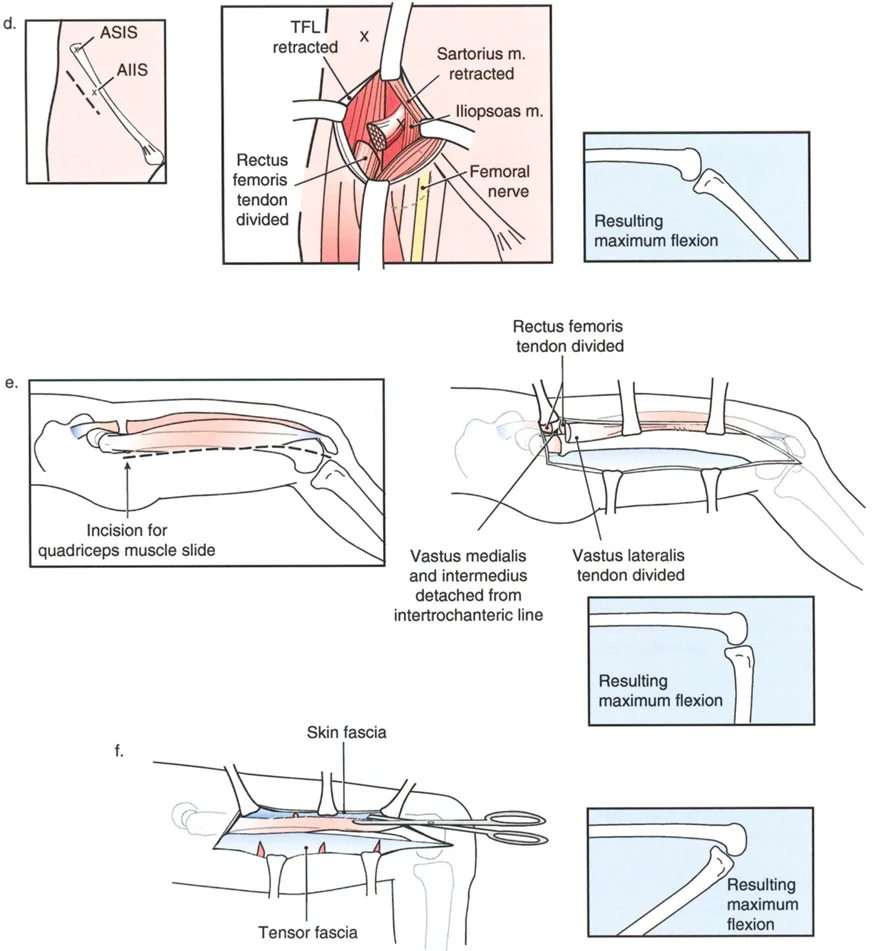
The Paley Modification of the Judet Quadricepsplasty
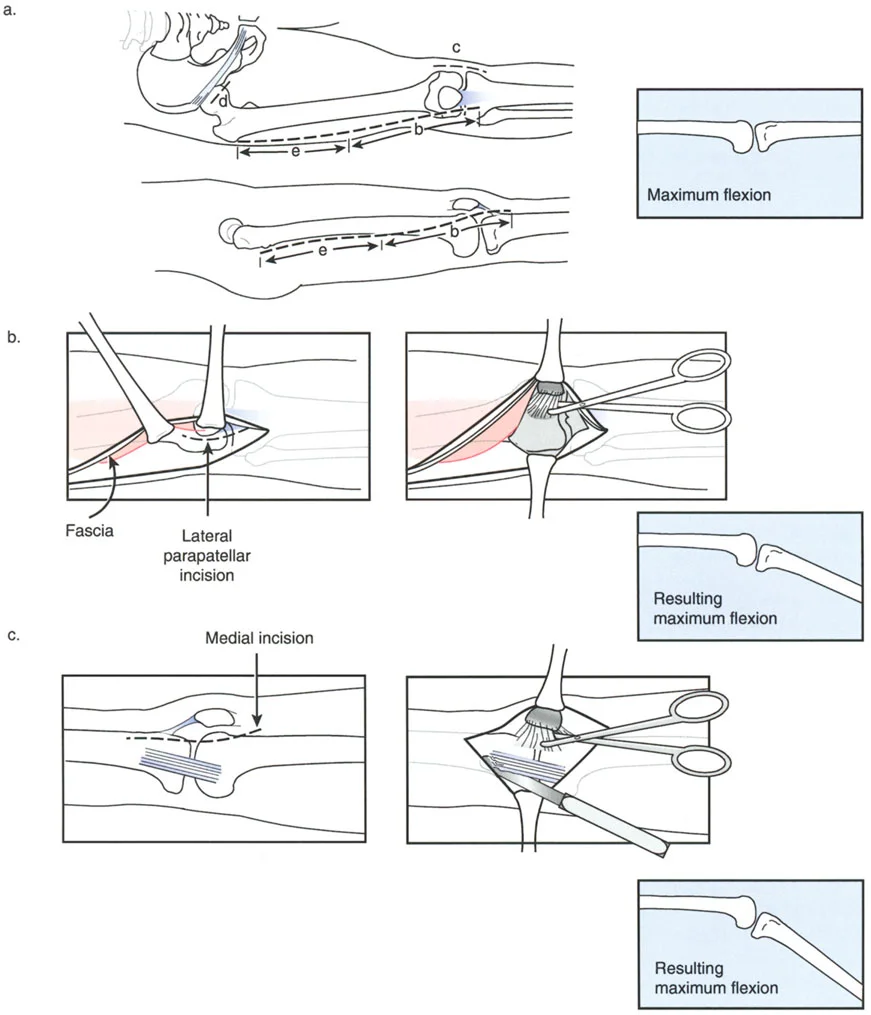
The traditional Judet Quadricepsplasty is a massive, open surgical procedure that involves stripping the entire vastus lateralis and vastus intermedius from the femur. While effective at restoring flexion, it carries a high risk of wound necrosis, hematoma, and extensor lag.
Dr. Dror Paley introduced a brilliant modification to this classic procedure. The Paley modification utilizes a minimally invasive, sequential release combined with the application of a circular external fixator. This allows for gradual, controlled fractional lengthening of the extensor mechanism, mitigating the risks of acute skin necrosis and catastrophic quadriceps rupture.
Indications for Quadricepsplasty
The Paley modification is indicated for patients with severe, rigid extension contractures of the knee (typically less than 30 degrees of total flexion) who have failed aggressive physical therapy and manipulation under anesthesia. It is particularly useful in patients with compromised soft tissue envelopes from prior trauma.
Step by Step Surgical Technique
The Paley modification follows a strict, sequential protocol. The surgeon only proceeds to the next phase if the desired intraoperative flexion is not achieved.
Phase 1 Percutaneous Adhesiolysis and Rectus Release
1. Small stab incisions are made over the medial and lateral gutters of the patella.
2. A specialized elevator is introduced to bluntly break up adhesions between the patella, the femoral condyles, and the gutters.
3. The rectus femoris tendon is identified proximally near the anterior inferior iliac spine and released percutaneously if tight.
Phase 2 Minimally Invasive Vastus Intermedius Release
1. If flexion remains inadequate, a limited lateral incision is made.
2. An elevator is passed deep to the vastus intermedius, elevating it off the anterior femur. This breaks the primary fibrotic tether preventing the muscle from gliding.
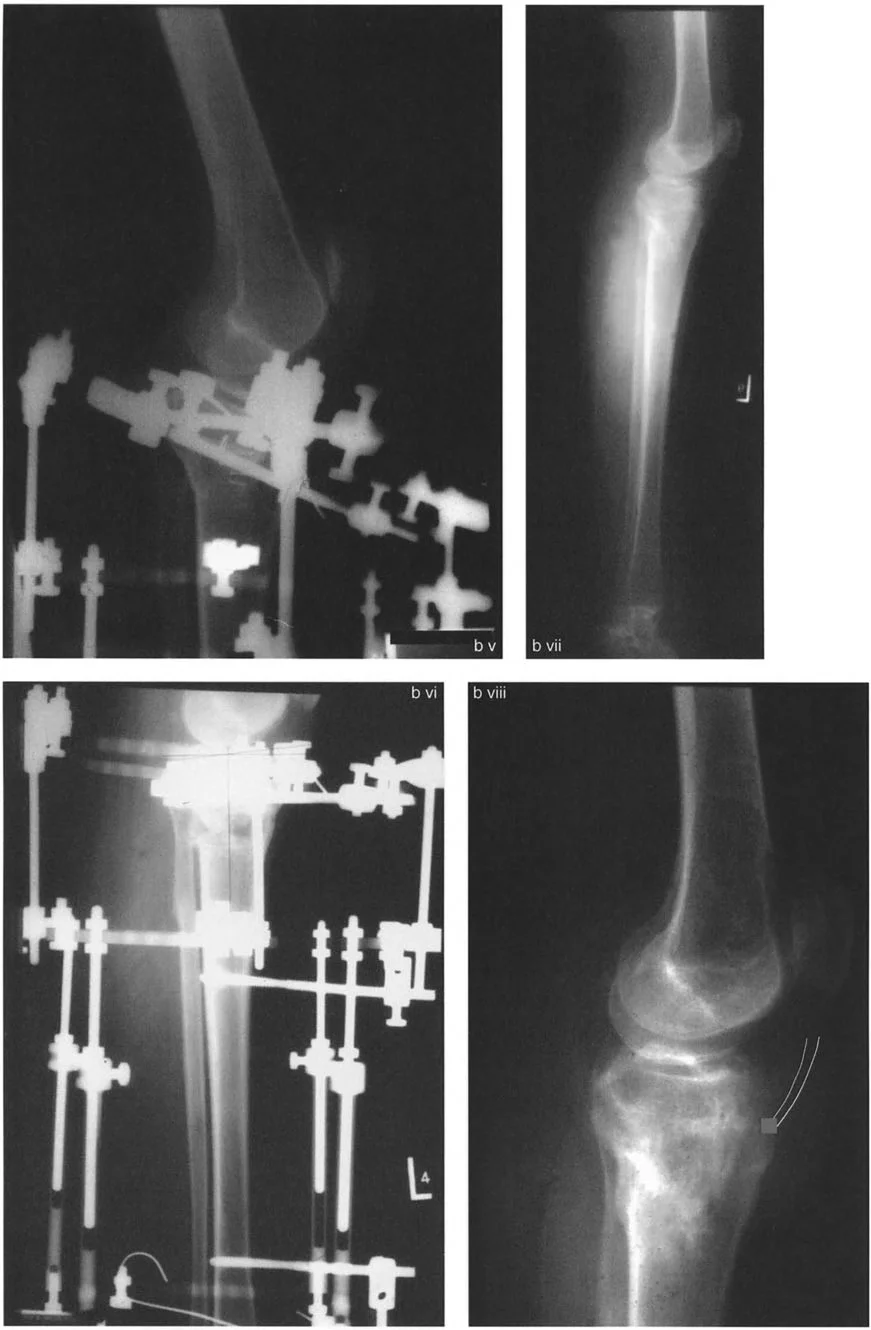
Phase 3 Application of External Fixation
1. Unlike the traditional Judet, which relies on acute intraoperative bending, Paley utilizes a circular external fixator (such as the Ilizarov or Taylor Spatial Frame).
2. Wires and half-pins are placed in the distal femur and proximal tibia.
3. Hinges are placed precisely at the anatomical axis of rotation of the knee joint.
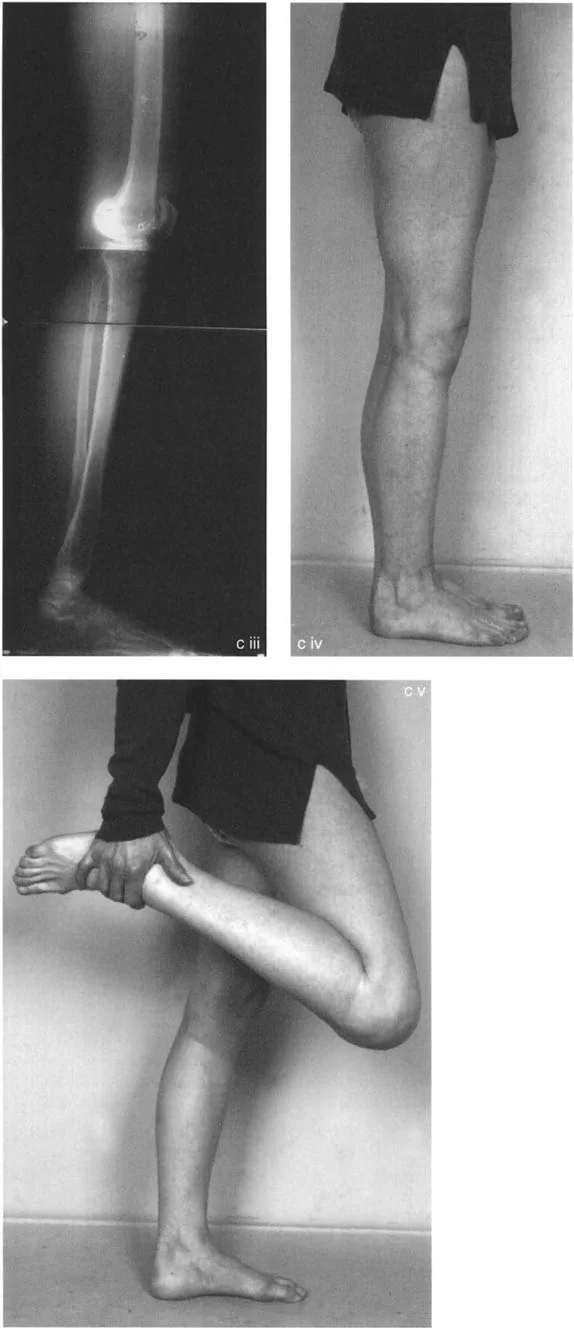
Phase 4 Gradual Distraction and Flexion
1. Postoperatively, the external fixator is used to gradually flex the knee at a rate of 1 to 2 degrees per day.
2. This slow, continuous stretch induces biological creep in the fibrotic quadriceps muscle and overlying skin, preventing acute rupture and wound dehiscence.
Postoperative Rehabilitation Protocol
The success of a quadricepsplasty relies heavily on the postoperative rehabilitation phase.
During the gradual distraction phase in the external fixator, the patient is encouraged to perform active assisted range of motion within the limits of the frame. Once the target flexion (typically 90 to 110 degrees) is achieved, the frame is locked in flexion at night and allowed to move freely during the day.
Aggressive pain management, often utilizing continuous peripheral nerve blocks or epidural analgesia, is mandatory to allow the patient to tolerate the intensive physical therapy required to maintain the newly acquired motion.
Complications and Salvage Procedures
Deformity correction in the sagittal plane is fraught with potential complications. The sheer biomechanical forces acting on the knee joint make hardware failure, loss of correction, and soft tissue complications a constant threat.
Managing Iatrogenic Patella Baja and Alta
As discussed previously, altering the sagittal alignment of the tibia can dramatically impact patellar height.
Iatrogenic patella baja occurs when the tibial tuberosity is distalized or when an anterior opening wedge osteotomy is performed distal to the tuberosity without lengthening the patellar tendon. This leads to severe anterior knee pain, restricted range of motion, and accelerated patellofemoral arthritis.
If patella baja is recognized intraoperatively, the surgeon must immediately perform a Z-lengthening of the patellar tendon or alter the osteotomy cut. If recognized postoperatively, salvage procedures involve a tibial tuberosity osteotomy with proximal translation and rigid screw fixation.
Conversely, patella alta can occur if the patellar tendon is over-lengthened or if a closing wedge osteotomy is performed distal to the tuberosity. This leads to patellar instability and subluxation. Management requires a distalizing tibial tuberosity osteotomy.
Addressing Hardware Failure and Nonunion
Sagittal plane osteotomies, particularly opening wedge corrections for recurvatum, create large structural voids that are slow to heal.
Surgical Pearls for Preventing Nonunion
* Always use structural allograft or autograft to fill opening wedge defects larger than 10 millimeters.
* Ensure the posterior cortical hinge remains intact during tibial osteotomies. A fractured hinge drastically reduces the inherent stability of the construct.
* Utilize heavy duty, locking plate technology. Standard non-locking plates cannot withstand the immense cantilever bending forces exerted by the quadriceps and hamstrings during early mobilization.
If a nonunion occurs, the surgeon must aggressively intervene with hardware removal, debridement of the nonunion site, application of orthobiologics (such as bone morphogenetic protein or iliac crest bone graft), and revision fixation, often utilizing an intramedullary nail or a circular external fixator to provide superior biomechanical stability.
!!! info "Academic Resource & Medical Review"
This academic resource was prepared and medically reviewed by Prof. Dr. Mohammed Hutaif, Consultant Orthopedic & Spine Surgeon. It is formulated specifically for medical students, orthopedic residents, and surgeons preparing for high-stakes board examinations (AAOS, FRCS Tr & Orth, Arab Board).
!!! warning "Disclaimer"
The surgical techniques, classifications, and clinical guidelines presented herein are for educational and academic review purposes only. They are not intended to replace institutional protocols or independent clinical judgment.
You Might Also Like