Mastering Orthopedic Deformity Correction: Hardware, Osteotomy, FAN & LON Techniques
Key Takeaway
Orthopedic deformity correction uses specific hardware and osteotomy. Techniques like Fixator-Assisted Nailing (FAN) and Lengthening Over a Nail (LON), guided by Paley principles (MAD, CORA), ensure precise limb alignment. This reduces external fixation time, improving patient comfort.
Hardware and Osteotomy Considerations in Deformity Correction
The evolution of orthopedic deformity correction has been profoundly shaped by the integration of internal and external fixation techniques. While traditional Ilizarov methods utilizing purely external circular fixation remain a cornerstone of limb reconstruction, the modern orthopedic surgeon must be adept at hybrid techniques. Fixator-Assisted Nailing (FAN) and Lengthening Over a Nail (LON) represent a paradigm shift, significantly reducing the External Fixation Index (EFI), improving patient comfort, and minimizing the risk of axial deviation during the consolidation phase.
This comprehensive guide delves into the hardware and osteotomy considerations necessary for executing complex deformity corrections. Rooted firmly in the principles established by Dr. Dror Paley, this chapter explores the preoperative planning, biomechanics, and intraoperative execution required for single-level, multi-level, and multi-planar corrections of the femur and tibia.
Foundational Principles of Deformity Correction
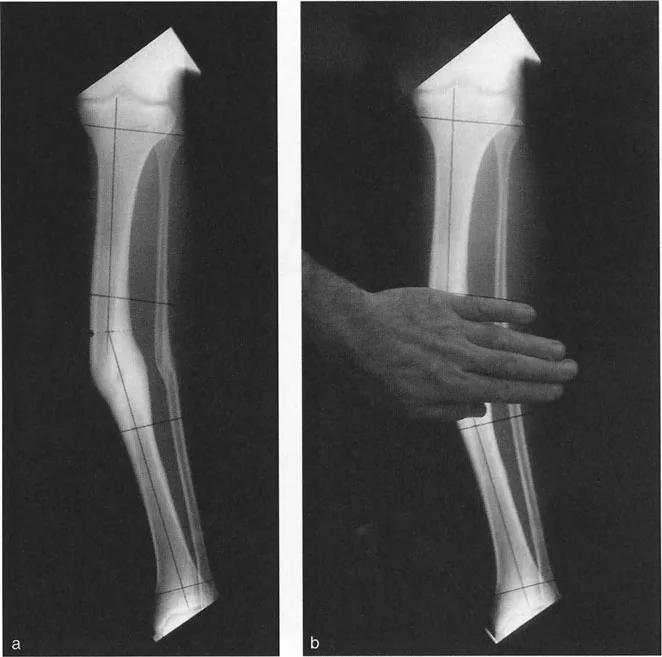
Before selecting hardware or determining the level of an osteotomy, the surgeon must master the geometric principles of deformity analysis. Dr. Paley’s systematic approach relies on identifying the Mechanical Axis Deviation (MAD) and pinpointing the Center of Rotation of Angulation (CORA).
Mechanical Axis Deviation and Joint Orientation Angles
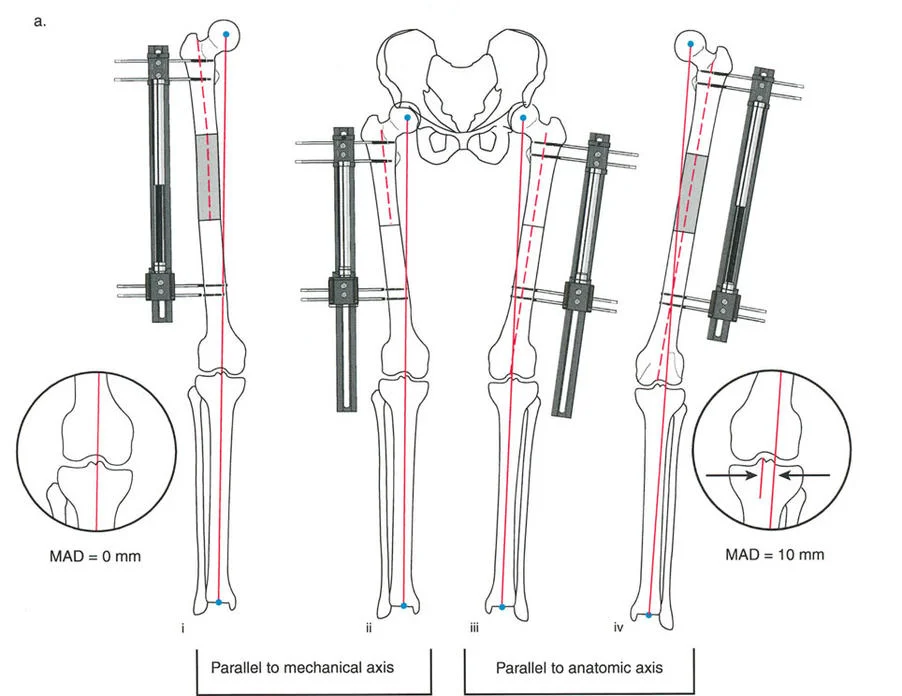
The mechanical axis of the lower extremity is a line drawn from the center of the femoral head to the center of the ankle joint. In a normal limb, this line passes slightly medial to the center of the knee joint. MAD occurs when this axis is shifted medially (varus) or laterally (valgus).
To correct MAD, the surgeon must evaluate the joint orientation angles. These angles define the relationship between the anatomic or mechanical axes of the long bones and their respective joint lines.
| Joint Orientation Angle | Abbreviation | Normal Value Range | Clinical Significance |
|---|---|---|---|
| Mechanical Lateral Distal Femoral Angle | mLDFA | 85° - 90° (avg 88°) | Determines distal femoral varus/valgus. |
| Mechanical Proximal Tibial Angle | MPTA | 85° - 90° (avg 87°) | Determines proximal tibial varus/valgus. |
| Joint Line Congruency Angle | JLCA | 0° - 2° | Evaluates ligamentous laxity or intra-articular deformity. |
| Lateral Distal Tibial Angle | LDTA | 86° - 92° (avg 89°) | Determines ankle mortise orientation. |
The Center of Rotation of Angulation CORA
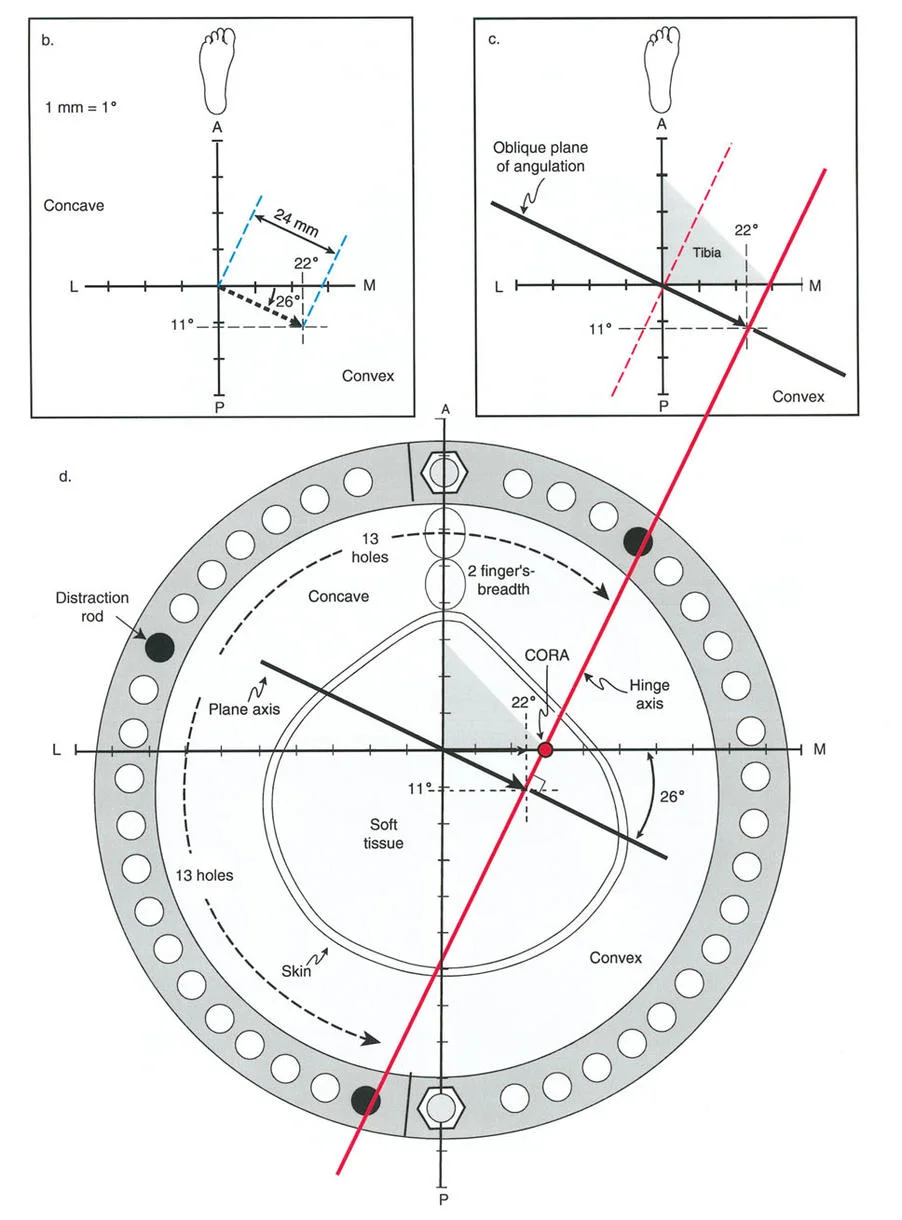
The CORA is the intersection of the proximal and distal mechanical (or anatomic) axis lines of a deformed bone. Identifying the CORA is the most critical step in preoperative planning, as it dictates the osteotomy rule to be applied.
Paley Osteotomy Rules
The relationship between the osteotomy rule, the CORA, and the hardware chosen will determine whether the bone translates, angulates, or both during correction.
- Osteotomy Rule 1: When the osteotomy passes through the CORA and the hinge (Axis of Rotation - ACA) is placed at the CORA, pure angulation occurs without translation. The mechanical axis is restored perfectly.
- Osteotomy Rule 2: When the osteotomy is made at a level separate from the CORA, but the hinge (ACA) remains at the CORA, the correction will result in angulation and intentional translation. This is often required when the CORA is juxta-articular, but the osteotomy must be placed in the diaphysis for hardware purchase.
- Osteotomy Rule 3: When the osteotomy and the hinge (ACA) are both separated from the CORA, the correction will result in a secondary translation deformity, shifting the mechanical axis parallel to, but not collinear with, the desired axis.
Fixator Assisted Nailing FAN Techniques
Fixator-Assisted Nailing (FAN) is a powerful technique utilized for acute deformity correction. The principle is elegant: an external fixator (monolateral or circular) is applied temporarily during surgery to achieve and hold the exact correction (angulation, translation, rotation, and length). Once the perfect alignment is confirmed fluoroscopically, an intramedullary nail is inserted and locked to provide permanent internal stability, after which the external fixator is removed.
Indications for Fixator Assisted Nailing
FAN is ideal for mature bones requiring acute correction of angular or rotational deformities where no significant lengthening is required. It is particularly useful for diaphyseal and metaphyseal malunions.
Executing the FAN Procedure
The successful execution of FAN requires meticulous attention to hardware placement to avoid conflicts between the temporary fixator pins and the permanent intramedullary nail.
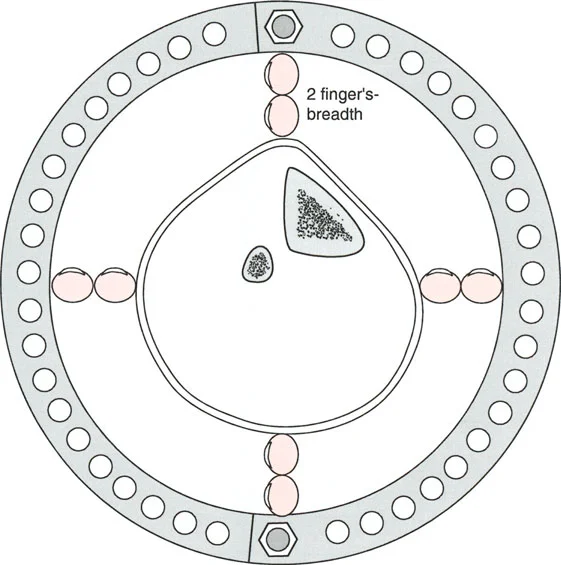
- Pin Placement: Half-pins for the external fixator must be placed outside the planned trajectory of the intramedullary nail. In the femur, pins are typically placed anteriorly or anterolaterally.
- Osteotomy Execution: A multiple drill-hole technique or a Gigli saw is preferred to minimize thermal necrosis.
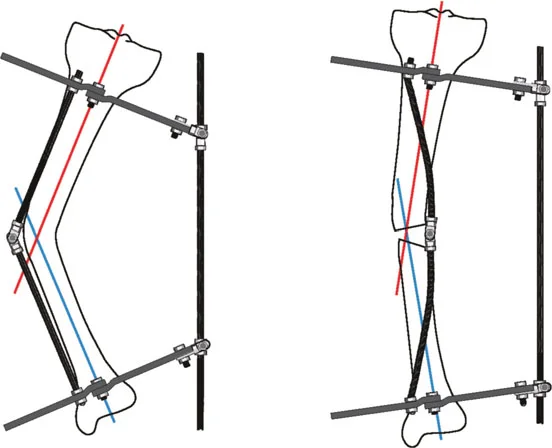
- Acute Correction: The external fixator is manipulated to correct the deformity. For a pure angular correction at the CORA, a focal dome osteotomy is preferred as it provides inherent bony stability and maximizes bone contact.
- Derotation Considerations: If a rotational correction is required, a straight transverse cut is mandatory. A dome osteotomy cannot be derotated without creating severe bony incongruity.
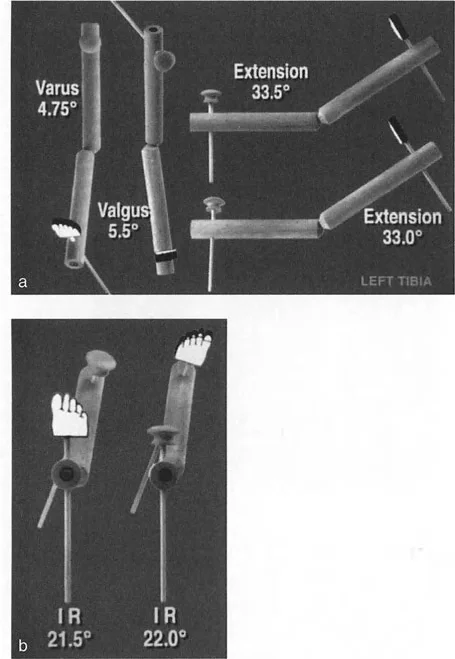
- Nailing: Once the mLDFA and MPTA are restored (e.g., aiming for an mLDFA of 88° and an MPTA of 90°), the bone is reamed and the nail is inserted and locked.

Case Application Two Level Femoral and Tibial FAN
Consider a complex case requiring a two-level femoral osteotomy. If the first osteotomy is designed purely for angular correction, a focal dome cut is utilized and stabilized temporarily with a Steinmann pin. If the second osteotomy requires derotation alongside valgusization, a straight transverse cut is mandatory.
Once the external fixator maintains the complete correction and an intraoperative mLDFA of 88° is confirmed, a retrograde intramedullary nail is inserted. A similar approach can be applied to the tibia, utilizing a proximal diaphyseal focal dome cut for angulation and a distal diaphyseal straight cut (via Gigli saw) for acute external rotation correction, aiming for an MPTA of 90°.
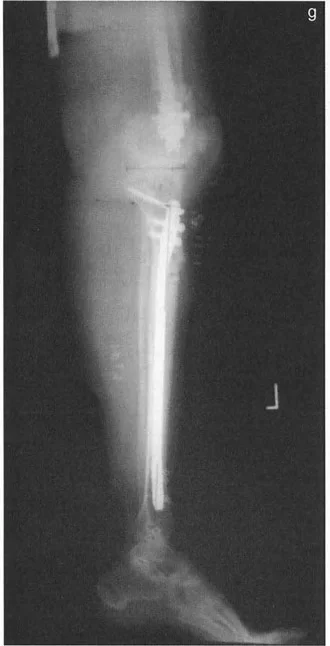
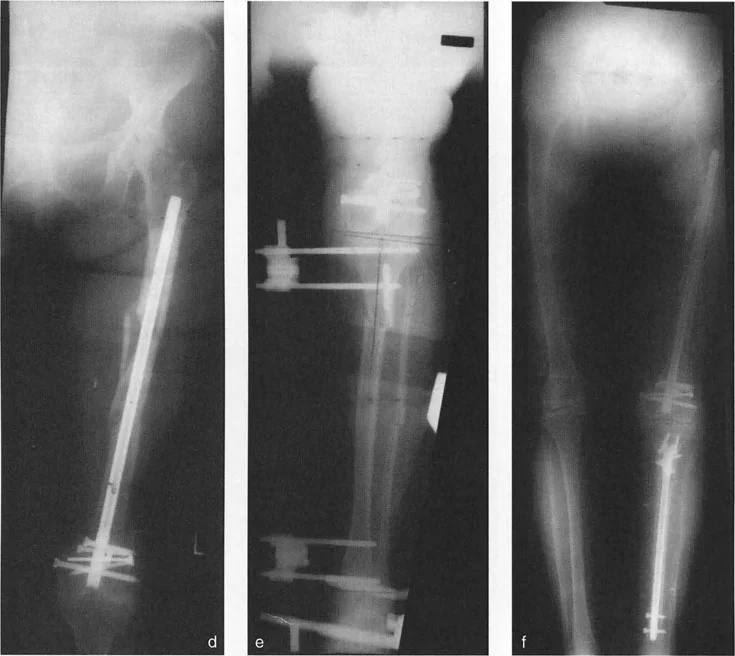
Lengthening Over a Nail LON Biomechanics and Technique
Lengthening Over a Nail (LON) combines the biological advantages of distraction osteogenesis via external fixation with the mechanical stability of intramedullary nailing. The primary goal of LON is to drastically reduce the time the patient spends in the external fixator. The fixator is used only for the distraction phase; once the desired length is achieved, the nail is locked distally, and the frame is removed. The nail protects the regenerate bone during the lengthy consolidation phase.
Femoral Lengthening Over a Nail
Femoral LON requires precise surgical sequencing to prevent catastrophic complications, such as deep intramedullary infection caused by pin-track contamination.
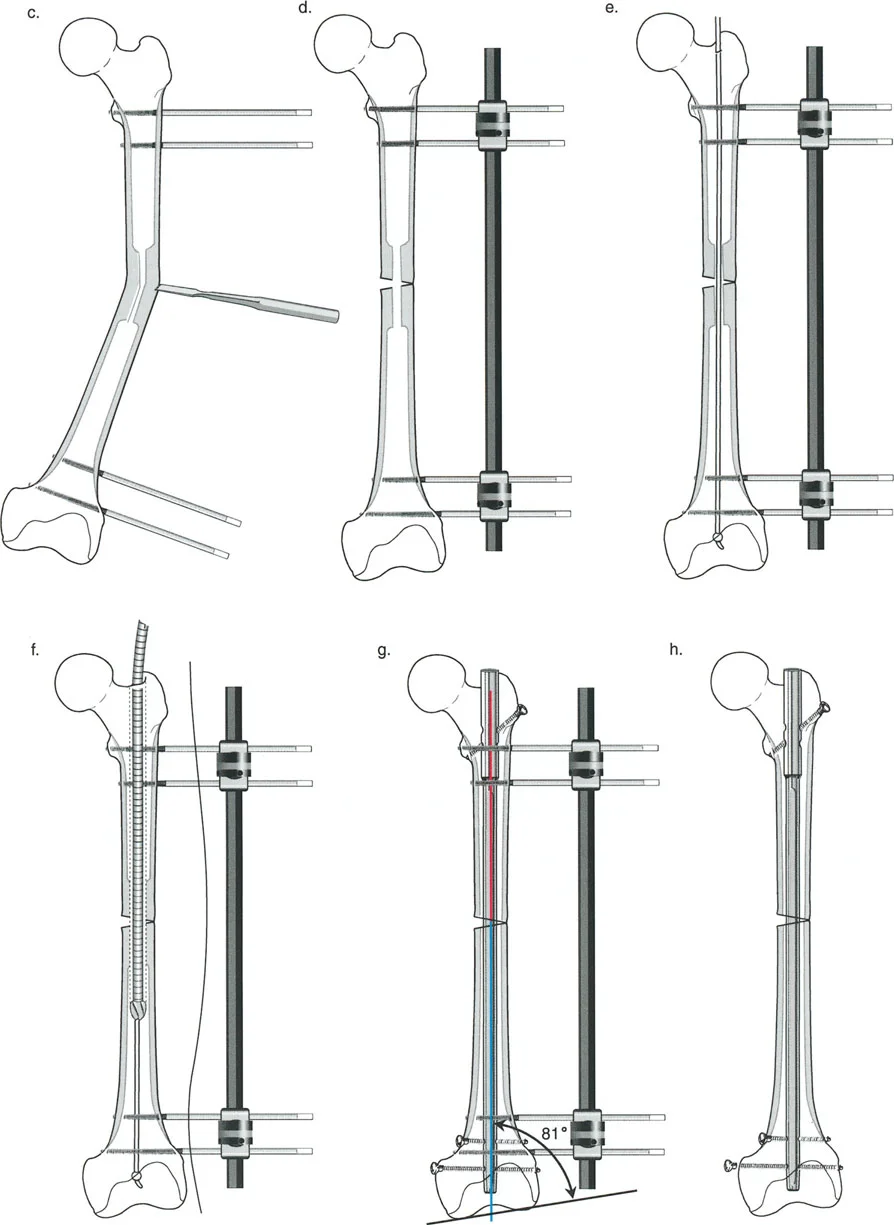
Step by Step Femoral LON Preparation
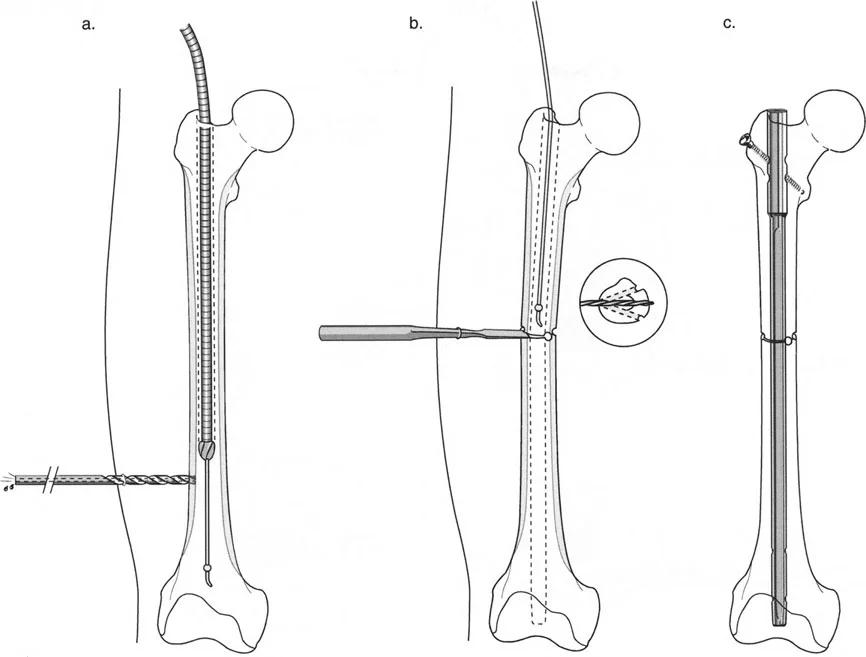
- Decompression and Reaming: The femur must be decompressed with a cannulated drill prior to reaming to prevent fat embolism. The canal is then over-reamed by 2 mm greater than the diameter of the intended nail. This over-reaming is critical; it allows the bone segments to slide smoothly over the nail during the distraction phase without binding.
- Osteotomy: After pulling back the guidewire to protect it, a multiple drill-hole osteotomy is performed at the planned diaphyseal or metaphyseal level.
- Nail Insertion: An antegrade nail is inserted and locked proximally. It is left unlocked distally.
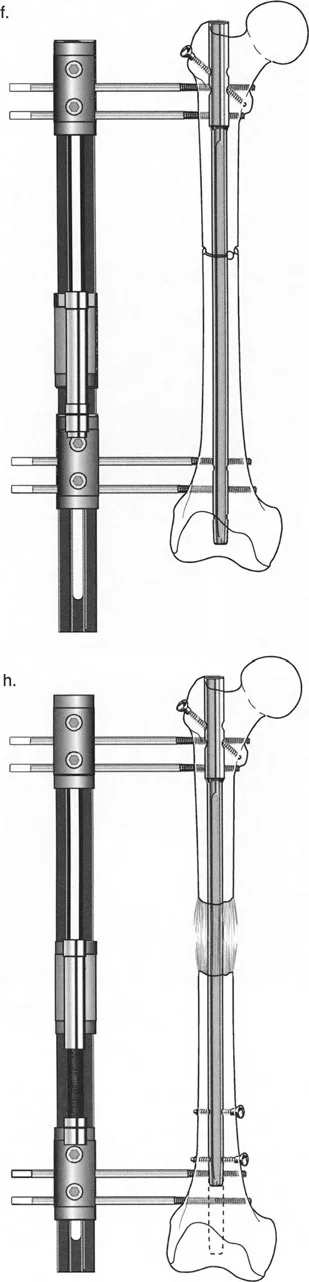
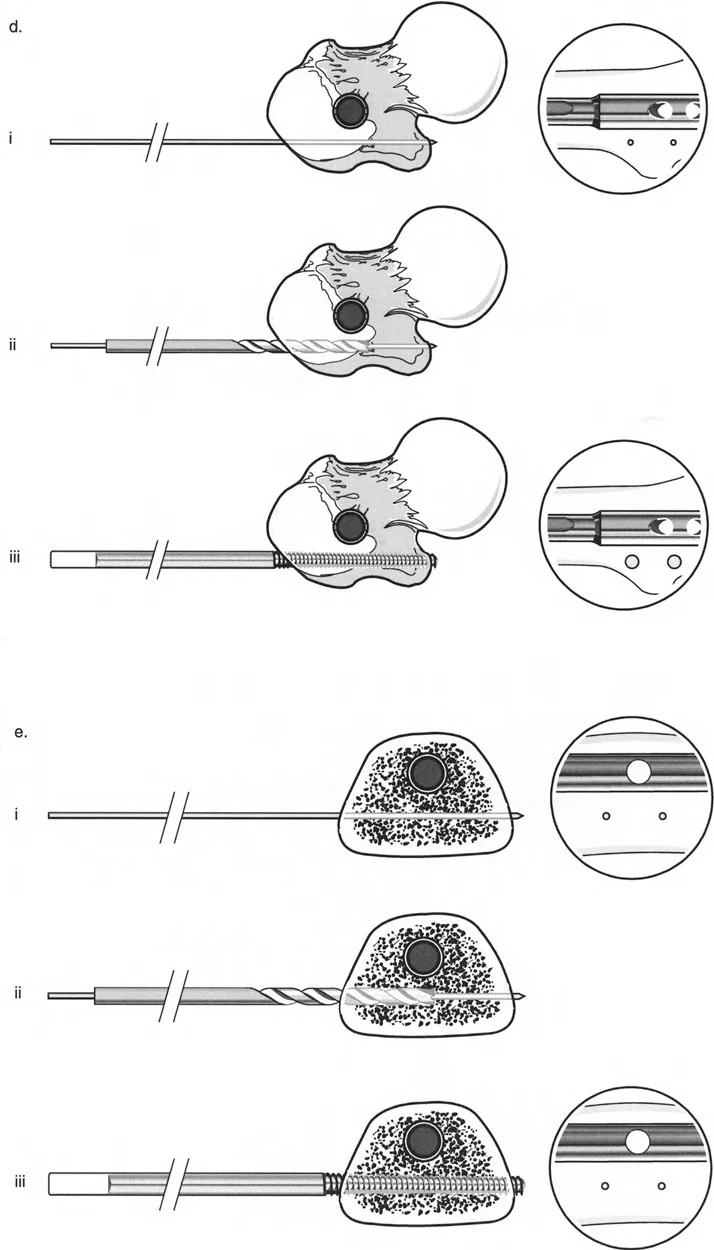
The Cannulated Drill Technique for Half Pins
The most significant risk in LON is the contact between the external fixator half-pins and the intramedullary nail. If a pin touches the nail, any superficial pin-site infection can track directly into the medullary canal, resulting in a devastating deep infection.
To prevent this, the cannulated drill technique is mandatory:
1. Confirm the location of a K-wire with the image intensifier, ensuring it passes anterior or posterior to the nail.
2. Ream over the K-wire with a 4.8-mm cannulated drill bit.
3. Insert the half-pin through the pre-drilled hole.
4. Confirm clearance between the pin and the intramedullary rod in multiple fluoroscopic views.
Distraction and Locking Phase
Distraction is carried out at the standard rate of 1 mm per day (divided into four 0.25 mm increments). Once the desired length is achieved, the patient returns to the operating room. The nail is locked distally.
Surgical Pearl: Lock the nail from the medial side of the femur. Because the external fixator half-pins were placed laterally or anterolaterally, utilizing a medial approach for the distal locking screws avoids the contaminated lateral pin tracks, further reducing infection risk.
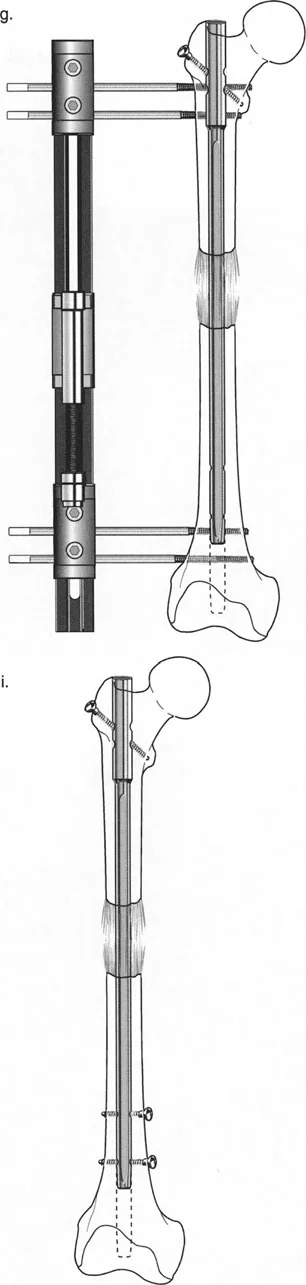
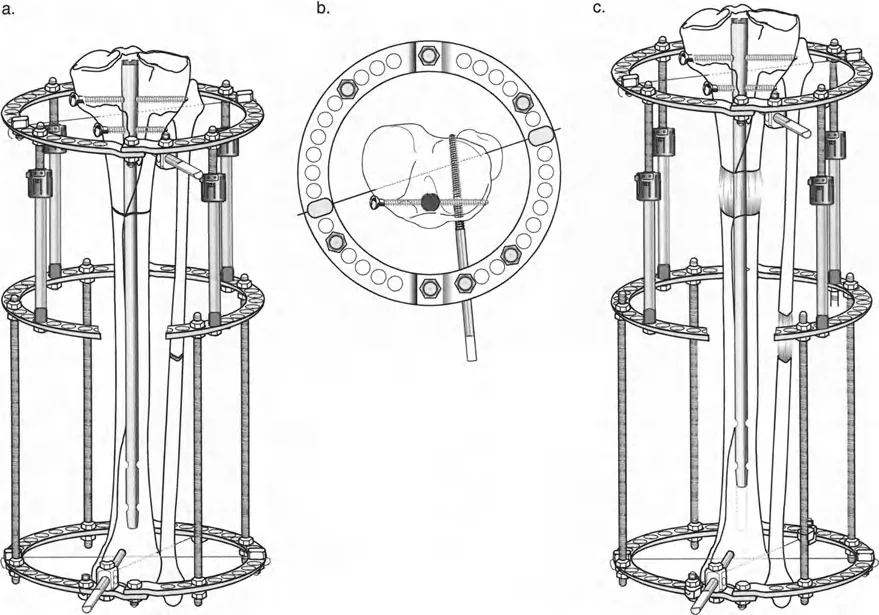
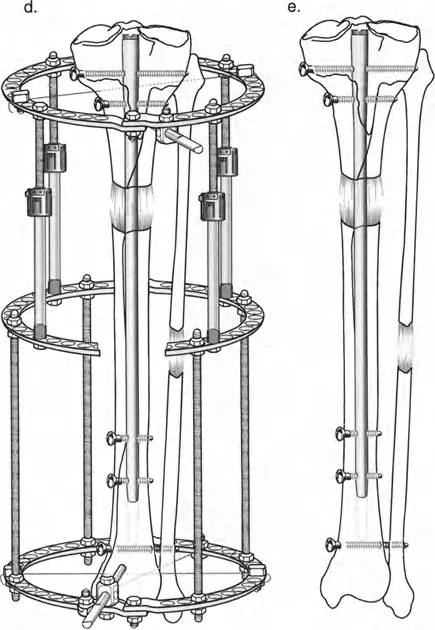
Tibial Lengthening Over a Nail
Tibial LON shares the same fundamental principles as femoral LON but introduces complexities related to the fibula, the interosseous membrane, and the ankle joint.
Tibial Hardware Configuration
After reaming and performing a multiple drill-hole osteotomy of both the tibia and the fibula, an antegrade tibial nail is inserted. The nail is locked proximally. Crucially, the nail must be sized slightly short to leave adequate metaphyseal room for the distal external fixator pins.
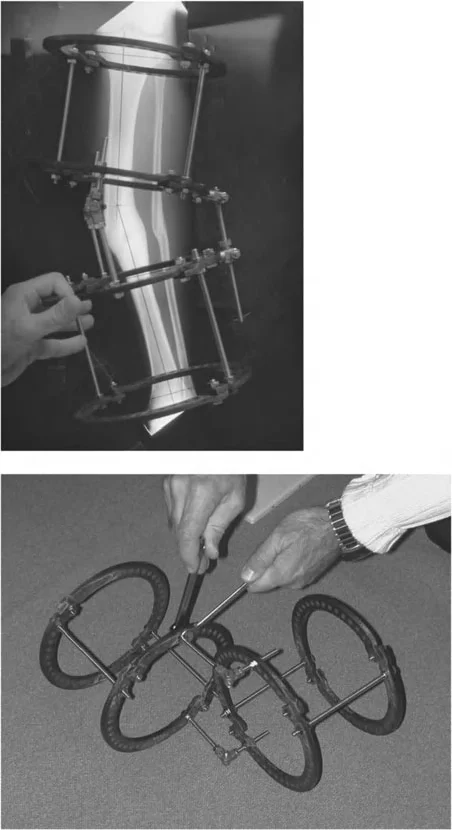
A circular external fixator (Ilizarov or hexapod) is typically applied, utilizing a combination of tensioned fine wires and half-pins.
Management of the Fibula and Syndesmosis
The fibula must be securely fixed to the tibia to prevent proximal migration during lengthening. As the tibia is lengthened, the soft tissues, particularly the interosseous membrane, exert a massive tensile force on the distal fibula.
- Proximal Fixation: A transfibulo-tibial wire is utilized at the proximal level, fixing the fibula to the tibia posterior to the intramedullary nail.
- Distal Fixation: Once the lengthening goal is achieved and the tibial nail is locked distally (from the medial side), a cannulated syndesmotic screw must be inserted to secure the distal fibula to the distal tibia. Failure to place this screw will almost certainly result in proximal migration of the lateral malleolus, leading to a catastrophic valgus collapse of the ankle mortise.
Equinus Contracture Prevention
Tibial lengthening severely stretches the gastrocnemius-soleus complex. To prevent a rigid equinus contracture, the circular frame should frequently be extended to include the foot, holding the ankle in a neutral (90°) position throughout the distraction phase.
Managing Complex Multilevel and Multiplanar Deformities
Severe deformities rarely exist in a single plane or at a single level. Osteomalacia, severe osteoporosis, or complex malunions often present with combined coronal (varus/valgus) and sagittal (procurvatum/recurvatum) deformities spanning the diaphysis and metaphysis.
Preoperative Planning for Multilevel Deformity
Consider a patient with marked osteoporosis presenting with diaphyseal varus, distal metaphyseal valgus, and multilevel procurvatum bowing of the femur, combined with a valgus and recurvatum deformity of the proximal tibia.
A single osteotomy cannot correct this. The surgeon must plot the mechanical axis and identify multiple CORAs. In such a severe case, a three-level femoral osteotomy may be required: two osteotomies to address the frontal plane deformities and a third to address the sagittal plane procurvatum. The tibia may require a separate focal dome osteotomy.
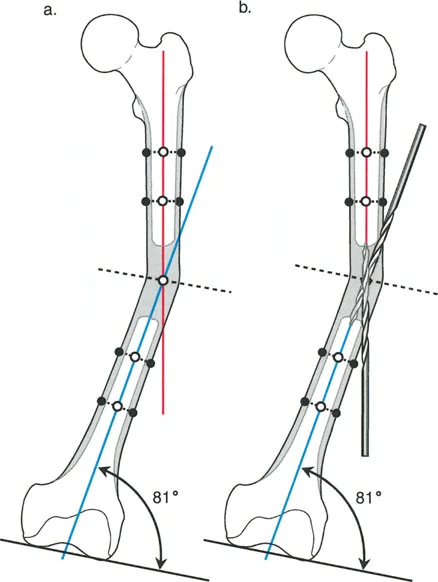
The Role of Blocking Screws Poller Screws
When performing multilevel osteotomies over an intramedullary nail, particularly in the wide metaphyseal regions of the distal femur or proximal tibia, the nail will naturally seek the path of least resistance. This can result in a loss of reduction and a recurrence of the deformity.
Blocking screws (Poller screws) are essential hardware components in these scenarios. Placed adjacent to the nail in the concavity of the deformity, these screws artificially narrow the medullary canal. They act as internal fulcrums, forcing the nail into the center of the epiphysis/metaphysis and rigidly maintaining the acute correction achieved during surgery.
Correcting Mal Nonunions with Leg Length Discrepancy
A challenging clinical scenario arises when a patient presents with an angular mal-nonunion combined with a significant Leg Length Discrepancy (LLD). For example, a varus mal-nonunion of the subtrochanteric femur resulting in a 4-cm shortening.
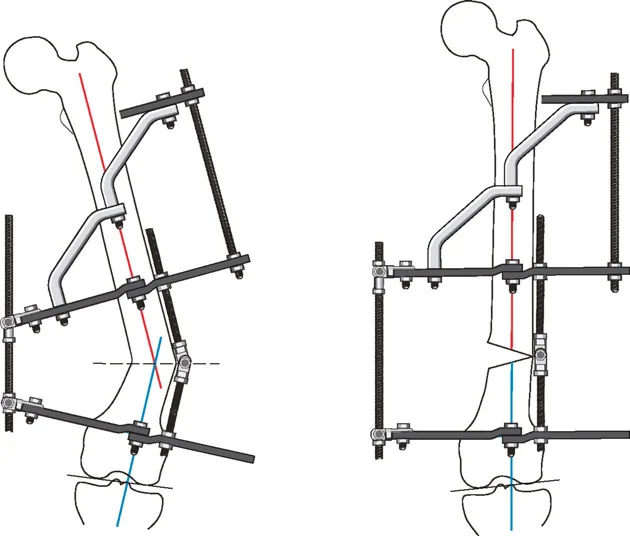
Combining FAN and LON
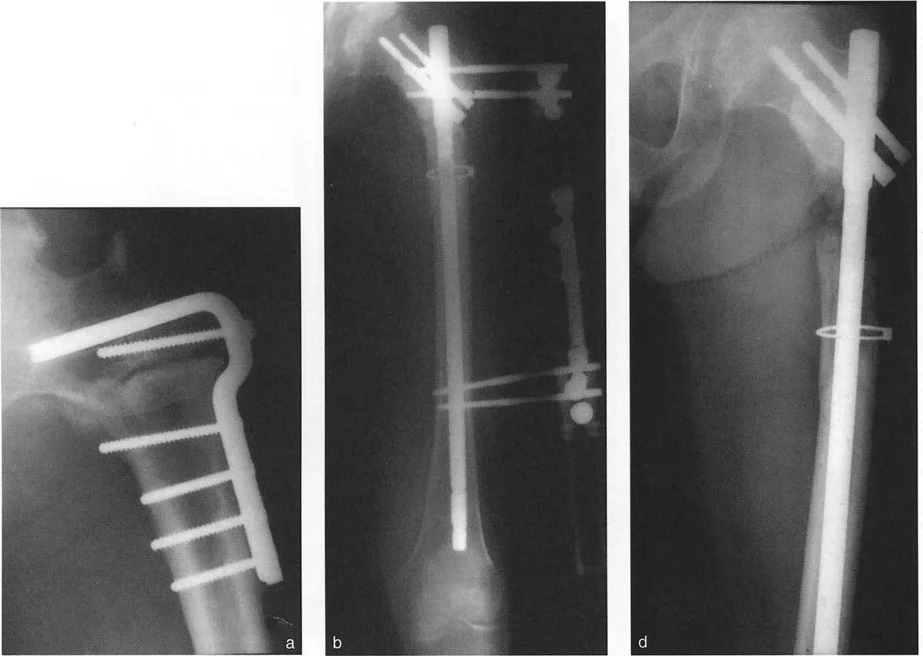
In these instances, the surgeon can combine the principles of FAN and LON.
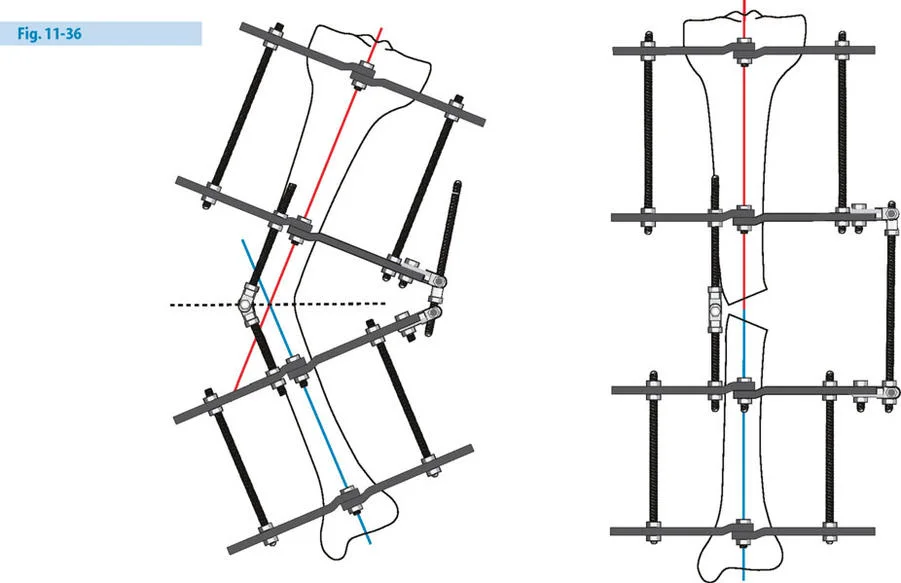
1. Acute Correction: A monolateral external fixator is applied. The nonunion site is taken down, and a subtrochanteric osteotomy is performed. The varus angulation and lateral translation are acutely corrected using the fixator.
2. Internal Fixation: A reconstruction nail is inserted to stabilize the nonunion site.
3. Gradual Lengthening: Instead of removing the fixator (as would be done in a standard FAN procedure), it is left in place. The acute correction of the nonunion heals, while the osteotomy site is gradually distracted at 1 mm per day to overcome the 4-cm LLD.
4. Final Locking: Once length is restored and a robust distraction gap is visualized radiographically, the distal locking screws are inserted into the nail, and the fixator is removed.
This hybrid approach allows for immediate correction of the mechanical axis while utilizing the body's osteogenic potential to restore limb length, ultimately resulting in a healed nonunion, corrected varus, and equalized leg lengths.
Nerve Management in Deformity Correction
The peripheral nervous system is highly sensitive to both acute stretching and gradual tension. The common peroneal nerve is particularly vulnerable as it wraps around the fibular neck.
Prophylactic Peroneal Nerve Decompression
Prophylactic surgical decompression of the common peroneal nerve is strongly indicated in the following scenarios:
* Valgus to Varus Acute Corrections: Correcting a severe valgus deformity of the proximal tibia acutely stretches the lateral structures, placing immediate tension on the nerve.
* Significant Tibial Lengthening: Lengthening beyond 3-4 cm significantly increases the risk of traction neuropathy.
* Proximal Fibular Osteotomies: Manipulating the proximal fibula near the nerve's anatomical course warrants exploration and release to prevent entrapment.
During a valgus-to-varus focal dome osteotomy of the proximal tibia, releasing the peroneal nerve before executing the correction is a critical step in avoiding devastating postoperative foot drop.
Surgical Pearls for Hardware and Osteotomy Success
- Respect the CORA: Never perform a straight transverse cut for a pure angular deformity at the CORA; always use a dome cut to maximize bone contact and stability. Conversely, never use a dome cut if derotation is required.
- Over-ream for LON: Always over-ream the medullary canal by 2 mm larger than the nail diameter to prevent the bone from binding during the distraction phase.
- Protect the Nail: Strict adherence to the cannulated drill technique for half-pin insertion is non-negotiable in LON to prevent deep medullary infection.
- Medial Locking: Always lock femoral LON nails from the medial side to avoid passing screws through potentially colonized lateral pin tracks.
- Secure the Syndesmosis: In tibial LON, failure to place a distal tibiofibular screw will result in proximal fibular migration and ankle valgus collapse.
- Utilize Poller Screws: Do not rely on the nail alone to maintain alignment in metaphyseal bone. Use blocking screws to guide the nail and maintain the corrected mechanical axis.
!!! info "Academic Resource & Medical Review"
This academic resource was prepared and medically reviewed by Prof. Dr. Mohammed Hutaif, Consultant Orthopedic & Spine Surgeon. It is formulated specifically for medical students, orthopedic residents, and surgeons preparing for high-stakes board examinations (AAOS, FRCS Tr & Orth, Arab Board).
!!! warning "Disclaimer"
The surgical techniques, classifications, and clinical guidelines presented herein are for educational and academic review purposes only. They are not intended to replace institutional protocols or independent clinical judgment.
You Might Also Like