Tibial Osteotomy Mastery: Paley's Principles & Fixator-Assisted Nailing
Key Takeaway
Tibial osteotomy mastery involves fixator-assisted nailing, leveraging temporary external fixation for acute correction before intramedullary stabilization. Paley's principles, including CORA identification and mechanical axis restoration, are crucial for precise planning and execution, minimizing translation and optimizing patient outcomes.
Introduction to Complex Tibial Deformity Correction
The correction of complex lower extremity deformities represents one of the most mechanically and biologically demanding challenges in orthopedic surgery. While the foundational principles of deformity correction pioneered by Gavriil Ilizarov and mathematically refined by Dror Paley remain the bedrock of our understanding, the evolution of hardware has drastically altered surgical execution. The transition from prolonged definitive external fixation to hybrid techniques such as Fixator Assisted Nailing and Fixator Assisted Plating has revolutionized patient outcomes. These modern techniques minimize pin tract infections, drastically reduce time in frames, and accelerate postoperative rehabilitation.
However, this marriage of external and internal fixation introduces a unique set of intraoperative challenges. When a surgeon utilizes temporary external fixation to achieve and hold a correction before passing an intramedullary nail, the spatial relationship between temporary pins and permanent implants becomes critical. This comprehensive guide delves deeply into the hardware and osteotomy considerations required to execute these complex procedures flawlessly, focusing heavily on Paleys principles, optimal starting points, and the precise execution of the osteotomy.
Evolution of Hardware in Deformity Correction
Historically, the Ilizarov method relied entirely on fine wire circular external fixators to gradually correct deformities through distraction osteogenesis. While biologically sound, the psychological and physical burden on the patient was immense. The advent of spatial frames allowed for six axis correction, but the fundamental issue of prolonged external hardware remained.
The paradigm shift occurred with the realization that the power of the external fixator could be harnessed acutely in the operating room. By using the fixator as a temporary reduction tool, surgeons can achieve perfect alignment, which is then permanently stabilized by an intramedullary nail. This technique leverages the biological advantages of a minimally invasive osteotomy while providing the immediate biomechanical stability of an internal load sharing device.
Foundational Principles of Dror Paley
Before a single pin is driven or a scalpel touches the skin, the surgeon must have an absolute mastery of the deformities geometry. Hardware placement is entirely dictated by the mechanical axis and the apex of the deformity. Dr Dror Paley established a rigorous mathematical framework that allows surgeons to quantify deformity and plan precise corrections.
Understanding Mechanical Axis Deviation
The mechanical axis of the lower extremity is the line connecting the center of the femoral head to the center of the ankle joint. In a normally aligned limb, this line passes slightly medial to the center of the knee joint, typically 8 to 10 millimeters medial to the midline.
When planning a tibial osteotomy, we must evaluate the Mechanical Axis Deviation. This is the perpendicular distance from the mechanical axis line to the center of the knee joint. A medial Mechanical Axis Deviation indicates a varus deformity, while a lateral Mechanical Axis Deviation indicates a valgus deformity. Quantifying the Mechanical Axis Deviation is the first step in determining the magnitude of the necessary correction.
Joint Orientation Angles in the Lower Extremity
To isolate the source of the Mechanical Axis Deviation, the surgeon must measure the joint orientation angles. These angles define the relationship between the mechanical or anatomic axes of the bones and their respective joint lines. Deformity correction relies on restoring these angles to normal population parameters.
| Angle Abbreviation | Full Anatomical Name | Normal Value Range | Clinical Significance |
|---|---|---|---|
| mLDFA | Mechanical Lateral Distal Femoral Angle | 85 to 90 degrees (avg 87) | Determines femoral contribution to varus or valgus |
| MPTA | Medial Proximal Tibial Angle | 85 to 90 degrees (avg 87) | Determines tibial contribution to varus or valgus |
| mLDTA | Mechanical Lateral Distal Tibial Angle | 86 to 92 degrees (avg 89) | Evaluates distal tibial articular alignment |
| JLCA | Joint Line Convergence Angle | 0 to 2 degrees | Evaluates intraarticular ligamentous laxity or cartilage loss |
Deviations from these normative values isolate the deformity to a specific bone segment. For example, an abnormal Medial Proximal Tibial Angle combined with a normal Mechanical Lateral Distal Femoral Angle definitively isolates the deformity to the tibia, dictating a tibial osteotomy.
Defining the Center of Rotation of Angulation
The Center of Rotation of Angulation, universally known as the CORA, is the intersection of the proximal and distal mechanical or anatomic axis lines of the deformed bone segment. Understanding and identifying the CORA is the single most critical step in osteotomy planning. The CORA represents the apex of the deformity in any given plane. Deformities may be uniapical, multiapical, or combined with translation, and identifying the exact location of the CORA dictates where the osteotomy should ideally be performed.
Paleys Three Osteotomy Rules
Dr Paley formulated three fundamental rules that govern the relationship between the CORA, the osteotomy site, and the axis of the hinge used for correction. Mastery of these rules is non negotiable for deformity surgeons.
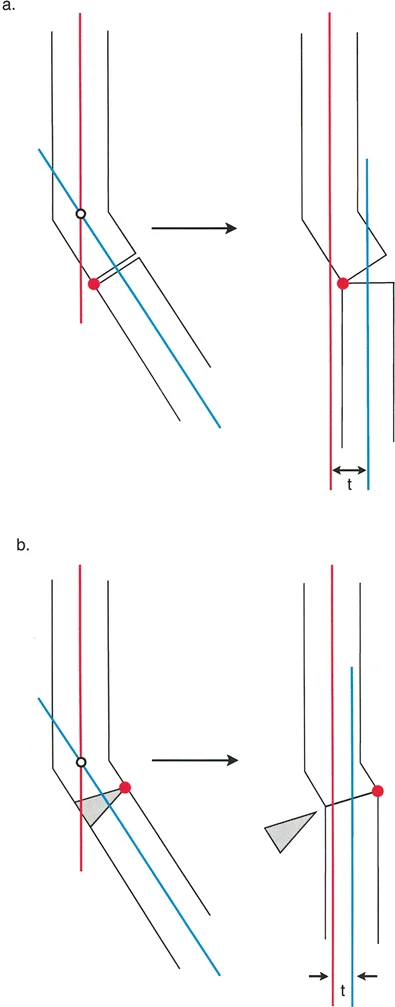
Rule One Angular Correction Without Translation
When the osteotomy passes directly through the CORA, and the hinge of correction is placed at the CORA, angular correction is achieved without any translation of the bone ends. The mechanical axis is fully restored, and the bone segments remain perfectly apposed. This is the ideal scenario for primary bone healing and is mechanically the most stable configuration.
Rule Two Hinge at CORA with Offset Osteotomy
When the osteotomy is performed at a level different from the CORA, but the hinge of correction remains placed at the CORA, the mechanical axis is successfully restored. However, the bone ends will translate at the osteotomy site. This translation is a mathematical necessity. While the overall limb alignment is corrected, the translation at the osteotomy site can complicate the passage of an intramedullary nail and may affect local bone healing biology.
Rule Three Hinge and Osteotomy Away from CORA
When both the osteotomy and the hinge are placed away from the CORA, a secondary translation deformity is created. The mechanical axis is not restored to normal, and a new deformity is iatrogenically introduced. This rule highlights a scenario that is generally avoided, although in highly specific salvage procedures, a surgeon might intentionally utilize Rule Three to compensate for an adjacent deformity that cannot be directly addressed.
In modern hardware applications, particularly when using an intramedullary nail, minimizing translation is preferred to allow for smooth passage of the nail. Therefore, identifying the CORA and placing the osteotomy as close to it as biologically and anatomically feasible is paramount.
Preoperative Planning Step by Step
Execution in the operating room is only as good as the blueprint created beforehand. Preoperative planning for tibial osteotomies requires meticulous attention to detail using calibrated, full length radiographs.
Step One Full Length Radiographs
Obtain standing, full length, weight bearing anteroposterior and lateral radiographs of both lower extremities. The patella must be facing directly forward to ensure accurate assessment of the frontal plane alignment. A magnification marker must be present to allow for precise digital templating.
Step Two Drawing the Mechanical Axes
Draw the mechanical axis of the normal limb to establish a baseline. On the deformed limb, draw the mechanical axis of the proximal tibial segment and the mechanical axis of the distal tibial segment. This requires utilizing the normal joint orientation angles to project where the axis should be.
Step Three Identifying the CORA and Magnitude
Extend the proximal and distal axis lines until they intersect. This intersection is the CORA. Measure the angle formed by this intersection to determine the exact magnitude of the angular deformity. This measurement dictates the required correction and helps select the appropriate hardware sizes.
Intramedullary Nailing in Tibial Deformities
When combining an osteotomy with intramedullary nailing, the trajectory of the nail dictates the final alignment of the bone segments. The intramedullary nail acts as an internal load sharing strut that forces the proximal and distal fragments to align along its rigid axis.
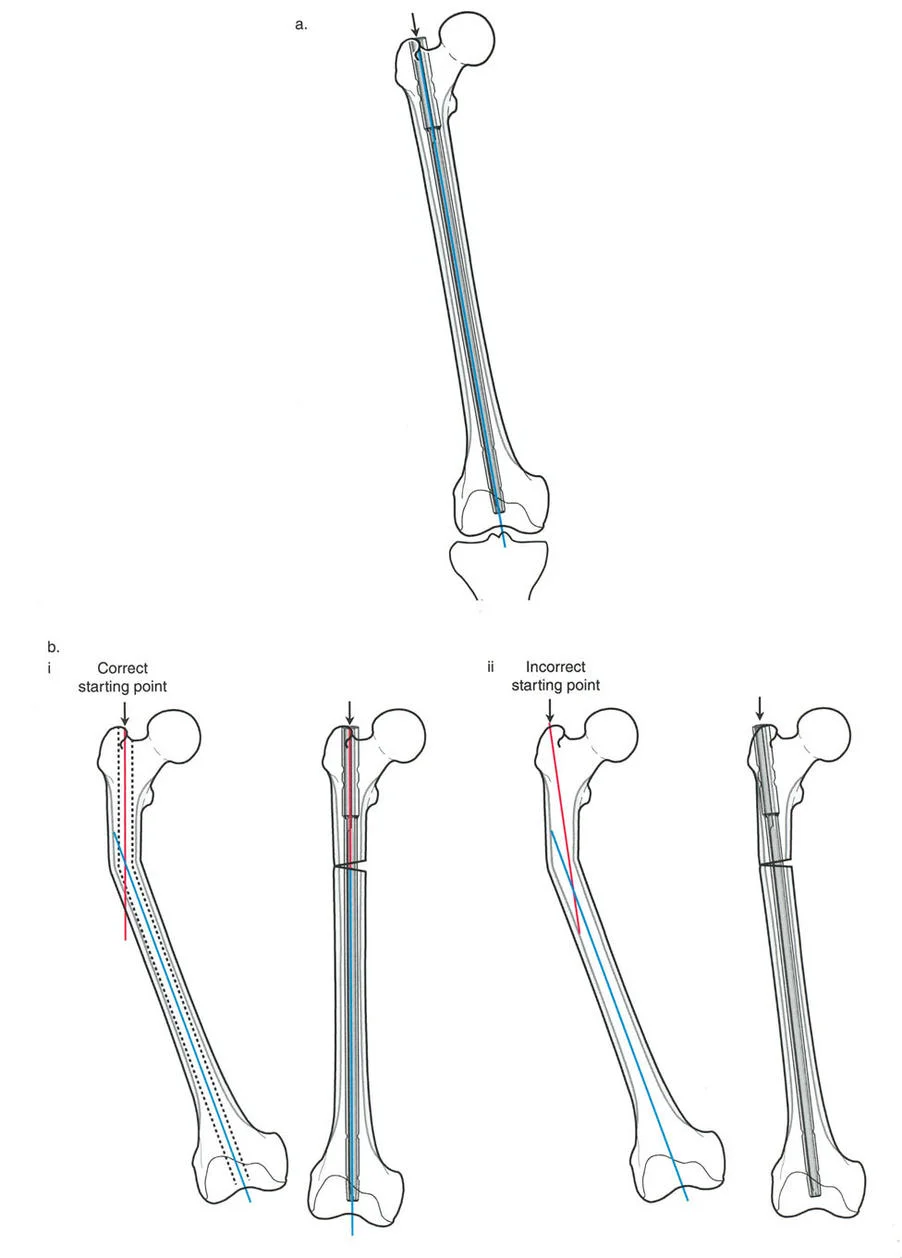
The Optimal Starting Point
In standard trauma nailing for diaphyseal fractures, the starting point is often described generally as being slightly medial to the lateral tibial spine. However, in complex deformity correction, especially when dealing with proximal tibial deformities or when executing a Fixator Assisted Nailing technique, the optimal starting point must be meticulously calculated based on the preoperative templating of the mechanical axis line.
As dictated by advanced deformity principles, the line that intersects the knee joint representing the true mechanical axis is the optimal starting point. In many varus and valgus tibial deformities, this mathematically calculates to the medial tibial spine.
Biomechanics of the Medial Tibial Spine
Utilizing the medial tibial spine as the starting point offers profound biomechanical advantages during deformity correction.
- Axis Alignment: A starting point on the medial tibial spine allows the rigid intramedullary nail to pass straight down the anatomical axis of the tibia, which is parallel to the mechanical axis.
- Preventing the Wedge Effect: If the starting point is too lateral, the insertion of the nail will force the proximal segment into a valgus position. This is the classic wedge effect seen in proximal third tibial fractures. By moving the starting point to the medial spine, the surgeon neutralizes this deforming force, allowing the hardware to support the corrected alignment rather than fight it.
- Canal Fill: A medial starting trajectory often allows for better fill of the distal tibial metaphysis, providing enhanced stability against angular forces.
Suprapatellar Approach Advantages
Accessing the medial tibial spine often requires a specialized surgical approach. The suprapatellar approach is highly recommended in deformity correction. It allows the knee to remain in a semi extended position during nail insertion. This relaxes the extensor mechanism, prevents the apex anterior angulation commonly seen with infrapatellar approaches, and provides direct, unobstructed access to the precise medial starting point required for optimal mechanical alignment.
Fixator Assisted Nailing Technique
The Fixator Assisted Nailing technique is the pinnacle of modern deformity correction. It utilizes the precision and power of an external fixator to acutely correct the deformity and hold the bone segments in perfect alignment while the intramedullary nail is inserted.
The Symphony of Hardware
Fixator Assisted Nailing requires the surgeon to manage two distinct hardware systems simultaneously. The external fixator acts as the reduction tool, providing absolute control over the proximal and distal bone segments in all six degrees of freedom. Once perfect alignment is confirmed fluoroscopically, the intramedullary nail is introduced to act as the definitive internal stabilizer. This symphony of hardware demands strict adherence to spatial rules to prevent catastrophic intraoperative conflicts.
Strategic Pin Placement and the Posterior Rule
The most catastrophic intraoperative complication during Fixator Assisted Nailing is hardware conflict. Specifically, this occurs when the intramedullary reamer or the nail itself strikes the Schanz pins of the temporary external fixator.
To prevent this, surgeons must strictly adhere to the Posterior Rule. When placing the half pins for the temporary external fixator, they must be inserted eccentric to the medullary canal. In the tibia, this typically means placing the pins entirely in the posterior half of the bone.
By keeping the pins posterior, the anterior and central portions of the medullary canal remain free and clear. This allows the flexible reamers and the rigid intramedullary nail to pass smoothly down the canal without encountering the external fixator pins. Verification of eccentric pin placement requires perfect lateral fluoroscopic views prior to initiating the reaming process.
Step by Step Surgical Execution of FAN
Executing a Fixator Assisted Nailing procedure requires a highly choreographed sequence of events.
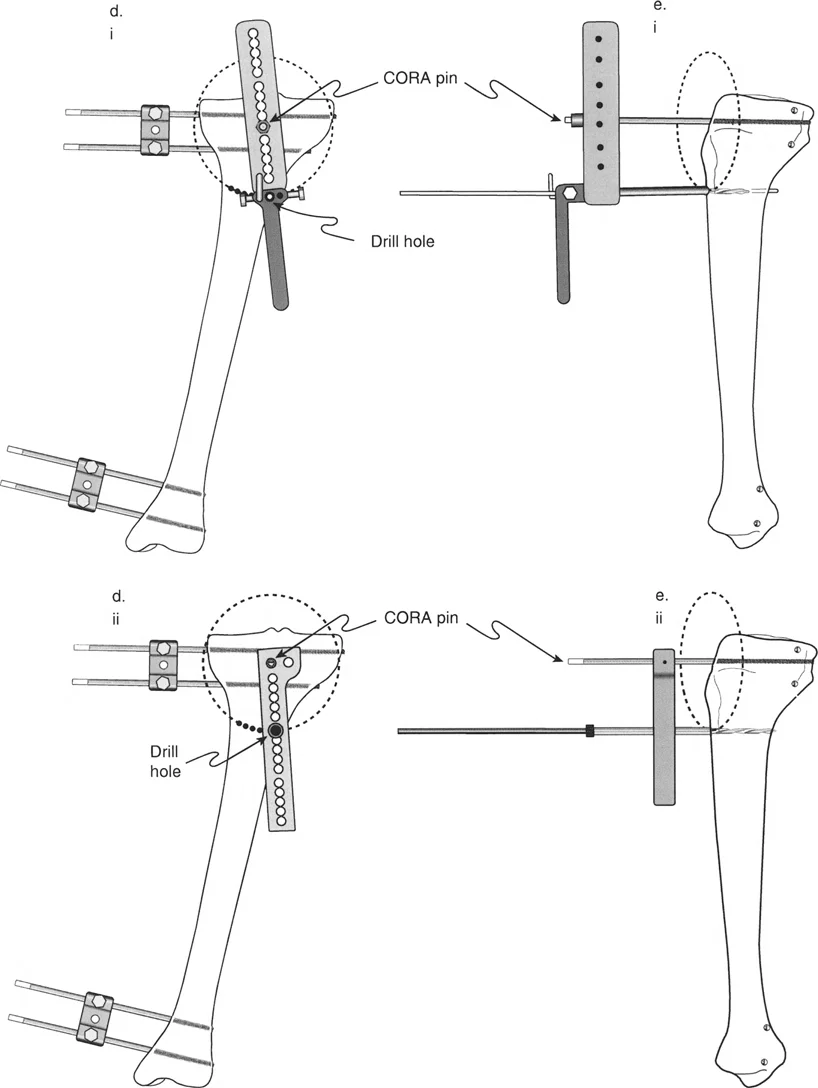
- Pin Placement: Insert two Schanz pins into the proximal tibial segment and two into the distal segment, strictly observing the Posterior Rule.
- Frame Application: Attach a monolateral fixator or a simple circular frame to the pins. Do not lock the frame yet.
- Fibular Osteotomy: Perform a fibular osteotomy to remove the tethering effect of the intact fibula. The level of this osteotomy depends on the level of the tibial deformity.
- Tibial Osteotomy: Execute a low energy tibial osteotomy at or near the precalculated CORA.
- Acute Correction: Manipulate the external fixator to acutely correct the deformity. Verify the restoration of the mechanical axis using a cautery cord or alignment grid on fluoroscopy.
- Locking the Frame: Once perfect alignment is achieved, rigidly lock the external fixator.
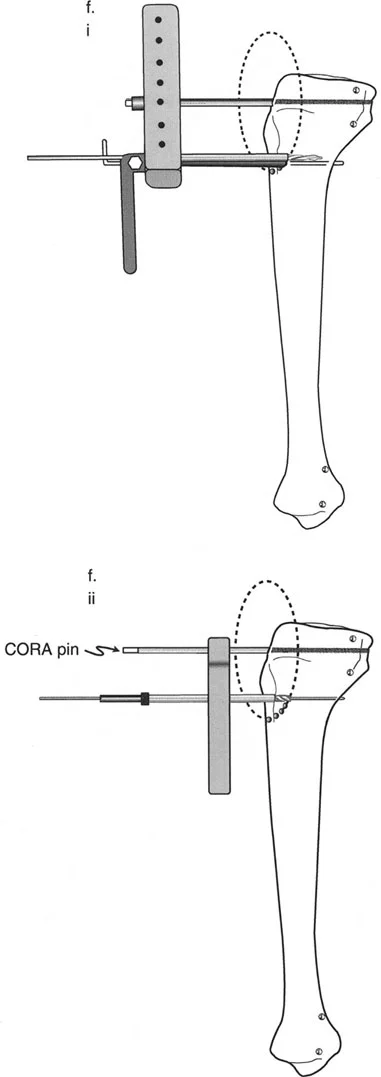
- Canal Preparation: Open the proximal tibia at the medial tibial spine and pass a ball tipped guide wire across the osteotomy site into the distal segment. Ream the canal over the guide wire.
- Nail Insertion: Insert the intramedullary nail.
- Interlocking: Place proximal and distal interlocking screws to secure the nail.
- Frame Removal: Remove the temporary external fixator and confirm final alignment and stability.
Osteotomy Execution and Biological Preservation
The method used to cut the bone is just as important as the hardware used to fix it. Deformity correction relies on robust bone healing, which is directly tied to the preservation of the local biology and periosteal blood supply.
Low Energy Osteotomy Techniques
High speed oscillating saws generate immense heat, leading to thermal necrosis of the bone ends and delayed union or nonunion. Therefore, deformity surgeons employ low energy osteotomy techniques.
- Multiple Drill Hole Technique: Also known as the De Bastiani technique, this involves making a small percutaneous incision and using a sharp drill bit to create multiple contiguous holes across the tibial cortex. An osteotome is then gently twisted to complete the osteotomy. This preserves the periosteum and generates minimal heat.
- Gigli Saw Technique: Passing a Gigli saw subperiosteally allows for a clean, low energy cut. This technique is particularly useful in the metaphyseal regions and ensures the preservation of the surrounding soft tissue envelope.
Managing the Fibula
The fibula acts as a lateral strut and will tether any attempt to correct a tibial deformity, particularly in varus or valgus corrections. A fibular osteotomy is almost always required.
- Surgical Pearls for Fibular Osteotomy:
- Perform the fibular osteotomy at a different level than the tibial osteotomy to prevent cross union.
- If correcting a proximal tibial deformity, perform a middle or distal third fibular osteotomy.
- Always protect the common peroneal nerve during proximal fibular interventions.
- Resect a small segment of the fibula (one centimeter) to ensure it does not prematurely consolidate and block further correction.
Avoiding Intraoperative Complications
Complex deformity correction is fraught with potential pitfalls. Anticipation and prevention are the hallmarks of a master surgeon.
Hardware Conflict Prevention
As discussed with the Posterior Rule, preventing the nail from hitting the fixator pins is paramount. If a pin is inadvertently placed centrally and blocks the canal, the surgeon must pause, remove the offending pin, and replace it eccentrically before proceeding with reaming. Attempting to force a reamer past a central pin will result in eccentric reaming, cortical blowout, or breakage of the reamer inside the canal.
Thermal Necrosis and Reaming
Reaming the medullary canal generates heat. In the setting of an acute osteotomy, excessive heat can devitalize the bone ends. Surgeons must use sharp reamers, advance them slowly, and frequently withdraw the reamer to clear debris. The use of a Reamer Irrigator Aspirator system can significantly reduce intramedullary pressure and temperature, preserving the endosteal blood supply necessary for rapid osteotomy consolidation.
Compartment Syndrome Considerations
Acute correction of severe deformities alters the volume of the fascial compartments of the leg. Furthermore, reaming increases intramedullary pressure, which can extrude marrow contents into the compartments.
Surgeons must have a low threshold for performing prophylactic fasciotomies, particularly in large angular corrections or when significant lengthening is performed simultaneously. Continuous intraoperative and postoperative monitoring of compartment pressures and clinical signs is mandatory.
Postoperative Care and Rehabilitation
The surgery does not end when the incisions are closed. Rehabilitation is a critical phase of the deformity correction process.
Weight Bearing Protocols
The primary advantage of Fixator Assisted Nailing over traditional external fixation is the immediate internal stability provided by the intramedullary nail. Depending on the quality of the bone and the robustness of the interlocking fixation, many patients can begin partial to full weight bearing shortly after surgery. Early weight bearing promotes micromotion at the osteotomy site, which stimulates secondary bone healing and callus formation.
Hardware Removal and Follow Up
Unlike external fixators, which must be removed once consolidation is achieved, intramedullary nails are typically left in place permanently unless they cause symptomatic hardware irritation. Regular radiographic follow up is required at four, eight, and twelve weeks to monitor callus formation and ensure the maintenance of the corrected mechanical axis.
By adhering strictly to the mathematical principles of Dror Paley, meticulously planning the osteotomy, and flawlessly executing the symphony of hardware required for Fixator Assisted Nailing, orthopedic surgeons can reliably conquer even the most daunting lower extremity deformities.
!!! info "Academic Resource & Medical Review"
This academic resource was prepared and medically reviewed by Prof. Dr. Mohammed Hutaif, Consultant Orthopedic & Spine Surgeon. It is formulated specifically for medical students, orthopedic residents, and surgeons preparing for high-stakes board examinations (AAOS, FRCS Tr & Orth, Arab Board).
!!! warning "Disclaimer"
The surgical techniques, classifications, and clinical guidelines presented herein are for educational and academic review purposes only. They are not intended to replace institutional protocols or independent clinical judgment.
You Might Also Like