Mastering Intramedullary Nailing: Paley Principles for Limb Deformity Correction
Key Takeaway
Intramedullary nailing in deformity correction offers superior comfort, eliminates pin-tract infections, enables early rehabilitation, and provides robust stability. It requires precise preoperative planning based on Paley's biomechanical principles, including mechanical axis deviation, joint orientation angles, and accurate osteotomy placement relative to the Center of Rotation of Angulation.
Introduction to Intramedullary Nailing in Deformity Correction
The evolution of orthopedic deformity correction has been fundamentally shaped by the rigorous biomechanical principles established by Dr. Dror Paley. While external fixation relying on the Ilizarov method and the Taylor Spatial Frame has historically served as the gold standard for managing complex multiplanar deformities, the modern orthopedic surgeon increasingly relies on internal fixation. Intramedullary nailing offers profound advantages that dramatically improve patient outcomes and postoperative quality of life. These benefits include superior comfort, the complete elimination of pin-tract infections, earlier and more aggressive rehabilitation, and robust biomechanical stability that facilitates early weight-bearing.
However, transitioning from the infinite adjustability of a fine-wire external fixator to the rigid unforgiving trajectory of an intramedullary nail introduces significant biomechanical and surgical challenges. In external fixation, residual deformities can be tweaked and dialed in postoperatively through strut adjustments. With intramedullary nailing, the correction is dictated entirely by preoperative planning, the exact location of the osteotomy, and the precise trajectory of the hardware. The nail acts as an internal template and the bone will inevitably conform to its shape.
This masterclass delves deep into the hardware and osteotomy considerations necessary for successful intramedullary nailing in deformity correction. We will exhaustively explore the biomechanics of starting and ending points, the Fixator Assisted Nailing technique, the nuances of Lengthening Over Nail, fully implantable lengthening nails, and the intricate management of rotational and translational deformities. For the surgeon in training, mastering these concepts is the difference between a perfectly aligned limb and a catastrophic iatrogenic malunion.
Core Principles of Paley Deformity Planning
To execute an intramedullary nailing deformity correction successfully, the surgeon must be fluent in the foundational principles of Dr. Dror Paley. The transition from external to internal fixation does not alter the geometry of the lower extremity. The rules of alignment remain absolute.
Mechanical Axis Deviation and Joint Orientation Angles
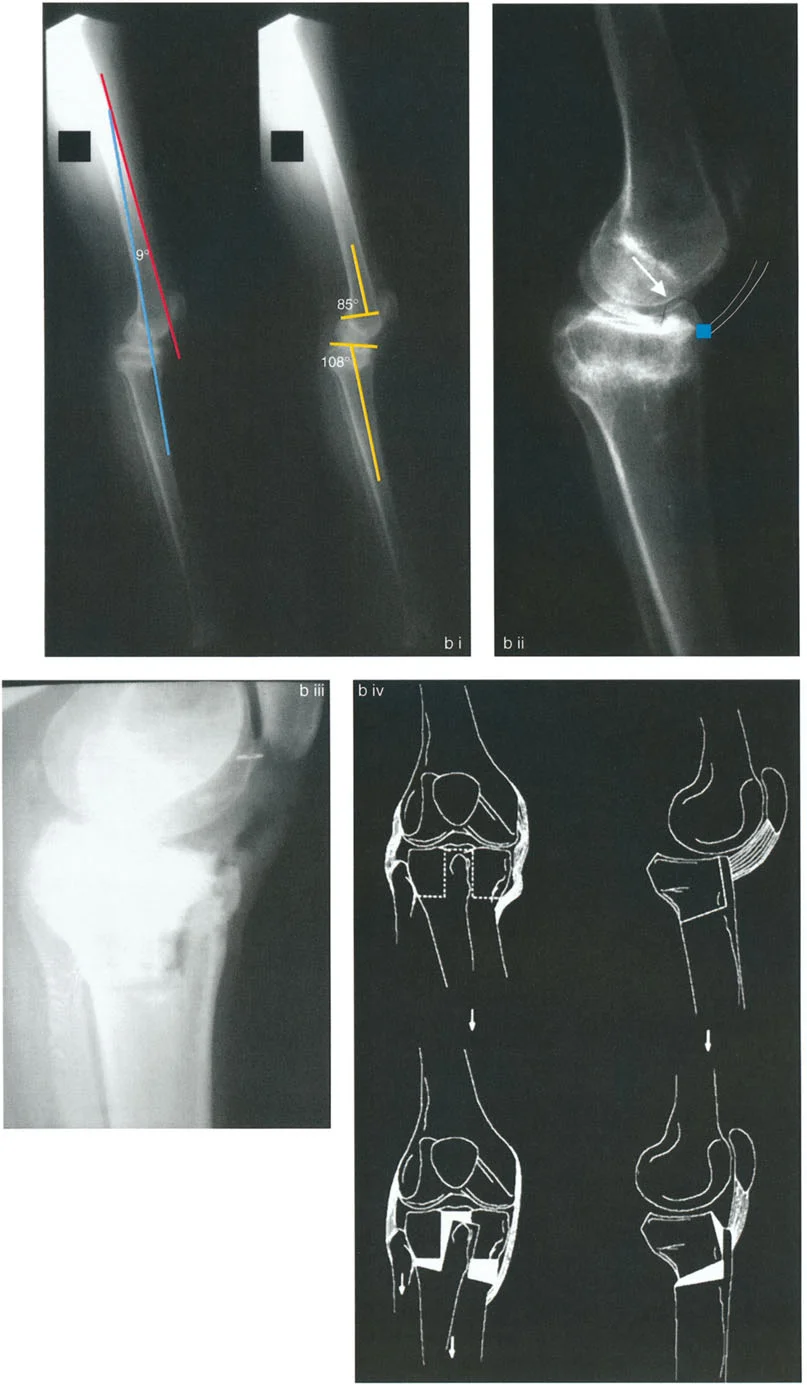
The first step in any deformity correction is quantifying the malalignment. This begins with a standing long-leg anteroposterior radiograph to assess the Mechanical Axis Deviation. The mechanical axis of the lower limb is a straight line drawn from the center of the femoral head to the center of the tibial plafond. In a normally aligned limb, this mechanical axis line passes slightly medial to the center of the knee joint, creating normal mechanical alignment. Mechanical Axis Deviation occurs when this line falls outside the normal parameters, indicating varus or valgus malalignment.
To determine the source of the Mechanical Axis Deviation, the surgeon must measure the joint orientation angles. These angles define the relationship between the anatomic or mechanical axes of the bone and the joint lines of the hip, knee, and ankle.
Understanding normal joint orientation angles is mandatory for recreating normal anatomy.
| Joint Orientation Angle | Abbreviation | Normal Range | Average |
|---|---|---|---|
| Mechanical Lateral Distal Femoral Angle | mLDFA | 85 to 90 degrees | 88 degrees |
| Medial Proximal Tibial Angle | MPTA | 85 to 90 degrees | 87 degrees |
| Joint Line Convergence Angle | JLCA | 0 to 2 degrees | 0 to 1 degree |
| Lateral Distal Tibial Angle | LDTA | 86 to 92 degrees | 89 degrees |
When preoperative planning reveals that the mLDFA or MPTA falls outside these normal ranges, the surgeon has identified the specific bone and metaphyseal region contributing to the overall limb deformity.
Defining the Center of Rotation of Angulation
Once the abnormal joint orientation angle is identified, the surgeon must locate the apex of the deformity. In Paley's terminology, this is the Center of Rotation of Angulation.
The Center of Rotation of Angulation is found by drawing the mid-diaphyseal line of the proximal bone segment and the mid-diaphyseal line of the distal bone segment. The exact point where these two lines intersect is the Center of Rotation of Angulation. In the context of intramedullary nailing, identifying this intersection is paramount because the nail will attempt to force these two intersecting lines into a single collinear straight line. If the osteotomy is not planned correctly in relation to the Center of Rotation of Angulation, the nail will induce unwanted translation or create a new deformity.
Biomechanics of Intramedullary Nailing
To master deformity correction with an intramedullary device, the surgeon must intimately understand the relationship between the mechanical axis and the anatomic axis of the lower extremity. The distinction between these two axes forms the foundation of surgical planning for internal fixation.
Anatomic Axis Versus Mechanical Axis
When performing preoperative planning for deformity correction using an external fixator, surgeons often utilize the mechanical axis method, drawing lines from the joints to find the intersection point. However, when planning for intramedullary fixation, the anatomic axis method is vastly superior and absolutely mandatory.
An intramedullary nail is a physical rigid cylinder that must follow the path of least resistance within the medullary canal. It inherently follows the mid-diaphysis, which is the anatomic axis. While the mechanical axis method remains mathematically valid for overall limb alignment, mechanical axis lines do not correspond to the physical path the nail will take through the bone. Therefore, planning an osteotomy for an intramedullary nail requires mapping the anatomic axis of the proximal segment and the anatomic axis of the distal segment.
Geometric Differences Between Tibia and Femur
Understanding the geometric differences between the tibia and the femur is critical when planning an osteotomy and predicting the postoperative mechanical axis deviation.
In the tibia, the mechanical axis and the anatomic axis are parallel. Although they are not perfectly collinear because the anatomic axis sits slightly lateral to the mechanical axis, their parallel nature simplifies correction. Because they are parallel, correcting a deformity or lengthening the tibia strictly along its anatomic axis does not alter the overall mechanical alignment of the limb. The mechanical axis remains stable.
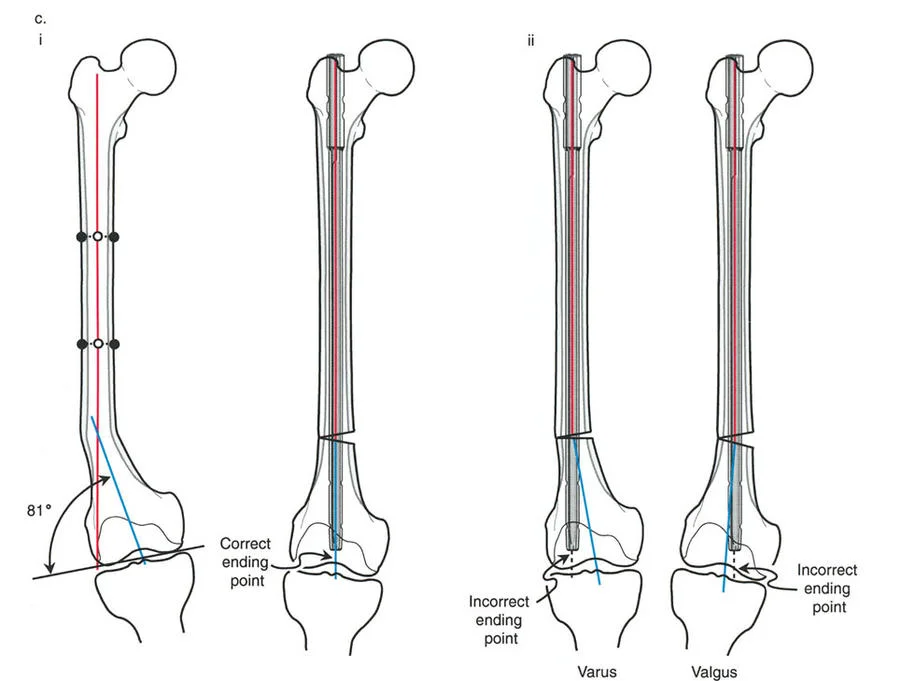
In the femur, the biomechanics are vastly different and far more complex. The anatomic axis of the femur sits at an angle to the mechanical axis. This is known as the Anatomic Mechanical Angle. The Anatomic Mechanical Angle typically measures between 6 and 9 degrees, averaging 7 degrees in most adults.
This angle is critical for intramedullary nailing. If you lengthen a femur along its anatomic axis, which is the exact path of the intramedullary nail, the distal fragment will translate laterally relative to the proximal fragment's mechanical axis line. This lateral translation shifts the mechanical axis laterally, potentially inducing a valgus Mechanical Axis Deviation. This phenomenon has profound implications for lengthening procedures and requires precise compensatory surgical techniques.
The Three Paley Osteotomy Rules Applied to Nailing
Dr. Paley established three fundamental osteotomy rules that dictate the relationship between the Center of Rotation of Angulation, the osteotomy site, and the resulting bone alignment. When using an intramedullary nail, these rules dictate the physical constraints of the surgery.
Osteotomy Rule One
Rule One states that if the osteotomy and the hinge are both placed exactly at the Center of Rotation of Angulation, the proximal and distal anatomic axes will align collinearly without any translation.
For intramedullary nailing, Rule One is the ideal scenario. Because the nail is a straight cylinder, it demands collinear alignment of the medullary canal. By placing the osteotomy precisely at the Center of Rotation of Angulation, the surgeon allows the nail to pass smoothly from the proximal segment into the distal segment, achieving perfect angular correction without creating a metaphyseal step-off.
Osteotomy Rule Two
Rule Two states that if the osteotomy is performed at a different level than the Center of Rotation of Angulation, but the hinge remains at the Center of Rotation of Angulation, the anatomic axes will align collinearly, but translation will occur at the osteotomy site.
In clinical practice, the Center of Rotation of Angulation often lies very close to the joint line in the extreme metaphysis or epiphysis. Performing an osteotomy at this level may not leave enough bone stock for the intramedullary nail to achieve distal fixation. Therefore, the surgeon must perform the osteotomy further away from the joint, effectively executing Rule Two. Because the rigid nail forces the axes to become collinear, the bone segments will obligatorily translate at the osteotomy site. The surgeon must anticipate this translation and ensure the medullary canal is wide enough to accommodate the nail despite the cortical step-off.
Osteotomy Rule Three
Rule Three states that if the osteotomy and the hinge are both placed outside the Center of Rotation of Angulation, the anatomic axes will become parallel but will not be collinear, resulting in a zigzag deformity.
Intramedullary nailing fundamentally violates Rule Three. Because a straight rigid nail cannot navigate a zigzag medullary canal, a Rule Three correction is physically impossible with a standard straight intramedullary nail. If a surgeon attempts this, the nail will bind, fracture the cortex, or force the bone into a malunion.
Preoperative Planning for Intramedullary Nailing
Meticulous preoperative planning is the cornerstone of successful deformity correction. The surgeon must transition from conceptualizing the deformity to drawing the exact surgical execution on digital radiographs.
Step by Step Anatomic Axis Planning
- Obtain high quality calibrated standing anteroposterior and lateral radiographs of the entire lower extremity.
- Draw the normal joint orientation lines for the proximal and distal joints of the deformed bone.
- Draw the anatomic axis of the proximal bone segment by finding the midpoint of the diaphyseal canal at two separate levels and connecting them.
- Draw the anatomic axis of the distal bone segment using the same mid-diaphyseal method.
- Locate the intersection of these two lines to define the Center of Rotation of Angulation.
- Measure the angle between the proximal and distal anatomic axes to quantify the magnitude of the angular deformity.
- Superimpose a digital template of the chosen intramedullary nail over the proximal anatomic axis.
- Determine the optimal starting point and trajectory for the nail.
- Plan the osteotomy level, keeping in mind Paley's Osteotomy Rules and the required translation if the osteotomy is placed outside the Center of Rotation of Angulation.
Surgical Execution and Trajectory Management
The single most common cause of failure, malunion, or iatrogenic deformity in intramedullary nailing deformity correction is the selection of incorrect starting and ending points, coupled with poor trajectory management through the osteotomy site.
Mastering Starting and Ending Points
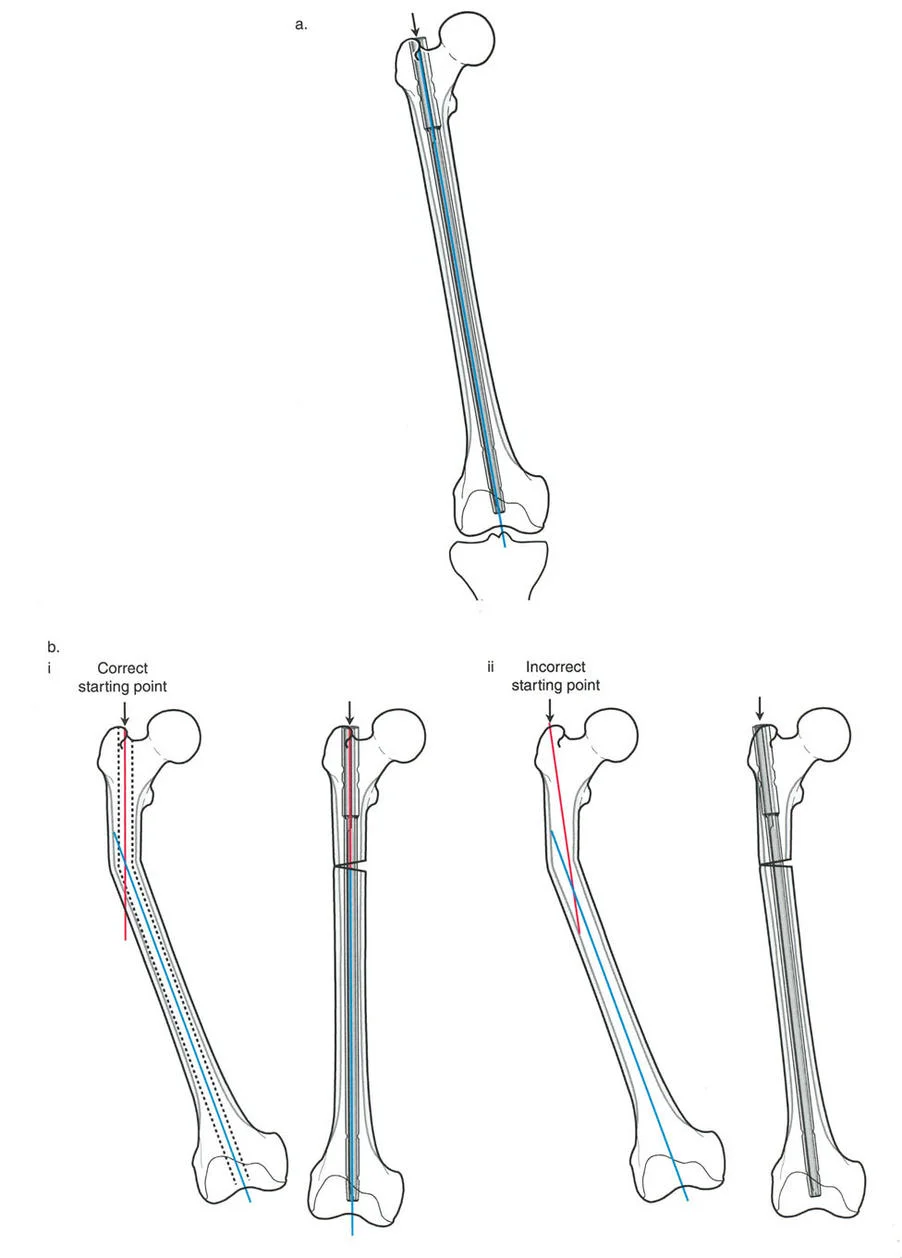
When correcting a deformity with an intramedullary nail, the nail acts as a powerful internal reduction tool. The bone segments will align themselves to the rigid trajectory of the nail as it passes through the isthmus and into the metaphysis. Therefore, it is absolutely essential to choose the correct starting entry point and ending terminal point.
It is not sufficient to obtain just one of these two points correctly. If either point is off axis, the final alignment will be compromised, resulting in an apex anterior, apex posterior, varus, or valgus malalignment.
In the femur, the intramedullary nail follows the medullary canal and the anatomic axis. For a standard antegrade femoral nail used in deformity correction, the correct starting point is the piriformis fossa or the exact tip of the greater trochanter for trochanteric entry specific nails. If the starting point is positioned too far laterally, the nail will force the proximal femur into varus. If the starting point is too anterior, it may cause an apex anterior sagittal deformity or blow out the anterior cortex.
The ending point is equally critical. The nail must terminate exactly in the center of the distal femoral metaphysis, centered on the intercondylar notch on the anteroposterior view and centered in the condyles on the lateral view.
The Role of Poller Blocking Screws
Because deformities often occur in the metaphysis where the medullary canal is wide, the intramedullary nail has room to toggle. The nail will naturally seek the path of least resistance, which often leads to malalignment. To combat this, the surgeon must use Poller screws, also known as blocking screws.
Blocking screws are placed strategically to narrow the medullary canal and physically block the nail from deviating into the wide metaphyseal space.
Surgical Pearls for Blocking Screws:
* Always place the blocking screw on the concave side of the deformity.
* Place the screw perpendicular to the plane of the deformity. For a coronal plane deformity like varus or valgus, place the screw in the anteroposterior direction.
* The screw should be placed near the osteotomy site in the short metaphyseal segment to guide the nail into the exact center of the bone.
* Blocking screws functionally extend the rigid isthmus of the diaphysis into the metaphysis, ensuring the nail maintains its planned trajectory.
Advanced Techniques in Deformity Correction
As intramedullary nailing has evolved, several advanced techniques have been developed to combine the precision of external fixation with the patient benefits of internal fixation.
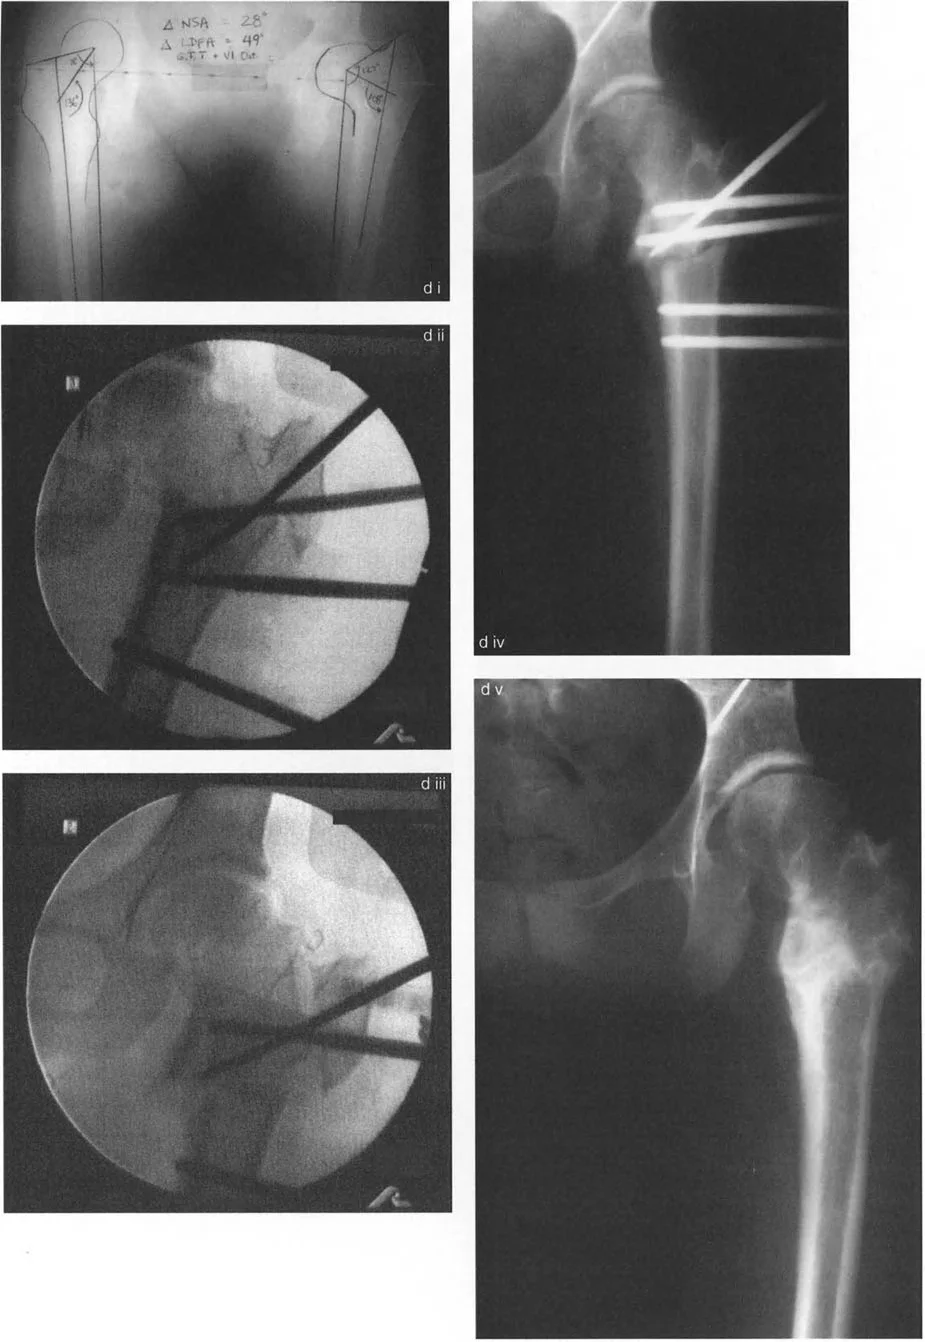
Fixator Assisted Nailing
Fixator Assisted Nailing is a powerful technique that utilizes a temporary external fixator to achieve and hold the deformity correction while the intramedullary nail is inserted. This technique eliminates the struggle of trying to manually hold the bone segments in perfect alignment while reaming and passing the nail.
Step by Step Fixator Assisted Nailing:
1. Insert half pins into the proximal and distal bone segments, ensuring they are positioned outside the planned trajectory of the intramedullary nail.
2. Perform a percutaneous osteotomy at the planned level using a multiple drill hole and osteotome technique to preserve the periosteal blood supply.
3. Apply the external fixator bar and manipulate the bone segments to achieve perfect angular and translational correction.
4. Confirm the correction with intraoperative fluoroscopy, checking the mechanical axis with a cautery cord.
5. Once perfect alignment is confirmed, lock the external fixator rigidly.
6. Open the starting point, pass the guide wire, ream the canal, and insert the intramedullary nail.
7. Insert the proximal and distal interlocking screws.
8. Remove the temporary external fixator.
This technique guarantees that the nail acts purely as a load-sharing fixation device rather than a reduction tool, minimizing the risk of iatrogenic malalignment.
Lengthening Over Nail
Lengthening Over Nail was developed to drastically reduce the amount of time a patient must wear an external fixator during a limb lengthening procedure. In traditional Ilizarov lengthening, the fixator must remain on the limb during both the distraction phase and the much longer consolidation phase.
In the Lengthening Over Nail technique, an intramedullary nail is inserted at the time of the osteotomy, but it is only locked proximally. An external fixator is applied over the limb. The external fixator performs the actual lengthening, dragging the distal bone segment down the shaft of the intramedullary nail. The nail maintains perfect axial alignment and prevents the bone from drifting into varus or valgus during distraction.
Once the desired length is achieved, the patient returns to the operating room. The distal interlocking screws are inserted into the intramedullary nail to secure the length, and the external fixator is immediately removed. The patient spends the entire consolidation phase without an external fixator, dramatically improving comfort and reducing the risk of pin tract infections.
Surgical Pearls for Lengthening Over Nail:
* The intramedullary canal must be over-reamed by at least two millimeters larger than the nail diameter to prevent the nail from binding during distraction.
* In the femur, lengthening along the anatomic axis will cause lateral translation of the mechanical axis due to the Anatomic Mechanical Angle. The surgeon must intentionally overcorrect the starting alignment into slight varus or use a specialized technique to compensate for this lateral shift.
Fully Implantable Lengthening Nails
The pinnacle of modern deformity correction and limb lengthening is the fully implantable magnetic motorized intramedullary nail. Devices such as the Precice nail contain an internal magnetic motor connected to a gearbox and a telescopic lead screw.
Following the osteotomy and insertion of the nail, the patient uses an external remote control that generates a rotating magnetic field. This magnetic field couples with the internal magnet, turning the gears and slowly telescoping the nail to lengthen the bone.
Fully implantable nails represent a paradigm shift. They completely eliminate the need for external fixation, dropping the pin tract infection rate to zero. Furthermore, because the lengthening is controlled by a rigid internal cylinder, the risk of axial deviation during lengthening is virtually eliminated, provided the initial starting and ending points were perfectly executed.
Managing Complex Multiplanar Deformities
While intramedullary nails are excellent at correcting coronal and sagittal plane angular deformities, managing rotational and translational deformities requires specific strategies.
Rotational Deformity Correction
Rotational deformities can be easily corrected acutely at the time of intramedullary nailing. The challenge lies in accurately gauging the degree of rotation intraoperatively.
Before performing the osteotomy, the surgeon should insert two parallel reference wires, one in the proximal segment and one in the distal segment. Once the osteotomy is complete, the distal segment is rotated until the desired correction is achieved. The angle between the two reference wires will visually confirm the exact degree of rotational correction. The intramedullary nail is then locked proximally and distally to secure the rotation.
Translational Deformity Correction
Translational deformities are notoriously difficult to correct with an intramedullary nail. Because the nail is a straight rigid cylinder, it naturally resists translation. If the medullary canal is narrow, attempting to translate the bone segments will cause the nail to bind against the cortex.
To achieve translation, the surgeon must either over-ream the canal significantly to create space for the nail to shift, or utilize the Poller blocking screw technique. By placing blocking screws in specific quadrants of the metaphysis, the surgeon can force the nail to sit eccentrically within the canal, effectively inducing translation of the bone segment.
Conclusion and Final Clinical Pearls
Mastering intramedullary nailing for deformity correction requires a profound understanding of lower extremity biomechanics, strict adherence to Paley's osteotomy rules, and meticulous surgical execution. The transition from external to internal fixation demands that the surgeon shift from a mindset of postoperative adjustability to one of absolute intraoperative precision.
Final High Yield Takeaways:
* Always plan intramedullary nailing based on the anatomic axis, not the mechanical axis.
* Identify the exact Center of Rotation of Angulation and understand how your chosen osteotomy level will dictate translation based on Paley's Rule Two.
* The starting and ending points of the nail are the primary determinants of final alignment. Compromising on either point guarantees a malunion.
* Do not hesitate to use Poller blocking screws in the metaphysis to narrow the canal and control the trajectory of the nail.
* For complex multiplanar deformities, utilize Fixator Assisted Nailing to achieve perfect reduction before committing to the rigid trajectory of the intramedullary nail.
By internalizing these principles, the orthopedic surgeon can leverage the immense benefits of intramedullary nailing while consistently achieving perfect biomechanical alignment and outstanding clinical outcomes.
!!! info "Academic Resource & Medical Review"
This academic resource was prepared and medically reviewed by Prof. Dr. Mohammed Hutaif, Consultant Orthopedic & Spine Surgeon. It is formulated specifically for medical students, orthopedic residents, and surgeons preparing for high-stakes board examinations (AAOS, FRCS Tr & Orth, Arab Board).
!!! warning "Disclaimer"
The surgical techniques, classifications, and clinical guidelines presented herein are for educational and academic review purposes only. They are not intended to replace institutional protocols or independent clinical judgment.
You Might Also Like