Mastering Orthopedic Deformity Correction: Osteotomy, Hardware & Paley's Rules
Key Takeaway
Orthopedic deformity correction involves meticulous geometric analysis, including Malalignment Test and CORA identification, to restore the limb's mechanical axis. Surgeons select precise osteotomy types and hardware based on Paley's rules and biomechanics, ensuring optimal bone healing and functional outcomes for complex limb reconstruction.
Fundamentals of Orthopedic Deformity Correction
Orthopedic deformity correction is a highly precise subspecialty that relies on a profound understanding of biomechanics, spatial geometry, and biologic healing. The foundational goal of any deformity correction is to restore the normal mechanical axis of the limb, ensure proper joint orientation, and maintain or optimize limb length. Achieving these goals requires meticulous preoperative planning and flawless surgical execution.
Central to this process are the decisions regarding the type of osteotomy to perform and the selection of appropriate hardware for stabilization. The interaction between the bone cut, the surrounding soft tissues, and the fixation construct determines the biomechanical stability and the biological environment for bone healing. This comprehensive guide explores the intricate details of hardware and osteotomy considerations, heavily expanding upon the foundational principles of deformity correction established by Dr. Dror Paley. Mastering these principles is non-negotiable for orthopedic surgeons, residents, and fellows aiming to achieve reproducible, excellent outcomes in complex limb reconstruction.
Geometric Analysis and Preoperative Planning
Before a saw blade or osteotome ever touches bone, the surgeon must thoroughly analyze the deformity using full-length, weight-bearing radiographs. The planning phase is governed by strict geometric principles that dictate where the bone should be cut and how it should be realigned. The Malalignment Test is the first step in this geometric analysis, serving to quantify the deviation and localize the source of the deformity.
Calculating Mechanical Axis Deviation
The mechanical axis of the lower extremity is defined by a line drawn from the center of the femoral head to the center of the ankle joint. In a normally aligned limb, this line passes slightly medial to the center of the knee joint, approximately 8 mm medial to the midline of the knee.
Mechanical Axis Deviation occurs when this weight-bearing line falls outside the normal physiological parameters, leading to abnormal stress distribution across the articular cartilage of the knee joint. A lateral shift indicates a valgus deformity, while a medial shift indicates a varus deformity. Correcting Mechanical Axis Deviation is the primary functional goal of lower limb realignment surgery, as failure to restore this axis leads to premature osteoarthritis and hardware failure.
Identifying the Center of Rotation of Angulation
The Center of Rotation of Angulation is the cornerstone of modern deformity analysis and the bedrock of Dr. Paley’s principles. It is defined as the point of intersection between the proximal anatomical or mechanical axis and the distal anatomical or mechanical axis of a deformed bone.
Identifying the Center of Rotation of Angulation is critical because it dictates the optimal level for the osteotomy and the placement of the Angulation Correction Axis. The Angulation Correction Axis is the true hinge point around which the distal bone fragment rotates to correct the angular deformity. The relationship between the Center of Rotation of Angulation, the osteotomy level, and the Angulation Correction Axis forms the basis of the three fundamental osteotomy rules.
Evaluating Standard Joint Orientation Angles
To accurately assess a deformity and pinpoint its exact anatomical location, surgeons rely on standardized joint orientation angles. These angles measure the relationship between the anatomical or mechanical axes of the long bones and their respective joint lines. Differentiating between a femoral deformity, a tibial deformity, or a joint line convergence issue (ligamentous laxity) is impossible without measuring these angles.
| Joint Orientation Angle | Acronym | Normal Range | Average | Clinical Significance |
|---|---|---|---|---|
| Mechanical Lateral Distal Femoral Angle | mLDFA | 85° - 90° | 87° | >90° indicates distal femoral varus; <85° indicates valgus |
| Medial Proximal Tibial Angle | MPTA | 85° - 90° | 87° | >90° indicates proximal tibial valgus; <85° indicates varus |
| Lateral Proximal Femoral Angle | mLPFA | 85° - 95° | 90° | Assesses proximal femoral deformity (coxa vara/valga) |
| Lateral Distal Tibial Angle | LDTA | 86° - 92° | 89° | Assesses distal tibial articular orientation |
| Joint Line Convergence Angle | JLCA | 0° - 2° | 1° | >2° indicates intra-articular deformity or ligamentous laxity |
| Posterior Distal Femoral Angle | PDFA | 79° - 87° | 83° | Sagittal plane assessment; deviations indicate procurvatum/recurvatum |
Clinical Pearls for Joint Orientation Angles
* Always assess the Joint Line Convergence Angle before planning a bony osteotomy. A widened Joint Line Convergence Angle on the concavity of the deformity suggests ligamentous laxity that may resolve once the bony alignment is corrected, or it may require simultaneous soft tissue reconstruction.
* When planning corrections in the sagittal plane, remember that the anatomical axis and mechanical axis of the femur and tibia are not parallel, which heavily influences the Posterior Distal Femoral Angle and Posterior Proximal Tibial Angle.
* Bilateral full-length radiographs are mandatory. Always compare the deformed limb to the contralateral normal limb to establish the patient's native baseline angles.
The Paley Osteotomy Rules and Application
Dr. Dror Paley codified the relationship between the Center of Rotation of Angulation, the osteotomy cut, and the hinge point into three distinct rules. Understanding and applying these rules is mandatory for preventing secondary, iatrogenic deformities during surgery.
Osteotomy Rule 1 Pure Angulation
When the osteotomy and the Angulation Correction Axis both pass through the Center of Rotation of Angulation, the correction achieves pure angulation without translation. The bone ends remain fully opposed, and the mechanical axis is restored symmetrically.
This is the ideal scenario for most corrections because it maximizes bone-to-bone contact, providing optimal intrinsic stability and an excellent biological environment for primary bone healing. The axis of the proximal segment and the axis of the distal segment become perfectly collinear. Whenever anatomically and safely possible, surgeons should strive to execute Rule 1.
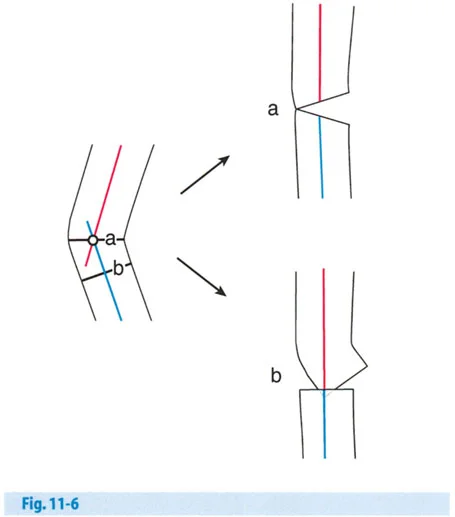
Osteotomy Rule 2 Angulation and Translation
When the Angulation Correction Axis passes through the Center of Rotation of Angulation, but the actual osteotomy cut is made at a different level (either proximal or distal to the Center of Rotation of Angulation), the correction will require both angulation and translation to realign the mechanical axis.
Because the hinge point remains at the Center of Rotation of Angulation, the mechanical axes will realign perfectly; however, the bone ends at the osteotomy site will offset or translate relative to one another. This rule is highly useful when the Center of Rotation of Angulation is located at the level of a joint line or in an area with poor soft tissue coverage, necessitating the bone cut to be moved to a more favorable metaphyseal or diaphyseal location.
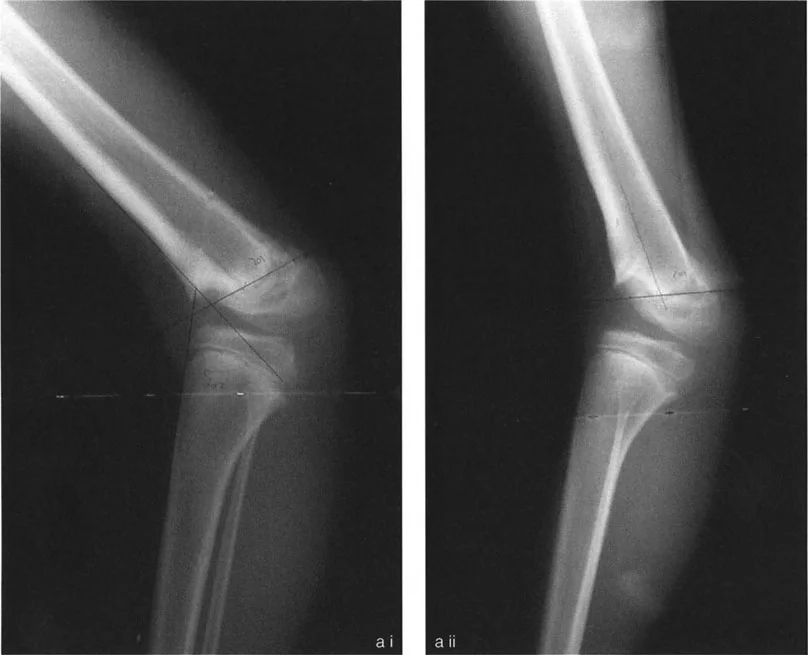
Diagram illustrating Osteotomy Rule 2. When the osteotomy is performed at a level different from the CORA, both angulation (a) and translation (t) must occur to properly realign the axes without creating a secondary deformity.
Osteotomy Rule 3 Secondary Translation Deformity
When the osteotomy is made at a level different from the Center of Rotation of Angulation, and the Angulation Correction Axis is placed at the level of the osteotomy rather than at the Center of Rotation of Angulation, the correction will result in a secondary translation deformity.
Because the hinge point is incorrect, the proximal and distal mechanical axes will end up parallel to each other rather than collinear. This creates an iatrogenic translation. The mechanical axis will not be fully restored to its normal position. This rule is generally avoided in standard deformity correction unless the surgeon intentionally wants to create a translation to compensate for an adjacent deformity or to shift the mechanical axis for joint-sparing offloading (such as in a medial opening wedge high tibial osteotomy with a planned lateralizing translation).
Biomechanics of Osteotomy Configurations
The geometric shape of the bone cut dictates the biomechanical stability of the construct, the requirement for bone grafting, and the effect on limb length. Surgeons must select the osteotomy configuration based on the patient's specific anatomical constraints and functional goals.
Closing Wedge Osteotomy Mechanics
A closing wedge osteotomy involves the precise removal of a wedge-shaped piece of bone from the apex (convex side) of the deformity. The gap is then closed, bringing the bone ends together and utilizing the intact cortex on the concave side as a soft tissue hinge.
The primary biomechanical advantage of a closing wedge osteotomy is high intrinsic stability. Because the bone ends are compressed directly against each other, the construct shares the mechanical load with the hardware. This load-sharing environment allows for rapid primary bone healing and permits earlier weight-bearing. Furthermore, it completely avoids the need for structural bone grafting, eliminating donor site morbidity and the risk of graft collapse.
However, the major disadvantage is limb shortening. Removing a wedge of bone inherently shortens the limb. Therefore, closing wedge osteotomies are generally contraindicated in patients who already have a functionally significant leg length discrepancy on the affected side. Additionally, closing wedge osteotomies can distort the local anatomy, making future arthroplasty more challenging.
Opening Wedge Osteotomy Mechanics
An opening wedge osteotomy involves making a single transverse or oblique cut through the bone and wedging it open on the concave side of the deformity to achieve correction.
The primary advantage of an opening wedge osteotomy is the preservation or slight increase in limb length. It is particularly advantageous in patients with a pre-existing leg length discrepancy or those who cannot tolerate any shortening. It also preserves the bone stock on the convex side, which can be beneficial for future joint replacement surgeries.
The biomechanical trade-off is a lack of intrinsic stability. The creation of a void means the hardware must bear the entirety of the mechanical load until the bone heals. This load-bearing construct carries a higher risk of hardware failure if union is delayed. Furthermore, gaps larger than 10 to 12 millimeters typically require structural bone grafting (autograft or allograft) to provide a scaffold for osteoconduction and to support the mechanical construct.
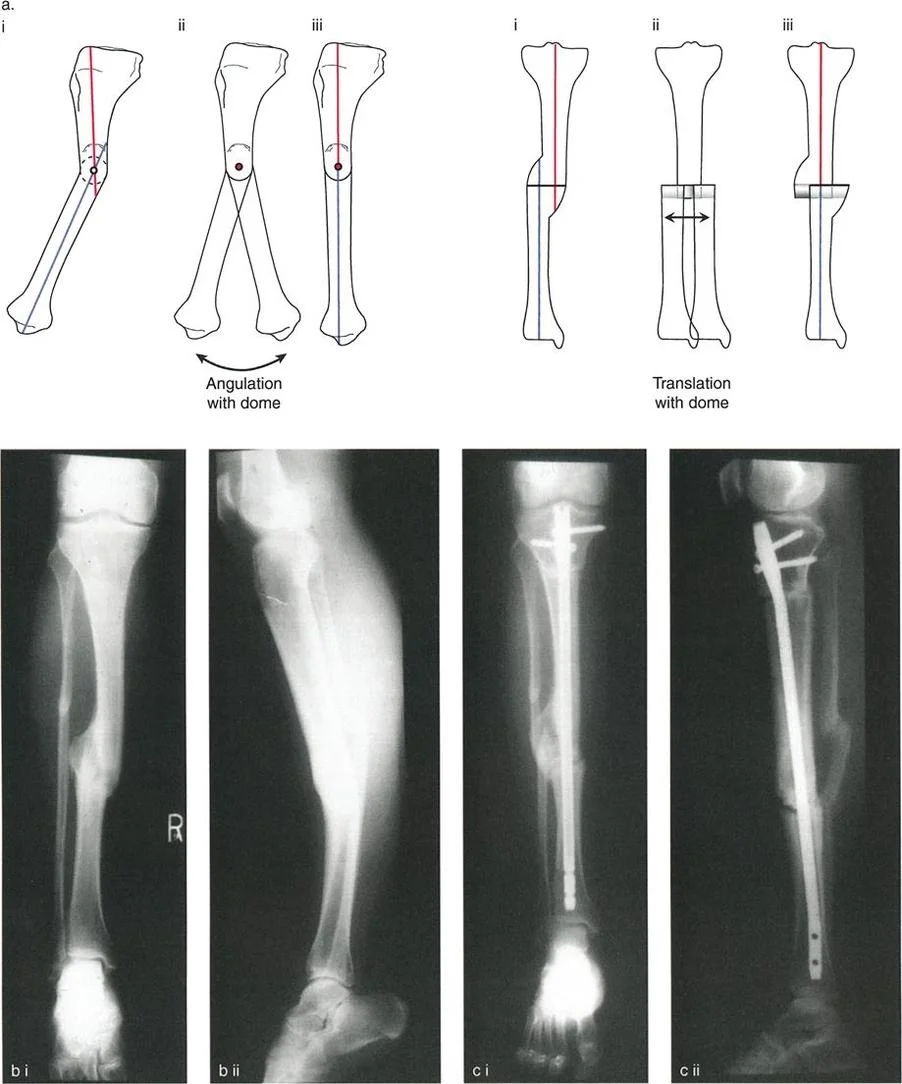
Dome and Focal Dome Osteotomy Techniques
A dome osteotomy utilizes a cylindrical or spherical cut, allowing the bone fragments to rotate around a central axis without creating a wedge defect or altering limb length.
Focal dome osteotomies are biomechanically superior in terms of maintaining bone-to-bone contact across a large surface area, which promotes excellent healing while allowing for multiplanar correction. Because the cut is curved, it offers high intrinsic stability against translation and torsion once compressed. However, executing a perfect dome osteotomy is technically demanding, requiring specialized crescentic saw blades and meticulous preoperative templating to ensure the radius of the cut perfectly matches the required Angulation Correction Axis.
Advanced Hardware Selection and Fixation Constructs
The choice of hardware is inextricably linked to the type of osteotomy performed and the biological quality of the patient's bone. The fixation construct must hold the corrected alignment rigidly enough to prevent loss of reduction, yet elastically enough to promote secondary bone healing where appropriate.
Internal Fixation with Locking Plates
Locking plate technology has revolutionized internal fixation in deformity correction. By threading the screw heads directly into the plate, the construct acts as an internal external fixator.
Locking plates are ideal for opening wedge osteotomies, where the plate must bridge a gap and bear the full mechanical load. The angular stability provided by locking screws prevents the screws from toggling in the bone, which is especially critical in osteoporotic bone or short metaphyseal segments. When utilizing locking plates, surgeons must pay careful attention to the working length of the plate—the distance between the innermost screws bridging the osteotomy. A longer working length decreases the stiffness of the construct, promoting micromotion and robust callus formation.
Intramedullary Nailing and Blocking Screws
Intramedullary nails offer a load-sharing, biomechanically superior construct for diaphyseal and certain metaphyseal deformity corrections. Because the nail sits in the neutral axis of the bone, it is highly resistant to bending forces and allows for immediate weight-bearing in many cases.
However, correcting an angular deformity with an intramedullary nail is notoriously difficult due to the "windmill effect," where the nail fails to control the wide metaphyseal bone segments. To counteract this, surgeons employ Dr. Paley's concept of blocking screws (Poller screws).
Blocking screws are placed strategically in the concavity of the deformity, adjacent to the planned path of the nail. They act as artificial cortices, narrowing the medullary canal and forcing the intramedullary nail to follow a specific trajectory. This technique translates the deforming forces into corrective forces, ensuring the nail rigidly holds the new mechanical axis.
Circular External Fixation and Hexapod Systems
When dealing with multiplanar deformities, poor soft tissue envelopes, active infection, or extreme leg length discrepancies requiring distraction osteogenesis, circular external fixation remains the gold standard.
Systems like the Ilizarov apparatus or modern hexapod fixators (e.g., Taylor Spatial Frame) utilize tensioned fine wires and half-pins attached to external rings. The hexapod systems are particularly powerful, utilizing a computer-assisted six-axis strut system to correct angulation, translation, rotation, and length simultaneously over a period of weeks.
The biomechanics of circular fixators rely on beam theory and wire tension. Increasing the tension of the wires, decreasing the distance between the rings and the bone, and utilizing multi-planar wire configurations all increase the rigidity of the construct. This method allows for postoperative adjustability, meaning the surgeon can fine-tune the mechanical axis deviation in the outpatient clinic without returning to the operating room.
Step by Step Surgical Execution
Executing a flawless deformity correction requires translating the two-dimensional radiographic plan into a three-dimensional surgical reality. Adherence to a strict, step-by-step protocol minimizes intraoperative errors.
Preoperative Templating
- Obtain Calibrated Imaging: Ensure all full-length radiographs are properly calibrated with a scaling marker to allow for accurate measurement of the mechanical axis deviation and joint orientation angles.
- Identify the Center of Rotation of Angulation: Draw the proximal and distal anatomical or mechanical axes. Mark their intersection point.
- Determine the Osteotomy Rule: Decide whether the osteotomy will pass through the Center of Rotation of Angulation (Rule 1) or at a different level (Rule 2 or 3).
- Simulate the Correction: Digitally or manually template the bone cut. Rotate the distal segment around the planned Angulation Correction Axis to verify that the mechanical axis is restored and to quantify the required wedge size or translation distance.
- Select the Hardware: Template the plate, nail, or external fixator over the corrected bone model to ensure adequate fit, sufficient screw purchase, and appropriate working length.
Intraoperative Osteotomy Execution
- Establish the Mechanical Axis: Use an electrocautery cord or a radiopaque alignment rod over the sterile drapes under fluoroscopy to visualize the mechanical axis from the center of the femoral head to the center of the ankle.
- Place the Hinge Pin: For wedge osteotomies, insert a rigid Kirschner wire exactly at the planned Angulation Correction Axis. This pin serves as the physical apex of the wedge and protects the cortical hinge from being inadvertently cut by the saw.
- Perform the Corticotomy: Use a sharp, cooled oscillating saw or an osteotome to cut the bone. Copious saline irrigation is mandatory to prevent thermal necrosis of the bone, which can lead to nonunion.
- Preserve the Periosteum: Meticulous subperiosteal dissection is critical. The periosteum on the concave side of the deformity must be preserved to act as a vital soft-tissue hinge, providing both vascularity and mechanical stability during the opening or closing of the osteotomy.
- Achieve the Correction: Slowly open or close the osteotomy. For opening wedges, use calibrated wedges or a laminar spreader to achieve the exact templated gap. Verify the correction of the mechanical axis deviation under fluoroscopy before final fixation.
- Apply Final Fixation: Secure the construct with the chosen hardware, ensuring absolute stability or appropriate elastic suspension based on the fixation philosophy.
Complication Avoidance in Deformity Correction
Even with meticulous planning, deformity correction carries significant risks. Anticipating and mitigating these complications is the hallmark of an expert deformity surgeon.
Preventing Multiplanar Deformities
A common error in single-plane osteotomies is the inadvertent creation of a deformity in an orthogonal plane (e.g., creating a procurvatum deformity while correcting a varus deformity). This occurs when the osteotomy cut is not perfectly perpendicular to the plane of the deformity.
Surgical Pearls for Preventing Multiplanar Errors
* Always visualize the bone in true orthogonal planes (true AP and true lateral) under fluoroscopy before making the cut.
* The saw blade must be positioned exactly parallel to the planned joint orientation line in both the coronal and sagittal planes.
* If using a single-cut opening wedge technique, ensure the hinge axis is perfectly perpendicular to the plane of the deformity. A skewed hinge will induce unwanted flexion, extension, or rotation as the wedge is opened.
Optimizing the Biologic Healing Environment
Nonunion and delayed union are devastating complications, particularly in load-bearing opening wedge osteotomies. Preserving the biology is just as important as perfecting the geometry.
Surgical Pearls for Biologic Optimization
* Thermal Management: Never run an oscillating saw continuously in dense cortical bone without aggressive cold saline irrigation. Thermal necrosis extends millimeters beyond the cut surface and destroys osteocytes.
* Osteotome Utilization: Whenever possible, finish the final few millimeters of the osteotomy with a sharp osteotome rather than a saw. This preserves bone dust and avoids thermal injury near the vital cortical hinge.
* Grafting Large Defects: Any opening wedge defect larger than 12 millimeters, or any defect in a patient with compromised biology (smokers, diabetics), should be filled with a high-quality structural allograft combined with osteoinductive materials (such as demineralized bone matrix or bone marrow aspirate concentrate) to stimulate robust callus formation.
By strictly adhering to Dr. Paley's geometric principles, selecting the appropriate biomechanical hardware construct, and respecting the local biology, orthopedic surgeons can reliably correct complex limb deformities, restore function, and dramatically improve patient outcomes.
!!! info "Academic Resource & Medical Review"
This academic resource was prepared and medically reviewed by Prof. Dr. Mohammed Hutaif, Consultant Orthopedic & Spine Surgeon. It is formulated specifically for medical students, orthopedic residents, and surgeons preparing for high-stakes board examinations (AAOS, FRCS Tr & Orth, Arab Board).
!!! warning "Disclaimer"
The surgical techniques, classifications, and clinical guidelines presented herein are for educational and academic review purposes only. They are not intended to replace institutional protocols or independent clinical judgment.
You Might Also Like