Precision Orthopedic Deformity Correction: Paley's Principles, Planning & Osteotomy
Key Takeaway
Paley's principles emphasize objective geometric and mathematical planning to quantify limb deformities and calculate precise corrections. This systematic approach ensures reproducible outcomes by determining optimal osteotomy location and hinge placement, independent of specific hardware, restoring normal biomechanical alignment.
Introduction to Advanced Deformity Correction
The fundamental purpose of advanced orthopedic deformity correction is to restore normal biomechanical alignment and joint kinematics while preserving the biological vitality of the limb. Historically the evolution of deformity correction has been heavily tethered to the development of specific hardware systems from early rigid plates to complex circular external fixators. However modern orthopedic paradigms heavily championed by Dr Dror Paley emphasize that the principles of deformity correction are universal and transcend any single implant.
The Center of Rotation of Angulation method of planning deformity correction along with the foundational principles of mechanical axis alignment operates completely independently of any particular method of fixation. The geometry of the bone and the mathematics of the correction dictate the osteotomy while the hardware is merely the vehicle used to maintain that correction. The choices regarding hardware and surgical technique are ultimately left to the discretion of the surgeon but they must be guided by a rigorous understanding of biomechanics patient biology and soft tissue constraints.
Often the biggest failings in deformity correction are associated not with the type of hardware chosen but rather with the way it is applied. A common pitfall is allowing the limitations of a chosen hardware system to dictate the osteotomy level and type of correction rather than selecting the hardware based on the optimal osteotomy level determined by the Center of Rotation of Angulation. This comprehensive guide will explore the intricate balance between hardware selection patient specific variables and precise osteotomy execution to equip the modern orthopedic surgeon with the tools necessary for mastery.
The Universal Principles of Dr Dror Paley
Before delving into hardware and surgical cuts a surgeon must master the preoperative planning phase. Deformity correction is a mathematical discipline applied to biological tissues. Dr Dror Paley revolutionized orthopedic surgery by standardizing the language and methodology used to analyze and treat limb deformities. His principles shift the focus from subjective visual assessment to objective geometric and mathematical planning.
The core philosophy dictates that normal limb alignment is defined by specific mechanical and anatomical axes and any deviation from these axes represents a deformity that can be quantified. By quantifying the deformity a surgeon can precisely calculate the exact location magnitude and direction of the required correction. This systematic approach eliminates guesswork and ensures reproducible clinical outcomes regardless of the chosen fixation method.
Preoperative Planning and Mathematical Modeling
The foundation of any successful deformity correction is a high quality full length standing anteroposterior radiograph of the lower extremities. The patellae must be oriented strictly forward to eliminate rotation which can artificially alter the appearance of coronal plane deformities.
Calculating Mechanical Axis Deviation
The mechanical axis of the lower extremity is a line drawn from the center of the femoral head to the center of the ankle joint at the tibial plafond. In a normally aligned limb this line passes just medial to the center of the knee joint specifically passing through the medial compartment.
The Mechanical Axis Deviation is the perpendicular distance from the center of the knee joint to this mechanical axis line. Quantifying the Mechanical Axis Deviation is the first critical step in diagnosing the severity of a coronal plane deformity such as varus or valgus.
- Medial Mechanical Axis Deviation: Indicates a varus deformity. The mechanical axis line falls medial to the center of the knee joint increasing compressive forces on the medial compartment.
- Lateral Mechanical Axis Deviation: Indicates a valgus deformity. The mechanical axis line falls lateral to the center of the knee joint increasing compressive forces on the lateral compartment.
By identifying the Mechanical Axis Deviation the surgeon confirms the presence of a global limb malalignment. However the Mechanical Axis Deviation alone does not identify the source of the deformity whether it originates in the femur the tibia or the knee joint itself.
Defining Joint Orientation Angles
To determine exactly where the deformity lies the surgeon must measure the joint orientation angles and compare them to standardized population norms. These angles define the relationship between the mechanical or anatomical axes of the bones and the articular surfaces of the joints.
The following joint orientation angles are critical for evaluating lower extremity deformities
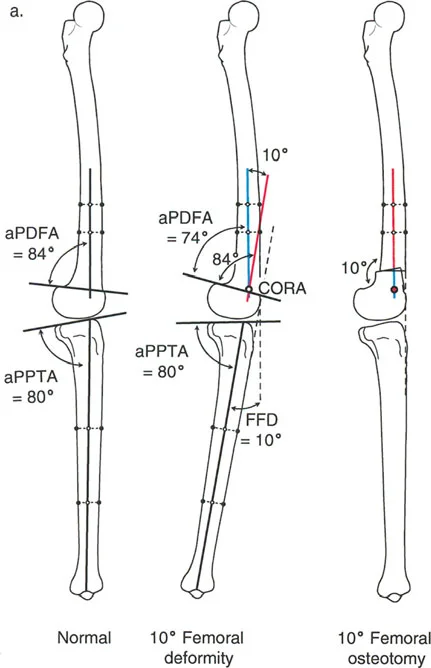
- Mechanical Lateral Distal Femoral Angle: The lateral angle formed by the mechanical axis of the femur and the joint line of the distal femur. The normal value is approximately 87 degrees with a standard deviation of 3 degrees.
- Medial Proximal Tibial Angle: The medial angle formed by the mechanical axis of the tibia and the joint line of the proximal tibia. The normal value is approximately 87 degrees with a standard deviation of 3 degrees.
- Lateral Distal Tibial Angle: The lateral angle formed by the mechanical axis of the tibia and the joint line of the distal tibia. The normal value is approximately 89 degrees with a standard deviation of 3 degrees.
- Joint Line Convergence Angle: The angle formed between the articular surface of the distal femur and the articular surface of the proximal tibia. This evaluates intra articular deformity or ligamentous laxity. The normal value is 0 to 2 degrees.
| Joint Orientation Angle | Normal Value | Clinical Significance in Deformity |
|---|---|---|
| Mechanical Lateral Distal Femoral Angle | 87 degrees | Values greater than 90 indicate femoral varus. Values less than 85 indicate femoral valgus. |
| Medial Proximal Tibial Angle | 87 degrees | Values less than 85 indicate tibial varus. Values greater than 90 indicate tibial valgus. |
| Lateral Distal Tibial Angle | 89 degrees | Values greater than 92 indicate distal tibial varus. Values less than 86 indicate distal tibial valgus. |
| Joint Line Convergence Angle | 0 to 2 degrees | Values greater than 2 degrees indicate intra articular deformity collateral ligament laxity or cartilage loss. |
The Malalignment and Malorientation Tests
Dr Paley formalized the Malalignment Test and the Malorientation Test as a step by step algorithm to pinpoint the source of the deformity.
- Step One: Draw the mechanical axis line from the femoral head to the ankle center. Determine if a Mechanical Axis Deviation exists.
- Step Two: If a Mechanical Axis Deviation is present measure the Mechanical Lateral Distal Femoral Angle and Medial Proximal Tibial Angle.
- Step Three: Compare the measured angles to normal values. If the Mechanical Lateral Distal Femoral Angle is abnormal the femur is deformed. If the Medial Proximal Tibial Angle is abnormal the tibia is deformed. If both are abnormal a multi apical or multi bone deformity exists.
- Step Four: Evaluate the Joint Line Convergence Angle. If it is abnormal ligamentous instability or cartilage wear is contributing to the overall Mechanical Axis Deviation and must be accounted for in the surgical plan.
The Center of Rotation of Angulation Method and Osteotomy Rules
The Center of Rotation of Angulation is the intersection of the proximal and distal mechanical or anatomical axis lines of a deformed bone. Identifying the Center of Rotation of Angulation is the crux of deformity planning. Once the apex of the deformity is located the surgeon must decide where to make the bone cut and where to place the hinge point for correction.
Paley established three fundamental osteotomy rules based on the geometric relationship between the Center of Rotation of Angulation the osteotomy site and the hinge axis. The hinge is the theoretical or physical axis around which the bone ends rotate during correction.
Osteotomy Rule One Pure Angulation
When the osteotomy and the hinge are both located at the Center of Rotation of Angulation the bone is realigned via pure angulation without any secondary translation deformity. The mechanical axis is perfectly restored and the bone ends remain completely apposed without shifting laterally or medially.
This is the ideal scenario for deformity correction as it maximizes bone contact for healing and perfectly restores the anatomical axis. Clinical examples include a closing wedge osteotomy or an opening wedge osteotomy performed exactly at the apex of the deformity.
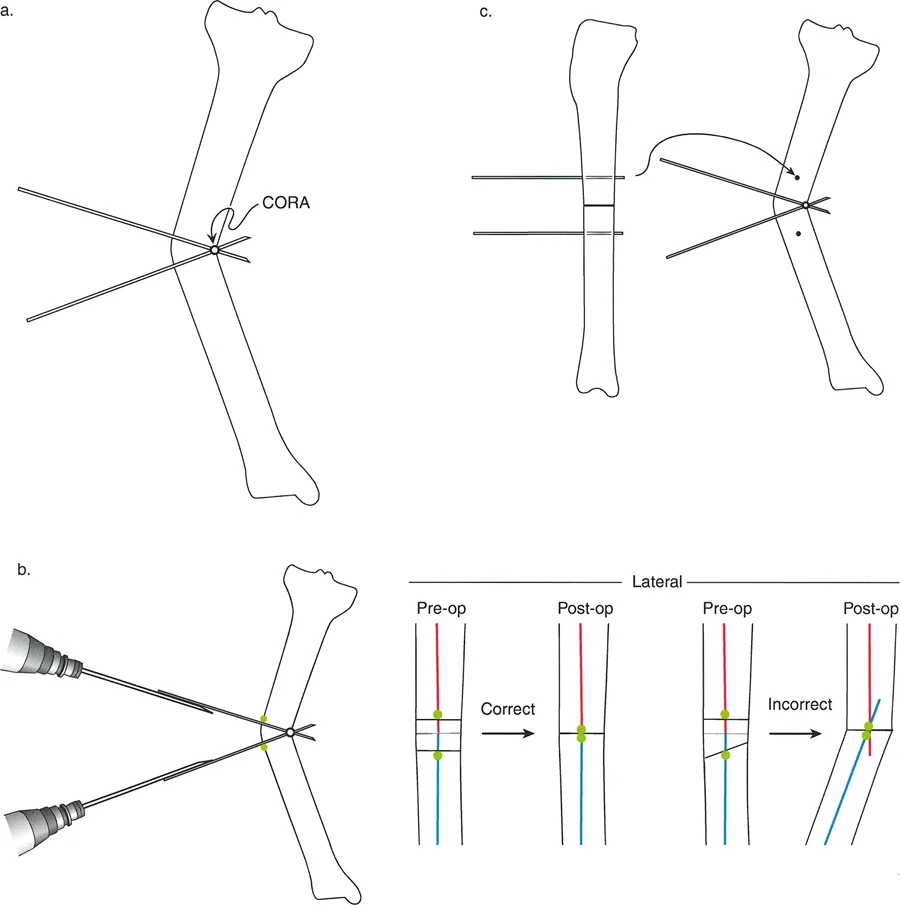
Osteotomy Rule Two Angulation and Translation
When the osteotomy is performed at a level distant from the Center of Rotation of Angulation but the hinge remains at the Center of Rotation of Angulation the bone ends must angulate and translate to achieve proper alignment.
This rule is frequently utilized when the true Center of Rotation of Angulation is located in an undesirable location such as within a joint space very close to the articular surface or in an area of severely compromised soft tissue. By placing the hinge at the Center of Rotation of Angulation but cutting the bone at a different level the surgeon can still achieve perfect mechanical axis alignment. However the necessary translation at the osteotomy site will reduce the cross sectional contact area between the bone segments which can impact the speed of bone healing and dictate the need for more robust hardware.
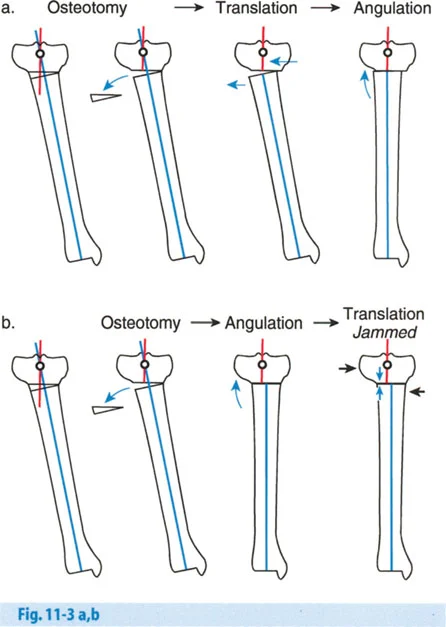
Osteotomy Rule Three The Dog Leg Deformity
When the osteotomy and the hinge are both located at a level distant from the Center of Rotation of Angulation the correction will result in a secondary translation deformity commonly referred to as a dog leg deformity.
This causes the mechanical axis to remain deviated which is a frequent cause of poor clinical outcomes and premature joint degeneration. Rule Three is generally considered a planning failure. It occurs when a surgeon places an intramedullary nail or a plate based purely on anatomical convenience rather than mathematical planning forcing the bone to hinge at the osteotomy site rather than the true apex of the deformity.
Comprehensive Guide to Hardware Selection
The choice of hardware is multifaceted and dependent on several critical factors including patient age level of osteotomy number of osteotomies type of osteotomy acute versus gradual correction bone quality soft tissue constraints and the surgeons familiarity with specific implant systems. Furthermore in developing countries or cost conscious environments the availability of hardware may be the determining factor.
Patient Age and Pediatric Considerations
With pediatric patients skeletal size and the presence of open physes dictate the surgical approach. Pediatric deformity correction requires a delicate balance between achieving mechanical alignment and protecting the growth potential of the limb.
- Guided Growth: Before considering an osteotomy in a growing child surgeons should evaluate the potential for guided growth using tension band plates. By tethering the convex side of a deformity at the physis the surgeon harnesses the childs natural growth to correct the angulation over time. This is a minimally invasive alternative to osteotomy.
- Physeal Protection: If an osteotomy is required the hardware must not cross an open physis unless physeal arrest is the intended outcome. Intramedullary nails are frequently contraindicated in young children due to the risk of damaging the proximal femoral or proximal tibial physes.
Bone Dimensions and Biomechanical Constraints
Bone diameter and length limit the size of the implants that can be used. A fundamental biomechanical rule is that holes drilled into the bone greater than one third the diameter of the bone significantly weaken the cortex. This results in a high risk of fracture through the stress riser either during fixation or after hardware removal.
Surgeons must carefully select plate sizes and screw diameters that provide adequate stability without compromising the structural integrity of the native bone. In cases of severe congenital deformities where the bones are abnormally thin specialized pediatric implants or fine wire external fixators may be the only viable options.
Hardware Retention Risks and Healing Potential
Removal of internal fixation after healing is frequently recommended for children and young adults. This is due to the theoretical risks of long term carcinogenesis from metal ions stress shielding which weakens the native bone by diverting mechanical loads away from it and the creation of stress risers at the ends of rigid plates.
Furthermore retained hardware can complicate future surgeries if the child requires subsequent lengthening or corrections as they grow. Because children heal with remarkable speed the required time for rigid fixation is relatively short allowing for safe hardware removal once cortical consolidation is confirmed radiographically. Adult patients conversely may retain hardware indefinitely unless they experience symptomatic hardware irritation.
Acute Versus Gradual Correction Strategies
One of the most critical decisions in deformity correction is choosing between an acute correction performed entirely in the operating room or a gradual correction performed over several weeks or months.
Indications for Acute Correction with Internal Fixation
Acute correction involves cutting the bone manually realigning it to the planned position and securing it immediately with internal hardware such as locking plates or intramedullary nails.
- Advantages: The primary advantage is patient comfort and convenience. The correction is complete when the patient wakes up from surgery and there is no need for prolonged external frame management or pin site care.
- Disadvantages: Acute correction is limited by the soft tissues. Large corrections can stretch neurovascular structures leading to catastrophic complications. For example an acute correction of a severe proximal tibial valgus deformity places the common peroneal nerve at high risk for a traction stretch injury resulting in foot drop. Acute correction also requires precise intraoperative execution as post operative adjustability is minimal.
Internal fixation options for acute correction include
- Locking Plates: Provide excellent angular stability and are ideal for metaphyseal osteotomies. They act as internal fixators and do not rely on friction against the bone for stability preserving periosteal blood supply.
- Intramedullary Nails: Offer superior biomechanical load sharing capabilities making them ideal for diaphyseal deformities. They allow for early weight bearing but require careful planning to ensure the nail trajectory aligns with the corrected mechanical axis.
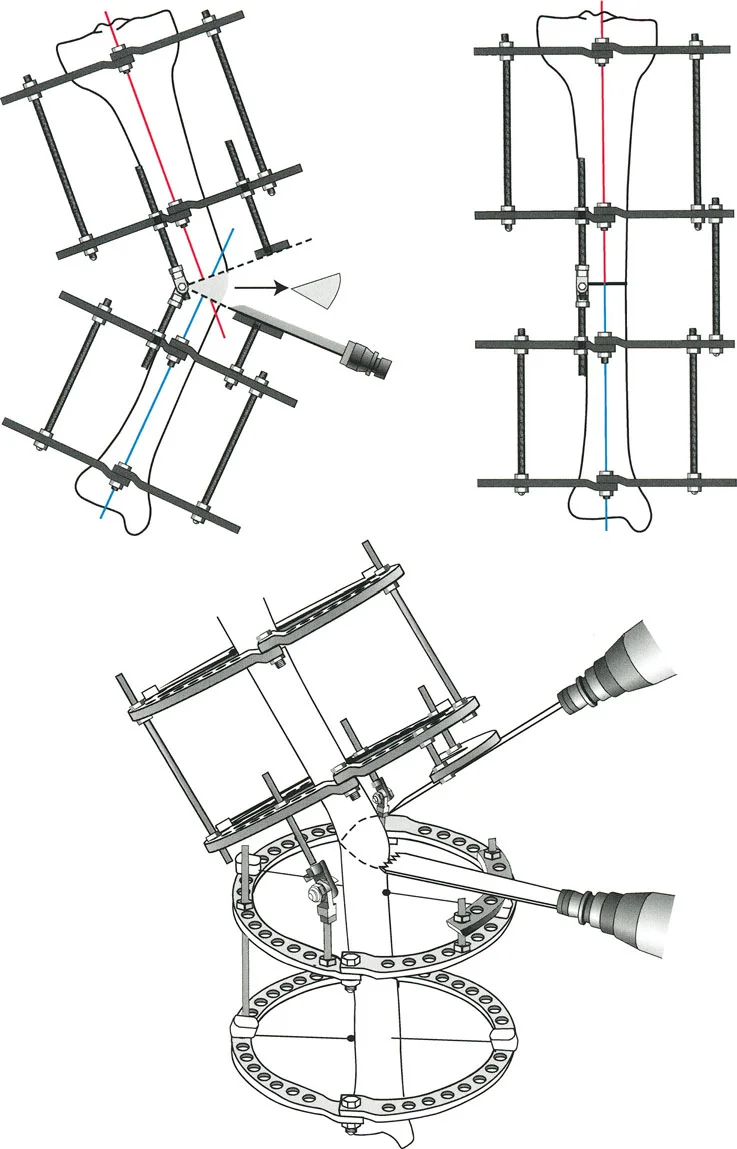
Indications for Gradual Correction with External Fixators
Gradual correction utilizes the biological principle of distraction osteogenesis also known as callotasis. The bone is cut through a low energy corticotomy and an external fixator is applied. After a latency period of a few days the bone ends are slowly pulled apart at a rate of approximately one millimeter per day allowing new bone tissue to form in the gap.
- Advantages: Gradual correction is unparalleled for managing severe multi planar deformities limb length discrepancies and cases with poor soft tissue coverage. Because the correction occurs slowly over time nerves blood vessels and skin safely stretch to accommodate the new alignment minimizing the risk of neurovascular compromise. Modern hexapod circular fixators utilize computer software to simultaneously correct angulation translation rotation and length in all six degrees of freedom.
- Disadvantages: The primary drawback is the significant burden placed on the patient. External fixators are bulky uncomfortable and require meticulous daily pin site care to prevent superficial and deep infections. The frame must remain in place until the regenerate bone is fully consolidated which can take several months.
Osteotomy Techniques and Soft Tissue Management
The physical execution of the bone cut is just as critical as the preoperative planning. The osteotomy must be performed in a manner that preserves the biological vitality of the bone to ensure rapid healing.
Percutaneous Versus Open Osteotomy
The surgical approach to the bone dictates the level of biological disruption.
- Open Osteotomy: Requires a larger incision to fully expose the bone. While this allows for direct visualization and precise geometric cuts using oscillating saws it strips the periosteum and disrupts the local blood supply potentially delaying union. Open techniques are typically required for complex closing wedge or opening wedge osteotomies stabilized with plates.
- Percutaneous Corticotomy: Championed by Ilizarov this technique involves making a minimal incision and using a sharp osteotome or a multiple drill hole technique to weaken the cortex before manually fracturing the remaining bone. This preserves the periosteal sleeve and the endosteal blood supply maximizing the osteogenic potential for gradual correction.
Types of Osteotomy Geometries
The geometry of the bone cut influences the stability of the correction and the healing potential.
- Opening Wedge Osteotomy: The bone is cut and hinged open on the concave side of the deformity. This technique adds length to the limb but creates a bony void that may require bone grafting to heal properly.
- Closing Wedge Osteotomy: A wedge of bone is removed from the convex side of the deformity and the gap is closed. This provides excellent bone to bone contact for rapid healing but inherently shortens the limb.
- Dome Osteotomy: A semi circular cut is made allowing the bone ends to rotate around a central axis without translating or creating a large gap. This provides excellent stability and maintains limb length but is technically demanding to execute.
Managing Soft Tissue and Joint Constraints
Bone deformity does not exist in a vacuum. The surrounding soft tissues muscles ligaments and fascia adapt to the deformed state over time. When a bone is acutely realigned these soft tissues can become severely tensioned.
Surgeons must frequently perform concomitant soft tissue procedures such as intramuscular aponeurotic lengthenings tendon releases or fascial compartment releases to prevent joint subluxation or compartment syndrome following an acute correction. Failure to address soft tissue contractures will inevitably lead to loss of correction or joint stiffness.
Avoiding Common Pitfalls in Deformity Correction
Mastering deformity correction requires recognizing and avoiding frequent errors that compromise patient outcomes.
Hardware Dictating the Osteotomy
As emphasized throughout this guide the most profound error a surgeon can make is allowing the implant to dictate the surgical plan. For example a surgeon may choose to use a standard straight intramedullary nail for a distal third tibial deformity. Because the nail requires a straight path the surgeon might be forced to make the osteotomy far proximal to the true Center of Rotation of Angulation resulting in a Rule Three violation and a post operative dog leg deformity. The hardware must always serve the mathematical plan never the reverse.
Failure to Address Sagittal and Axial Plane Deformities
While coronal plane deformities varus and valgus are the most visible on standard radiographs failure to identify and correct concomitant sagittal plane deformities procurvatum and recurvatum or axial plane deformities internal and external torsion will result in ongoing biomechanical dysfunction.
A comprehensive clinical examination including assessing the thigh foot angle and the transmalleolar axis is mandatory to rule out rotational malalignment. Advanced imaging such as computed tomography may be required to accurately quantify complex torsional deformities before finalizing the surgical plan.
Neglecting the Joint Line Convergence Angle
Surgeons often focus entirely on the bony anatomy and ignore the joint space. If a patient has significant lateral compartment cartilage loss or medial collateral ligament laxity the Joint Line Convergence Angle will be abnormally widened. If the surgeon corrects the bony deformity to a neutral mechanical axis without accounting for this intra articular laxity the patient will remain mechanically malaligned when weight bearing. The surgical plan must overcorrect or undercorrect the bony osteotomy to compensate for the dynamic instability of the joint.
Conclusion and Future Directions in Deformity Correction
Mastering deformity correction is a lifelong pursuit that requires a deep integration of geometry biomechanics and surgical craftsmanship. By adhering strictly to the universal principles established by Dr Dror Paley surgeons can demystify complex limb deformities and approach every case with mathematical precision.
The future of deformity correction lies in the continued advancement of technology. Three dimensional computer modeling patient specific 3D printed cutting guides and robotic assisted osteotomies are rapidly entering the clinical arena. These technologies promise to further reduce intraoperative errors and perfectly translate the preoperative mathematical plan to the surgical field. However regardless of how advanced the hardware or the technology becomes the foundational principles of the Center of Rotation of Angulation mechanical axis alignment and biological preservation will remain the bedrock of successful orthopedic deformity correction.
!!! info "Academic Resource & Medical Review"
This academic resource was prepared and medically reviewed by Prof. Dr. Mohammed Hutaif, Consultant Orthopedic & Spine Surgeon. It is formulated specifically for medical students, orthopedic residents, and surgeons preparing for high-stakes board examinations (AAOS, FRCS Tr & Orth, Arab Board).
!!! warning "Disclaimer"
The surgical techniques, classifications, and clinical guidelines presented herein are for educational and academic review purposes only. They are not intended to replace institutional protocols or independent clinical judgment.
You Might Also Like