Mastering the Posteromedial Ankle Arthrotomy: Surgical Techniques and Approaches
Key Takeaway
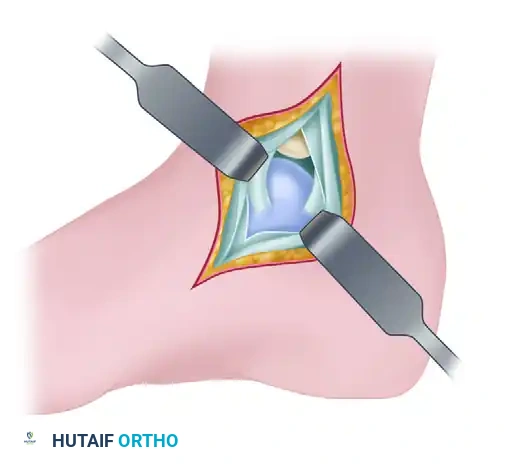
The posteromedial arthrotomy of the ankle provides critical access to the posterior talar dome and tibial plafond. This comprehensive guide details two primary techniques: the anteromedial approach and the posterior tibial tendon sheath approach. By mastering these precise anatomical windows, orthopedic surgeons can effectively address osteochondral lesions of the talus, loose bodies, and posterior capsular pathology while safeguarding the vital neurovascular structures of the tarsal tunnel.
INTRODUCTION TO POSTEROMEDIAL ANKLE ARTHROTOMY
Accessing the posteromedial aspect of the ankle joint presents a unique anatomical challenge for the orthopedic surgeon. The dense arborization of the deltoid ligament complex, combined with the critical neurovascular structures housed within the tarsal tunnel, makes surgical exposure technically demanding. While medial malleolar osteotomy remains a workhorse for massive, centrally located osteochondral lesions of the talus (OLTs), it carries inherent risks, including nonunion, malunion, and hardware irritation.
Consequently, joint-sparing posteromedial arthrotomies have been developed to provide adequate visualization of the posterior talar dome and tibial plafond without the morbidity of an osteotomy. This masterclass details two highly effective, evidence-based surgical techniques: the Posteromedial Arthrotomy Through an Anteromedial Approach (described by Thompson and Loomer) and the Approach to the Posteromedial Ankle Through the Posterior Tibial Tendon Sheath (described by Bassett et al.).
These approaches are primarily indicated for the excision and curettage of posterior osteochondral lesions of the talus, removal of posterior loose bodies, synovectomy for conditions such as synovial chondromatosis, and the management of posterior ankle impingement syndromes.
SURGICAL ANATOMY AND BIOMECHANICS
A profound understanding of medial ankle anatomy is non-negotiable when executing these approaches. The medial malleolus serves as the primary osseous landmark.
The Deltoid Ligament Complex
The deltoid ligament is divided into superficial and deep components. The superficial deltoid resists hindfoot eversion, while the deep deltoid is the primary stabilizer against lateral talar excursion and external rotation. The approaches detailed herein are specifically designed to exploit anatomical intervals that spare the critical deep posterior tibiotalar fibers of the deltoid ligament, thereby preserving ankle stability.
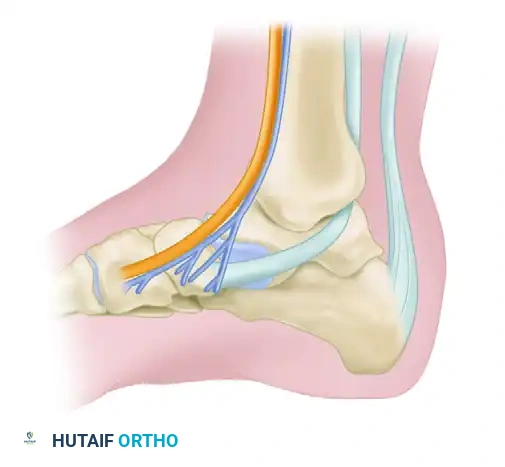
The Tarsal Tunnel
Located immediately posterior to the medial malleolus, the tarsal tunnel is roofed by the flexor retinaculum. From anterior to posterior, its contents include:
* Tibialis posterior tendon
* Flexor Digitorum longus tendon
* Posterior tibial Artery and Vein
* Tibial Nerve
* Flexor Hallucis longus tendon
Surgical Warning: Iatrogenic injury to the tibial nerve or its branches (medial calcaneal, medial plantar, lateral plantar nerves) can result in debilitating postoperative neuralgia. Retraction in this area must be deliberate, gentle, and strictly protective.
POSTEROMEDIAL ARTHROTOMY THROUGH ANTEROMEDIAL APPROACH (THOMPSON AND LOOMER)
The Thompson and Loomer technique utilizes a dual-window concept, leveraging the dynamic mobility of the ankle joint (plantar flexion and dorsiflexion) to sequentially expose the anterior and posterior halves of the superomedial talar dome.
Indications
This approach is ideal for lesions that span the mid-to-posterior aspect of the medial talar dome, where a single anterior or posterior window would provide insufficient access.
Step-by-Step Surgical Technique
1. Superficial Incision and Anterior Exposure
* Make a 10-cm curved incision, convex posteriorly, centered posterior to the medial malleolus. This curvilinear design allows for both anterior and posterior mobilization of the skin flap.
* Carefully dissect through the subcutaneous tissues to expose the medial joint capsule.
* Make a 2-cm longitudinal incision in the anteromedial capsule, extending precisely from the distal tibia to the talar neck.
2. Dynamic Anterior Inspection
* Maximally plantar flex the foot. This maneuver translates the talus anteriorly out of the mortise.
* Inspect the anterior one-half to two-thirds of the superomedial rim of the talus.
* If the osteochondral defect is fully visualized, proceed with excision, curettage, and microfracture drilling through this anterior window.
3. Posterior Extension (If Required)
* If the defect extends too far posteriorly and cannot be completely inspected or instrumented from the anterior window, the approach must be extended.
* Make a secondary curved incision directly over the posterior tibial tendon.
* Retract the superficial tissues anteriorly to expose the flexor retinaculum.
* Make a careful incision in the deep surface of the flexor retinaculum.
Clinical Pearl: Do not expose, dissect, or examine the neurovascular contents of the tarsal tunnel. Simply place a blunt retractor and gently retract the entire neurovascular bundle posteriorly. Overzealous dissection here is a primary cause of postoperative tarsal tunnel syndrome.
4. Dynamic Posterior Inspection
* With the tarsal tunnel contents safely retracted posteriorly, maximally dorsiflex the foot. This translates the posterior aspect of the talus into the surgical window.
* Observe the posterior one-half of the superomedial border of the talus.
* Inspect the lesion and treat it appropriately by excision, curettage, and marrow stimulation.
APPROACH TO POSTEROMEDIAL ANKLE THROUGH POSTERIOR TIBIAL TENDON SHEATH (BASSETT ET AL.)
The Bassett approach is an elegant, trans-sheath technique that utilizes the posterior tibial tendon itself as a physical barrier to protect the posterior neurovascular bundle. By entering the joint through the deep layer of the tendon sheath, the surgeon gains excellent access to the posterior mortise while sparing the posterior fibers of the deltoid ligament.
Patient Positioning and Anesthesia
- Positioning: The patient can be placed prone to allow direct posterior access. However, the supine position with the ipsilateral hip and knee flexed and externally rotated (the "figure-of-four" position) is far more commonly used. This allows simultaneous access to the anterior ankle if required and is generally better tolerated by the patient and anesthesia team.
- Tourniquet: A proximal thigh or calf tourniquet is utilized to ensure a bloodless surgical field, which is critical for identifying the posterior capsular layers and neurovascular structures.
Step-by-Step Surgical Technique
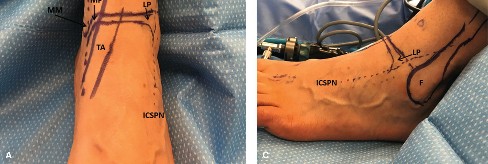
1. Landmarks and Superficial Incision
* Palpate the medial malleolus and the Achilles tendon. The interval between these two structures dictates the surgical corridor.
* Make a 5- to 8-cm incision immediately overlying the posterior tibial tendon, located just behind the medial malleolus.
* Curve the incision distally and slightly anteriorly, meticulously following the natural contour of the medial malleolus.
2. Superficial Dissection and Nerve Protection
* Deepen the incision through the subcutaneous tissue down to the flexor retinaculum overlying the posterior tibial tendon.
* Critical Step: Identify and protect the long saphenous vein and the saphenous nerve, which lie anterior to the incision path. Retract them gently anteriorly using a Ragnell or Senn retractor.
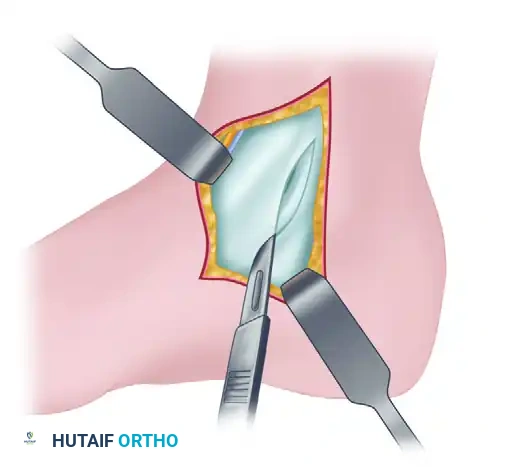
3. Incision of the Flexor Retinaculum
* Palpate the posterior tibial tendon as it curves posterior and inferior to the medial malleolus.
* Make a 5- to 8-cm longitudinal incision directly into the flexor retinaculum, following the exact contour of the posterior tibial tendon.
4. Tendon Retraction and Deep Exposure
* Mobilize the posterior tibial tendon and retract it posteriorly.
* Biomechanical Rationale: Retracting the tendon posteriorly is the cornerstone of this approach. The tendon acts as a robust, physical shield that protects the posterior neurovascular bundle (tibial nerve, posterior tibial artery/vein) from iatrogenic injury during the deep capsulotomy.
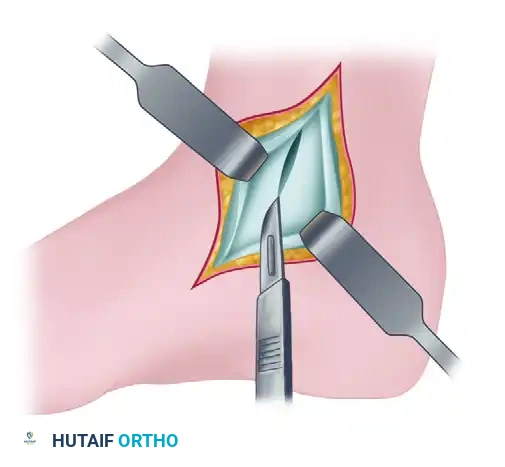
5. Deep Capsulotomy
* With the tendon retracted, the deep layer of the flexor retinaculum (the deep posterior tibial tendon sheath) and the underlying joint capsule are exposed.
* Make a 3- to 5-cm longitudinal incision through this deep layer and the joint capsule. Precision here is crucial to ensure direct entrance into the tibiotalar joint without damaging the adjacent articular cartilage.
6. Joint Inspection and Dynamic Exposure
* Place a blunt retractor (such as a mini-Hohmann or a smooth lamina spreader) through this capsular incision. Retract the capsule anteriorly and the posterior tibial tendon posteriorly.
* Move the foot dynamically into dorsiflexion, plantar flexion, inversion, and eversion.
* This dynamic manipulation allows for a comprehensive examination of the articular surface of the posterior talus, the posterior tibial plafond, and the posterior joint capsule.
Surgical Pearl: Utilizing the Bassett trans-sheath approach, the surgeon can successfully expose approximately 60% of the posterior talar dome and 50% of the posterior tibial articular surface. Crucially, this extensive exposure is achieved while completely sparing the posterior fibers of the deltoid ligament, thereby preventing postoperative medial instability.
POSTOPERATIVE CARE AND REHABILITATION PROTOCOL
The postoperative management following a posteromedial ankle arthrotomy is dictated by the specific intra-articular pathology addressed (e.g., simple loose body removal vs. extensive microfracture for an OLT). However, the foundational principles remain consistent.
Phase 1: Immediate Postoperative Period (0-2 Weeks)
- Wound Care: A bulky, sterile soft compressive dressing is applied in the operating room to minimize hemarthrosis and dead space.
- Immobilization: A posterior splint in neutral dorsiflexion may be used for the first 48-72 hours for pain control, but prolonged immobilization is strictly discouraged.
- Range of Motion (ROM): Immediate, gentle active and active-assisted range-of-motion exercises are initiated as soon as the patient tolerates. Early ROM is critical to prevent capsular adhesions, minimize posterior tibial tendon tethering, and provide mechanical stimulation for fibrocartilage generation if marrow stimulation was performed.
- Weight-Bearing: Weight-bearing as tolerated (WBAT) in a controlled ankle motion (CAM) boot is generally permitted for simple arthrotomies. If extensive microfracture was performed, the surgeon may elect for a period of restricted weight-bearing (e.g., touch-down weight-bearing for 4-6 weeks) depending on the lesion's size and location.
Phase 2: Intermediate Rehabilitation (2-6 Weeks)
- Sutures are removed at 14 days postoperatively.
- Transition to full weight-bearing in standard footwear as tolerated.
- Physical therapy focuses on restoring full symmetric dorsiflexion and plantar flexion.
- Inversion and eversion strengthening is initiated, with particular attention to posterior tibial tendon rehabilitation, given its mobilization during the surgical approach.
Phase 3: Advanced Function (6+ Weeks)
- Proprioceptive training (e.g., BAPS board, single-leg stance).
- Progressive resistance exercises.
- Return to high-impact activities and sports is typically permitted between 3 to 6 months, contingent upon the resolution of symptoms and radiographic evidence of healing (if applicable).
COMPLICATIONS AND PITFALLS
While highly effective, posteromedial arthrotomies carry specific risks that the orthopedic surgeon must actively mitigate:
- Tarsal Tunnel Syndrome / Tibial Neuralgia: The most devastating complication. It is entirely preventable by avoiding aggressive dissection of the neurovascular bundle. Always use blunt retractors and rely on the posterior tibial tendon as a protective barrier (Bassett approach).
- Saphenous Nerve Injury: The long saphenous vein and nerve cross the superior aspect of the surgical field. Failure to identify and retract these structures anteriorly can lead to painful neuromas or medial midfoot numbness.
- Posterior Tibial Tendon Adhesions: Because the tendon sheath is incised (and in the Bassett approach, both superficial and deep layers are violated), postoperative adhesions can occur. This manifests as medial ankle pain during active inversion. Immediate postoperative ROM is the primary defense against this complication.
- Inadequate Exposure: Attempting to access a lesion that is too far anterior via a posterior approach (or vice versa) will lead to frustration and potential iatrogenic cartilage damage from forced instrumentation. Precise preoperative MRI templating is mandatory to select the correct surgical window.
By adhering strictly to these anatomical principles and step-by-step techniques, the orthopedic surgeon can safely navigate the posteromedial ankle, providing definitive treatment for complex intra-articular pathology while minimizing patient morbidity.
You Might Also Like