Ankle Arthroscopy & Microfracture for Osteochondral Lesions of the Talus: A Masterclass
Key Takeaway
Welcome to the OR for an immersive masterclass on microfracture for osteochondral lesions of the talus (OLT). We'll cover comprehensive surgical anatomy, meticulous preoperative planning, and a granular, step-by-step intraoperative execution from the surgeon's viewpoint. Understand critical pearls, potential pitfalls, and detailed postoperative management protocols to optimize patient outcomes. This session provides an exhaustive guide for fellows.
Comprehensive Introduction and Patho-Epidemiology
Welcome to the operating theater, colleagues. Today, we are addressing a ubiquitous yet notoriously recalcitrant pathology in foot and ankle surgery: the osteochondral lesion of the talus (OLT). This patient presents with persistent, deep-seated ankle pain, recurrent effusion, and mechanical symptoms, with magnetic resonance imaging (MRI) confirming an identifiable bone bruise and a full-thickness cartilage defect on the medial talar dome. The nomenclature surrounding these lesions has historically been a source of confusion—encompassing terms such as transchondral fractures, osteochondral fractures, flake fractures, and osteochondritis dissecans (OCD). However, "osteochondral lesion of the talus" has emerged as the most universally accepted and anatomically accurate descriptor, capturing the spectrum of chondral and subchondral pathology without implying a strictly inflammatory or ischemic etiology.
The long-term biological impact of subchondral effusion, and potential hemorrhage, on the articular cartilage layers remains a critical focal point of orthopedic research. We must interrogate the pathophysiology: is this a minor traumatic insult to the tide mark leading to prolonged, aseptic separation, or is it a more insidious process driven by chronic fluid intrusion through a fissured chondral layer? In our extensive clinical experience, chronic ankle instability frequently precipitates medial talar dome lesions characterized by abrasive, shear-type wear. This suggests a mechanism of repetitive microtrauma, contrasting sharply with the classic subchondral ischemic necrosis historically attributed to OCDs in other joints. These lesions often manifest as full-thickness cartilage defects, are frequently associated with subtle varus hindfoot alignment, and can present bilaterally in patients with a history of recurrent, bilateral inversion injuries.
Fundamentally, OLTs are defined by the aseptic separation or degeneration of an articular cartilage fragment, with or without the involvement of the underlying subchondral bone. The paramount clinical distinction to establish—both during preoperative templating and intraoperative evaluation—is the chronicity of the lesion. Acute injuries typically involve a fresh, well-demarcated osteochondral separation following a distinct traumatic event. Conversely, chronic lesions are the sequelae of repetitive microtrauma, often exhibiting sclerotic margins, subchondral cyst formation, and a mechanically inferior, fibrillated cartilaginous cap.
The etiology and pathogenesis of OLTs exhibit distinct geographic patterns on the talar dome. Lateral lesions are overwhelmingly associated with acute traumatic events—specifically, a dorsiflexed ankle forced into violent inversion. This mechanism drives the lateral border of the talar dome against the fibular articular surface, resulting in a shallow, wafer-like lesion typically situated in the anterior or middle third of the lateral aspect. Medial lesions, by contrast, are predominantly the result of repetitive microtrauma or a single, severe supination event. The classic mechanism involves a plantarflexed ankle subjected to inversion and external rotation, causing the medial talar dome to impact the tibial plafond. Consequently, medial lesions are generally deeper, cup-shaped, and located in the middle to posterior third of the talus. While genetic predispositions, endocrine anomalies, and localized ischemia have been postulated as contributing factors, robust evidence-based support for these endogenous etiologies remains sparse compared to the overwhelming biomechanical data.
It is imperative to recognize that our primary surgical objective in managing symptomatic OLTs is the alleviation of pain and the restoration of mechanical function, rather than the absolute prevention of secondary osteoarthritis. Longitudinal studies spanning decades have demonstrated that untreated, asymptomatic OLTs do not invariably progress to widespread, end-stage ankle arthropathy. Many OLTs discovered incidentally on advanced imaging remain quiescent and should be managed with benign neglect. Pain, functional limitation, and mechanical symptoms—not merely the presence of an imaging abnormality—must serve as our definitive benchmarks for surgical intervention.
Detailed Surgical Anatomy and Biomechanics
Before initiating any surgical approach, a meticulous review of the regional osteology, articular kinematics, and neurovascular topography is mandatory. The talus is an anatomically unique and unforgiving bone; approximately 60% of its surface area is covered by articular cartilage, leaving a remarkably limited footprint for vascular ingress.
Osteology and Articular Kinematics
The talar body possesses a complex trapezoidal geometry, being approximately 2.5 mm wider anteriorly than posteriorly. Its superior dome (trochlea) articulates with the tibial plafond, while the medial and lateral articular facets intimately engage their respective malleoli. Comprehending this trapezoidal morphology is critical for understanding standard ankle kinematics: during dorsiflexion, the wider anterior portion of the talus wedges into the ankle mortise, conferring maximal bony stability. Conversely, in plantarflexion, the narrower posterior aspect occupies the mortise, rendering the joint reliant on ligamentous restraints (primarily the anterior talofibular ligament) and increasing vulnerability to inversion trauma. Any subtle instability, syndesmotic widening, or anterior impingement alters these kinematics, increasing focal shear stresses on the articular cartilage and contributing to OLT pathogenesis.
Vascular Anatomy and the Talar Watershed
The vascular supply to the talus is notoriously precarious, creating watershed zones highly susceptible to delayed healing and avascular necrosis. The talus is perfused via an extraosseous arterial ring formed by the three major arteries of the lower leg. The primary intraosseous supply enters through the talar neck via the sinus tarsi and tarsal canal.
1. Artery of the Tarsal Canal: A branch of the posterior tibial artery, this is the dominant blood supply to the talar body.
2. Artery of the Sinus Tarsi: Formed by anastomoses from the perforating peroneal artery and the dorsalis pedis artery, supplying the lateral talar body and neck.
3. Deltoid Branches: Arising from the posterior tibial artery, these supply the medial aspect of the talar body.
The superior talar dome, particularly the subchondral bone immediately beneath the articular cartilage, relies on terminal intraosseous microvascular networks. When an osteochondral fragment separates, its blood supply is abruptly severed. The rationale behind marrow stimulation techniques, such as microfracture, is to mechanically breach the sclerotic subchondral bone plate, thereby accessing the highly vascularized cancellous marrow. This allows mesenchymal stem cells, growth factors, and a fibrin superclot to populate the defect, eventually organizing into a fibrocartilaginous repair tissue.
Neurovascular Topography and Portal Safety
Arthroscopic access to the ankle joint requires navigation through a dense network of superficial neurovascular structures. Precision in portal placement is non-negotiable.
- Anteromedial Portal: Established just medial to the tibialis anterior tendon at the level of the joint line. The primary structures at risk are the great saphenous vein and the saphenous nerve, which course subcutaneously in the superficial fascia.
- Anterolateral Portal: Positioned lateral to the extensor digitorum longus (EDL) tendons and medial to the lateral malleolus. This is the most perilous standard portal due to the variable arborization of the superficial peroneal nerve (SPN), specifically its intermediate dorsal cutaneous branch. The SPN can often be palpated or visualized by plantarflexing and inverting the foot. Only the skin should be incised with a scalpel; deeper dissection must be strictly blunt using a mosquito hemostat.
- Posteromedial Portal: Located medial to the Achilles tendon and superior to the flexor hallucis longus (FHL) tendon. The tibial nerve and posterior tibial artery lie immediately anterior to the FHL. This portal is less commonly used for standard anterior OLTs but is critical for posterior lesions.
- Posterolateral Portal: Established lateral to the Achilles tendon. The sural nerve and small saphenous vein are at risk here.
Exhaustive Indications and Contraindications
The decision to proceed with arthroscopic bone marrow stimulation (microfracture) hinges on a careful calculus of patient symptoms, lesion morphology, and the failure of conservative management. Non-operative modalities—including immobilization in a controlled ankle motion (CAM) boot, non-weight-bearing protocols, physical therapy focusing on peroneal strengthening and proprioception, and judicious use of NSAIDs—should be exhausted for at least 3 to 6 months in chronic cases. Acute, displaced osteochondral fractures may warrant earlier surgical intervention.
The gold standard indication for primary arthroscopic microfracture is a symptomatic, focal OLT measuring less than 1.5 cm² in area (or less than 15 mm in diameter). Lesions exceeding this critical threshold demonstrate a precipitous drop in clinical success rates with marrow stimulation alone, as the resultant fibrocartilage lacks the structural integrity to withstand the immense shear forces across a large surface area. In such massive lesions, osteochondral autograft transfer (OATS) or matrix-induced autologous chondrocyte implantation (MACI) are more appropriate primary interventions.
| Indications for Arthroscopic Microfracture | Contraindications for Arthroscopic Microfracture |
|---|---|
| Symptomatic OLT failing 3-6 months of conservative care | Asymptomatic OLT discovered incidentally |
| Lesion size < 1.5 cm² (or < 15 mm in diameter) | Lesion size > 1.5 cm² (relative contraindication; consider OATS/MACI) |
| Acute, displaced osteochondral fracture (Stage IV) | Uncorrected global ankle instability (must be addressed concurrently) |
| Contained cystic lesions (with concurrent cyst decompression/grafting) | Uncorrected severe malalignment (e.g., severe varus/valgus hindfoot) |
| Patient willing to comply with strict NWB postoperative protocol | Diffuse, end-stage tibiotalar osteoarthritis ("kissing lesions") |
| Primary surgical intervention for symptomatic OLT | Active joint infection or severe peripheral vascular disease |
Pre-Operative Planning, Templating, and Patient Positioning
Surgical excellence is predicated on exhaustive preoperative planning. The margin for error in the ankle joint is measured in millimeters, and navigating the convex talar dome requires a precise, three-dimensional understanding of the lesion's topography.
Advanced Imaging and Staging
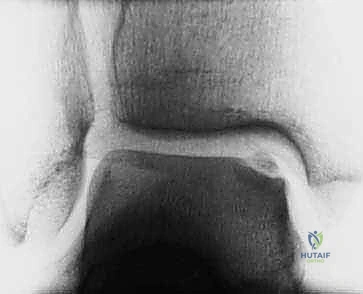
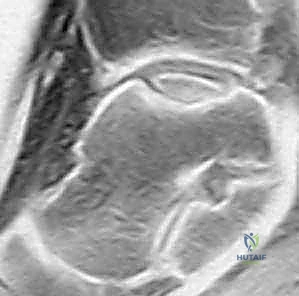
Our review of the imaging portfolio dictates the surgical strategy. Standard weight-bearing radiographs (AP, lateral, and mortise views) are obtained to assess overall joint space, alignment, and the presence of osteophytes. However, advanced imaging is paramount. A limited computed tomography (CT) scan is unparalleled for defining the osseous architecture, precise dimensions, and the presence of subchondral cysts or sclerotic margins.
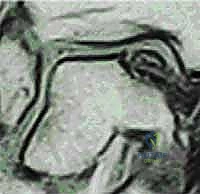
Magnetic Resonance Imaging (MRI) remains the gold standard for evaluating the chondral surface, subchondral bone marrow edema, and the integrity of the surrounding ligamentous structures. We meticulously utilize the Dipaola et al. MRI classification, an adaptation of the classic Berndt and Harty radiographic system, to stage the pathology:
* Stage I: Thickening of the articular cartilage with subchondral bone marrow edema (low signal on T1, high signal on T2).
* Stage II: Articular cartilage breached, with a low-signal rim behind the fragment indicating fibrous attachment without complete detachment.
* Stage III: Articular cartilage breached, with high-signal changes (fluid) behind the fragment indicating synovial fluid interposition between the fragment and the underlying subchondral bone. This fluid prevents healing and leads to subchondral cyst formation.
* Stage IV: Complete detachment of the fragment, presenting as an intra-articular loose body.
Operating Room Setup and Anesthesia
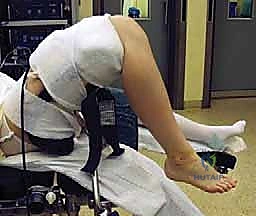
The patient is brought into the operating theater and positioned supine. General anesthesia is typically preferred to ensure complete muscle relaxation, though regional anesthesia (spinal or popliteal block) is an excellent adjunct for postoperative pain control. A well-padded pneumatic tourniquet is placed high on the ipsilateral thigh. Following exsanguination with an Esmarch bandage, the tourniquet is inflated to 250-300 mmHg. We strictly monitor tourniquet time, aiming for completion within 90-120 minutes to mitigate ischemic complications.
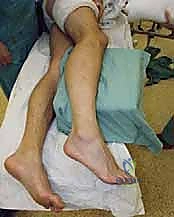
Patient Positioning and Examination Under Anesthesia (EUA)
Proper positioning is the linchpin of joint access. We utilize a specialized leg holder that suspends the distal thigh, allowing the knee to rest in approximately 45 degrees of flexion. This specific angle is critical: it relaxes the gastrocnemius-soleus complex, releasing tension on the Achilles tendon and permitting maximal passive dorsiflexion and plantarflexion. This dynamic mobility is essential for bringing posterior and central talar dome lesions into the arthroscopic field of view.

Prior to prepping and draping, an Examination Under Anesthesia (EUA) is mandatory. Without the confounding variable of patient guarding, we can accurately assess concurrent ligamentous instability. We perform an anterior drawer test to evaluate the anterior talofibular ligament (ATFL) and a varus talar tilt test to assess the calcaneofibular ligament (CFL). If gross instability is identified, a concurrent lateral ligament stabilization (e.g., Broström-Gould procedure) must be integrated into the surgical plan to prevent accelerated wear of the newly formed fibrocartilage.
Step-by-Step Surgical Approach and Fixation Technique
With the patient prepped and draped, and the fluoroscopic C-arm positioned for immediate access, we commence the arthroscopic phase.
Portal Placement and Joint Access
We begin by establishing our standard anterior portals. Joint distension prior to incision is highly recommended. Using an 18-gauge needle, we inject 15-20 cc of sterile saline into the joint space, aiming medial to the tibialis anterior tendon. A palpable distension of the capsule confirms intra-articular placement and pushes the anterior neurovascular structures away from the joint line.
- Anteromedial Portal: A 5-8 mm vertical skin incision is made just medial to the tibialis anterior tendon. Using a mosquito hemostat, we bluntly dissect through the subcutaneous tissue down to the extensor retinaculum and joint capsule. A blunt trocar and cannula are introduced, aiming toward the center of the joint. A distinct "pop" is felt as the capsule is breached.
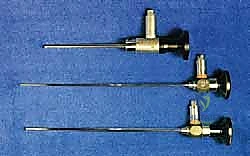
- Anterolateral Portal (Working Portal): With the 4.0mm, 30-degree arthroscope introduced medially, we illuminate the lateral gutter. Using direct transillumination and an 18-gauge spinal needle for localization, we identify the optimal trajectory lateral to the peroneus tertius. A skin-only incision is made, followed by rigorous blunt dissection to protect the superficial peroneal nerve.
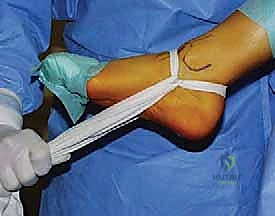
In cases where the lesion is located far laterally, or if access is restricted by a prominent anterior tibial osteophyte, an anterocentral portal (lateral to the extensor hallucis longus) may be carefully established, though the deep peroneal nerve and dorsalis pedis artery are at elevated risk here. Non-invasive distraction straps can be applied to the foot to open the joint space by 2-3 mm, which is often the difference between successful access and iatrogenic scuffing of the articular cartilage.
Diagnostic Arthroscopy and Lesion Preparation
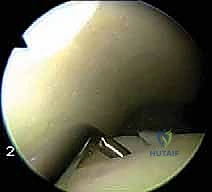
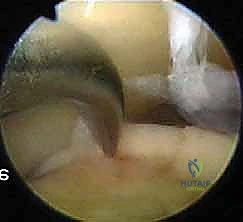
Upon entering the joint, a systematic 21-point diagnostic sweep is performed, evaluating the gutters, the syndesmosis, and the entire visible articular surface. The OLT is identified; it often presents as a ballotable, softened area of cartilage (the "blister" sign) or a frank chondral flap.
The critical next step is debridement. Using an arthroscopic probe, the unstable cartilage is elevated. A combination of arthroscopic shavers (4.0 mm or 3.5 mm) and ring curettes are utilized to meticulously remove all delaminated, fibrillated, and unviable cartilage.
The goal is to create stable, vertical margins of healthy hyaline cartilage—often referred to as the "ring of fire." Beveling the edges is strictly avoided, as vertical walls are necessary to contain the postoperative marrow superclot. Once the cartilage is debrided, the necrotic subchondral bone base must be addressed. We use a curette to scrape away the calcified cartilage layer and any fibrous tissue down to a bleeding subchondral bone base. Failure to remove the calcified cartilage layer is a primary cause of microfracture failure, as it acts as a barrier to marrow integration.
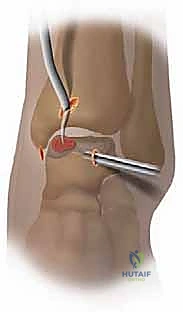
The Microfracture Technique
With the lesion prepared and measured (confirming it is < 1.5 cm²), we proceed to marrow stimulation. We utilize specialized, angled arthroscopic awls (typically 45, 60, and 90 degrees) to address the perpendicular topography of the talar dome.
Surgical Pearl: We explicitly avoid using motorized drills for marrow stimulation. High-speed drilling generates thermal necrosis, which can coagulate the microvasculature and kill the very mesenchymal stem cells we are attempting to recruit. Awls create micro-trabecular fractures and preserve the biologic viability of the surrounding bone.

The awl is positioned perpendicular to the subchondral bone surface. Mallet strikes are used to advance the awl to a depth of 2 to 4 mm, sufficient to breach the subchondral plate and enter the cancellous marrow. The microfracture holes are created starting at the periphery of the lesion and working centrally. The holes should be spaced approximately 3 to 4 mm apart to maintain the structural integrity of the subchondral plate; placing them too close together risks catastrophic coalescence and subchondral collapse.
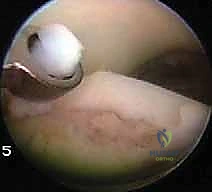
Once the entire defect has been microfractured, the arthroscopic fluid inflow pressure is temporarily reduced or turned off. We meticulously observe the microfracture holes for the extrusion of marrow elements—macroscopic fat droplets and blood. This "blush" confirms adequate penetration into the vascularized cancellous bone.
The joint is then thoroughly lavaged to remove any loose debris. The portals are closed with simple nylon sutures, and a bulky, sterile compressive dressing is applied, followed by a posterior splint with the ankle in neutral dorsiflexion.
Complications, Incidence Rates, and Salvage Management
While arthroscopic microfracture is generally safe and highly effective for appropriately selected lesions, it is not without risk. Complications can be categorized into approach-related, biologic, and mechanical failures.
The most frequent approach-related complication is iatrogenic injury to the superficial peroneal nerve during anterolateral portal placement, resulting in paresthesias or painful neuromas. Biologic failure occurs when the recruited mesenchymal stem cells fail to differentiate into robust fibrocartilage, or when the resulting fibrocartilage degrades prematurely due to inferior biomechanical properties (primarily Type I collagen, as opposed to the Type II collagen of native hyaline cartilage). Mechanical failure often presents as subchondral cyst formation, driven by synovial fluid pressure forcing fluid through micro-fissures in the repair tissue.
| Complication | Estimated Incidence | Prevention and Management Strategy |
|---|---|---|
| Superficial Peroneal Nerve Injury | 2% - 5% | Prevention: Skin-only incision, rigorous blunt dissection. Management: Gabapentinoids, local desensitization; surgical neuroma excision if refractory. |
| Iatrogenic Cartilage Scuffing | 3% - 8% | Prevention: Joint distension prior to entry, use of non-invasive distraction, careful instrument manipulation. Management: Debridement of scuffed flaps; usually asymptomatic if minor. |
| Failure of Fibrocartilage Fill / Recurrence | 15% - 25% (at 5+ years) | Prevention: Strict adherence to size criteria (< 1.5 cm²), removal of calcified cartilage layer, vertical margins. Management: Advanced salvage procedures (OATS, ACI). |
| Subchondral Cyst Formation | 5% - 10% | Prevention: Complete debridement of necrotic bone, ensuring clot stability. Management: Retrograde drilling and bone grafting if symptomatic. |
| Deep Vein Thrombosis (DVT) | < 1% | Prevention: Early mobilization of toes/knee, chemical prophylaxis in high-risk patients. Management: Standard systemic anticoagulation. |
Salvage Procedures for Failed Microfracture
When primary microfracture fails, resulting in persistent pain and a documented lack of cartilage fill on follow-up MRI, salvage procedures are required. For lesions that remain relatively small but have failed marrow stimulation, an Osteochondral Autograft Transfer System (OATS) procedure is utilized. This involves harvesting a cylindrical plug of bone and hyaline cartilage from a non-weight-bearing portion of the ipsilateral knee (e.g., the lateral femoral condyle periphery) and press-fitting it into the talar defect. For larger lesions, or when knee morbidity is a concern, Matrix-induced Autologous Chondrocyte Implantation (MACI) or fresh osteochondral allografts are the definitive salvage options, though they require an open arthrotomy (often with a medial malleolar osteotomy) and carry extended recovery timelines.
Phased Post-Operative Rehabilitation Protocols
The biological success of a microfracture procedure is heavily reliant on strict adherence to a phased postoperative rehabilitation protocol. The goal is to protect the fragile fibrin superclot during its initial organization, followed by controlled mechanical loading to stimulate mesenchymal cell differentiation into fibrocartilage.
Phase I: Protection and Early Motion (Weeks 0-2)
Immediately postoperatively, the patient is placed in a posterior splint and is strictly non-weight-bearing (NWB) on the operative extremity. At the 10-to-14-day mark, sutures are removed, and the patient is transitioned to a removable CAM boot. The critical component of this phase is the initiation of early, passive, and active-assisted range of motion (ROM) exercises. The patient is instructed to remove the boot multiple times daily to perform non-weight-bearing dorsiflexion and plantarflexion. This motion provides essential synovial fluid nourishment to the developing clot and prevents capsular contracture.
Phase II: Progressive Loading (Weeks 2-6)
The patient remains NWB for a total of 4 to 6 weeks, depending on the size and location of the lesion. ROM exercises are intensified, and stationary cycling with low resistance can be initiated. Pool therapy (hydrotherapy) is an excellent adjunct during this phase, allowing for buoyant, low-impact joint articulation. Strengthening of the proximal musculature (quadriceps, hamstrings, gluteals) and open-chain ankle strengthening (using resistance bands) are commenced.
Phase III: Functional Restoration (Weeks 6-12+)
At 6 weeks, if clinical progression is satisfactory, the patient begins a graduated transition to partial weight-bearing (PWB), advancing to full weight-bearing (FWB) over a 2-to-3-week period, initially within the CAM boot and then transitioning to a supportive athletic shoe. Physical therapy shifts focus to aggressive proprioceptive training (BAPS board, single-leg stance), closed-chain kinetic exercises, and functional movement patterns. Return to high-impact sports or pivoting activities is generally restricted until 4 to 6 months postoperatively, contingent upon the resolution of pain, restoration of full ROM, and symmetric lower extremity strength.
Summary of Landmark Literature and Clinical Guidelines
The clinical efficacy of arthroscopic microfracture for OLTs is well-documented, but deeply nuanced by patient selection. The landmark study by Chuckpaiwong et al. (2008) unequivocally established the size threshold for microfracture success. In their cohort, lesions measuring less than 15 mm in diameter demonstrated excellent clinical outcomes in over 85% of cases, whereas lesions exceeding 15 mm experienced a
