Master Guide to Ankle Arthroscopy: Portals & Techniques
Key Takeaway
Ankle arthroscopy is a minimally invasive surgical technique essential for diagnosing and treating intra-articular pathology, including osteochondral defects, impingement syndromes, and synovitis. Success relies on a profound understanding of neurovascular anatomy for safe portal placement. This guide details the systematic evaluation of the anterior and posterior compartments, optimal patient positioning, and advanced instrumentation required to minimize morbidity and accelerate postoperative rehabilitation in orthopedic practice.
Introduction and Historical Context
The evolution of ankle arthroscopy represents a significant milestone in minimally invasive orthopedic surgery. In 1931, Burman reported his initial experience with the arthroscopy of multiple joints in a cadaveric model. Due to the rudimentary techniques and bulky instrumentation available at the time, he erroneously deemed the ankle joint unsuitable for arthroscopic viewing. However, the Japanese orthopaedic literature saw Takagi describe a functional method for ankle arthroscopy in 1939. It was not until Johnson’s seminal 1981 text on arthroscopy that the procedure gained widespread traction in the American literature.
Since that era, advancements in fiber optics, fluid management, and small-joint instrumentation have propelled ankle arthroscopy from a purely diagnostic novelty to a highly therapeutic, standard-of-care procedure.
Advantages and Disadvantages
Advantages:
Ankle arthroscopy offers unparalleled direct visualization, allowing for meticulous inspection and palpation of the articular surfaces. It facilitates dynamic stress examination of the ligamentous structures under direct vision. Operative procedures performed arthroscopically yield significantly less postoperative morbidity, highly cosmetically pleasing incisions, accelerated rehabilitation, and a faster return to baseline function compared to traditional open arthrotomies.
Disadvantages:
The primary disadvantage lies in the steep learning curve and the inherent risk of iatrogenic damage to superficial neurovascular structures due to improperly placed portals. Furthermore, instrumentation in the central and posterior portions of the talus can be technically demanding due to the highly congruent, constrained nature of the tibiotalar joint. The reliance on specialized, fragile small-joint instrumentation also adds to the procedural expense.
Current Indications
Currently, ankle arthroscopy is considered the gold standard or a highly valuable adjunct for the treatment of:
* Osteochondritis dissecans (OCD) of the talus
* Transchondral fractures of the talar dome
* Removal of intra-articular loose bodies
* Management of chronic synovitis and arthrofibrosis
* Anterolateral, anteromedial, and posterior impingement syndromes
* Early-stage osteoarthritis (debridement and chondroplasty)
* Arthroscopic-assisted reduction and internal fixation (ORIF) of intra-articular tibial plafond (pilon) or talar fractures, which dramatically improves articular cosmesis and decreases soft-tissue morbidity.
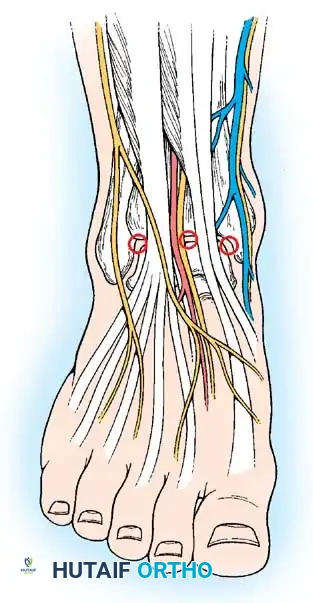
Arthroscopic Portal Placement and Neurovascular Anatomy
A profound, three-dimensional understanding of the anatomy surrounding the ankle joint is the most critical prerequisite for safe ankle arthroscopy. The superficial neurovascular structures must be meticulously identified, palpated, and outlined with a surgical marking pen prior to the induction of regional or general anesthesia, or immediately after exsanguination.
Arthroscopic portals are anatomically designated as anterior, posterior, transmalleolar, and transtendinous.
🚨 Surgical Warning: The "Nick and Spread" Technique
To minimize the risk of iatrogenic nerve injury, all skin incisions for portal placement must be made superficially with a No. 11 blade. Deep dissection must be performed bluntly using a small hemostat (the "nick and spread" technique) down to the level of the joint capsule.
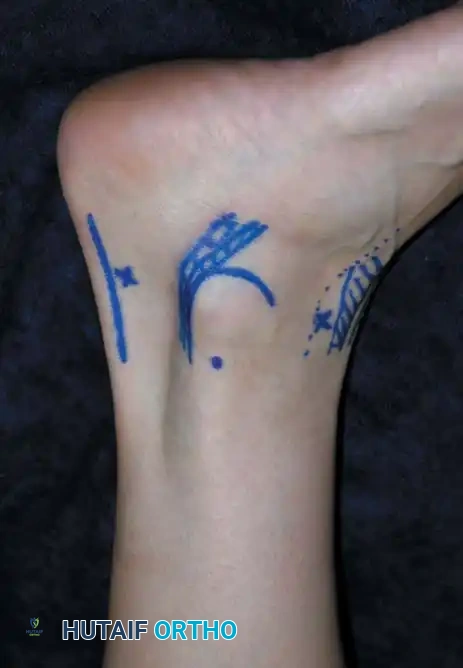
Anterior Portals
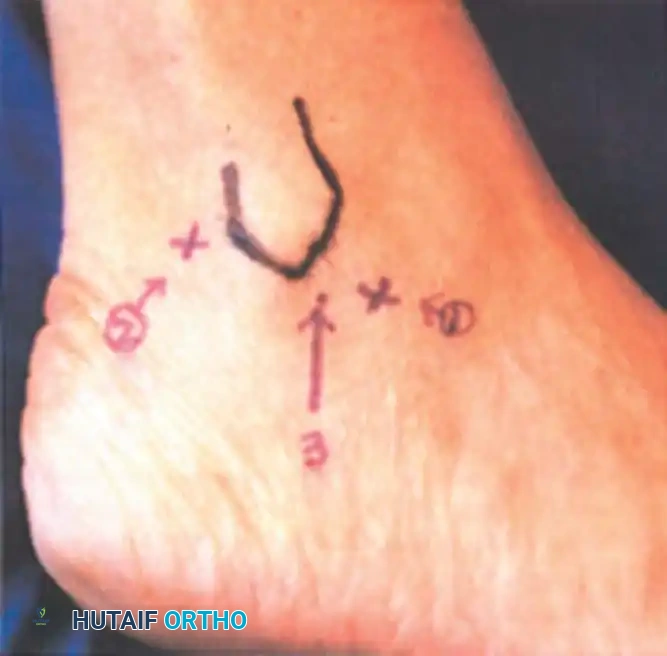
The anterior compartment of the ankle is accessed primarily through the anterolateral and anteromedial portals.
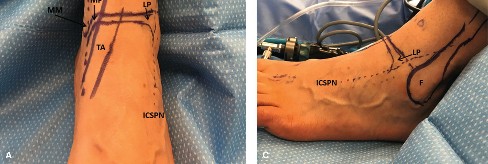
Anterior portals diagram illustrating the critical relationship between the portals and the anterior neurovascular bundles.
Clinical photograph demonstrating the marking of two anterior portals in relation to the anterior tibial and other extensor tendons.
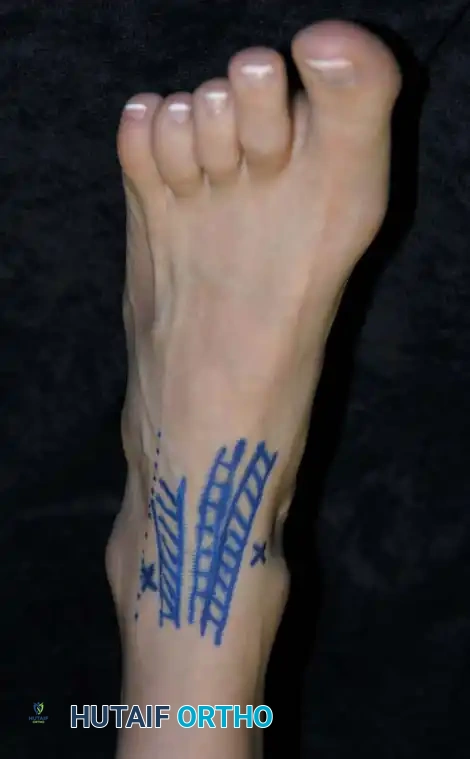
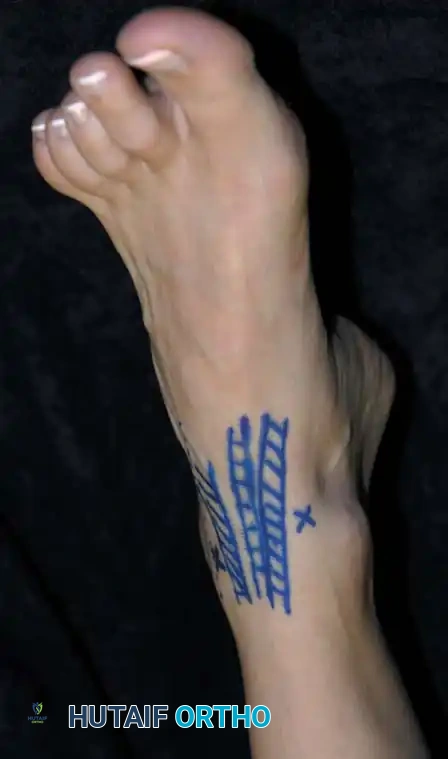
1. Anterolateral Portal
* Location: Located at the level of the tibiotalar joint line, immediately lateral to the peroneus tertius tendon.
* Structure at Risk: The intermediate dorsal cutaneous branch of the superficial peroneal nerve.
* Clinical Pearl: Injury to this nerve can be reliably avoided by plantarflexing and inverting the foot. This maneuver places the nerve under tension, allowing it to be visually identified or palpated as a subcutaneous cord prior to incision.
Anterolateral portal site marked precisely lateral to the peroneus tertius.
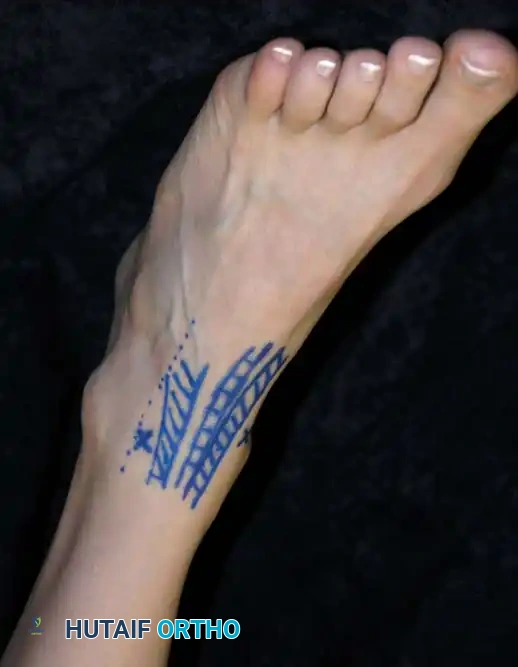
2. Anteromedial Portal
* Location: Located at the joint line, immediately medial to the anterior tibial tendon.
* Structure at Risk: The great saphenous vein and the saphenous nerve.
* Clinical Pearl: Injury is avoided by keeping the incision strictly adjacent to the medial border of the tibialis anterior tendon and avoiding medial drift during trocar insertion.
Anteromedial portal site marked medial to the anterior tibial tendon.
3. Anterocentral Portal (Not Recommended)
* Location: Located just lateral to the extensor hallucis longus (EHL) tendon or between the tendons of the extensor digitorum communis (EDC).
* Structure at Risk: The dorsalis pedis artery and the deep branch of the peroneal nerve.
* Consensus: Routine use of this portal is strongly discouraged due to the unacceptably high risk of catastrophic neurovascular injury. If absolutely necessary, blunt dissection is mandatory. Most master surgeons find no clinical necessity for this portal.
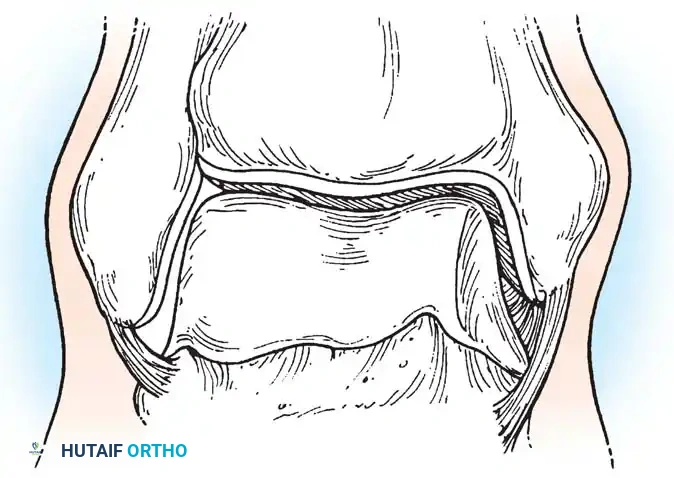
Posterior Portals
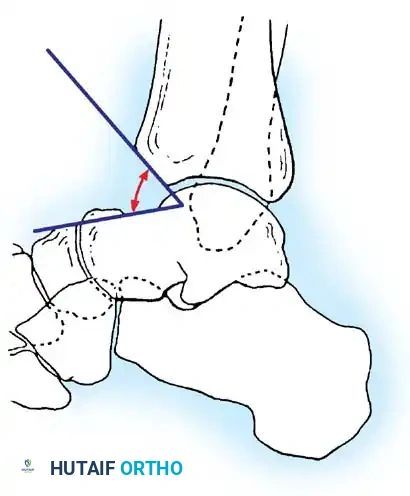
Access to the posterior compartment is essential for addressing posterior impingement (os trigonum syndrome), posterior loose bodies, and posterior talar dome lesions.
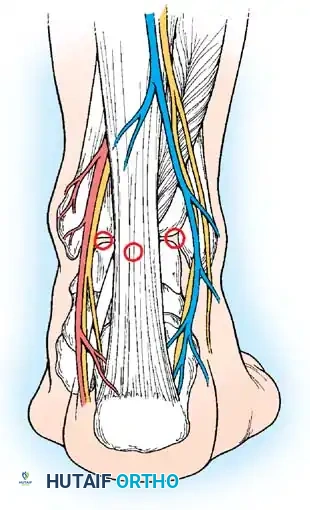
Posterior portals diagram detailing the relationship to the Achilles tendon, sural nerve, and posterior tibial neurovascular bundle.
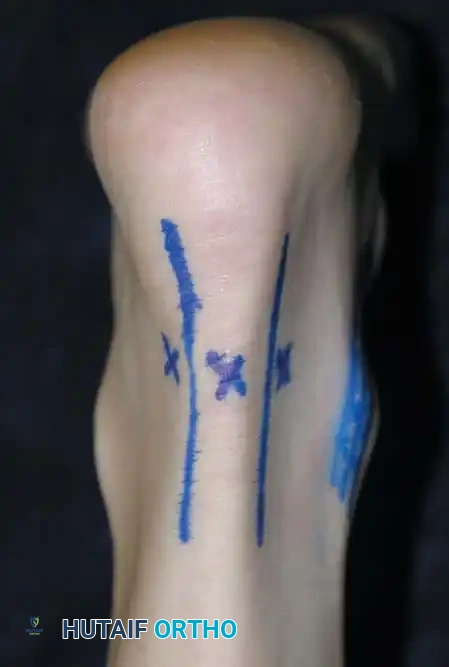
Clinical photograph showing the marking of the posterior portals.
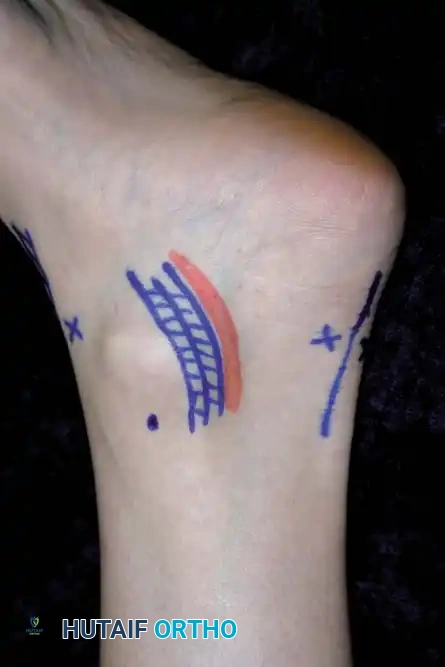
1. Posterolateral Portal
* Location: Located immediately lateral to the Achilles tendon at or slightly above the level of the joint line.
* Structure at Risk: The sural nerve and the small saphenous vein.
* Technique: The proper level is determined by arthroscopically viewing the entrance of an 18-gauge spinal needle placed just posterolateral to the tendon. The surgeon must avoid straying too far anteriorly to protect the sural nerve.
2. Posteromedial Portal
* Location: Located at the level of the joint line, just medial to the Achilles tendon.
* Structure at Risk: The posterior tibial artery, tibial nerve, and the medial calcaneal branch of the tibial nerve.
* Safety Profile: Sitler et al. evaluated the safety of posterior portals in the prone position. They found that 54% of the posterior talar dome could be visualized. The average distance to neurovascular structures was 3.2 mm to the sural nerve (laterally) and 6.4 mm to the tibial nerve (medially). Extreme caution is required.
Transmalleolar Portals
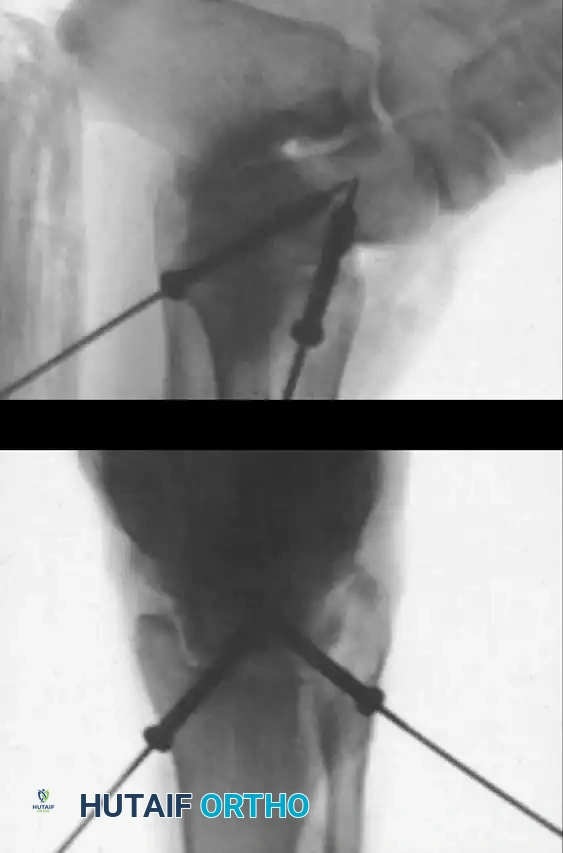
As originally described by Guhl, transmalleolar portals are advanced techniques reserved for addressing osteochondral defects of the posterior-central portion of the talus that cannot be reached via standard portals.
Medial transmalleolar portal trajectory.
Lateral transmalleolar portal trajectory.
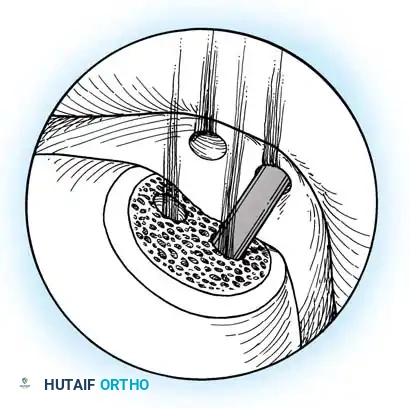
- Technique: These portals are established 2 to 3 cm proximal to the tip of the medial or lateral malleolus. Under direct arthroscopic visualization from an anterior portal, a 0.062-inch Kirschner wire is inserted using an anterior cruciate ligament (ACL) tibial guide for pinpoint accuracy. The wire is advanced across the malleolus to drill the chondral lesion. The ankle can be dynamically plantarflexed or dorsiflexed to allow drilling of the lesion in various locations.
Preoperative Setup and Instrumentation
Ankle arthroscopy is typically performed under general anesthesia to ensure complete muscle relaxation, though spinal or epidural anesthesia is an acceptable alternative.
Instrumentation:
* Arthroscope: A 30-degree, 2.7-mm wide-angle scope is considered the gold standard for ankle arthroscopy. Its smaller diameter allows for atraumatic passage into the tight anterior and posterior compartments. A 4.0-mm scope should be available for larger joints or specific anterior compartment work, but the 2.7-mm scope is generally sufficient for all procedures.
* Fluid Management: Inflow can be managed via gravity assistance with large-bore tubing or through a dedicated arthroscopic fluid pump. If a pump is used, low-level pressure (typically 30-40 mmHg) must be maintained.
🚨 Pitfall: Fluid Extravasation
The soft tissues of the leg and foot must be continuously monitored for swelling. Excessive pump pressures or inadequate outflow can lead to massive fluid extravasation, potentially resulting in iatrogenic compartment syndrome of the leg or foot.
Surgical Technique: Step-by-Step Guide
The following protocol outlines a systematic approach to diagnostic and therapeutic ankle arthroscopy.
1. Positioning and Preparation
- Place the patient supine on the operating table. Apply a well-padded tourniquet around the midthigh. A thigh holder may be utilized to stabilize the extremity and maintain slight hip flexion.
- Prep and drape the leg and ankle in a standard sterile, waterproof fashion.
- Apply a commercially available sterile non-invasive traction device (e.g., a specialized ankle strap) to the foot. By slightly flexing the foot of the table, longitudinal traction creates essential joint space, facilitating access to the central and posterior compartments.
- Note on Distraction: Non-invasive distraction is strongly preferred. Invasive distraction (using transcalcaneal or transtibial pins) does not provide a clinically significant increase in visualization compared to non-invasive techniques and carries unwarranted risks of pin-tract infection, ligamentous over-distraction, and stress fractures.
2. Landmark Identification and Joint Distention
- Elevate the extremity, exsanguinate with an Esmarch bandage, and inflate the tourniquet.
- Carefully outline the bony landmarks: the medial malleolus, lateral malleolus, and the anterior joint line (approximately 2.5 cm proximal to the tip of the lateral malleolus).
- Mark the anticipated anteromedial, anterolateral, and posterolateral portals.
- Insert an 18-gauge spinal needle at the marked anteromedial portal site, directing it toward the anatomic center of the joint.
- Inflate the joint with 20 mL of sterile normal saline. Proper intra-articular placement is confirmed by the visible bulging of the joint capsule medially and laterally, and the easy backflow of fluid through the needle hub.
3. Portal Creation
- Establish the anterolateral portal first. Place a spinal needle at the site and confirm fluid return.
- Use a No. 11 blade to make a vertical 5-mm skin incision. Use a small hemostat to bluntly spread the subcutaneous tissues down to the capsule, protecting the superficial peroneal nerve branches.
- Insert a blunt trocar and cannula through the capsule, directing it toward the center of the joint. Never use a sharp trocar, as it can easily scuff the highly congruent talar articular surface.
- Connect the inflow to the arthroscope cannula in the anterolateral portal.
- Under direct intra-articular vision, establish the anteromedial portal using spinal needle localization, followed by the "nick and spread" technique.

Initial arthroscopic view upon entering the anterior compartment, demonstrating the tight congruency of the tibiotalar joint.
4. The Systematic Diagnostic Tour
Any arthroscopic procedure must begin with a thorough, reproducible, systematic examination of the joint to ensure no concomitant pathology is overlooked. The ankle is conceptually divided into anterior and posterior compartments, each further subdivided into medial, central, and lateral zones.
The Anterior Compartment Sweep:
* Anteromedial Zone: Visualize the deep portion of the deltoid ligament, the medial talomalleolar articulation, and the medial tibiotalar joint. Look for medial gutter synovitis or osteophytes.
* Central Zone: Sweep across the dome of the talus and the corresponding tibial plafond. Probe the cartilage for softening, fibrillation, or frank osteochondral defects. Dynamic plantarflexion and dorsiflexion under traction significantly improve exposure of the talar dome.
* Anterolateral Zone: Examine the lateral tibial plafond, the lateral talomalleolar articulation, and the intra-articular portion of the anterior talofibular ligament (ATFL).
* Anterior Gutter: Sweep the scope distally over the talar neck. Inspect the anterior lip of the tibia for impingement osteophytes (often seen in athletes) and thoroughly check the anterior gutter for hidden loose bodies.
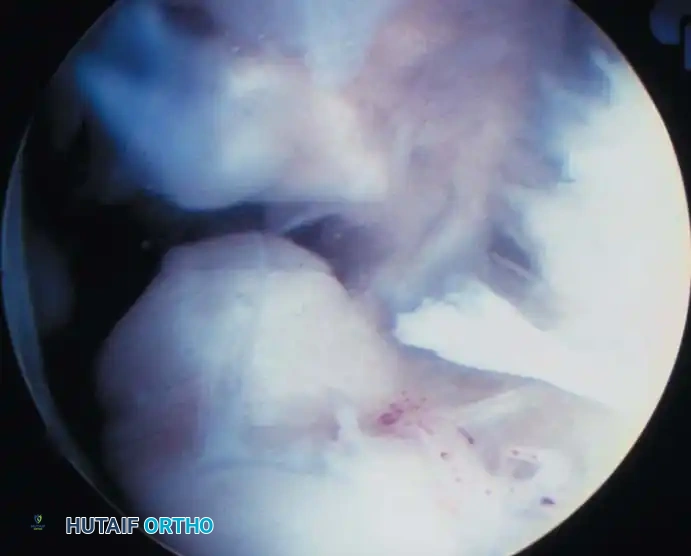
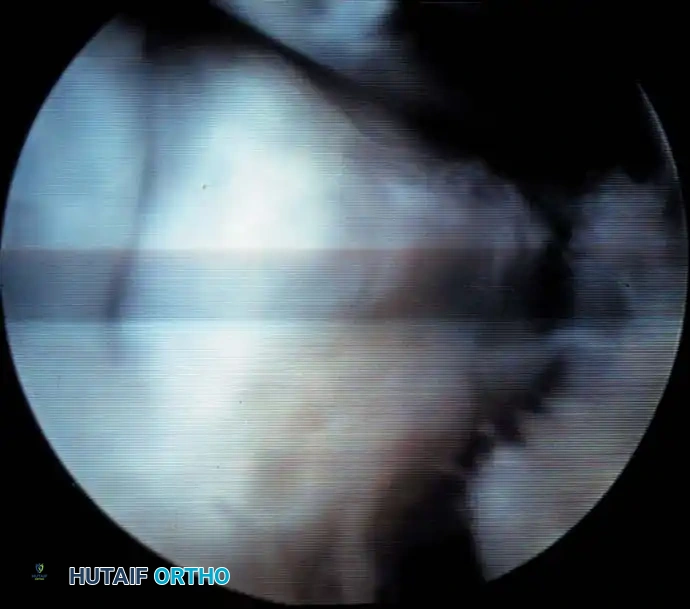
Arthroscopic view of the anterolateral gutter demonstrating synovial hypertrophy and soft-tissue impingement.

Arthroscopic visualization of an osteochondral defect (OCD) on the medial talar dome.
The Posterior Compartment Sweep:
In ankles with adequate ligamentous laxity or sufficient non-invasive distraction, the posterior compartment can be viewed from the anterior portals.
* Evaluate the posteromedial, central, and lateral tibiotalar articulations.
* Inspect the posteroinferior tibiofibular ligament and the transverse ligament.
* Loose Body Hunt: Loose bodies frequently migrate and become entrapped posterior to the tibiofibular ligaments. The surgeon should manually massage the posterior soft tissues of the ankle to express potential loose bodies into the arthroscopic field of view.
Arthroscopic view of the posterior gutter, a common hiding place for intra-articular loose bodies.
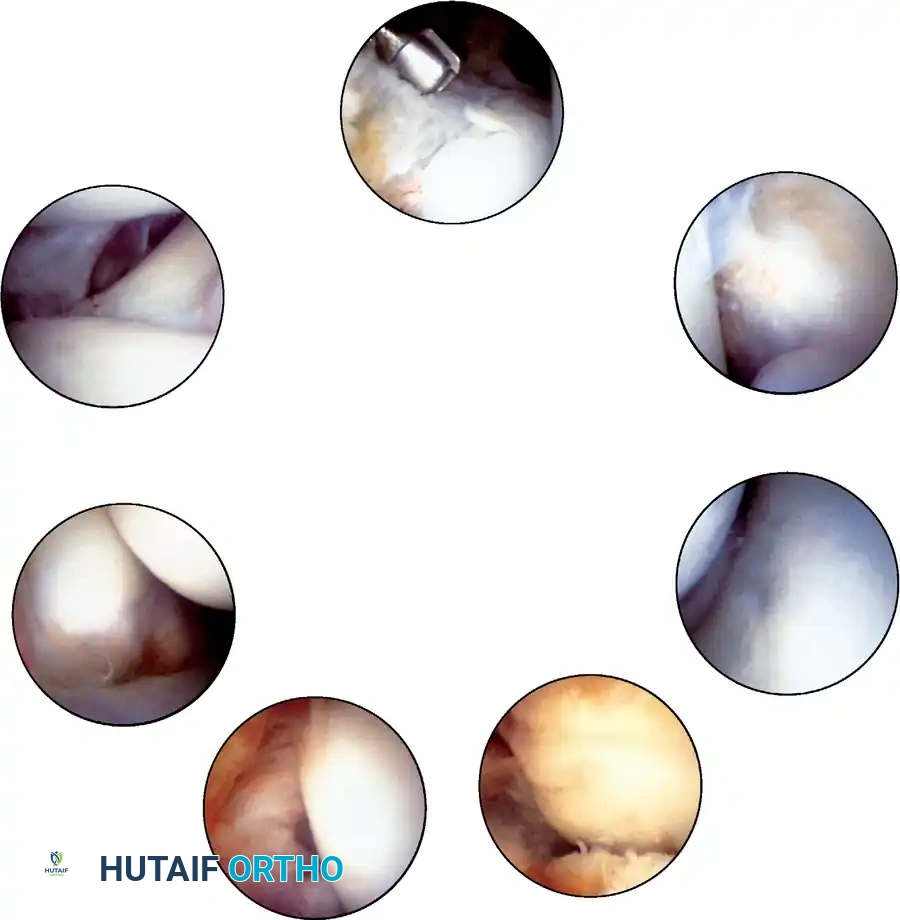
Further visualization of the posterior compartment structures, including the transverse ligament.
If the posterior compartment cannot be adequately visualized from anteriorly, a posterolateral portal must be established. Insert an 18-gauge needle just lateral to the Achilles tendon, approximately 1 cm distal to the corresponding anterior portal (to account for the curvature of the talar dome), which places it roughly 1.5 to 2 cm above the tip of the lateral malleolus.
Soft-Tissue Procedures and Pathology Management
More than one-third of operative ankle arthroscopies are performed exclusively for soft-tissue lesions.
Anterolateral Impingement Syndrome
The most frequent soft-tissue pathology is anterolateral impingement, typically resulting from a history of recurrent inversion ankle sprains.
* Pathophysiology: Incomplete healing of the anterior talofibular ligament (ATFL) or calcaneofibular ligament (CFL) results in hypertrophic scar formation and chronic synovitis in the anterolateral gutter. This fibrotic mass becomes pinched between the talus and fibula during dorsiflexion, causing persistent pain, catching, and swelling.
* Treatment: A motorized full-radius resector (shaver) and radiofrequency ablation wand are introduced via the anteromedial portal while viewing from the anterolateral portal. The hypertrophic tissue is aggressively debrided until the lateral gutter is completely cleared and the lateral malleolar articular surface is fully visible.
Arthroscopic debridement of anterolateral soft-tissue impingement using a motorized shaver.
Post-debridement view showing a cleared lateral gutter and restored articular space.
Syndesmotic Sprains and Anteromedial Impingement
- Anteromedial Impingement: Less common, but can occur after recurrent eversion sprains, leading to scarring of the deep deltoid ligament and anteromedial capsule.
- Syndesmotic Pathology: High ankle sprains often cause scarring
Associated Surgical & Radiographic Imaging
📚 Medical References
- ankle arthroscopy: analysis of the fi rst 518 cases, Orthop Trans 16:726, 1992.
- Freiberg A: Infraction of the second metatarsal bone, Surg Gynecol Obstet 19:191, 1914.
- Gross RH: Fractures and dislocations of the foot. In Rockwood CA Jr, Wilkins KE, King RE, eds: Fractures in children, Philadelphia, 1984, Lippincott. Hawkins LG: Fractures of the neck of the talus, J Bone Joint Surg 52A:991, 1970.
- Hepple S, Winson IG, Glew D: Osteochondral lesions of the talus: a revised classifi cation, Foot Ankle 20:789, 1999.
- Johnson FG: Pediatric Lisfranc injury: bunk bed fracture, AJR Am J Roentgenol 137:1041, 1981.
- Kavanaugh JH, Brower TD, Mann RV: The Jones fracture revisited, J Bone Joint Surg 60A:776, 1978.
- Kay RM, Tang CW: Pediatric foot fractures: evaluation and treatment, J Am Acad Orthop Surg 9:308, 2001.
- Kensinger DR, Guille JT, Horn D, et al: The stubbed great toe: importance of early recognition and treatment of open fractures of the distal phalanx, J Pediatr Orthop 21:31, 2001.
- Kling TF Jr: Operative treatment of
You Might Also Like