Posterior Surgeries for Idiopathic Scoliosis: A Masterclass in Surgical Technique
Key Takeaway
The posterior approach remains the workhorse for the surgical correction of adolescent idiopathic scoliosis. It provides extensile, safe access to the entire vertebral column, facilitating multi-segmental instrumentation and robust arthrodesis. Success relies on meticulous patient positioning to preserve sagittal alignment, precise subperiosteal exposure to minimize blood loss, and rigorous facetectomy and decortication to ensure a solid, long-lasting spinal fusion.
INTRODUCTION TO THE POSTERIOR APPROACH
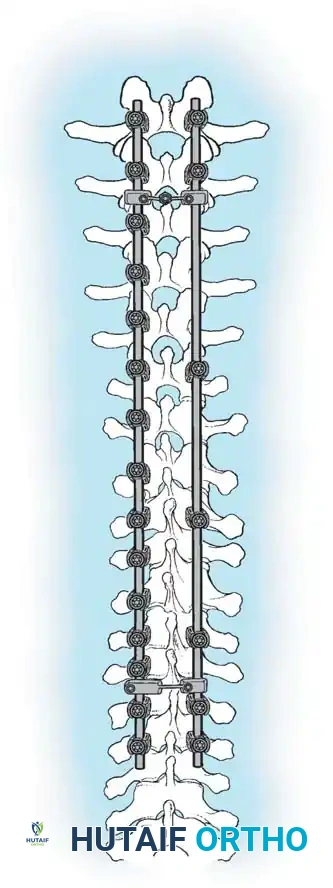
The posterior approach to the spinal column remains the most universally utilized and versatile corridor for the surgical management of adolescent idiopathic scoliosis (AIS). Familiar to all fellowship-trained orthopaedic spine surgeons, this extensile approach offers safe, comprehensive exposure of the entire vertebral column. It facilitates the application of modern multi-segmental pedicle screw constructs, allows for aggressive posterior column osteotomies, and provides a massive surface area for robust arthrodesis.
The long-term success of any operative procedure for scoliosis is fundamentally predicated on achieving a solid, mature arthrodesis. While instrumentation provides immediate biomechanical stability and deformity correction, it is the biological fusion that ensures lifelong maintenance of alignment.
PREOPERATIVE PLANNING AND PATIENT POSITIONING
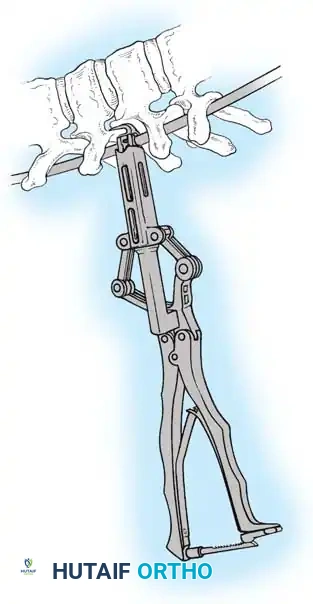
Meticulous patient positioning is the first and arguably one of the most critical steps in posterior spinal surgery. Proper positioning mitigates intraoperative complications, reduces blood loss, and fundamentally dictates the final sagittal profile of the instrumented spine.
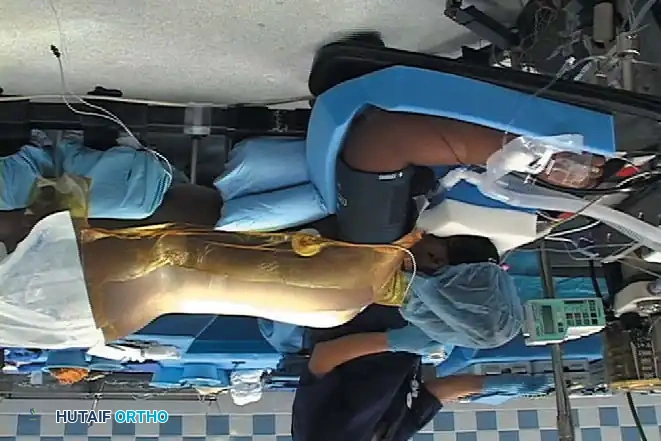
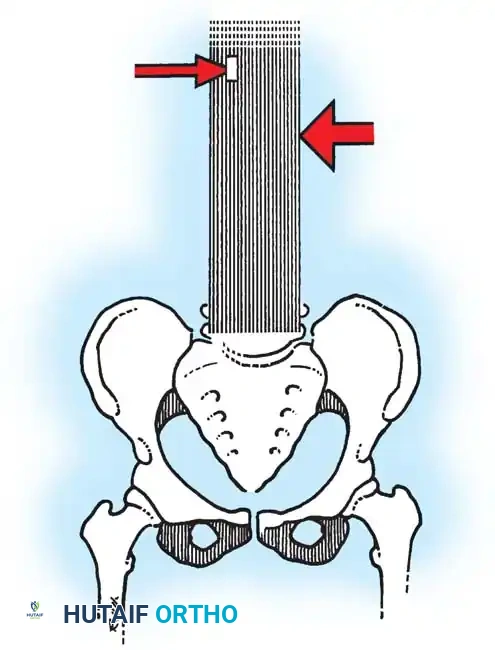
Fig. 38-22: Patient positioning on a Jackson table with hips in extension to maintain physiological lumbar lordosis.
Positioning on the Jackson Table
- Prone Positioning: The patient is carefully rolled prone onto an open-frame Jackson table (e.g., Mizuho OSI, Union City, Calif). The open frame is paramount as it allows the abdomen to hang free.
- Hemodynamic Optimization: Eliminating intra-abdominal pressure prevents compression of the inferior vena cava. This directly reduces venous engorgement within Batson’s epidural venous plexus, drastically minimizing intraoperative blood loss during exposure and pedicle cannulation.
- Neurological Protection: The arms must be meticulously supported on arm boards with all bony prominences (especially the elbows and ulnar nerves) heavily padded.
- Brachial Plexus Precaution: Do not abduct the shoulders beyond 90 degrees. Excessive abduction or extension places undue traction on the brachial plexus, risking postoperative neuropraxia.
- Chest Pad Placement: Ensure the upper pads of the frame rest squarely on the bony thorax (rib cage/sternum) and do not migrate into the axilla, which could compress the neurovascular bundle.
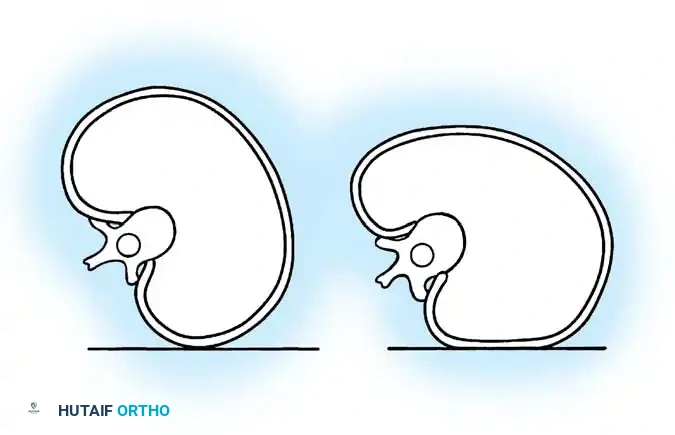
Surgical Warning: When a patient is positioned prone with the hips flexed, physiological lumbar lordosis is artificially obliterated. If the planned fusion extends into the lower lumbar spine (L3, L4, or L5), it is imperative to elevate the knees and thighs so the hip joints are fully extended. This maneuver restores and locks in normal lumbar lordosis, which is critical for preventing postoperative flatback syndrome and adjacent segment disease.
SURGICAL EXPOSURE: STEP-BY-STEP TECHNIQUE
A bloodless, efficient exposure sets the tone for the entire procedure. Meticulous subperiosteal dissection preserves the viability of the paraspinal musculature and minimizes hemorrhagic morbidity.
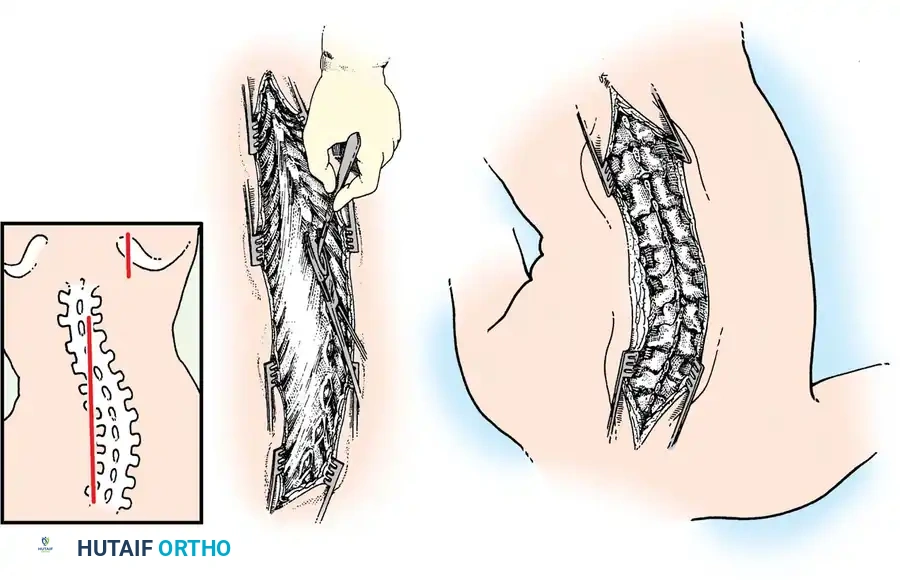
Fig. 38-23: A, Skin incisions for posterior fusion. B, Incisions over spinous processes and interspinous ligaments. C, Weitlaner retractors maintaining tension during dissection.
Incision and Superficial Dissection
- Skin Preparation: Scrub the patient’s back with a surgical chlorhexidine or iodine-based soap solution for 5 to 10 minutes, followed by an antiseptic paint. Drape the operative site widely and seal the skin with an antimicrobial plastic Steri-Drape.
- Incision Planning: Make a straight midline skin incision extending from one to two vertebrae superior to the proposed upper instrumented vertebra (UIV) down to one vertebra inferior to the lower instrumented vertebra (LIV). A perfectly straight scar significantly improves the postoperative cosmetic appearance.
- Hemostatic Infiltration: Make the initial incision through the dermal layer only. Infiltrate the intradermal and subcutaneous tissues with an epinephrine solution (1:500,000) to induce local vasoconstriction.
- Deepening the Wound: Deepen the incision through the subcutaneous fat to the level of the spinous processes. Utilize self-retaining Weitlaner retractors to maintain constant outward tension on the skin margins. Identify the avascular midline raphe (interspinous ligament), which typically appears as a distinct white line.
Deep Subperiosteal Dissection
- Cartilaginous Cap Incision: Incise the cartilaginous cap overlying the spinous processes precisely in the midline. Note that in severe scoliosis, the midline may be significantly deviated due to apical vertebral rotation.
- Cobb Elevation: Utilizing a Cobb elevator combined with electrocautery, expose the spinous processes subperiosteally. Move the cartilaginous caps and attached paraspinal muscles laterally.
- Direction of Dissection: It is anatomically advantageous to dissect from caudad to cephalad. The short rotator muscles (multifidus and rotatores) and ligaments of the spine attach obliquely, pointing superomedially. Sweeping upward works with the grain of these fibers, allowing for a cleaner, faster subperiosteal release.
- Maintaining Tension: As the exposure deepens, sequentially advance the Weitlaner or Cerebellar retractors. Constant, firm retraction is the surgeon's best tool for passive hemostasis.
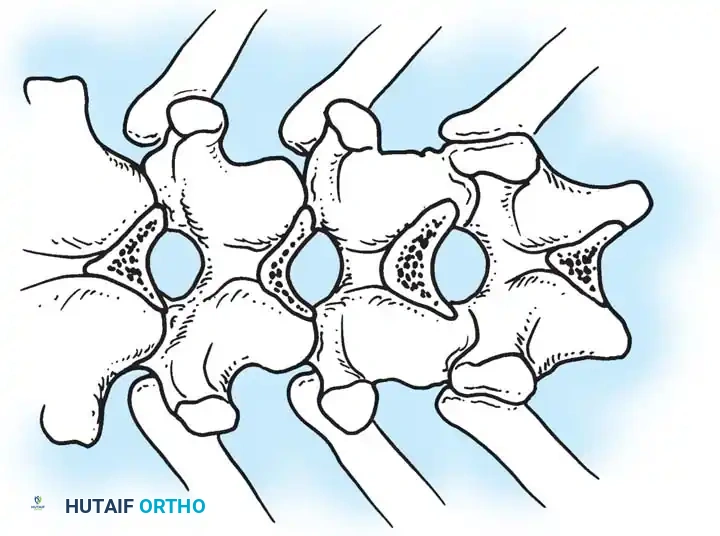
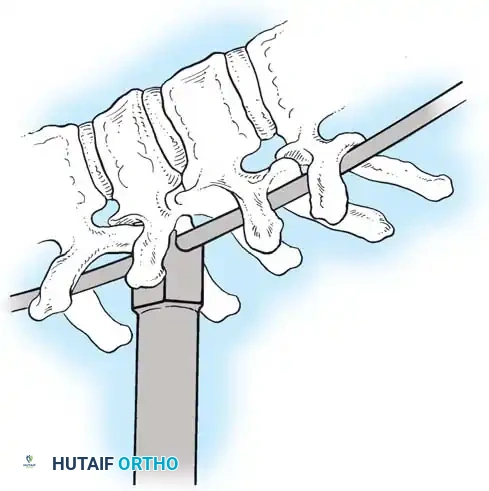
Lateral Exposure and Hemostasis
- Transverse Process Exposure: Extend the subperiosteal dissection laterally, first exposing the facet joints, and then continuing out to the tips of the transverse processes bilaterally.
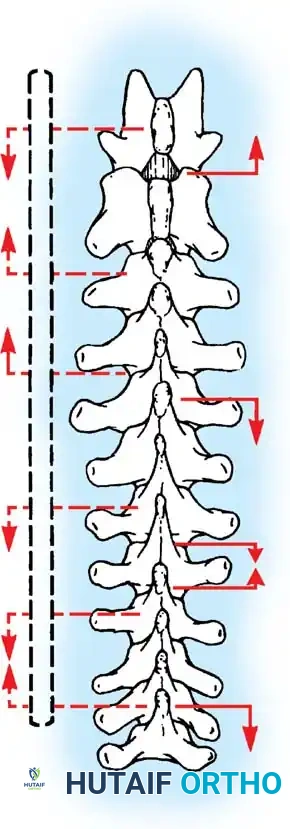
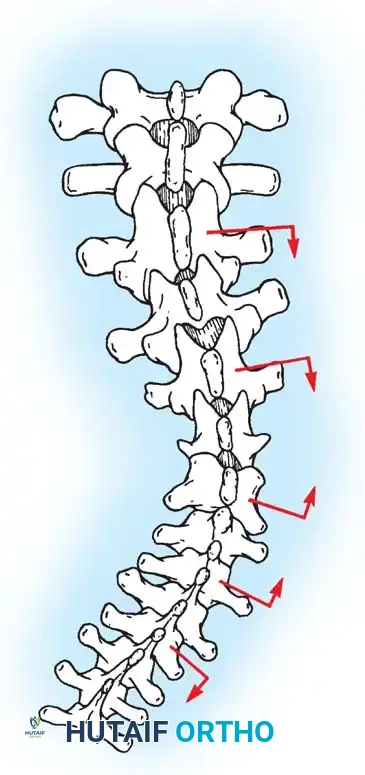
- Segmental Vessels: As you dissect lateral to the facet joints, you will encounter the posterior branches of the segmental vessels. These must be meticulously identified and coagulated with bipolar or monopolar cautery to prevent insidious bleeding.
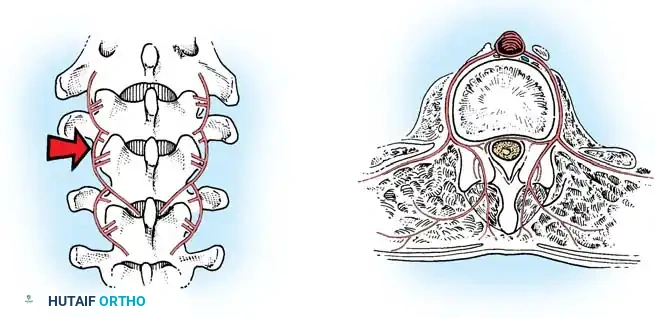
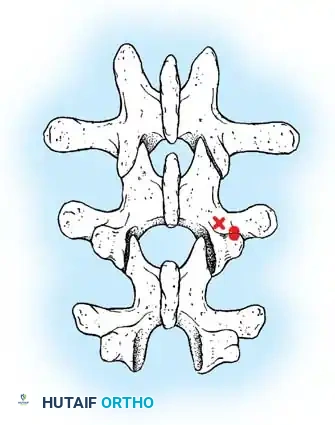
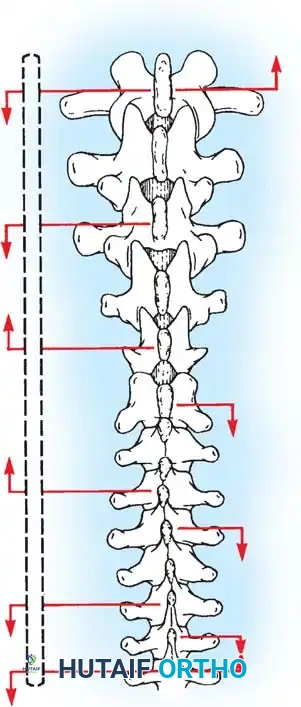
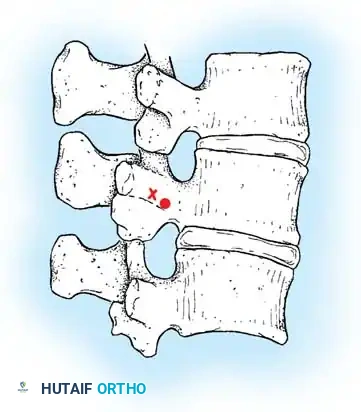
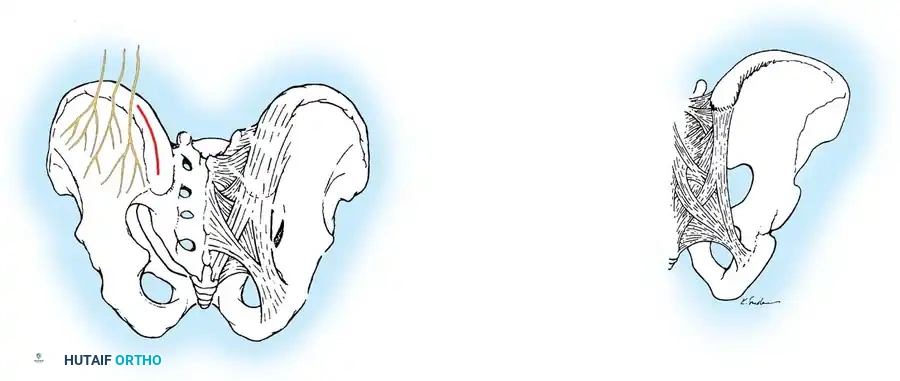
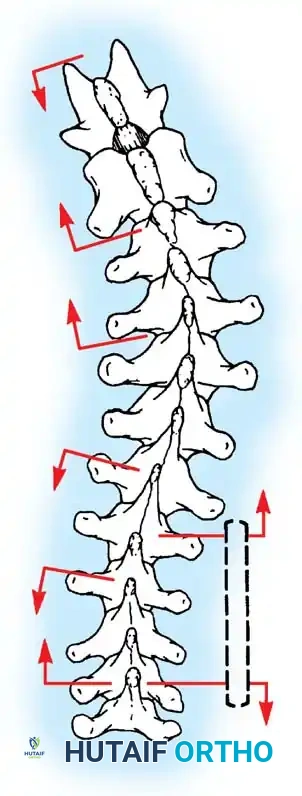
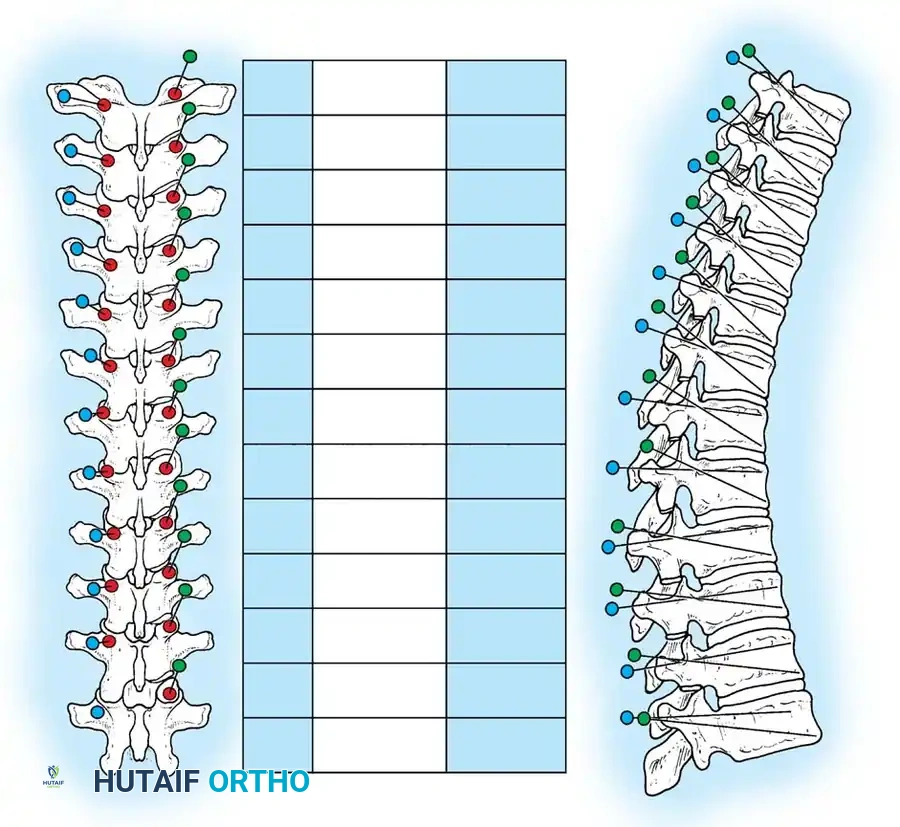
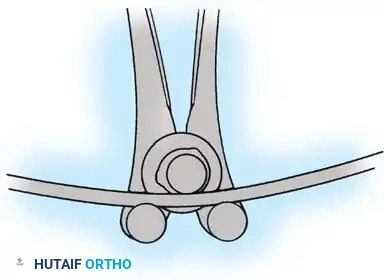
Fig. 38-24: Posterior view of segmental vessels located just lateral to each facet joint, requiring meticulous coagulation.
- Facet Cleaning: Use a sharp curet and a pituitary rongeur to completely excise the facet capsules and clean the interspinous ligaments.
Clinical Pearl: Always direct your curet from the midline laterally when cleaning the facet joints. This directional force ensures that if the instrument slips, it moves safely away from the spinal canal, preventing catastrophic dural tears or iatrogenic spinal cord injury.
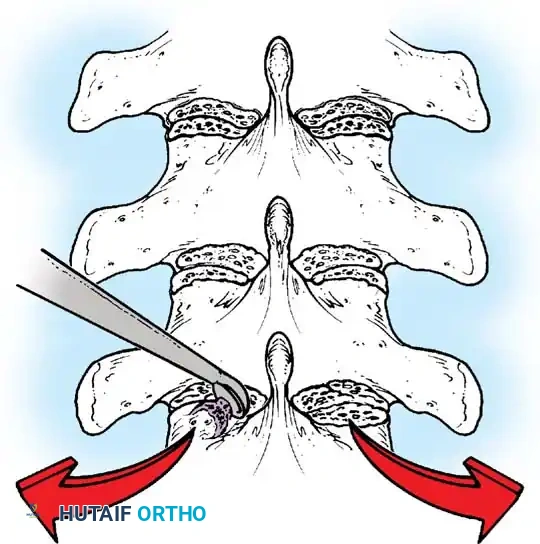
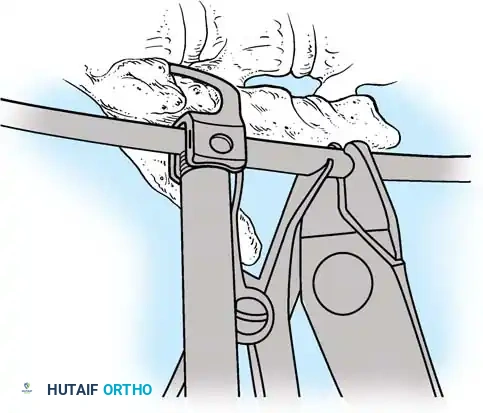
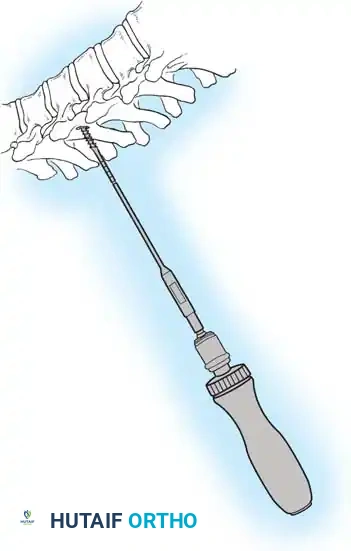
Fig. 38-25: Cobb curets utilized to meticulously clean the facets of all ligamentous and capsular attachments.
PRINCIPLES OF POSTERIOR SPINAL ARTHRODESIS
The ultimate goal of scoliosis surgery is not merely instrumentation, but a solid, lifelong arthrodesis. The classic extra-articular Hibbs technique has largely been abandoned in favor of comprehensive intra-articular fusion techniques that incorporate the facet joints.
The success of a spinal arthrodesis relies on a delicate interplay of factors:
1. Surgical Preparation: Meticulous removal of all avascular soft tissue and thorough decortication of the posterior elements.
2. Biomechanical Stability: Rigid segmental instrumentation to neutralize micromotion.
3. Biological Environment: Adequate delivery of osteoprogenitor cells and a vascularized graft bed.
4. Host Factors: Optimization of patient nutrition and strict cessation of smoking, as nicotine is a potent inhibitor of osteogenesis and significantly increases pseudarthrosis rates.
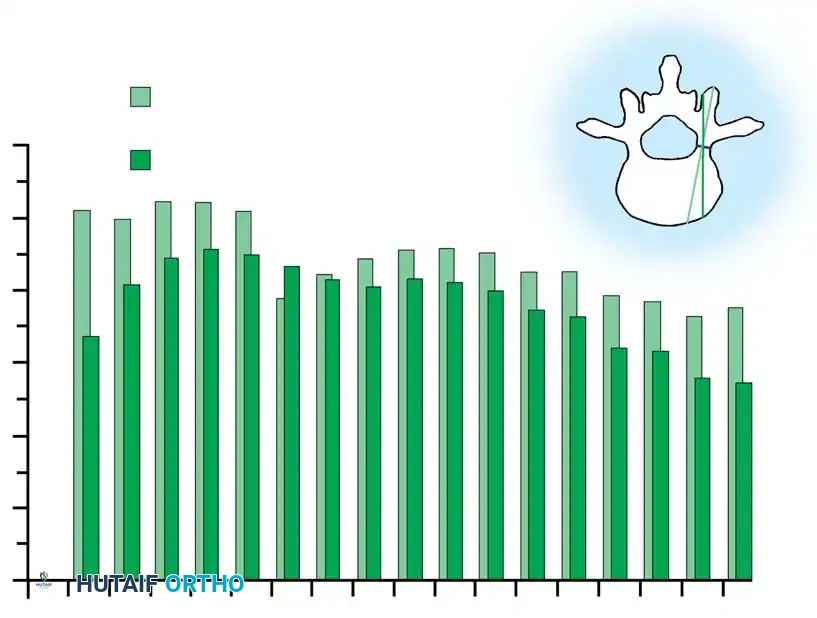
Biomechanics of Bone Grafting
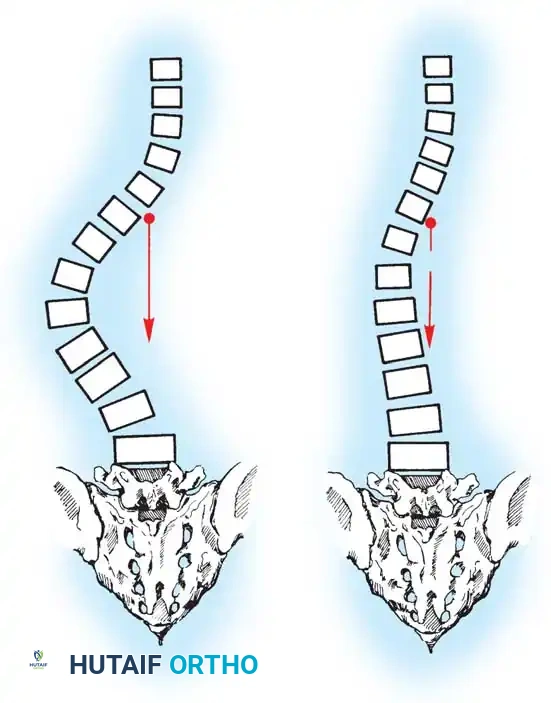
Bone graft incorporates most effectively under compressive loads and is biologically disadvantaged in environments of distraction. Therefore, in scoliosis correction, if autogenous bone is limited, it should be preferentially concentrated on the concave side of the curve, which is subjected to compressive forces, rather than the convex side, which experiences tension. Furthermore, the farther the fusion mass is placed from the instantaneous axis of rotation, the more effectively it will neutralize movement across that axis.
FACET FUSION TECHNIQUES
With the advent of modern intra-articular fusion techniques and meticulous transverse process decortication, the pseudarthrosis rate in adolescent idiopathic scoliosis has plummeted to 2% or less.
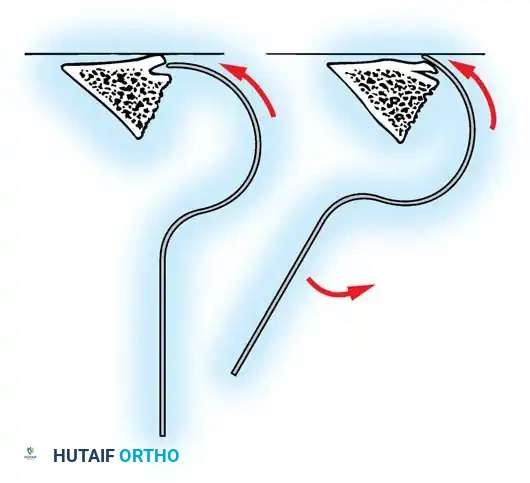
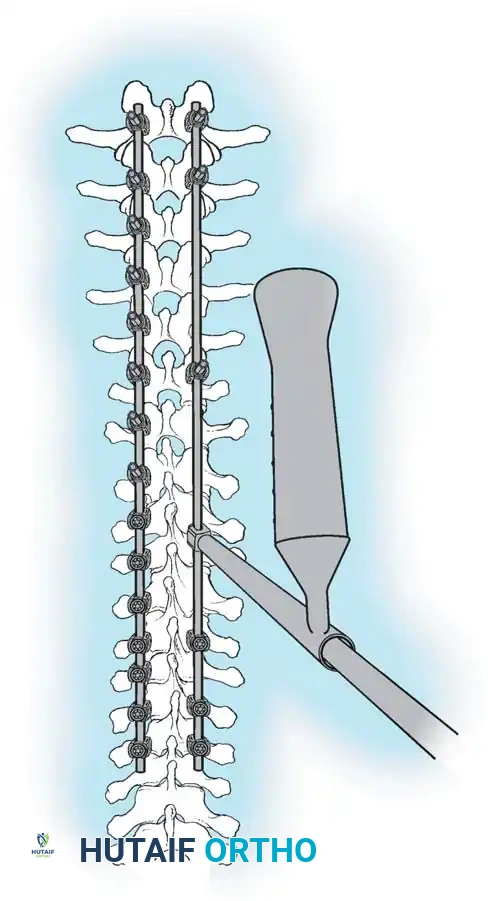
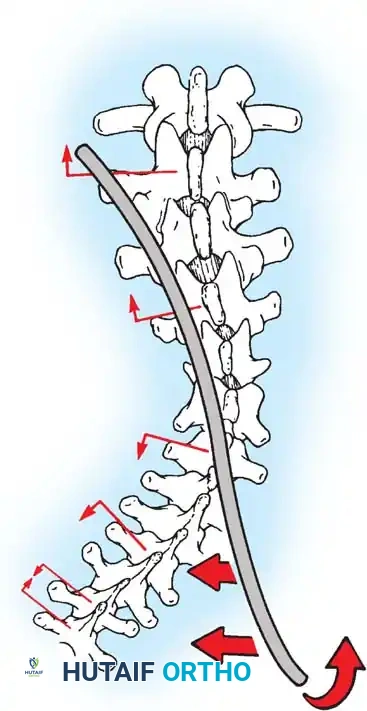
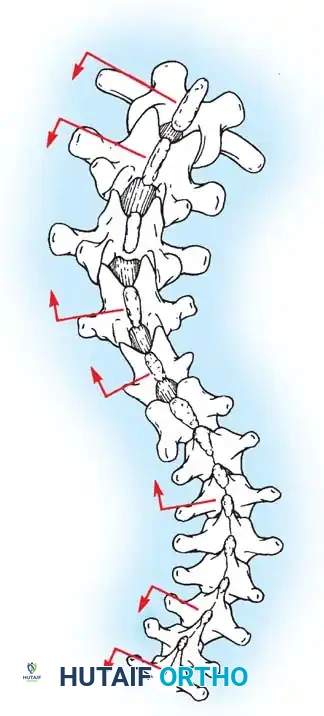
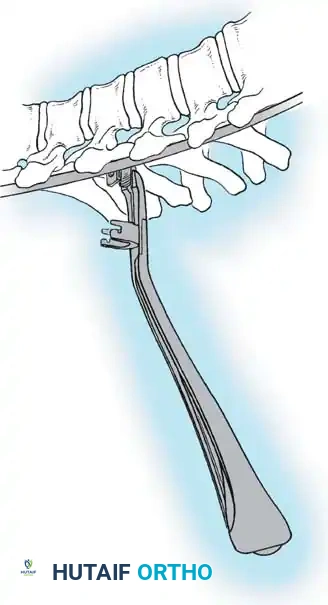
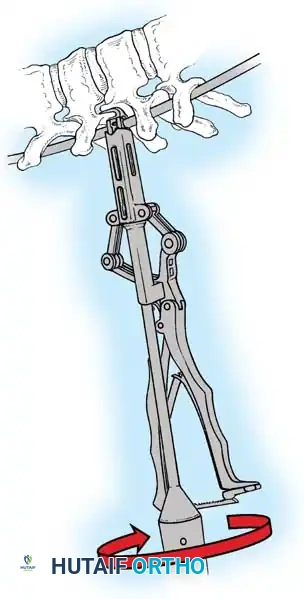
The Moe Technique (Thoracic Spine)
The Moe technique is a highly effective method for achieving intra-articular arthrodesis in the coronally oriented thoracic facet joints.
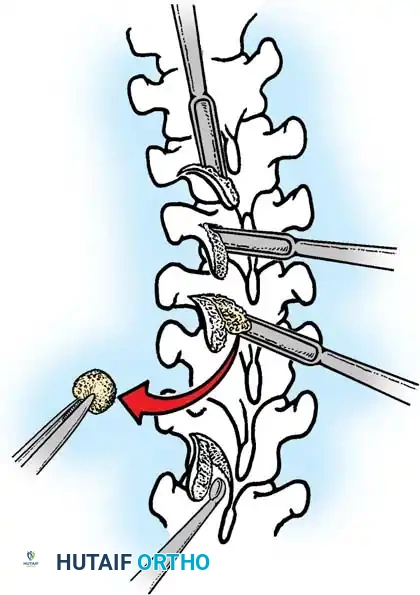
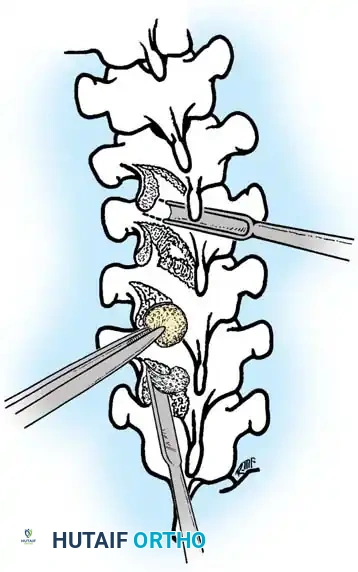
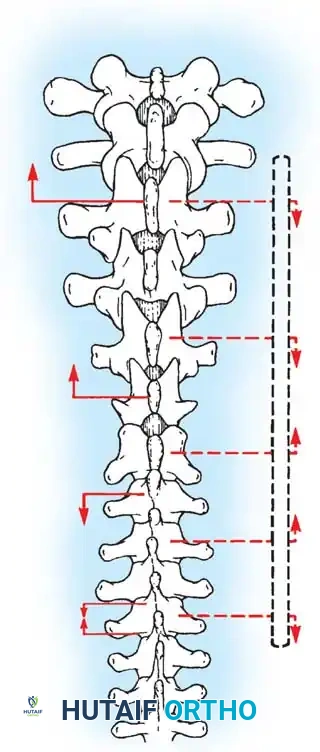
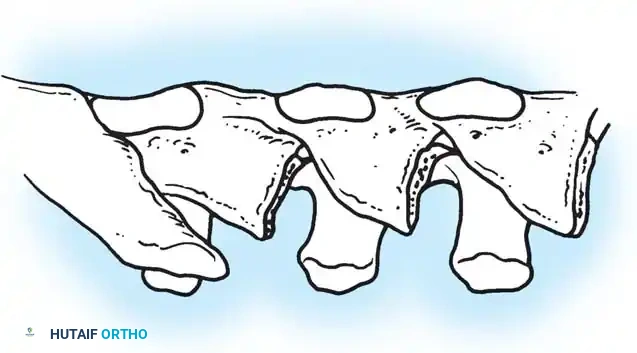
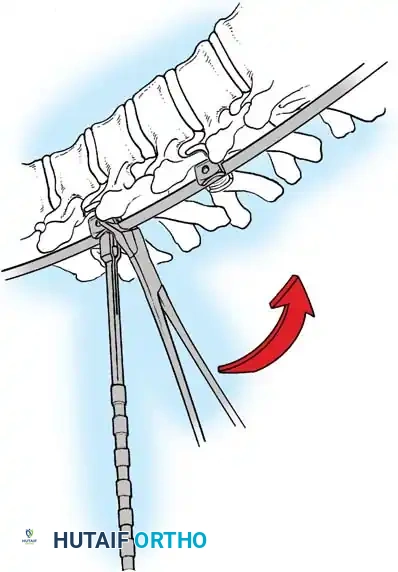
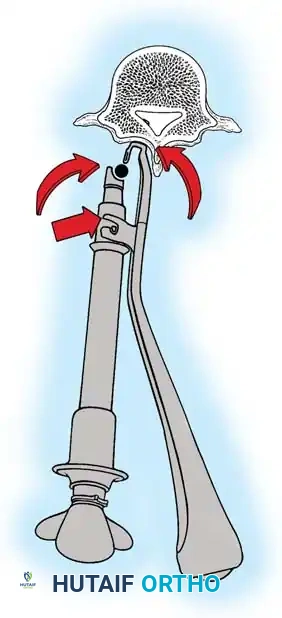
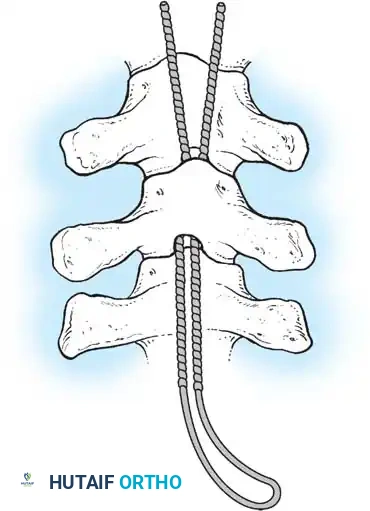
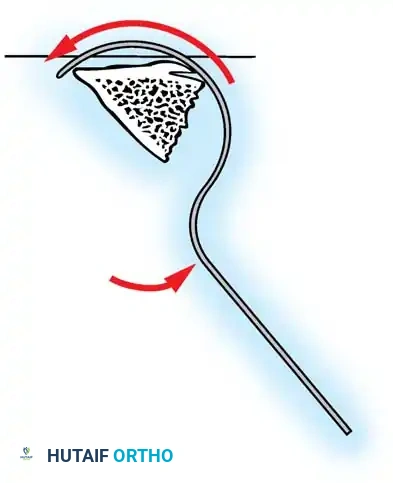
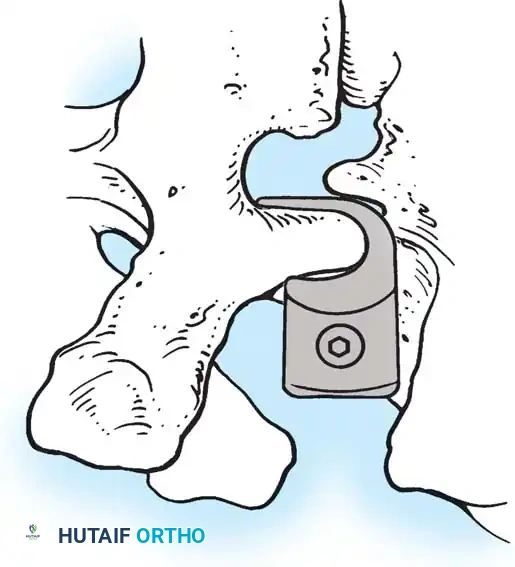
Fig. 38-26: The Moe technique of thoracic facet fusion, demonstrating the creation of hinged bone flaps.
- Expose the spine fully to the tips of the transverse processes.
- Using a sharp osteotome or Cobb gouge, begin a cut over the cephalad articular process at the base of the lamina.
- Carry this cut along the transverse process almost to its tip. Bend this cortical fragment laterally so it lies between the transverse processes, ideally leaving it hinged on its lateral periosteal attachment to preserve local vascularity.
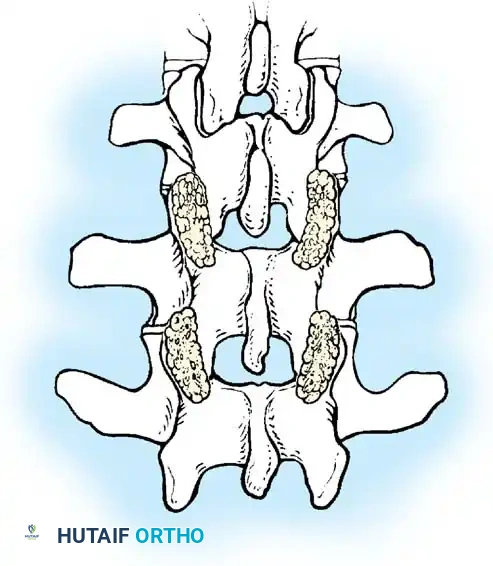
- Thoroughly denude all articular cartilage from the superior articular process using a sharp curet.
- Make a secondary cut in the superior articular facet, working medially to laterally, producing another hinged fragment.
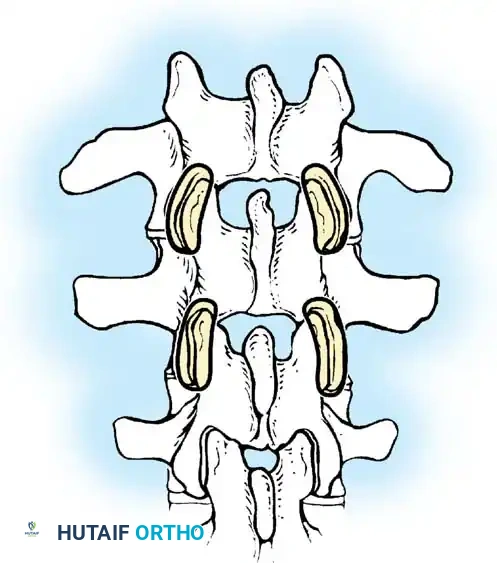
- Pack the resulting intra-articular defect tightly with cancellous bone graft.
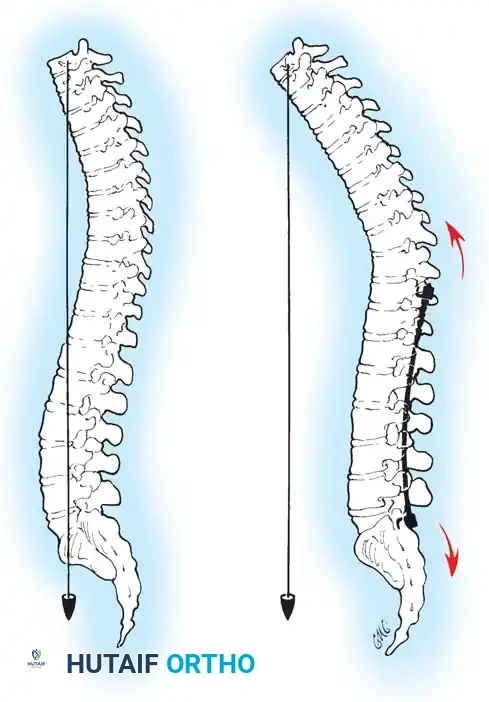
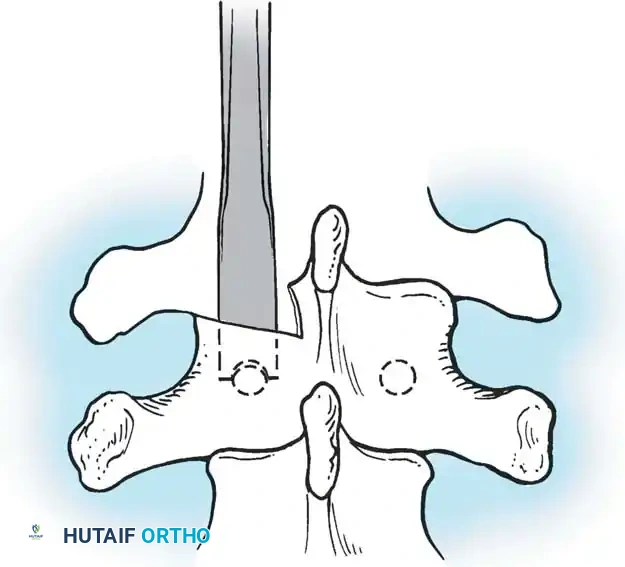
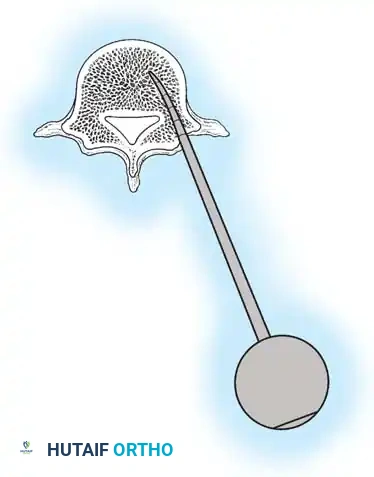
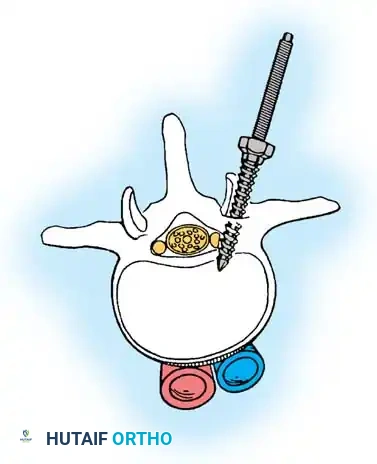
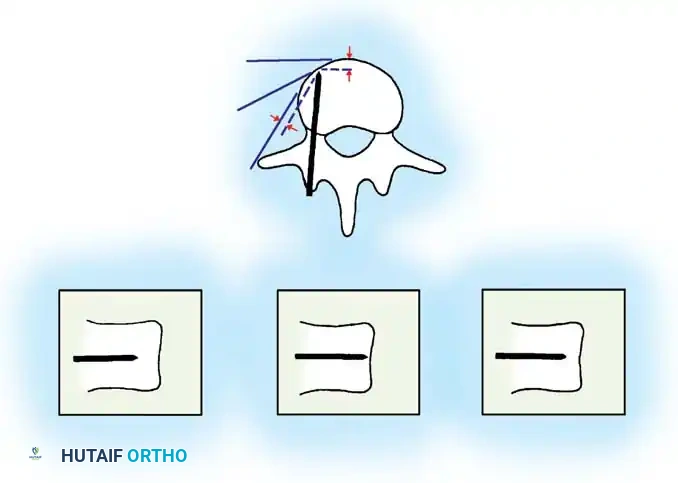
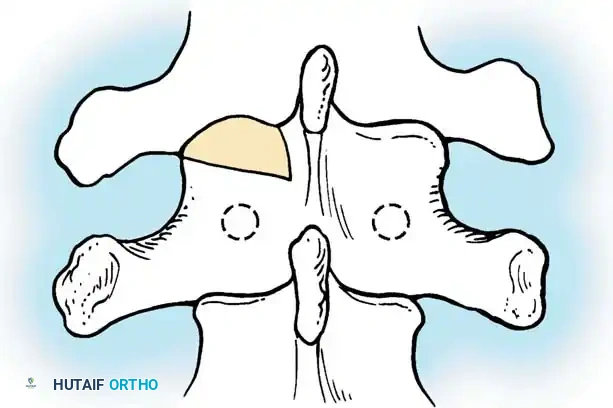
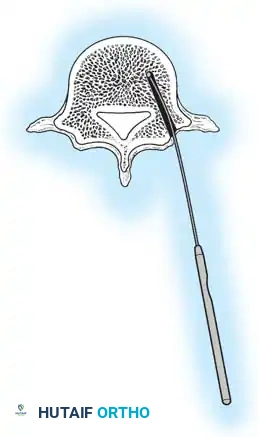
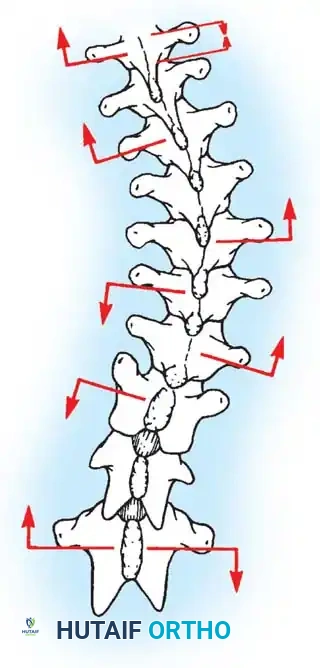
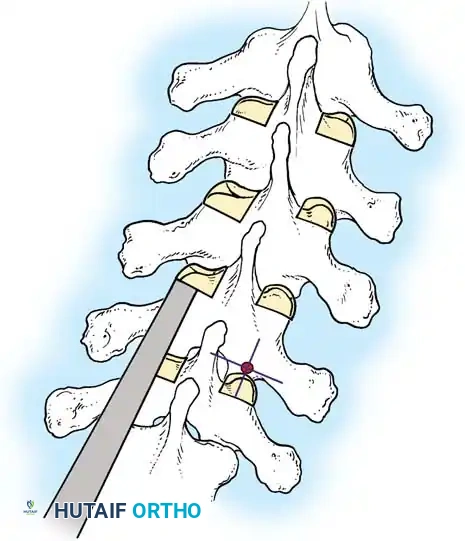
The Moe Technique (Lumbar Spine)
In the lumbar spine, the facet joints are oriented in a more sagittal plane, necessitating a modified approach.
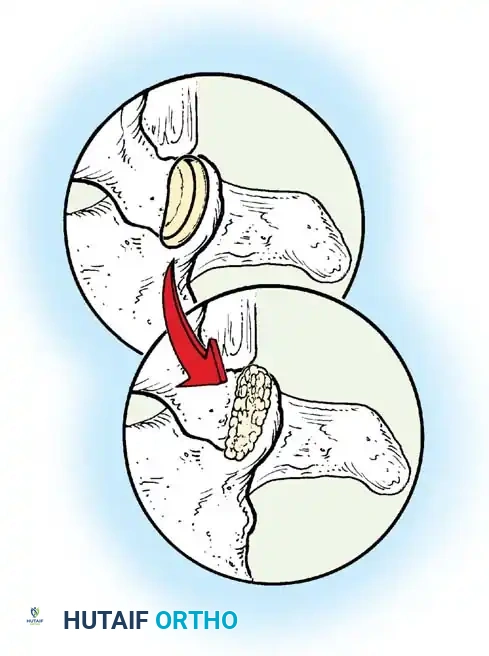
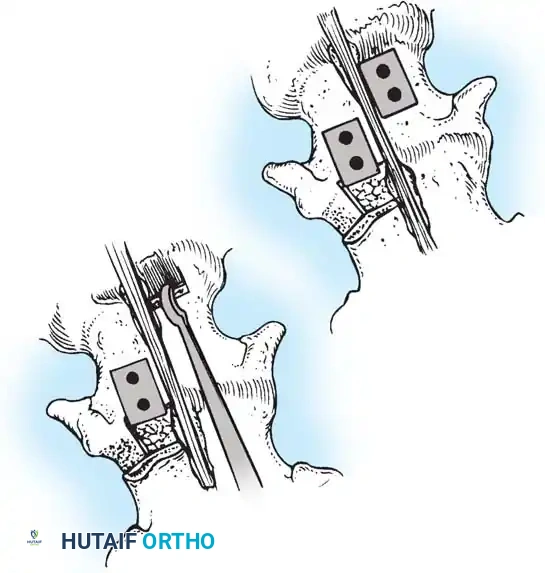
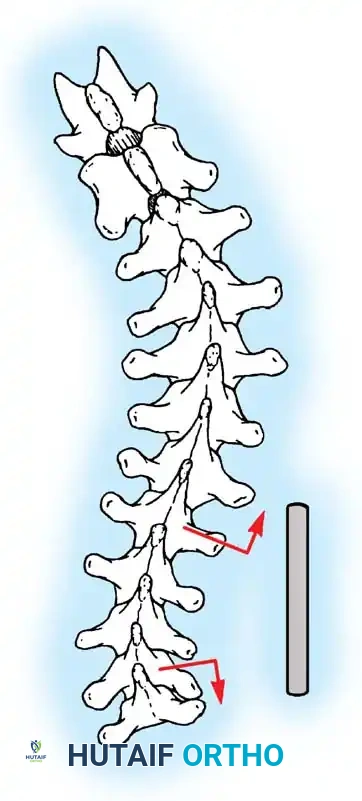
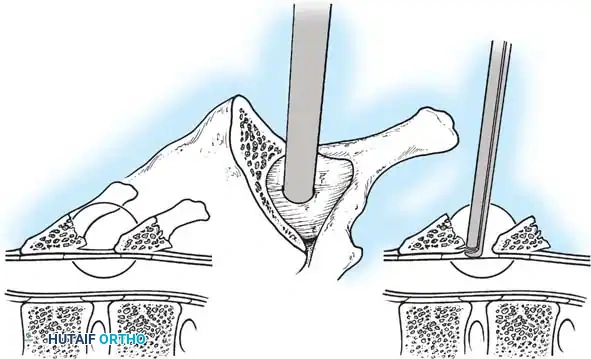
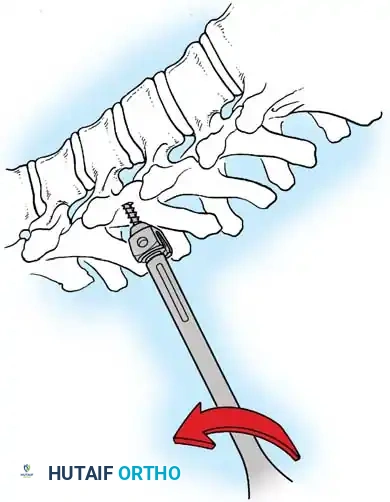
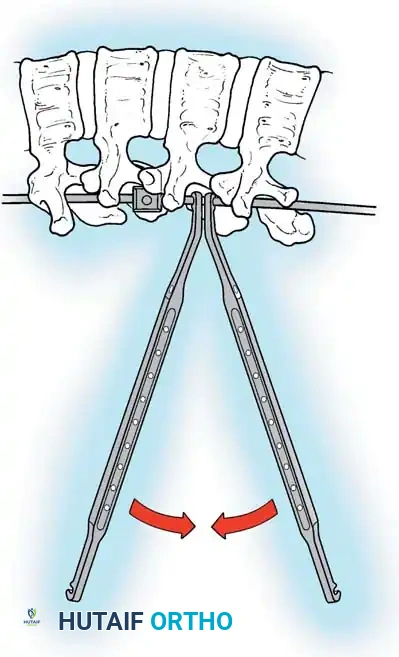
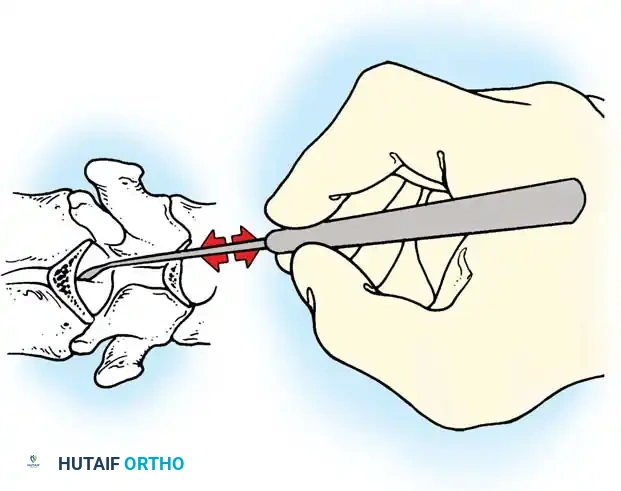
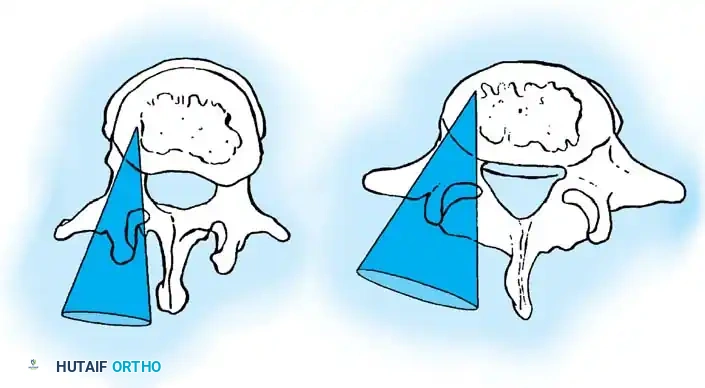
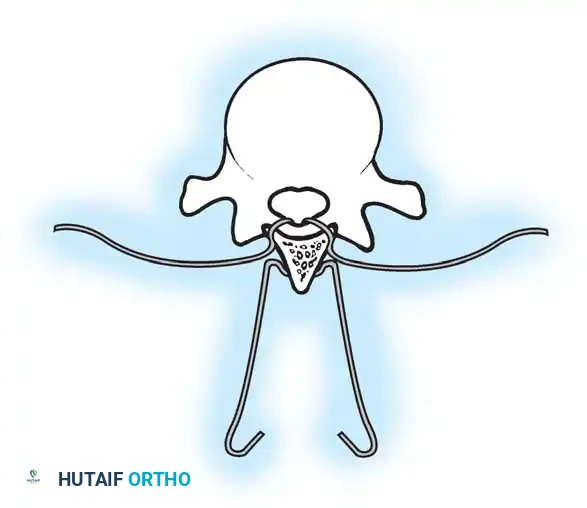
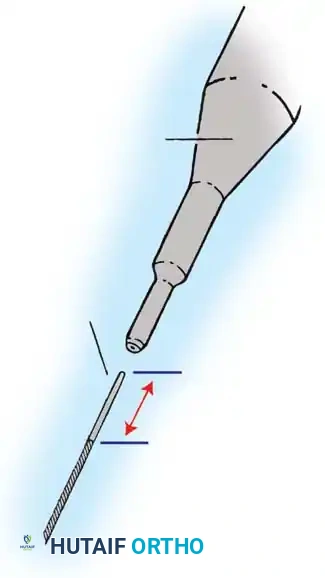
Fig. 38-27: The Moe technique adapted for lumbar facet fusion, addressing the sagittal orientation of the joints.
- Utilize a small osteotome or a needle-nose rongeur to resect the adjoining joint surfaces.
- This creates a distinct rectangular defect within the sagittally oriented joint space.
- Pack this defect forcefully with cancellous bone graft.
- Proceed to decorticate the entire exposed posterior elements (laminae and transverse processes) using Cobb gouges, always directing force away from the spinal canal.
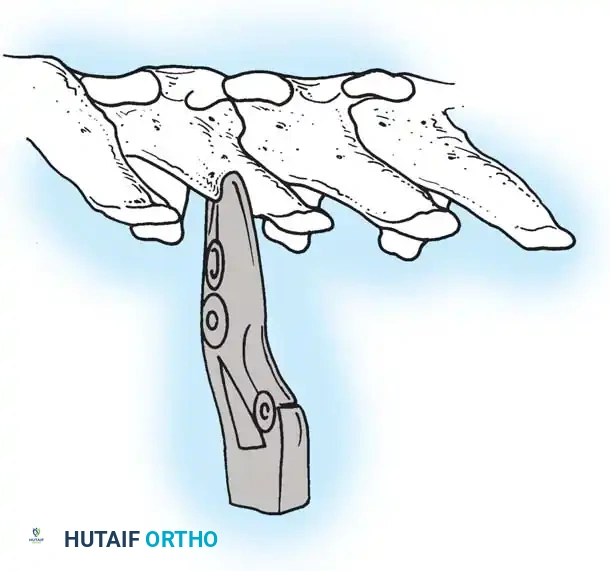
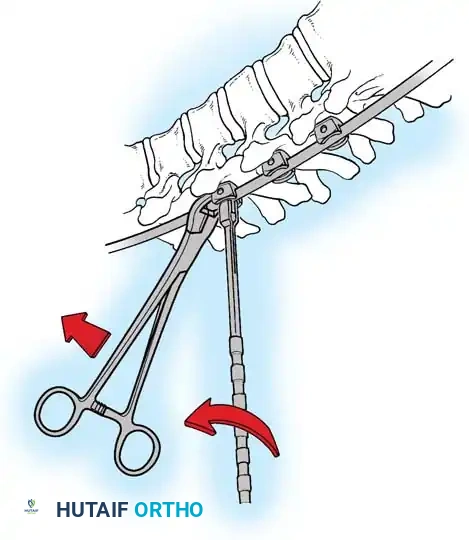
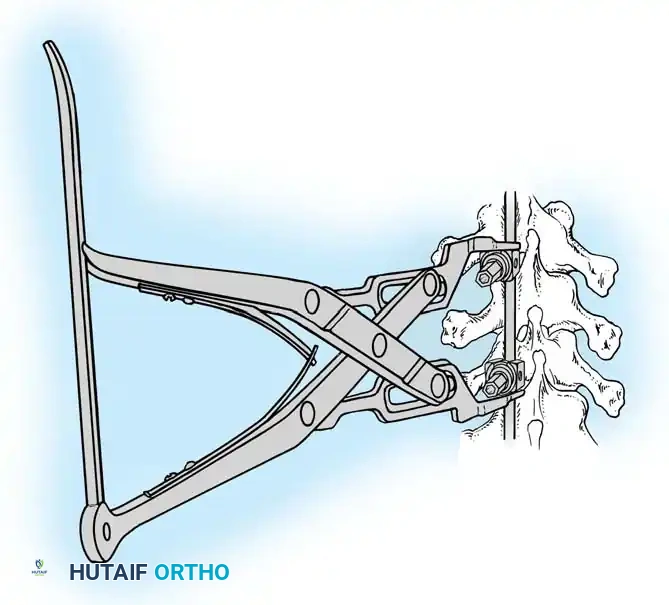
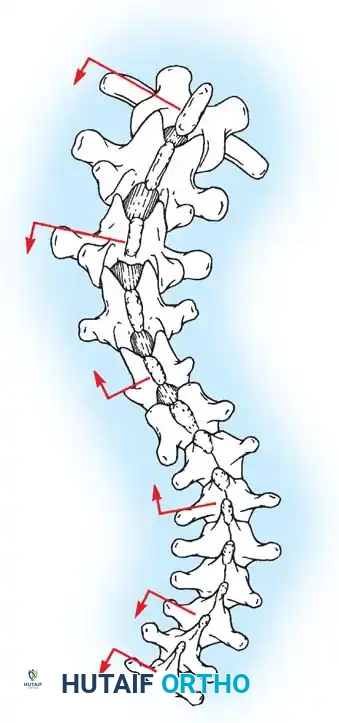
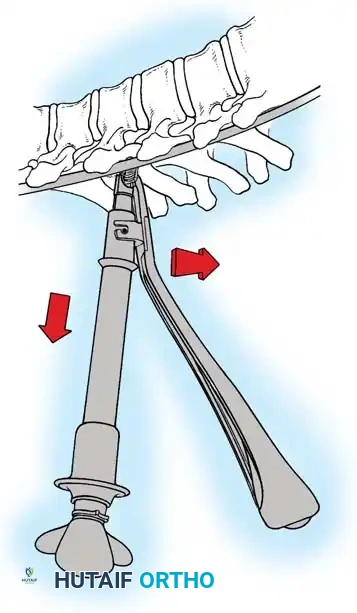
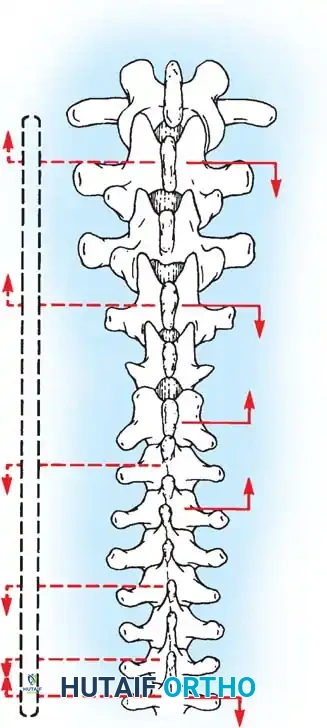
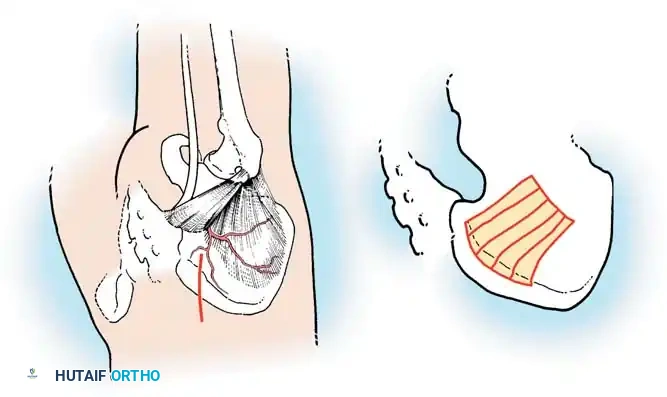
The Hall Technique
The Hall technique offers an alternative method for facet obliteration and grafting, particularly useful in rigid deformities.
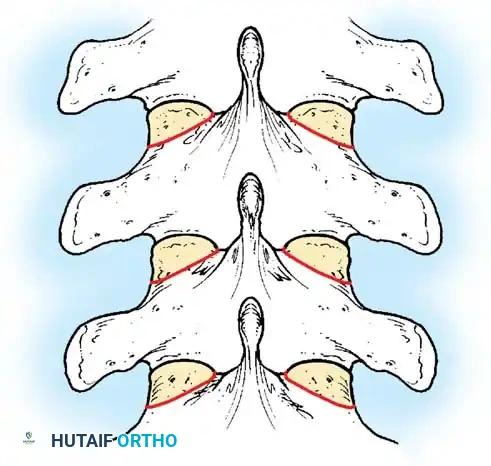
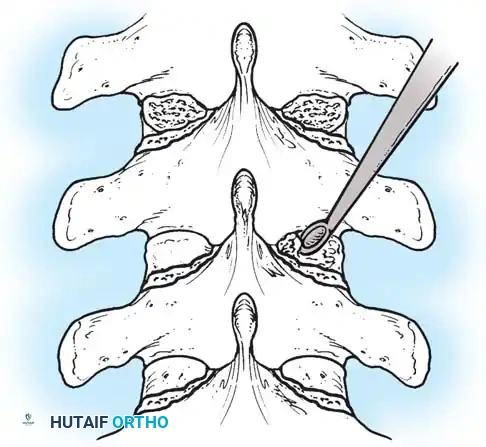
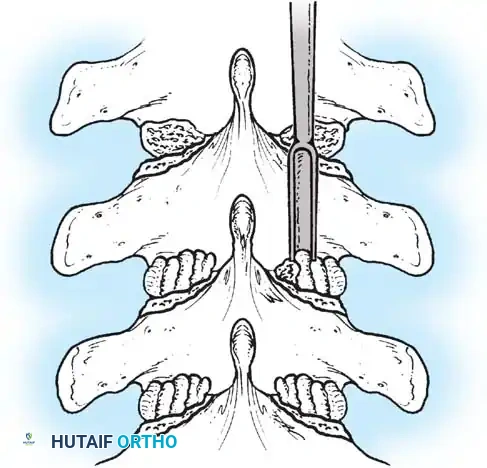
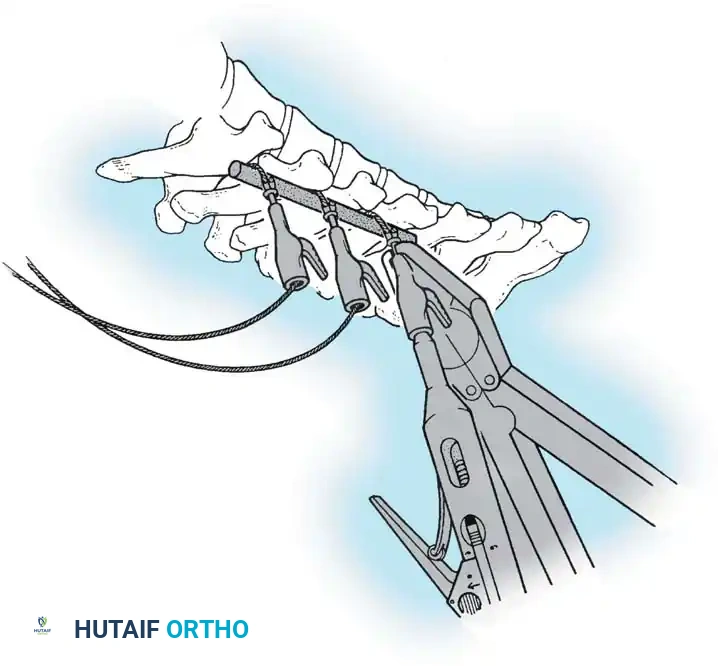
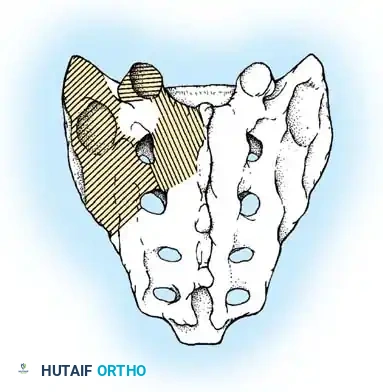
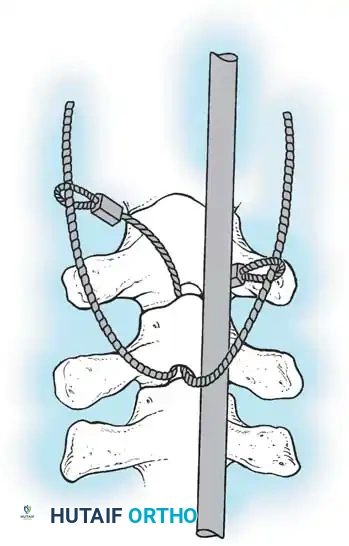
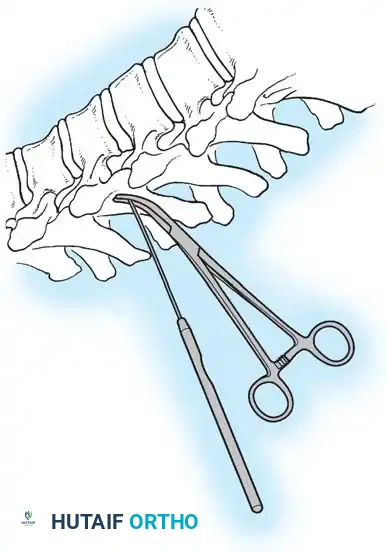
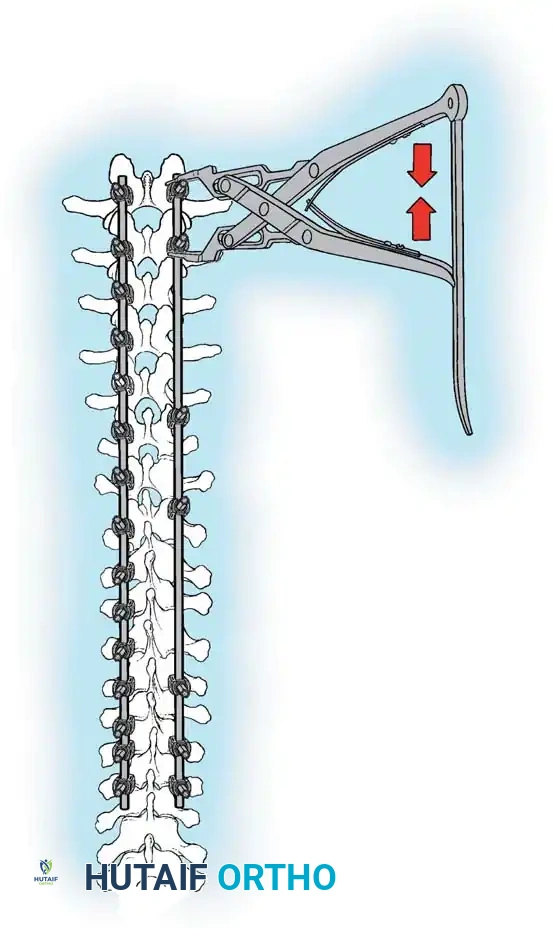
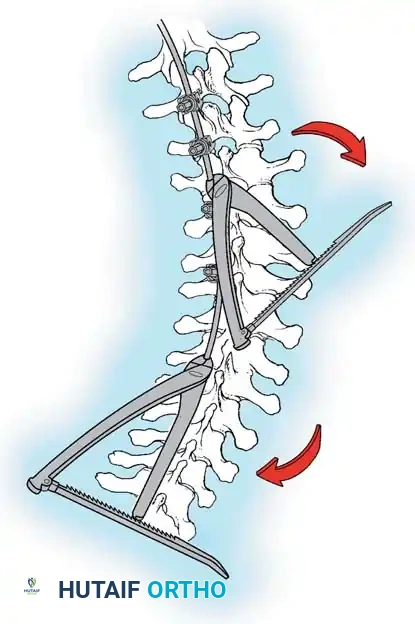
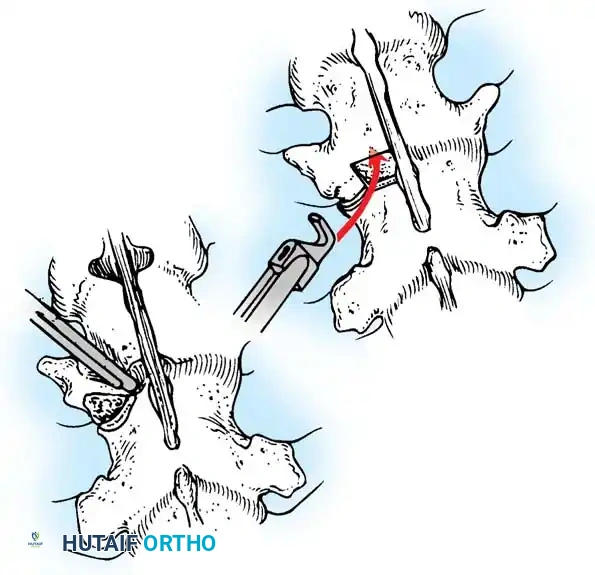
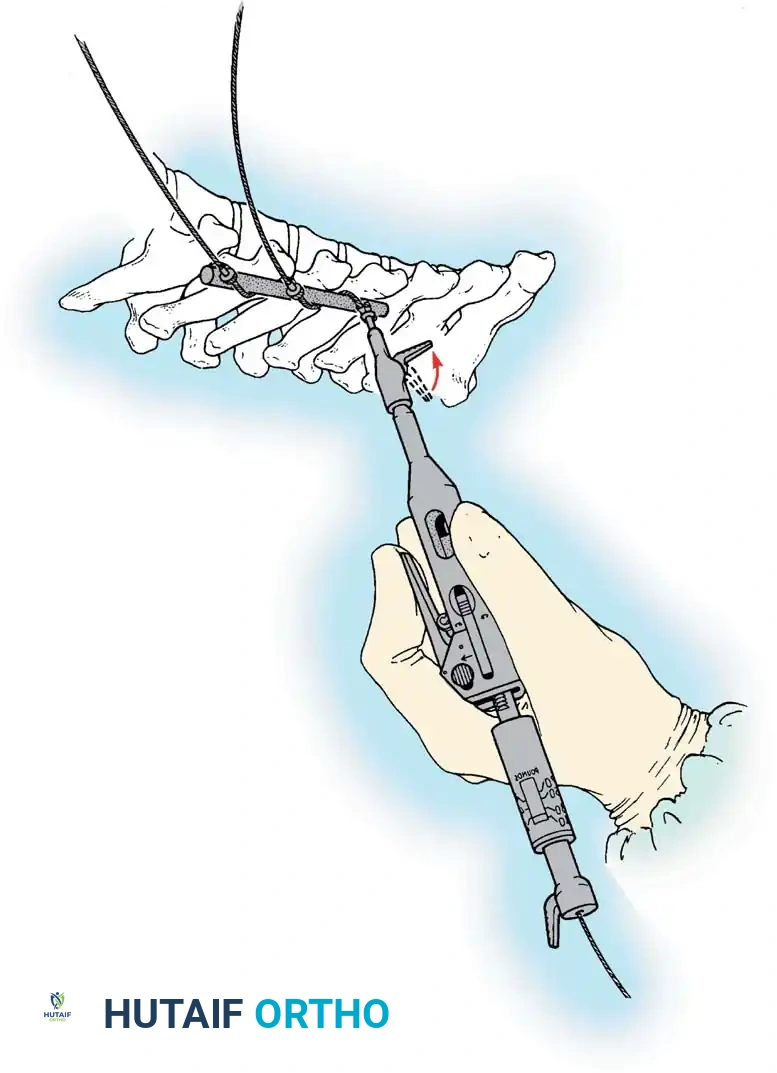
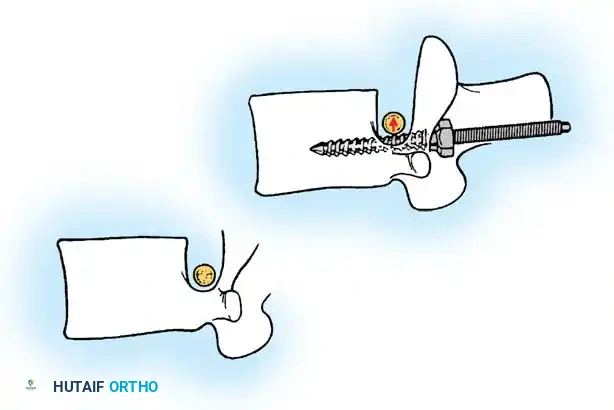
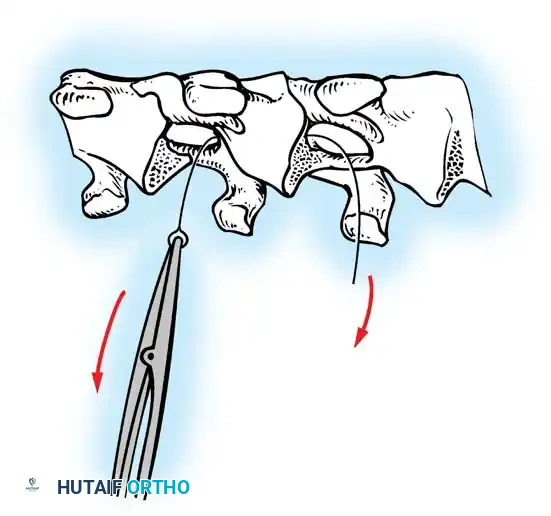
Fig. 38-28: The Hall technique of facet fusion, involving sharp excision of the inferior facet and trough creation.
- Sharply amputate the inferior articular facet with a gouge and remove the bone fragment entirely. This exposes the cartilage of the superior facet.
- Remove the exposed cartilage completely with a sharp curet.
- Create a bleeding trough by removing the outer cortex of the superior facet.
- Impact cancellous bone grafts directly into this vascularized trough.
- Complete the procedure with global decortication of the posterior elements.
BONE GRAFTING STRATEGIES
For decades, autogenous iliac crest bone graft (ICBG) has been heralded as the "gold standard," possessing the critical triad of osteogenic cells, osteoinductive growth factors, and an osteoconductive matrix. However, harvesting ICBG is associated with significant donor-site morbidity, including chronic pain, hematoma, and increased operative time.
Modern literature, including landmark studies by Betz et al., has demonstrated that the rigid fixation provided by contemporary multi-segmental pedicle screw constructs, combined with aggressive facetectomy and the inherent osteogenic potential of the immature adolescent skeleton, yields excellent fusion rates using local autograft (bone harvested from the spinous processes and osteotomies) supplemented with allograft.
Allograft provides an excellent osteoconductive scaffold and mild osteoinductive properties. While it carries a theoretical risk of disease transmission and adds to the material cost of the procedure, these factors are heavily outweighed by the elimination of donor-site morbidity, reduced blood loss, and shortened operative times. Advanced alternatives, such as demineralized bone matrix (DBM), tricalcium phosphate, and Bone Morphogenetic Protein (BMP), continue to evolve, offering potent osteoinductive boosts in high-risk pseudarthrosis cases (e.g., neuromuscular scoliosis or adult revisions).
CLOSURE AND POSTOPERATIVE PROTOCOL
Following the completion of instrumentation, decortication, and grafting, meticulous closure is paramount to prevent deep surgical site infections.
- Irrigation: Copiously irrigate the wound with sterile saline (and optionally, dilute betadine or antibiotic solutions) to remove all bone dust and debris.
- Drain Placement: Place a subfascial or subcutaneous closed-suction drain. Ensure the drain reservoir is kept separate from any bone graft reservoirs to accurately monitor postoperative bleeding.
- Layered Closure: Close the deep fascial tissues meticulously with heavy, interrupted absorbable sutures (e.g., #1 or 0 Vicryl) to create a watertight seal over the hardware. Approximate the subcutaneous tissues with 2-0 absorbable sutures to eliminate dead space.
- Skin Closure: Close the skin with a running subcuticular absorbable stitch or skin staples, followed by a sterile, bulky compressive dressing.
Postoperative Care
The patient is carefully log-rolled from the Jackson table to the hospital bed. Intravenous fluids are maintained until bowel function returns and oral intake is tolerated. Prophylactic intravenous antibiotics (typically first-generation cephalosporins) are continued for 24 hours postoperatively. A Foley catheter, placed prior to positioning, is generally removed within 48 to 72 hours to encourage early mobilization. With modern rigid pedicle screw constructs, postoperative bracing or casting is rarely indicated, allowing for rapid rehabilitation and early return to functional activities.
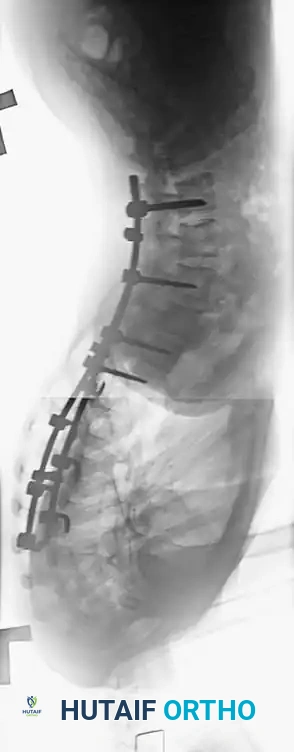
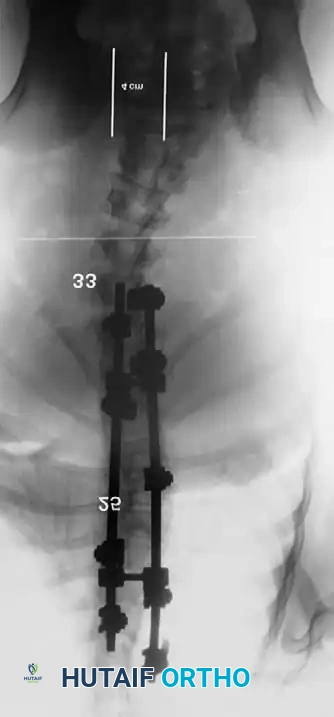
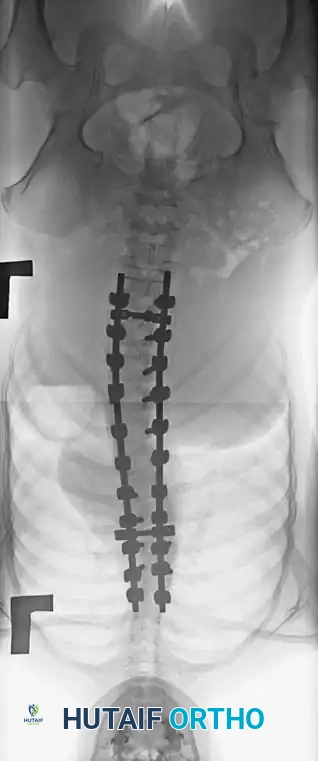
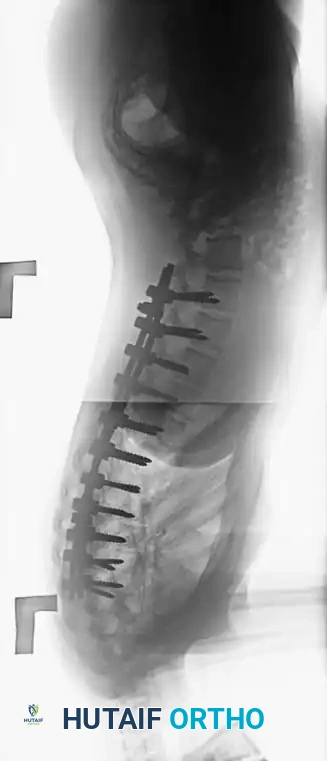
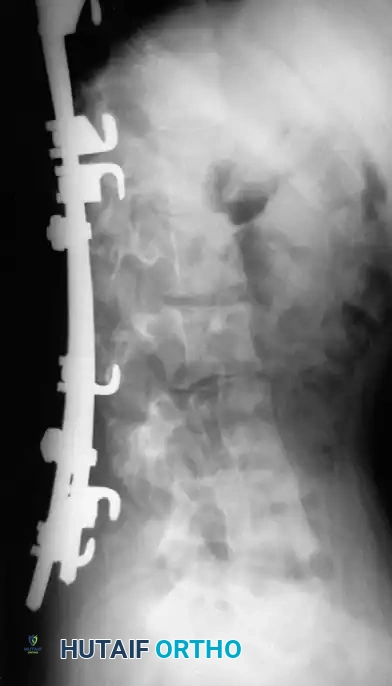
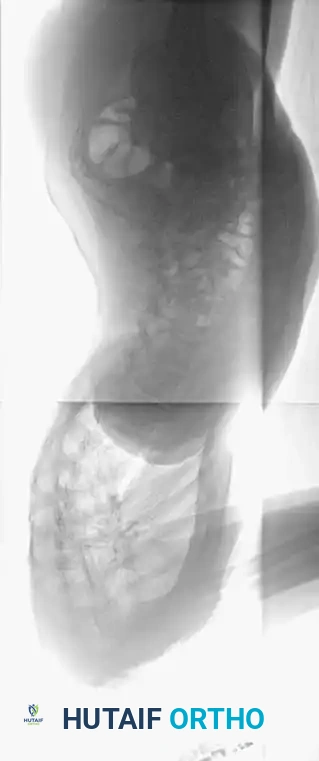
Associated Surgical & Radiographic Imaging


You Might Also Like