Endoscopic Anterior Instrumentation of Idiopathic Scoliosis: A Master Surgical Guide
Key Takeaway
Endoscopic anterior instrumentation for idiopathic scoliosis utilizes video-assisted thoracoscopic surgery (VATS) to achieve anterior release, fusion, and deformity correction. While posterior approaches are currently favored for their predictable stability, the anterior endoscopic technique remains a critical skill for addressing specific rigid thoracic curves. This approach minimizes chest wall morbidity compared to open thoracotomy while allowing for excellent anterior column mobilization and direct visualization of the vertebral bodies and disc spaces.
INTRODUCTION AND HISTORICAL CONTEXT
The surgical management of adolescent idiopathic scoliosis (AIS) has undergone a profound evolution. As experience with video-assisted thoracoscopic surgery (VATS) expanded in the late 20th and early 21st centuries, techniques were pioneered for the anterior instrumentation of the thoracic spine through a minimally invasive thoracoscopic approach. The primary objective of this evolution was to achieve thoracoscopic anterior discectomy, fusion, and instrumentation with outcomes comparable to those of a traditional open thoracotomy, but with significantly reduced chest wall morbidity, improved cosmetic outcomes, and accelerated pulmonary recovery.
However, the landscape of spinal deformity surgery is dynamic. With the advent of high-density pedicle screw constructs, the correction, derotation, and stability of instrumentation have become vastly more predictable posteriorly than anteriorly. Consequently, the contemporary indication for standalone anterior endoscopic instrumentation in idiopathic scoliosis has become exceedingly rare. Nevertheless, mastering this technique remains a fundamental requirement for the comprehensive deformity surgeon. The skills acquired through VATS are directly transferable to anterior releases for severe, rigid curves, the management of thoracic disc herniations, and the treatment of anterior spinal infections or tumors.
This guide details the CD Horizon Eclipse Spinal Instrumentation technique (Picetti), providing a rigorous, step-by-step academic framework for executing this complex procedure.
INDICATIONS AND BIOMECHANICAL RATIONALE
While modern posterior constructs dominate, anterior instrumentation historically offered specific biomechanical advantages:
* Superior Derotation: Direct application of force to the anterior column (the apex of the deformity) allows for powerful axial derotation.
* Level Preservation: Anterior constructs often save one to two distal fusion levels compared to posterior constructs, preserving lumbar motion segments.
* Hypokyphosis Correction: Anterior structural grafting and compression can effectively restore thoracic kyphosis in lordoscoliotic curves.
Contraindications
- Severe pulmonary compromise preventing one-lung ventilation.
- Prior thoracotomy or empyema resulting in dense pleural adhesions.
- Curves with significant structural lumbar components requiring posterior instrumentation.
- High thoracic curves (above T4), which are anatomically inaccessible via standard VATS due to the great vessels and thoracic inlet.
Clinical Pearl: The primary modern utility of the VATS approach in deformity surgery is the anterior release (discectomy) of rigid, large-magnitude curves (>75 degrees) prior to posterior instrumentation, rather than standalone anterior instrumentation.
PREOPERATIVE PLANNING AND ANESTHESIA
Meticulous preoperative planning is the cornerstone of a successful endoscopic procedure.
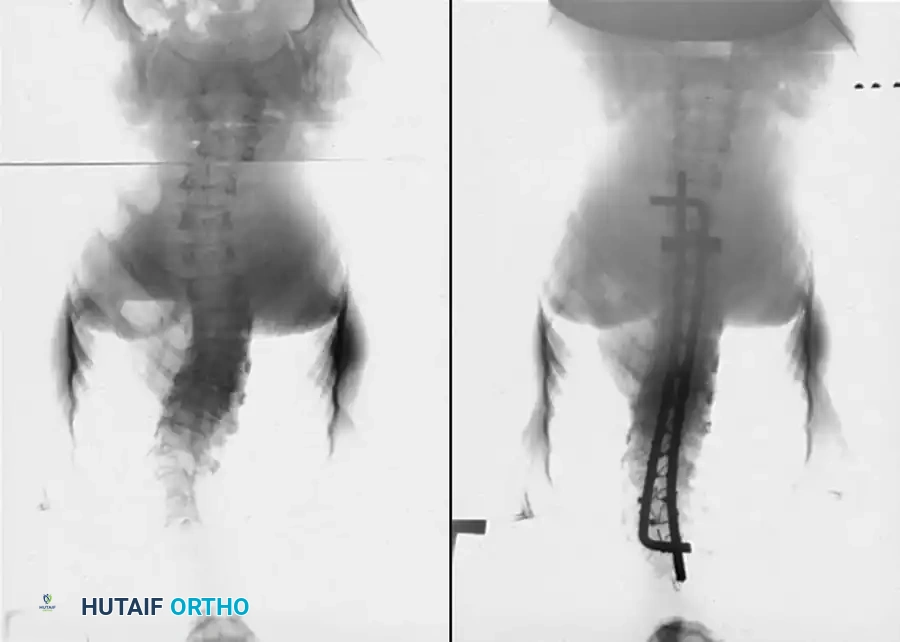
- Imaging: Obtain standing posteroanterior (PA), lateral, and side-bending radiographs to determine curve flexibility and select fusion levels based on Cobb angles. MRI is mandatory to rule out neural axis abnormalities (e.g., syringomyelia, tethered cord).
- Pulmonary Function: Formal pulmonary function tests (PFTs) are required to ensure the patient can tolerate single-lung ventilation.
Anesthesia and Airway Management
General anesthesia is induced, and a double-lumen endotracheal tube is placed to facilitate selective one-lung ventilation.
* Pediatric Consideration: Children weighing less than 45 kg may have tracheas too small for a double-lumen tube; in these cases, selective mainstem intubation of the ventilated lung or the use of a bronchial blocker is required.
* Complete collapse of the operative lung is imperative for visualization and safe instrument manipulation.
PATIENT POSITIONING
Positioning dictates the success of the portal placement and the safety of the trajectory.
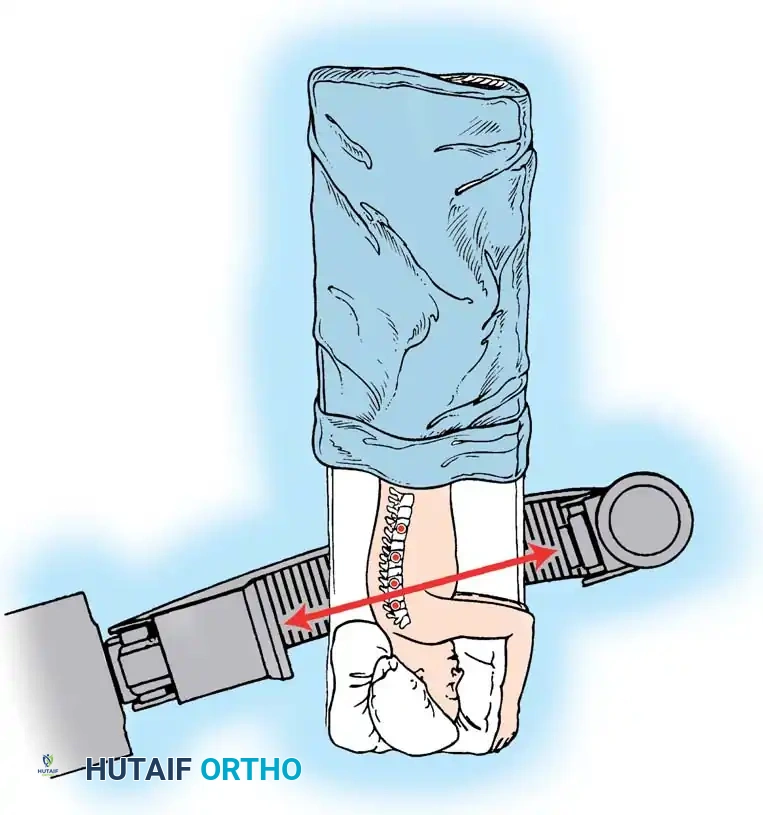
- Once one-lung ventilation is confirmed, place the patient in the direct lateral decubitus position.
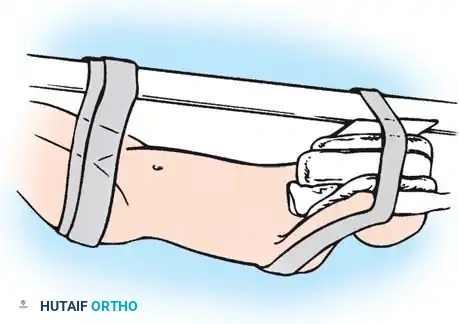
- The arms are positioned at 90/90 (abduction/flexion).
- The concave side of the curve is positioned facing down (the approach is always from the convexity of the curve).
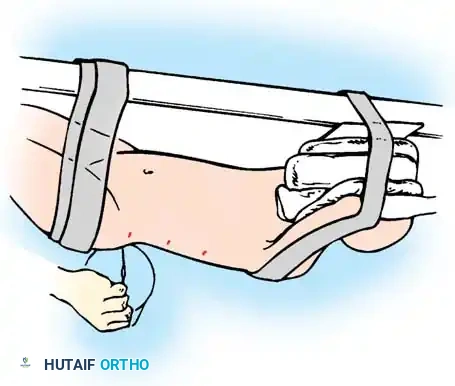
- If the patient’s oxygen saturation drops precipitously upon lateral positioning, the anesthesiologist must immediately readjust the tube or bronchial blocker.
- Securely tape the hips and shoulders to the operating table to allow for table tilting without patient shifting.
Surgical Warning: The patient must be perfectly orthogonal to the floor. Any unrecognized rotation of the pelvis or thorax will translate into a misjudgment of the sagittal plane, risking catastrophic vascular or neurologic injury during screw placement.
FLUOROSCOPIC MAPPING AND PORTAL PLACEMENT
The superior and inferior access incisions are the most critical, as the vertebrae at these levels are at the greatest angle in relation to the apex of the curve.
The Picetti Mapping Technique
-
PA Plane Alignment: Utilize C-arm fluoroscopy in the posteroanterior plane. Ensure the vertebral end plates are parallel and well-defined. Rotate the C-arm until it is parallel to the vertebral body end plates (note: this will not be perpendicular to the table due to the deformity).
-
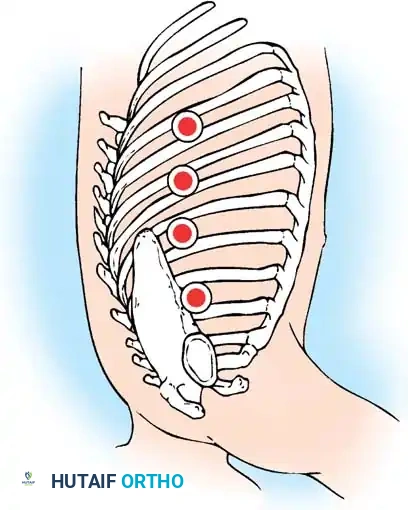
Posterior Marker Placement: Position a straight metallic marker posterior to the patient and align it with every other vertebral body.
-
Incision Marking: Once the marker is centered and parallel to the end plates, draw a line on the patient's skin at each portal site. Marks should be two interspaces apart. This spacing allows the placement of portals above and below the rib at each level, providing access to two vertebral levels through a single skin incision. Typically, three to five incisions are used.
-
Lateral Cross-Marking: Rotate the C-arm to the lateral position. Place the marker end on each previously drawn line. Adjust the marker until the C-arm image shows the end of the marker exactly at the level of the rib head on the vertebrae. Place a cross mark here. This intersection dictates the center of the portals and accounts for the rotational deformity of the spine.
SURGICAL EXPOSURE AND PLEURAL DISSECTION
The surgeon stands at the patient’s back. This ergonomic positioning ensures that all instruments are directed anteriorly—away from the spinal cord.
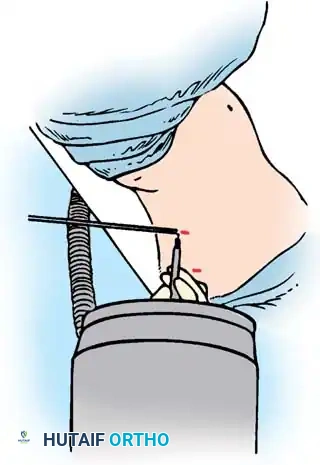
- Initial Portal: Make a modified thoracotomy incision at the central mark. This central incision is slightly larger as it accommodates central discectomies, screw placement, and the primary optical trocar.
- Lung Deflation Check: After the lung is completely deflated, make the initial portal in the sixth or seventh interspace using the alignment marks. Inserting the first portal at this mid-to-lower thoracic level avoids injury to the diaphragm, which is situated more caudally.
- Adhesion Sweep: Insert a finger through the initial portal to confirm lung deflation and sweep away any fine pleural adhesions.
- Working Portals: Place 10.5-mm to 12.0-mm access portals under direct endoscopic visualization at the predetermined cross-marks. Count the ribs internally to verify the correct operative levels.
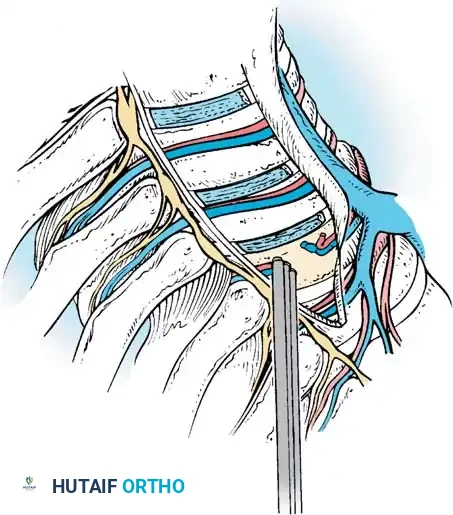
Pleural Flap Creation
- Incise the parietal pleura longitudinally along the entire length of the spine to be instrumented.
- Use a Bovie hook on the pleura over a disc space to create the initial opening. Elevate the pleura and extend the incision.
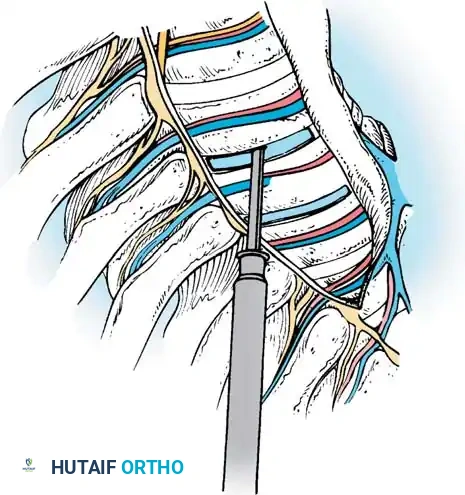
- Dissect the pleura off the vertebral bodies and discs. Carry the dissection anteriorly off the anterior longitudinal ligament (ALL) and posteriorly off the rib heads using a peanut sponge or endoscopic grasper.
ENDOSCOPIC ANTERIOR DISCECTOMY
A meticulous discectomy is the most critical step for achieving curve flexibility and ensuring a robust arthrodesis.
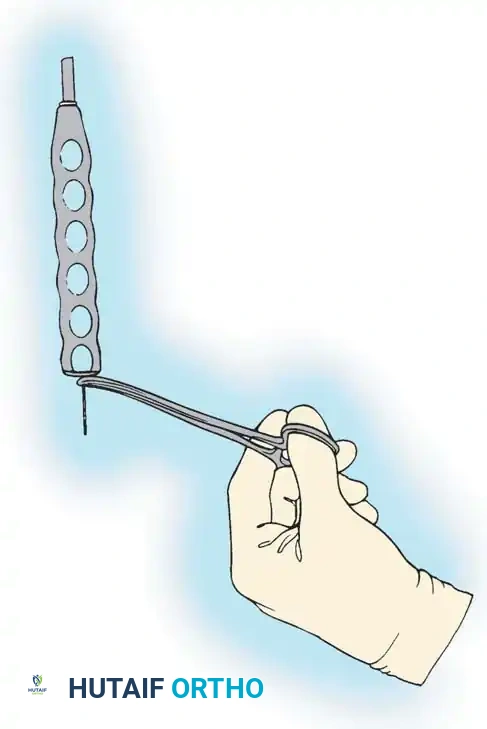
- Level Confirmation: Place a Kirschner wire (K-wire) into the disc space and confirm the anatomical level with C-arm fluoroscopy.
- Annulotomy: Use extended electrocautery to incise the disc annulus.
- Nucleotomy and Endplate Preparation: Evacuate the disc material using a combination of endoscopic curettes, pituitary rongeurs, Cobb elevators, and Kerrison rongeurs. Endoscopic shavers and rasps may be utilized to expedite the process.
- ALL Release: Once the disc is removed, thin the anterior longitudinal ligament from within the disc space using a pituitary rongeur. The goal is to reduce the ALL to a flexible, non-structural remnant that will act as an anterior containment barrier for the bone graft.
- Posterior Release: Remove the disc and annulus posteriorly back to at least the rib head. Use a Kerrison rongeur to resect the annulus posterior to the rib heads. Crucially, leave the rib head intact at this stage, as it serves as the primary anatomical landmark for safe screw trajectory.
- Hemostasis: Pack the evacuated disc space with oxidized regenerated cellulose (Surgicel) or bone wax to control cancellous endplate bleeding.
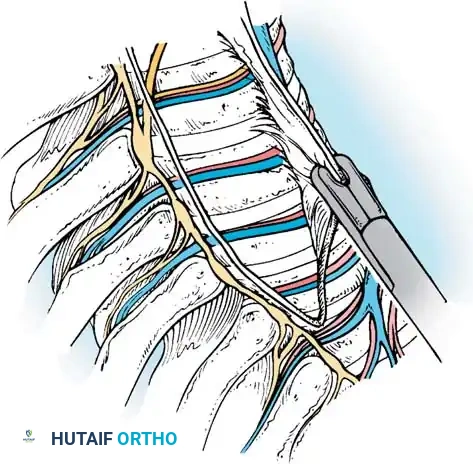
AUTOLOGOUS BONE GRAFT HARVEST
Structural support and osteogenic material are required for the anterior column.
- Use an Army-Navy retractor through the portal to stabilize the selected rib.
- With an endoscopic rib cutter, make two vertical cuts through the superior aspect of the rib, extending halfway across its width. Connect the cuts with an osteotome.
- Remove and morselize the rib section. Repeat this process for three or four ribs to obtain adequate volume.
- Nerve Protection: If a rib is removed through an access incision, dissect it subperiosteally. Preserving the periosteal sleeve protects the intercostal neurovascular bundle, significantly decreasing postoperative chest wall neuralgia.
- Note: Do not resect the rib heads during this harvest; they must remain as landmarks for instrumentation.
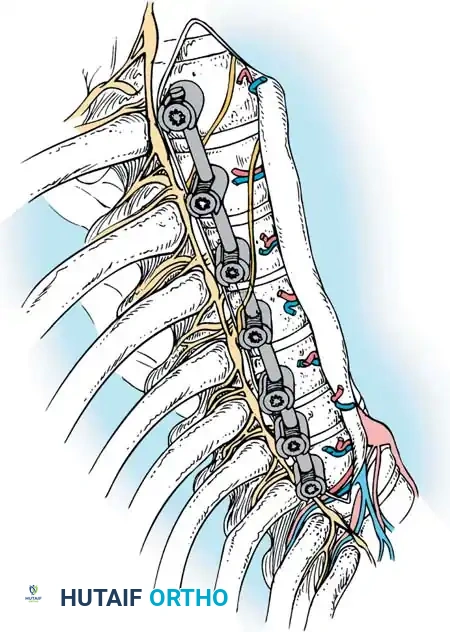
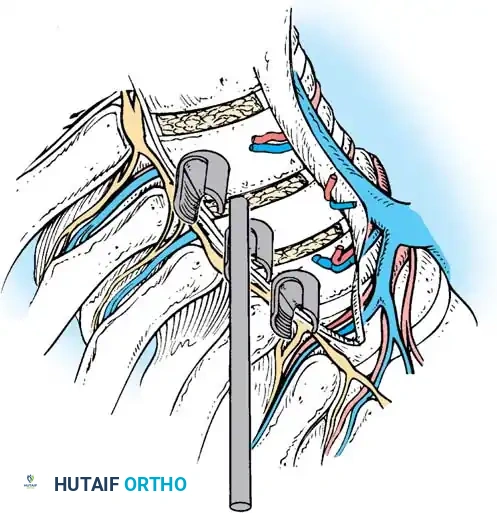
VERTEBRAL BODY INSTRUMENTATION
The placement of anterior vertebral body screws requires absolute precision to avoid the aorta anteriorly and the spinal canal posteriorly.
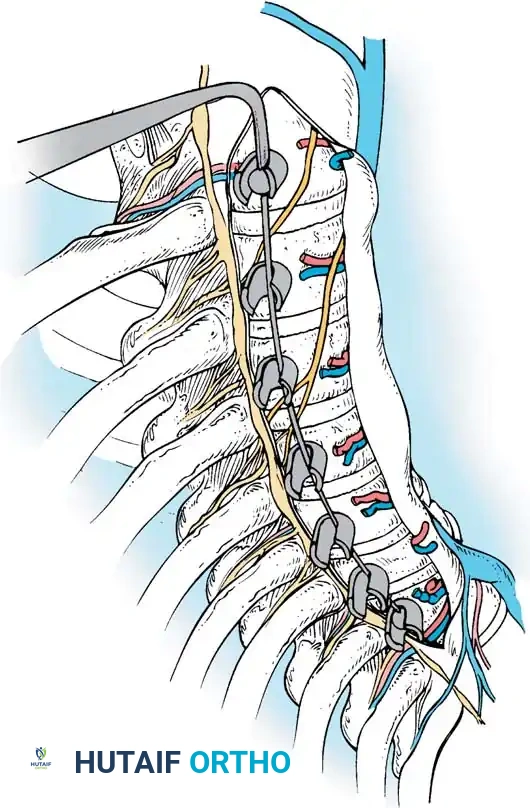
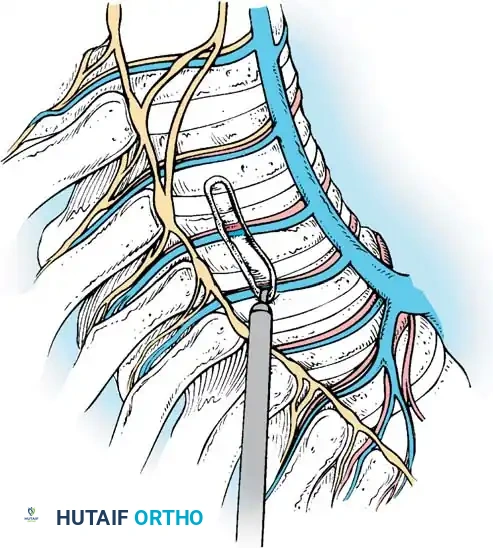
Segmental Vessel Management
The segmental vessels are located in the anatomical "valley" (the waist) of the vertebral body. They serve as a guide for the mid-vertebral starting point.
* Grasp the segmental vessels and coagulate them at the mid-vertebral body level using bipolar electrocautery or an ultrasonic scalpel.
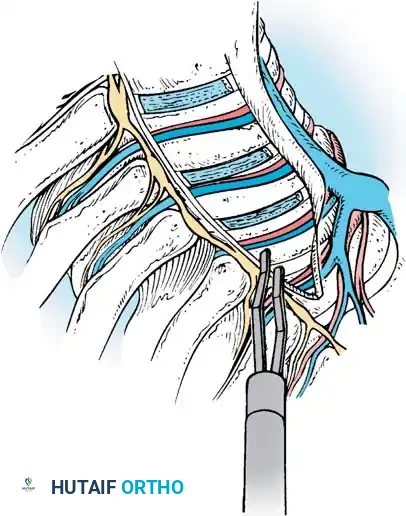
* Larger vessels may require endoscopic hemoclips before transection.
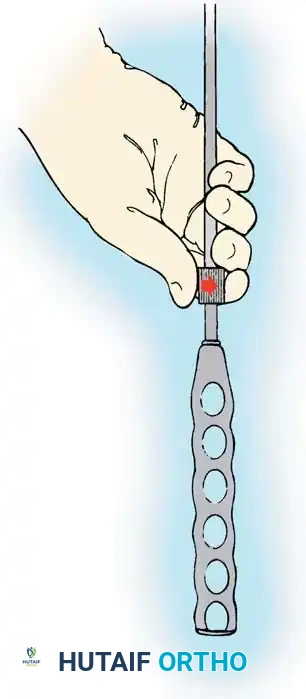
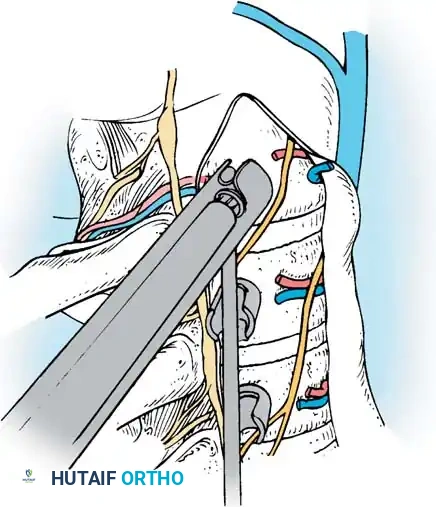
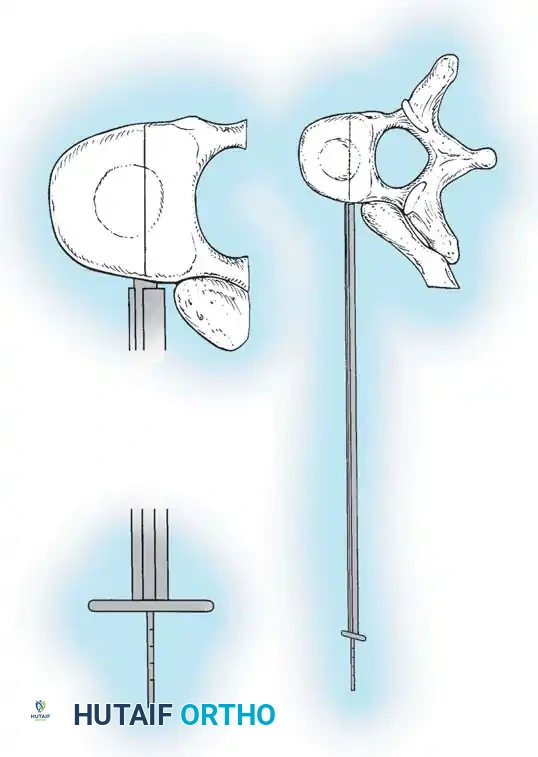
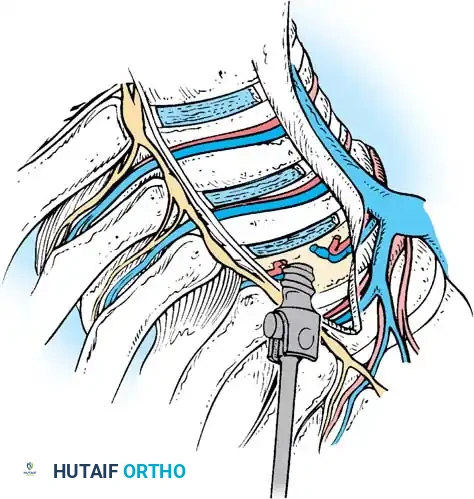
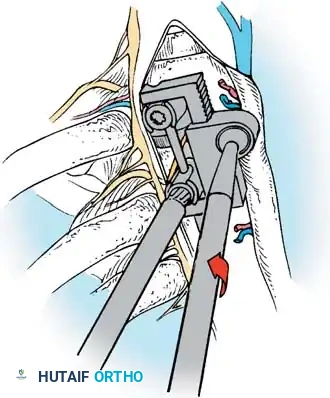
K-Wire and Screw Trajectory
- Starting Point: Place the K-wire guide onto the vertebral body just anterior to the intact rib head.
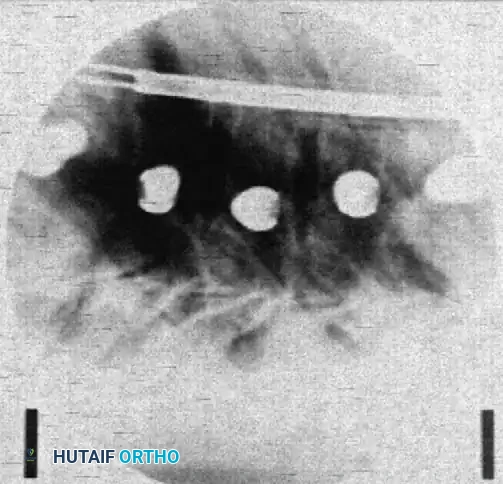
- Fluoroscopic Verification: Check the position with the C-arm to verify the wire is parallel to the end plates and centered in the vertebral body.
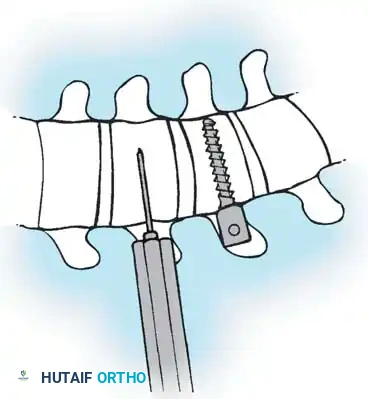
- Trajectory: The guide must have a slight posterior-to-anterior inclination (typically 10-15 degrees). This directs the wire safely away from the spinal canal.
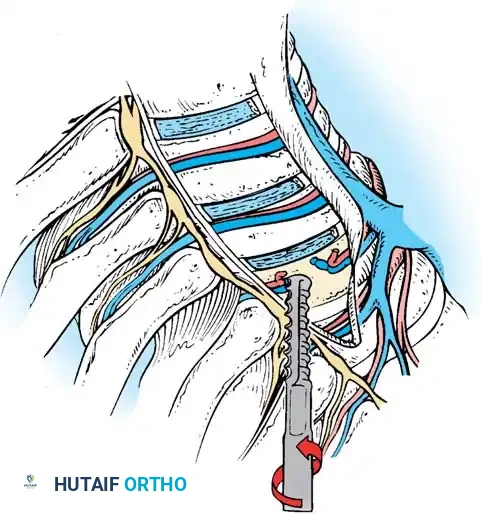
- Wire Advancement: Advance the K-wire. The etched lines on the wire (at 5-mm increments) determine the appropriate screw length.
- Tapping: Grasp the distal end of the K-wire with a clamp to prevent inadvertent advancement. Insert the cannulated tap over the wire and tap only the near cortex.
Surgical Warning: Never plunge the tap or the screw through the far cortex. The aorta (on the left) or the azygos vein (on the right) lies immediately adjacent to the contralateral cortex. Bicortical purchase is rarely necessary and carries catastrophic vascular risk.
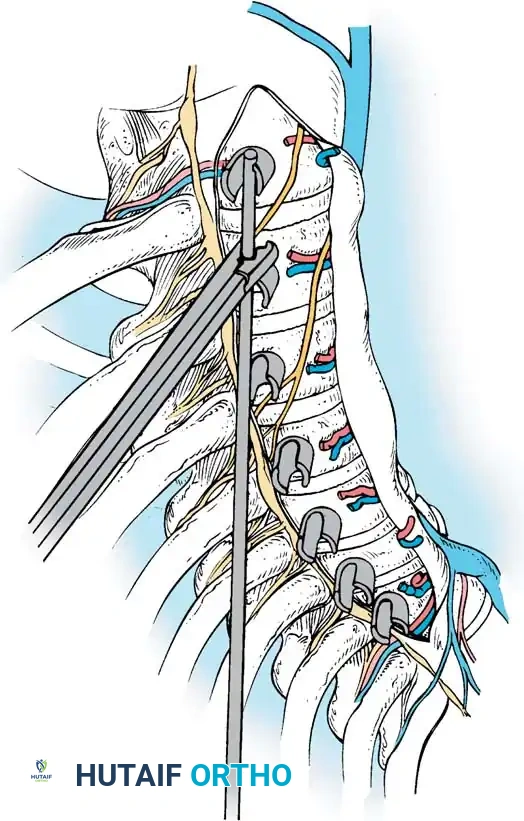
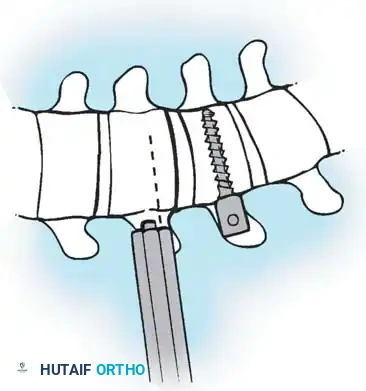
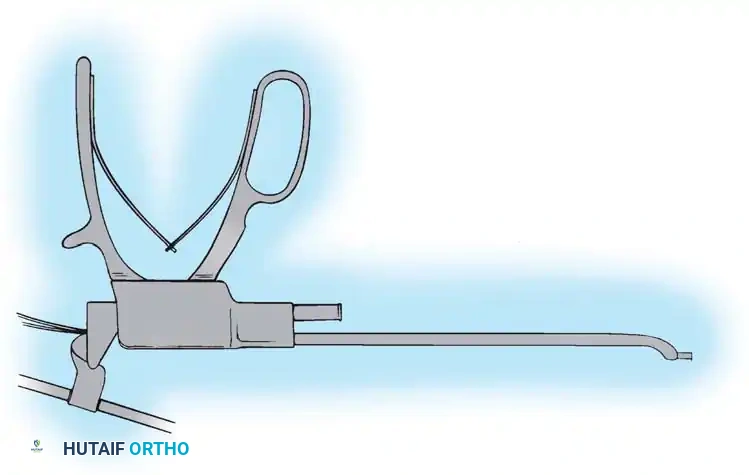
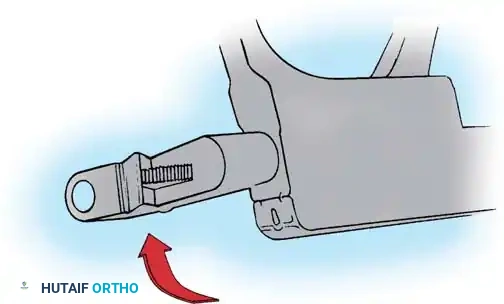
Screw Insertion
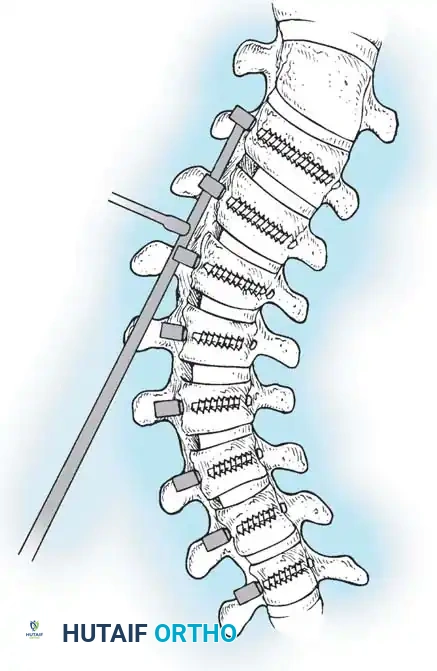
- Place the appropriately sized CD Horizon Eclipse screw over the K-wire using the endoscopic screwdriver.
- Verify the alignment of the screw heads via a lateral C-arm image.
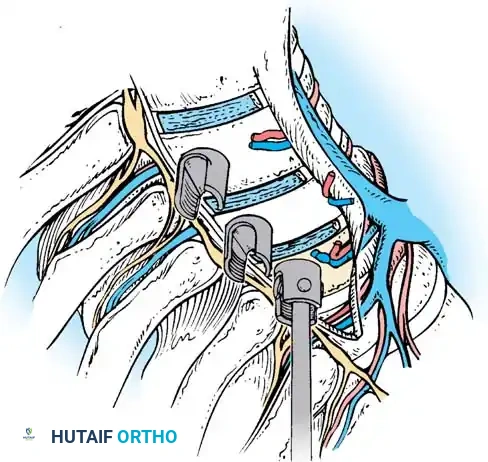
- Adjust the side walls of the screws so the saddles are perfectly in line to receive the rod.
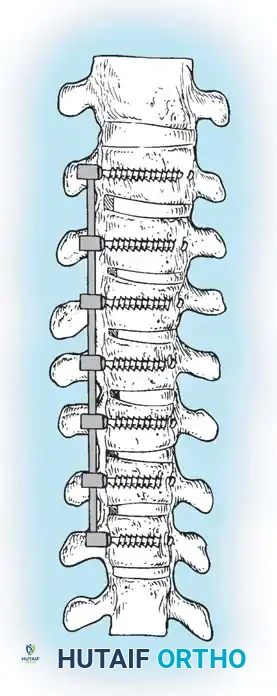
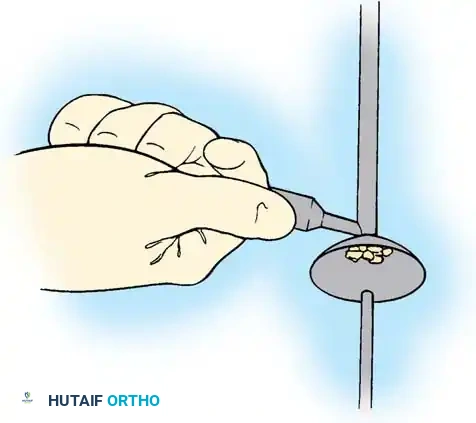
GRAFT DELIVERY AND ROD INSERTION
Before the rod is seated, the anterior column must be reconstructed with the harvested bone graft.
- Grafting: Deliver the morselized rib graft into the prepared disc spaces using a specialized endoscopic graft funnel and plunger. The disc space must be packed tightly, extending completely across to the contralateral annulus.
- Rod Contouring: Measure the required rod length and contour it to the desired sagittal profile (restoring thoracic kyphosis).
- Rod Introduction: Introduce the rod through the most inferior or superior portal and seat it into the screw saddles using endoscopic rod pushers and reducers.
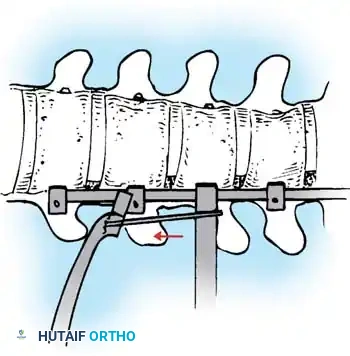
- Correction: Apply compression across the convex side of the curve. This maneuver simultaneously shortens the convexity, corrects the coronal deformity, and induces kyphosis in the sagittal plane.
- Final Tightening: Sequentially tighten all set screws under direct visualization and final fluoroscopic confirmation.
POSTOPERATIVE PROTOCOL AND COMPLICATIONS
Immediate Postoperative Care
- Chest Tube: A thoracostomy tube (usually 20-24 French) is placed under direct endoscopic vision through one of the lower portals to drain hemothorax and manage potential pneumothorax. It is typically removed when drainage is less than 50 cc per 24 hours.
- Extubation: Most patients can be extubated immediately postoperatively, provided one-lung ventilation did not induce severe pulmonary edema.
- Mobilization: Early mobilization is encouraged on postoperative day one to facilitate pulmonary toilet and prevent atelectasis.
Complication Avoidance
- Vascular Injury: The most feared complication. Strict adherence to the posterior-to-anterior screw trajectory and avoidance of bicortical penetration are mandatory.
- Neurologic Deficit: Can occur from direct spinal cord injury (errant K-wire) or ischemic injury (ligation of a critical medullary feeder, such as the Artery of Adamkiewicz). Segmental vessels should be ligated at the mid-vertebral body, away from the neural foramen, to allow collateral flow.
- Intercostal Neuralgia: Minimized by utilizing flexible trocars, avoiding excessive torque on the ribs, and performing subperiosteal rib resections.
- Pseudarthrosis: Prevented by aggressive endplate preparation down to bleeding subchondral bone and meticulous, dense packing of the interbody space with autograft.
While the paradigm of idiopathic scoliosis surgery has shifted toward posterior-only approaches, the endoscopic anterior instrumentation technique remains a masterclass in spinal anatomy, biomechanics, and minimally invasive execution. Mastery of these principles ensures the deformity surgeon is equipped to handle the most complex, rigid spinal pathologies.
===END===
You Might Also Like