Advanced Surgical Management of Idiopathic Scoliosis: Concave Rib Osteotomies and Anterior Instrumentation
Key Takeaway
Concave rib osteotomies serve as a powerful release procedure to increase flexibility in rigid scoliotic curves. By sectioning the ribs on the tension side, surgeons can achieve significant deformity correction. While modern pedicle screw constructs have reduced the absolute necessity of this technique, it remains a critical adjunct for severe, rigid deformities. This guide details the biomechanics, step-by-step surgical execution, and integration with anterior instrumentation for optimal coronal and sagittal balance.
CONCAVE RIB OSTEOTOMIES: HISTORICAL CONTEXT AND BIOMECHANICS
The concept of concave rib osteotomies as a structural release procedure for severe spinal deformity was first introduced by Flinchum in 1963. Subsequently, prominent deformity surgeons including Kostuik, Tolo, Goldstein, and Mann et al. expanded upon its utility, demonstrating its value in mobilizing rigid thoracic and thoracolumbar curves.
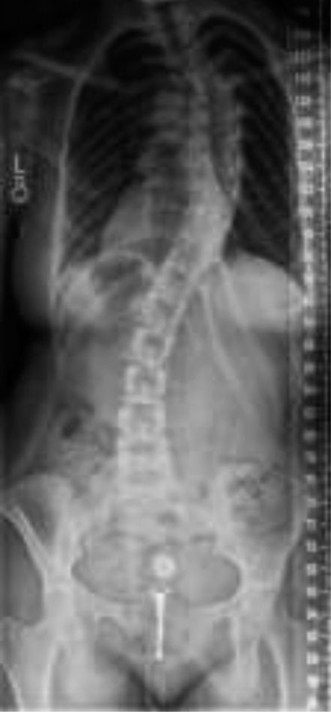
The biomechanical rationale for this procedure is rooted in the tension-band effect of the thoracic cage. In severe scoliosis, the ribs on the concave side of the curve become structurally contracted, acting as a rigid tether that resists coronal correction and derotation. Halsall et al. conducted pivotal cadaveric studies testing spinal flexibility before and after the sectioning of ribs on the tension (concave) side. Their findings demonstrated an average increase in coronal deflection of 53%, with the maximum increase in flexibility achieved when five or six apical ribs were resected or osteotomized.
Evolution from Resection to Osteotomy
Historically, the addition of concave rib procedures to spinal instrumentation and fusion carried a significant risk of pulmonary morbidity. Goldstein reported a high complication rate—including five pleural effusions and three pneumothoraces in a cohort of 17 patients—when performing frank resections of 5 to 6 cm of the concave ribs.
To mitigate these risks, Mann et al. refined the technique by performing targeted rib osteotomies rather than wide resections. This modification dramatically decreased the incidence of pulmonary complications, yielding only two pleural effusions and one pneumothorax in 10 patients.
Clinical Pearl: While concave osteotomies undeniably increase the flexibility of rigid curves, the advent of modern, high-density pedicle screw fixation systems has provided unprecedented three-dimensional corrective power. Consequently, the absolute necessity for concave rib osteotomies has diminished. However, in cases of severe, neglected, or exceptionally rigid deformities, it remains a highly effective adjunct. If performed, the prophylactic insertion of a chest tube is mandatory.
SURGICAL TECHNIQUE: CONCAVE RIB OSTEOTOMY
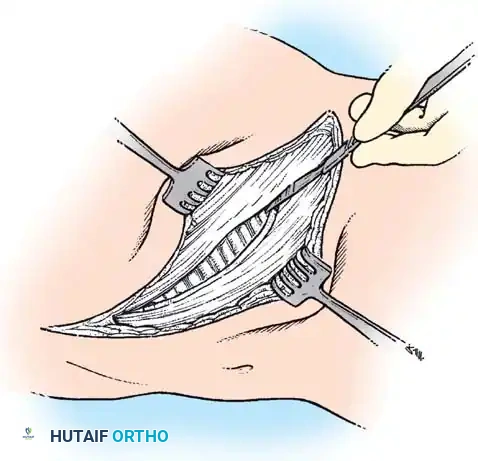
The execution of concave rib osteotomies requires meticulous subperiosteal dissection to protect the underlying parietal pleura. The goal is to disrupt the bony tether while maintaining the integrity of the pleural cavity.
🔪 Surgical Technique 38-15: Step-by-Step Execution
- Incision and Exposure: Approach the concave ribs through the standard midline posterior incision utilized for the primary spinal instrumentation and fusion.
- Muscle Retraction: Vigorously retract the paraspinous musculature lateral to the tips of the concave transverse processes. If the anatomy is obscured by severe rotation, utilize electrocautery to carefully incise the overlying myofascial tissue along the axis of the rib.
- Periosteal Incision: Incise the periosteum directly along the longitudinal axis of the rib, extending approximately 1.5 cm lateral to the tip of the transverse process.
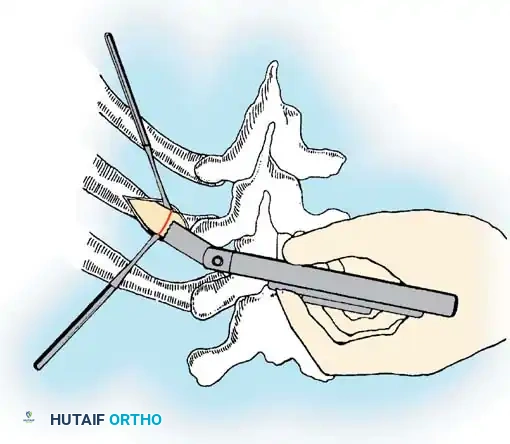
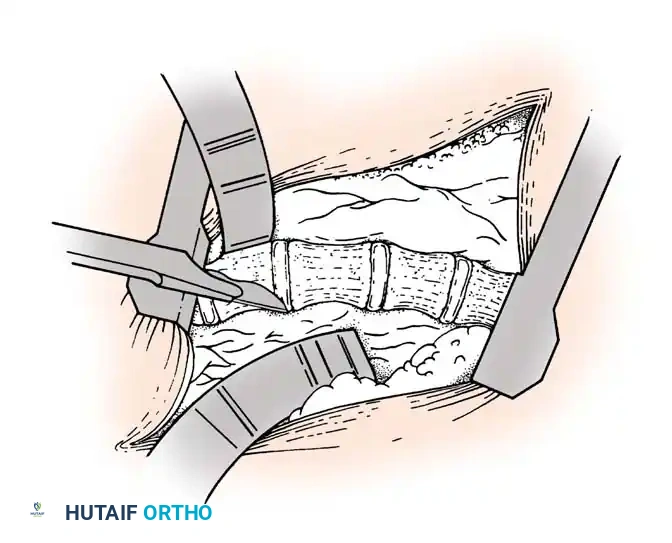
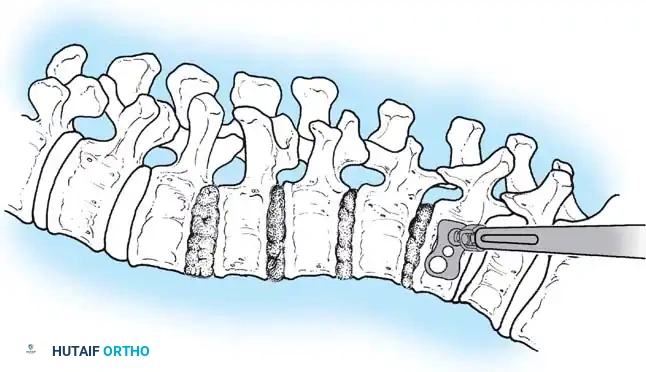
- Subperiosteal Dissection: Utilize small, curved Cobb elevators or Alexander periosteal elevators to expose the rib circumferentially. Surgical Warning: The parietal pleura is intimately adherent to the deep surface of the rib. Keep the elevator strictly within the subperiosteal plane to avoid pneumothorax.
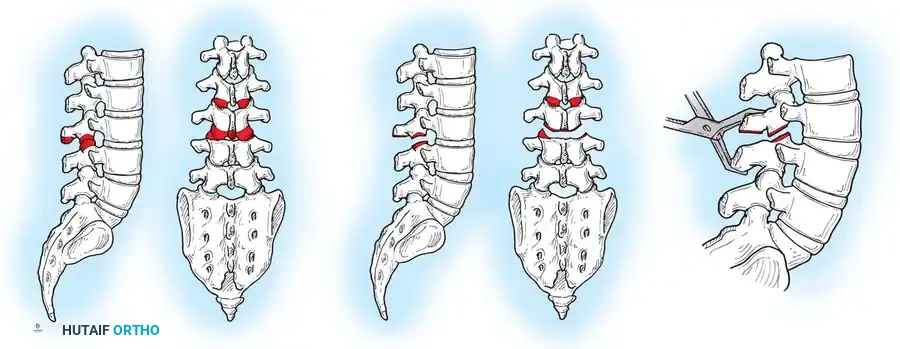
- Osteotomy: Protect the deep pleura with a malleable retractor or the elevator itself. Utilize a microsagittal saw or a sharp rib cutter to section the rib approximately 1 cm lateral to the transverse process.
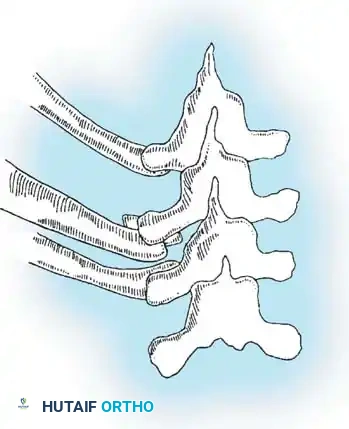
- Segment Overlap: Grasp the lateral rib segment with a Kocher clamp. Elevate it and allow it to overlap posteriorly over the medial segment. This shortening maneuver releases the tension band and prevents the sharp bony edges from piercing the pleura during curve correction.
- Hemostasis and Protection: Use a rongeur to smooth any jagged bony ends. Place a small pledget of thrombin-soaked Gelfoam between the osteotomized rib ends and the underlying pleura to provide mechanical protection and achieve local hemostasis.
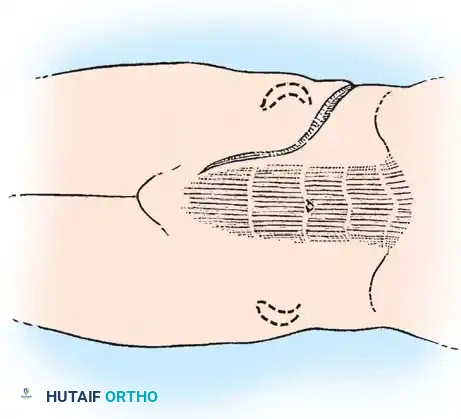
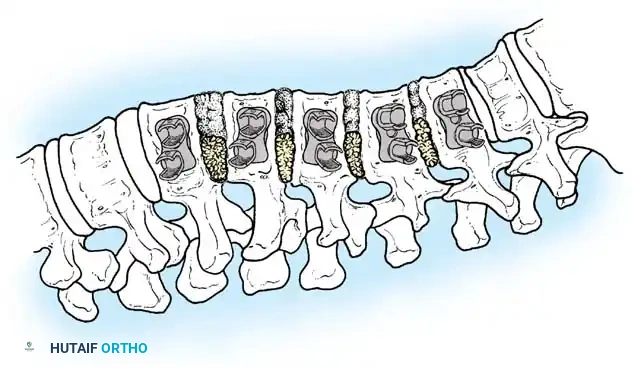
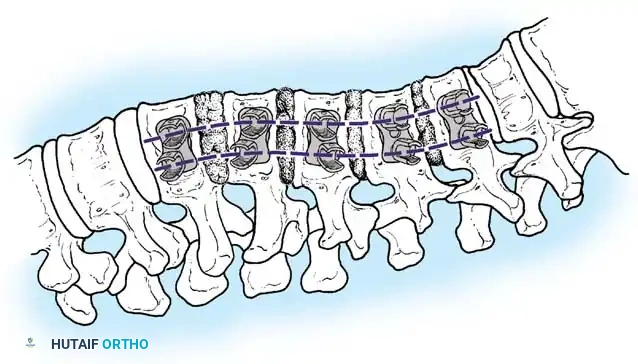
- Apical Release: Repeat this process to create four to six osteotomies centered over the apical concave vertebrae.
- Closure: Approximate the paraspinous muscles over the osteotomy sites using heavy absorbable sutures to eliminate dead space.
- Postoperative Management: Complete the spinal instrumentation and fusion. Regardless of whether a gross pleural violation was identified, insert a prophylactic chest tube to manage potential effusions or occult pneumothoraces.

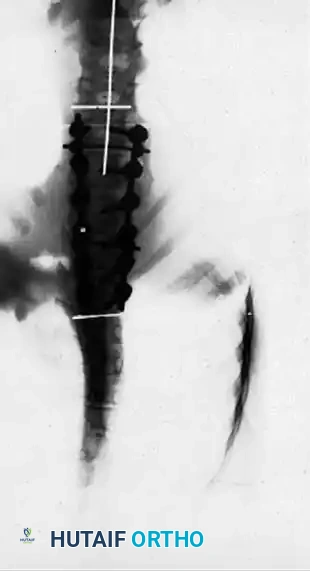
ANTERIOR INSTRUMENTATION FOR IDIOPATHIC SCOLIOSIS
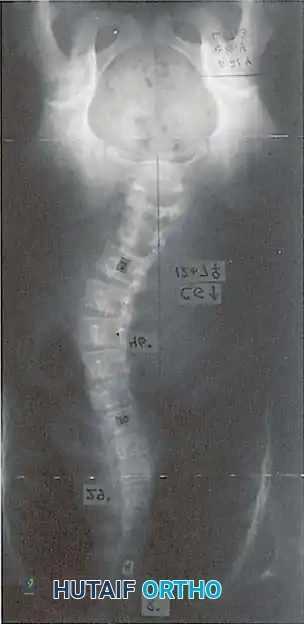
Anterior instrumentation and fusion have historically been a well-accepted, powerful procedure for specific curve patterns, particularly thoracolumbar and lumbar curves.
Indications and Curve Selection
The ideal candidate for an anterior approach is a patient with a Lenke Type 4 curve pattern, where the thoracolumbar or lumbar curve is the primary structural component, and the main thoracic or proximal thoracic curves are nonstructural and highly flexible.
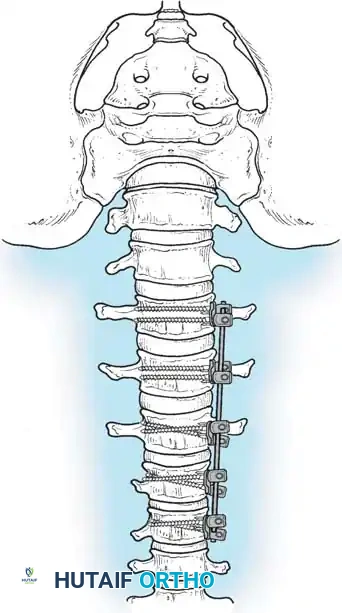
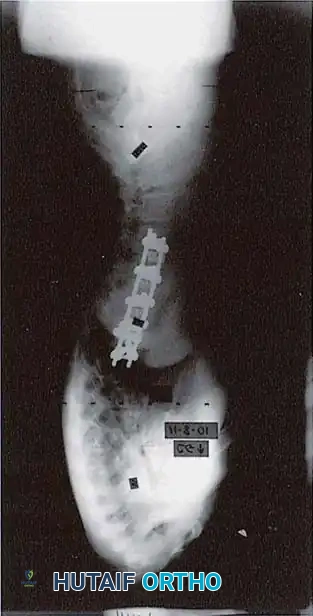
Anterior instrumentation provides unparalleled derotation and correction of the deformity in the coronal plane due to the complete excision of the intervertebral discs and anterior longitudinal ligament, which are the primary anterior tethers.
Surgical Advantage: Historically, a major advantage of the anterior approach was the ability to correct the deformity while fusing fewer motion segments compared to a posterior approach. By instrumenting end-vertebra to end-vertebra anteriorly, surgeons could often save one or two distal lumbar motion segments. However, with the advent of modern posterior pedicle screw constructs, this advantage has been largely neutralized.
Radiographic Prerequisites
Careful preoperative radiographic analysis is mandatory:
1. Flexibility: The thoracolumbar or lumbar curve must demonstrate significant flexibility on side-bending films.
2. Thoracic Curve: The compensatory thoracic curve must be nonstructural, reducing to 25 degrees or less on supine bending films.
3. Fractional Curve: The incomplete (fractional) curve between the lowest instrumented vertebra (LIV) and the sacrum must be carefully evaluated. It must be flexible enough to correct and become horizontal on bending films.
4. Age/Size: The child must be skeletally mature enough to possess vertebral bodies large enough to accommodate anterior screws. Extreme caution is advised when considering anterior systems in children younger than 9 years of age.
Level Selection Criteria
- Lowest Instrumented Vertebra (LIV): Generally selected as the lower end vertebra of the Cobb measurement. On the convex bending film, the disc below the proposed LIV must open up symmetrically on both sides. This confirms that the selected lower vertebra can be rendered horizontal relative to the pelvis.
- Proximal Level: Usually selected as the neutral vertebra. The fusion must strictly avoid extending into the compensatory thoracic curve above.
- Discrepancy Rule: If there is a discrepancy in the calculated levels between the bending films and the standing posteroanterior (PA) radiograph, the surgeon should select the method that dictates the longest segment of instrumentation to prevent marginal curve progression.
COMPLICATIONS AND DISADVANTAGES OF THE ANTERIOR APPROACH
While powerful, the anterior approach for thoracolumbar and lumbar curves carries a unique and significant morbidity profile:
* Visceral and Vascular Injury: Risk of iatrogenic injury to the ureter, spleen, or great vessels (aorta, inferior vena cava).
* Pulmonary/Lymphatic: Chylothorax from thoracic duct injury, and decreased pulmonary function due to chest wall disruption.
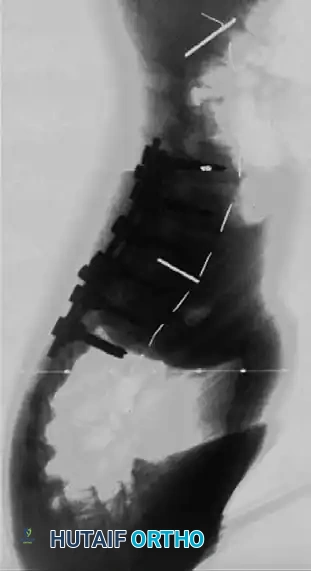
* Biomechanical Failures: Without meticulous attention to rod contouring and structural grafting, a kyphosing effect can occur, obliterating normal lumbar lordosis. Furthermore, because anterior screws rely on relatively cancellous vertebral body bone, proximal screw pullout or dislodgment is a known risk.
* Late Complications: Retroperitoneal fibrosis and vascular impingement from prominent instrumentation.
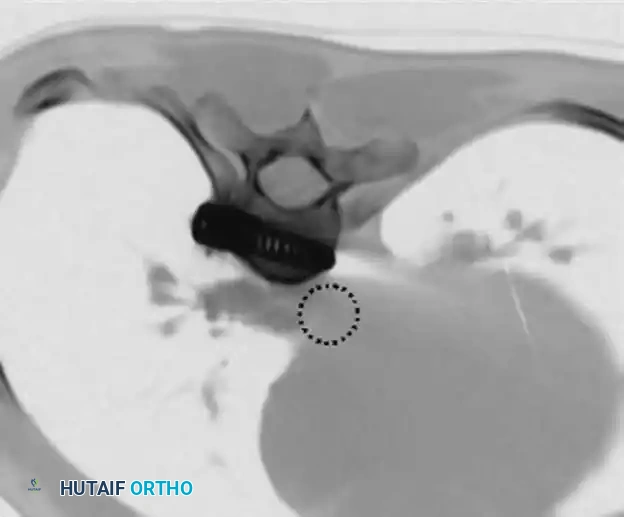
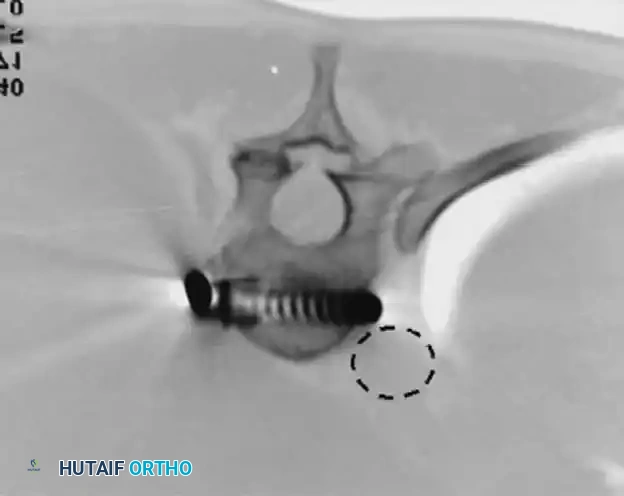
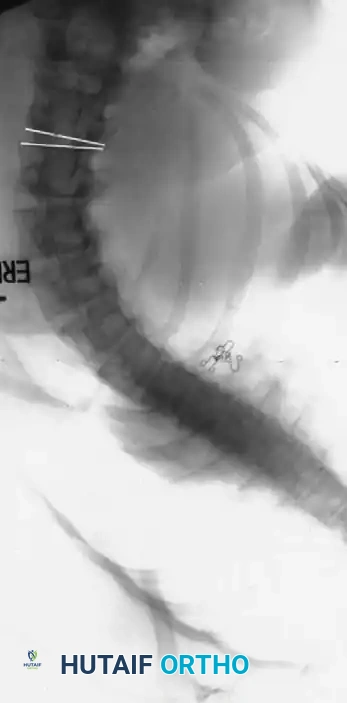
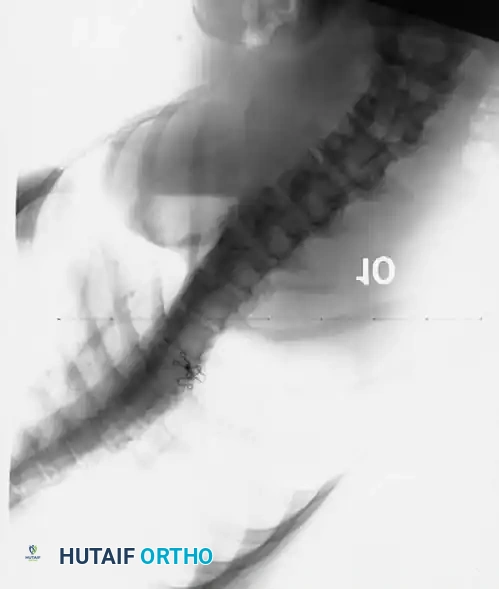
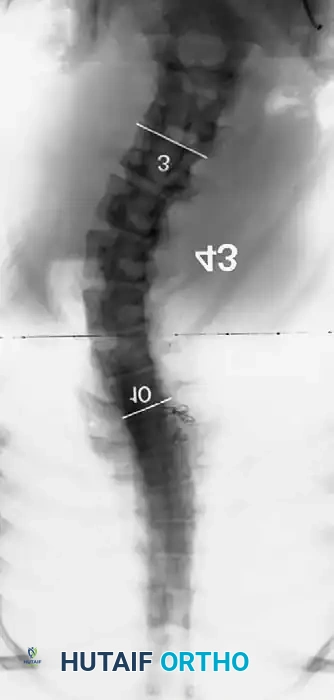
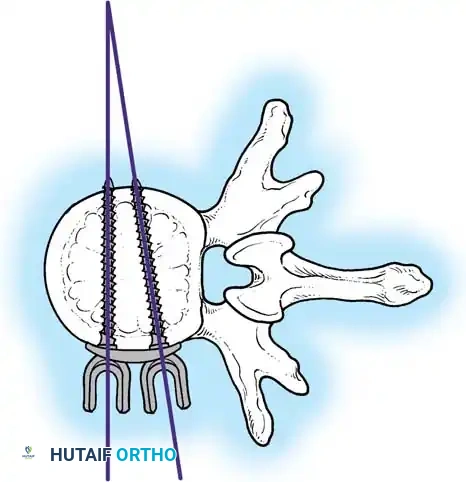
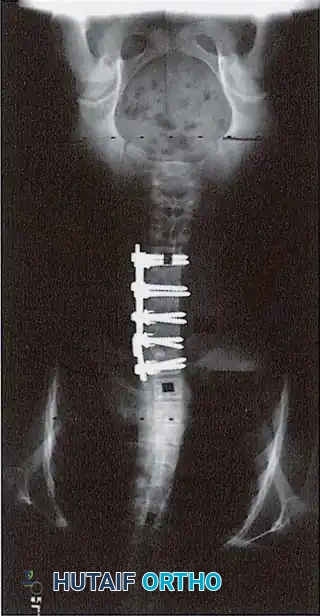
(CT imaging demonstrating the critical proximity of anterior thoracic screws to the descending aorta. Bicortical purchase must be executed with extreme caution.)
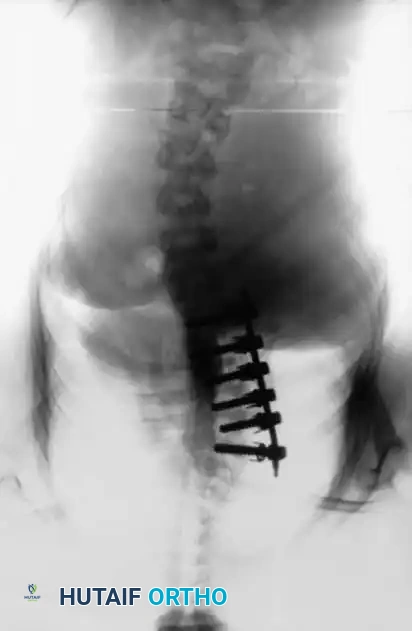
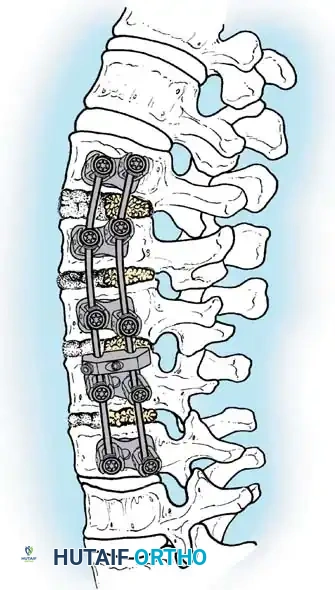
THE POSTERIOR ALTERNATIVE: PEDICLE SCREW FIXATION
Given the morbidities associated with anterior surgery, many key opinion leaders have transitioned to all-posterior approaches. Shufflebarger et al. strongly advocated for a posterior approach utilizing pedicle screw fixation and posterior column shortening for lumbar and thoracolumbar scoliosis.
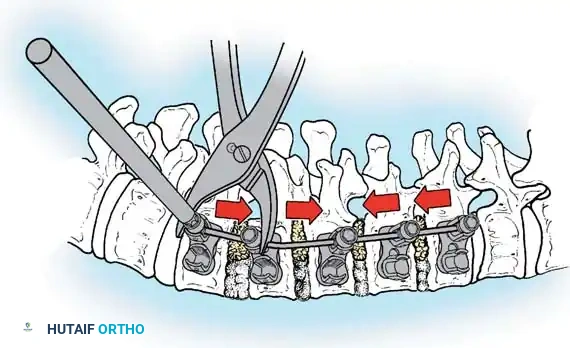
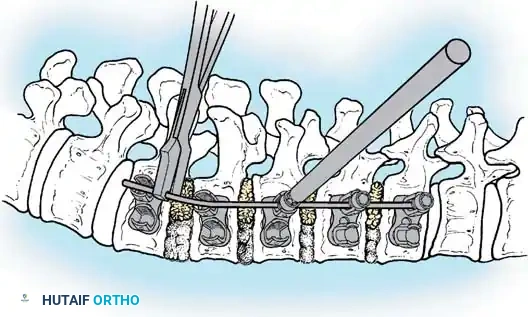
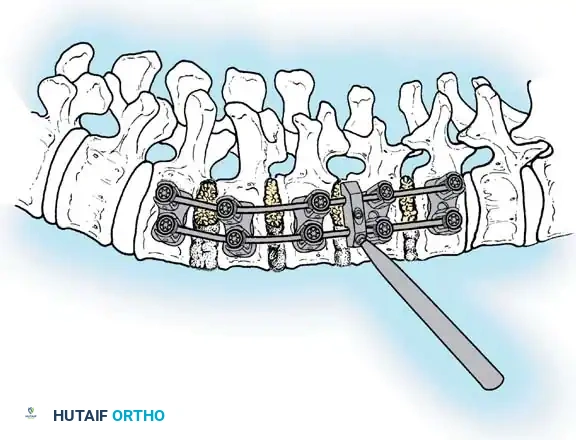
The Posterior Shortening Technique
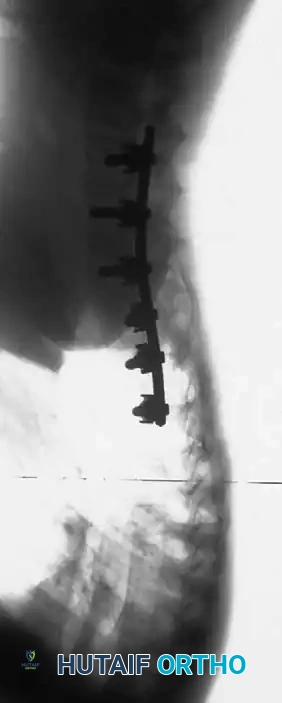
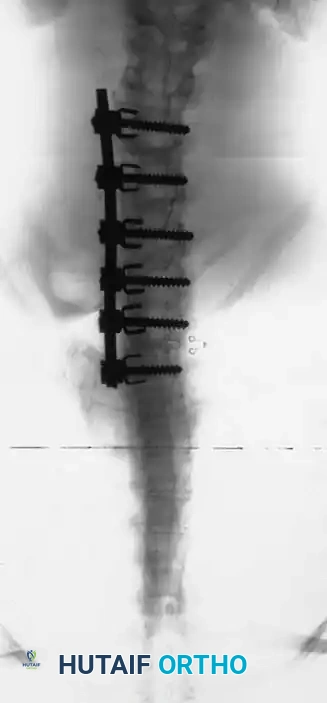
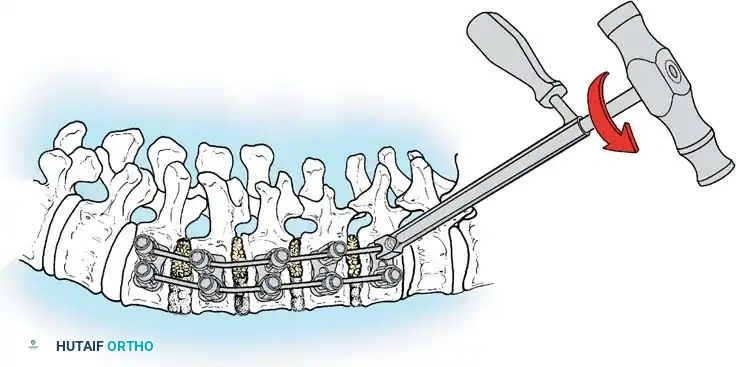
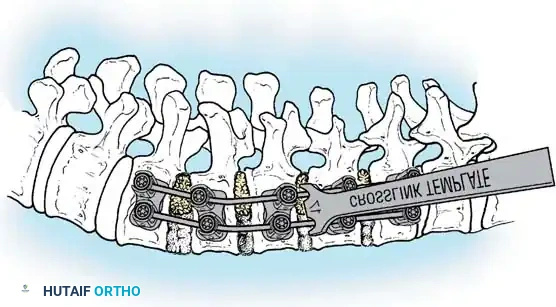
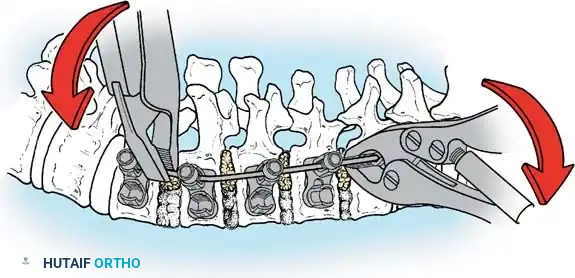
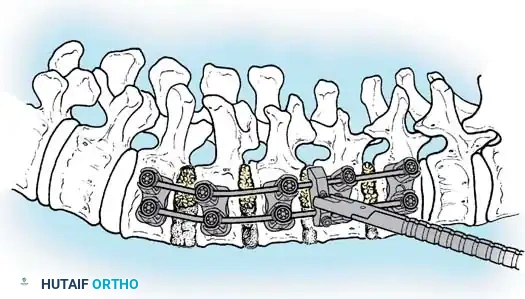
Following a wide posterior release (including complete facetectomies and removal of the ligamentum flavum), the spine is instrumented with pedicle screws and a 5.0-mm or 5.5-mm rod system.
* Advantages: This technique allows the surgeon to fuse the exact same number of levels as an anterior approach while entirely avoiding the morbidity of thoracotomy or retroperitoneal dissection.
* Outcomes: It provides excellent, rigid correction of both coronal and sagittal deformities, allowing for the restoration of physiological lumbar lordosis through posterior compression.
ANTERIOR THORACIC INSTRUMENTATION: A CONTROVERSIAL PARADIGM
The application of anterior instrumentation for primary thoracic curves remains highly controversial. Betz et al. prospectively evaluated anterior spinal instrumentation (using a solid-rod system to prevent the high breakage rates seen with early threaded rods) versus posterior multisegmental hook-rod systems.
Theoretical Advantages of Anterior Thoracic Fusion:
- True 3D Correction: Thorough excision of the intervertebral discs and anulus allows for superior derotation.
- Shorter Fusion Constructs: Fusion from end-vertebra to end-vertebra often saves distal motion segments, reducing the need to cross the thoracolumbar junction.
- Prevention of Crankshaft Phenomenon: By fusing the anterior column in skeletally immature patients (Risser 0), continued anterior spinal growth is arrested, preventing late rotational deformity.
- Sagittal Profile Control: The surgeon can induce either kyphosis or lordosis at specific segments via structural grafting and rod contouring.
Disadvantages and the Shift to Posterior Pedicle Screws:
Despite these advantages, the anterior thoracic approach disrupts the chest cage, negatively impacting pulmonary function tests (PFTs). Furthermore, the thoracic vertebral bodies are small, leading to less secure screw fixation.
Potter et al. definitively compared curve correction between posterior thoracic pedicle screws and anterior single-rod instrumentation in Lenke Type 1 curves. Their findings revolutionized modern practice: Posterior pedicle screw instrumentation provided superior coronal correction, better control of thoracic torsion, and excellent spontaneous correction of uninstrumented lumbar curves. Consequently, anterior instrumentation for thoracic curves is now rarely indicated in contemporary deformity practice.


SURGICAL TECHNIQUE: THORACOABDOMINAL APPROACH
When an anterior approach is mandated for a thoracolumbar curve, a formal thoracoabdominal exposure is required. This provides seamless access from the lower thoracic spine down to the lower lumbar spine.
🔪 Technique 38-16: Thoracoabdominal Exposure
- Positioning: Place the patient in the lateral decubitus position. The convex side of the scoliotic curve must be elevated (facing the ceiling). Ensure the patient is securely taped and the table is flexed to open the operative space between the iliac crest and the rib cage.
- Incision Planning: Make a curvilinear incision centered over the rib that corresponds to one level higher than the most proximal vertebra to be instrumented. For most thoracolumbar curves, this is the 9th or 10th rib.
- Superficial Dissection: Extend the incision distally along the anterolateral abdominal wall, following the contour of the external oblique, ending just lateral to the rectus abdominis muscle.
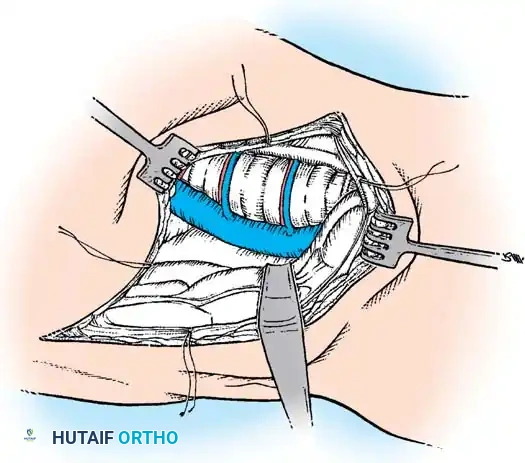
- Rib Resection: Expose the selected rib subperiosteally. Excise the rib from the costochondral junction to the angle of the rib posteriorly. Keep the resected bone for use as autograft.
- Thoracic Entry: Enter the pleural cavity through the bed of the resected rib. Deflate the ipsilateral lung (utilizing a double-lumen endotracheal tube) and gently retract it superiorly using moist laparotomy sponges.
- Diaphragmatic Takedown: Identify the diaphragm. It must be detached to connect the thoracic and retroperitoneal spaces.
- Method 1 (Peripheral Detachment): Incise the diaphragm circumferentially near its peripheral attachment to the chest wall, leaving a 1-2 cm cuff of tissue for later repair. This minimizes injury to the phrenic nerve branches.
- Method 2 (Crural Splitting): Split the crus of the diaphragm down to the aortic hiatus.
- Retroperitoneal Exposure: Distal to the diaphragm, bluntly sweep the peritoneum anteriorly to expose the psoas muscle and the anterolateral aspect of the lumbar spine. Identify and mobilize the ureter, ensuring it remains attached to the undersurface of the reflected peritoneum to preserve its blood supply.
- Segmental Vessel Ligation: Identify the segmental vessels running transversely across the mid-portion of each vertebral body. Ligate and divide these vessels to allow complete mobilization of the great vessels away from the spine.
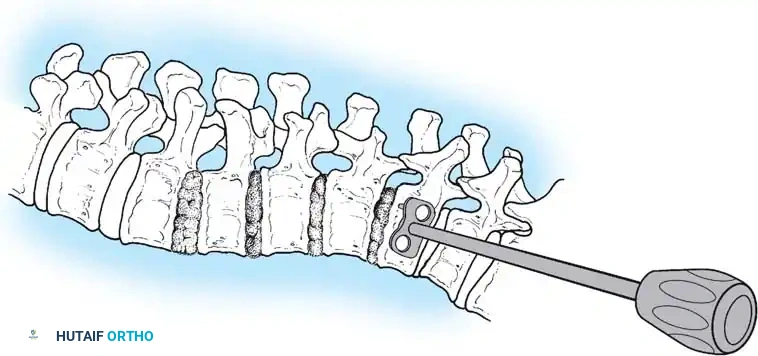
- Disc Excision: Perform a radical discectomy and complete excision of the anterior longitudinal ligament at all levels to be instrumented. This is the critical step that provides the necessary flexibility for curve correction.

📚 Medical References
- concave rib osteotomies in the correction of thoracic scoliosis, Spine 14:491, 1989.
- Mann DC, Wilham MR, Brower EM, et al: Decreasing homologous blood transfusion in spinal surgery by use of the cell saver and predeposited blood, Spine 14:1296, 1989.
- Marsicano JG, Lenke LG, Bridwell KH, et al: The lordotic effect of the OSI frame on operative adolescent idiopathic scoliosis patients, Spine 23:1341, 1998.
- Mason DE, Crango P: Spinal decompensation in CotrelDubousset instrumentation, Spine 16:S394, 1991.
- Mason RJ, Betz RR, Orlowski JP, et al: The syndrome of inappropriate antidiuretic hormone secretion and its effect on blood indices following spinal fusion, Spine 14:722, 1989.
- McAfee P, Regan J, Zdeblick T, et al: The incidence of complications in endoscopic anterior thoracolumbar spinal reconstructive surgery, Spine 20:1624, 1995.
- McCall RE, Bronson W: Criteria for selective fusion in idiopathic scoliosis using Cotrel-Dubousset instrumentation, J Pediatr Orthop 12:475, 1992.
- McCarthy RE, Peek RD, Morrissy RT, et al: Allograft bone and spinal fusion for paralytic scoliosis, J Bone Joint Surg 68A:370, 1986.
- Mehlman CT, Crawford AH: Video-assisted thoracoscopic surgery: pediatric orthopaedic applications. In Zdeblick T, ed: Anterior approaches in spine surgery, St Louis, 1995, Quality Medical Publishing. Mehlman CT, Crawford AH, Wolf RK: Video-assisted thoracic surgery. Endoscopic thoracoplasty technique, Spine 22:2178, 1997.
- Michel CR, Lalain JJ: Late results of Harrington’s operation: long-term evolution of the lumbar spine below the fused segments, Spine 10:414, 1985.
- Mirkovic S, Abitbol JJ, Steinman J, et al: Anatomic considerations for sacral screw placement, Spine 16(suppl):289, 1991.
- Moe JH: A critical analysis of methods of fusion for scoliosis: an evaluation in 266 patients, J Bone Joint Surg 40A:529, 1958.
- Moe JH: Methods of correction and surgical techniques in scoliosis, Orthop Clin North Am 3:17, 1972.
- Moe JH, Purcel GA, Bradford DS: Zielke instrumentation (VDS) for the correction of spinal curvature, Clin Orthop Relat Res 180:133, 1983.
- Moore MR, Baynham GC, Brown CW, et al: Analysis of factors related to truncal decompensation following Cotrel-Dubousset instrumentation, J Spinal Disord 4:188, 1991.
- Moore SV: Segmental spinal instrumentation: complications, correction, and indications, Orthop Trans 7:413, 1983.
- Moskowitz A, Moe JH, Winter RB, et al: Long-term follow-up of scoliosis fusion, J Bone Joint Surg 62A:364, 1980.
- Mubarak SJ, Wenger DR, Leach J: Evaluation of CotrelDubousset instrumentation for treatment of idiopathic scoliosis, Update Spinal Disord 2:3, 1987.
- Naito M, Owen JH, Bridwell KH, et al: Effects of distraction on physiologic integrity of the spinal cord, spinal cord bloodfl ow, and clinical status, Spine 17:1154, 1992.
- Nasca RJ, Lemons JE, Montgomery R: Evaluation of cryopreserved bone and synthetic biomaterials in promoting spinal fusion, Spine 16:S330, 1991.
- Nash C, Moe J: A study of vertebral rotation, J Bone Joint Surg 51A:223, 1969.
- Newton PO, Cardelia JM, Farnsworth CL, et al: Biomechanical comparison of open and thoracoscopic anterior spinal release in a goat model, Spine 23:530, 1998.
- Newton PO, Shea KG, Granlund KF: Defi ning the pediatric spinal thoracoscopy learning curve, 65 consecutive cases, Spine 25:1028, 2000.
- Newton PO, Wenger DR, Mubarak SJ, et al: Anterior release and fusion in pediatric spinal deformity: a comparison of early outcome and cost of thoracoscopic and open thoracotomy approaches, Spine 22:1398, 1997.
- Nickel VL, Perry J, Affeldt JE, et al: Elective surgery on patients with respiratory paralysis, J Bone Joint Surg 39A:989, 1957.
- O’Brien MF, Lenke LG, Bridwell KH, et al: Recognition and treatment of the proximal thoracic curve in adolescent idiopathic scoliosis treated with Cotrel-Dubousset instrumentation. Paper presented at the 28th annual meeting of the Scoliosis Research Society, Dublin, Sept 1993.
- Oga M, Ikuta H, Sugioka Y: The use of autologous blood and the surgical treatment of spinal disorders, Spine 17:1381, 1992.
- Ogiela DM, Chan PK: Ventral derotation spondylodesis: a review of 22 cases, Spine 11:18, 1986.
- Ogilvie JW: Anterior spine fusion with Zielke instrumentation for idiopathic scoliosis in adolescents, Orthop Clin North Am 19:313, 1988.
- Olsewski JM, Simmons EH, Kallen FC, et al: Morphometry of the lumbar spine: anatomical perspectives related to transpedicular fi xation, J Bone Joint Surg 72A:541, 1990.
- Owen JH, Laschinger J, Bridwell K, et al: Sensitivity and specifi city of somatosensoryand neurogenic motor-evoked potentials in animals and humans, Spine 13:1111, 1988.
- Owen R, Turner DA, Bamforth JS, et al: Costectomy as the fi rst stage of surgery for scoliosis, J Bone Joint Surg 68B:91, 1986.
- Passuti N, Daculsi G, Rogez JM, et al: Macroporous calcium phosphate ceramic performance in human spine fusion, Clin Orthop Relat Res 248:169, 1989.
- Phillips WA, Hensinger RN: Control of blood loss during scoliosis surgery, Clin Orthop Relat Res 229:88, 1988.
- Picetti GD III: CD Horizon Eclipse Spinal System surgical technique manual, Memphis, Tenn, 1999, Medtronic Sofamor Danek. Pinto MR: Complications of pedicle screw fi xation, Spine: State of the Art Reviews 6:45, 1992.
- Polly Jr DW: Material presented at Spinal Deformity: Challenges and Solutions of Surgical Treatment, Puerto Rico, May 12-13, 2000.
- Ponseti IV, Friedman B: Changes in the scoliotic spine after fusion, J Bone Joint Surg 32A:751, 1950.
- Potter BK, Kuklo TR, Lenke LG: Radiographic outcomes of anterior spinal fusion versus posterior spinal fusion with tho- racic pedicle screws for treatment of Lenke type I adolescent idiopathic scoliosis curves, Spine 30:1859, 2005.
- Pullock FE, Pollock FE Jr: Idiopathic scoliosis: correction of lateral and rotational deformities using the Cotrel-Dubousset spinal instrumentation system, South Med J 83:161, 1990.
- Puno RM, Grossfeld SL, Johnson JR, et al: Cotrel-Dubousset instrumentation in idiopathic scoliosis, Spine 17:S258, 1992.
- Puno RM, Johnson JR, Ostermann PA, et al: Analysis of the primary and compensatory curvatures following Zielke instrumentation for idiopathic scoliosis, Spine 14:738, 1989.
- Rappaport M, Hall K, Hopkins K, et al: Effects of corrective scoliosis surgery on somatosensory-evoked potentials, Spine 7:404, 1982.
- Regan JJ, Mack MJ, Picetti MG: Comparison of VAT to open thoracotomy in thoracic spinal surgery, Orthop Trans 18:112, 1994.
- Regan JJ, Mack MJ, Picetti GD: A technical report on videoassisted thoracoscopy in thoracic spinal surgery, Spine 20:831, 1995.
- Regan JJ, McAfee PC: Thoracoscopy and laparoscopy of the spine. In Bridwell KH, DeWald RL, eds: The textbook of spinal surgery, 2nd ed, Philadelphia, 1997, Lippincott-Raven. Relton JES, Hall JE: An operation frame for spinal fusion: a new apparatus designed to reduce haemorrhage during operation, J Bone Joint Surg 49B:327, 1967.
- Richards BS: Lumbar curve response in type II idiopathic scoliosis after posterior instrumentation of the thoracic curve, Spine 17:S282, 1992.
- Richards BS, Birch JG, Herring JA, et al: Frontal plane and sagittal plane balance following Cotrel-Dubousset instrumentation for idiopathic scoliosis, Spine 14:733, 1989.
- Richards BS, Johnston CE II: Cotrel-Dubousset instrumentation for adolescent idiopathic scoliosis, Orthopedics 10:649, 1987.
- Riddick M, Winter RB, Lutter L: Spinal deformities in patients with spinal muscle atrophy, Spine 8:476, 1982.
- Riseborough EJ: The anterior approach to the spine for the correction of deformities of the axial skeleton, Clin Orthop Relat Res 93:207, 1973.
- Roaf R: The treatment of progressive scoliosis by unilateral growth arrest, J Bone Joint Surg 45B:637, 1963.
- Roth A, Rosenthal A, Hall JE, et al: Scoliosis and congenital heart disease, Clin Orthop Relat Res 93:95, 1973.
- Roye DP Jr, Farcy JP, Rickert JB, et al: Results of spinal instrumentation of adolescent idiopathic scoliosis by King type, Spine 17:S270, 1992.
- Ryan TP, Britt RH: Spinal and cortical somatosensory-evoked potential monitoring during corrective spinal surgery with 108 patients, Spine 11:352, 1986.
- Schram RA, Allen BL Jr, Ferguson RL: Rib regeneration area as an indicator of fusion area in adolescent idiopathic scoliosis, Spine 12:346, 1987.
- Shono Y, Kaneda K, Yamamoto I: A biomechanical analysis of Zielke, Kanada, and Cotrel-Dubousset instrumentations in thoracolumbar scoliosis: a calf spine model, Spine 16:1305, 1991.
- Shuffl ebarger HL: Clinical issue: rod rotation in scoliosis surgery, Warsaw, Ind, 1994, DePuy Motech. Shuffl ebarger HL: The theory of the segmental approach to spinal instrumentation: a defi nitive method of planning spinal instrumentation for every spinal pathology, Warsaw, Ind, 1994, DePuy Motech. Shuffl ebarger HL: Thoracoplasty anterior technique. In Bridwell KH, DeWald RL, eds: The textbook of spinal surgery, 2nd ed, Philadelphia, 1997, Lippincott-Raven. Shuffl ebarger HL, Clark CE: Cotrel-Dubousset instrumentation, Orthopedics 11:1435, 1988.
- Shuffl ebarger HL, Clark CE: Fusion levels and hook patterns in thoracic scoliosis with Cotrel-Dubousset instrumentation, Spine 15:916, 1990.
- Shuffl ebarger HL, Geck MJ, Clark CE: The posterior approach for lumbar and thoracolumbar adolescent idiopathic scoliosis: posterior shortening and pedicle screws, Spine 29:269, 2004.
- Shuffl ebarger HL, Harms J: Moss Miami three-dimensional spinal instrumentation: surgical technique, Warsaw, Ind, 1994, DePuy Motech. Shuffl ebarger HL, Harms J: Moss Miami three-dimensional spinal instrumentation: taking spinal instrumentation to a new dimension, Warsaw, Ind, 1994, DePuy Motech. Smith AD, von Lackum WH, Wylie R: An operation for stapling vertebral bodies in
You Might Also Like