Mastering Safe External Fixation of the Humerus: Techniques & Placement
Key Takeaway
Here are the crucial details you must know about Mastering Safe External Fixation of the Humerus: Techniques & Placement. External fixation of the humerus is a minimally invasive surgical procedure using pins or wires inserted into the bone and connected to an external device. This fixation of the humerus provides stability for fractures, often employed in severe soft tissue injuries, infections, or polytrauma. Safe pin placement is critical due to the humerus's close association with neurovascular bundles.
Introduction & Epidemiology
External fixation of the humerus represents a critical temporary or definitive stabilization modality in orthopedic trauma surgery. This technique involves the percutaneous insertion of pins or wires into the bone, connected to an external frame, to stabilize fractures, correct deformities, or provide joint distraction. While initially popularized for complex lower limb trauma, its application in the humerus, particularly for open fractures, polytrauma, or severe soft tissue compromise, has gained significant traction.
Humeral fractures constitute approximately 3% of all adult fractures, with a bimodal distribution peaking in young males (high-energy trauma) and elderly females (low-energy trauma). While many diaphyseal and some proximal/distal humeral fractures can be managed non-operatively or with internal fixation, external fixation assumes a paramount role in situations where definitive internal fixation is either contraindicated, premature, or technically challenging. Its utility extends from damage control orthopedics (DCO) in hemodynamically unstable patients to definitive management of infected non-unions or acute bone loss. The principles of external fixation emphasize minimal soft tissue disruption, immediate stability, and often, the ability to facilitate wound care and subsequent reconstructive procedures.
Surgical Anatomy & Biomechanics
A thorough understanding of the surgical anatomy of the humerus and surrounding neurovascular structures is non-negotiable for safe and effective external fixator placement. Deviation from established safe corridors can lead to devastating iatrogenic injury.
Neurovascular Structures at Risk
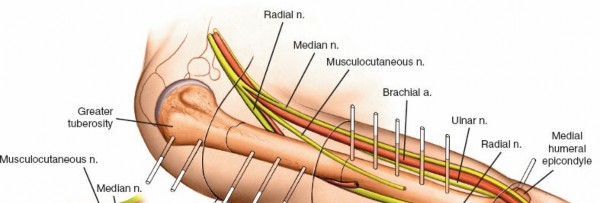
The humerus is intimately associated with several critical nerves and vessels:
- Radial Nerve: This is arguably the most frequently injured nerve in humeral diaphyseal fractures and during surgical interventions. It courses from posterior to anterior in the spiral groove (groove for the radial nerve), approximately 10-14 cm proximal to the lateral epicondyle, piercing the lateral intermuscular septum to lie anterior to the lateral epicondyle. Pin placement in the posterior or posteromedial aspects of the mid-diaphysis is extremely hazardous. Anterolateral pin placement, utilizing blunt dissection to the bone, is the preferred approach in the mid-diaphysis.
- Axillary Nerve: Located at the surgical neck of the humerus, it wraps around the posterior aspect, approximately 5-7 cm distal to the acromion, often referred to as the "quadrangular space." It innervates the deltoid and teres minor. Pin placement in the proximal humerus requires careful consideration of its course, often advocating for more anterior or anterolateral pin insertion points relative to the deltoid insertion.
- Musculocutaneous Nerve: Pierces the coracobrachialis muscle in the proximal arm and then runs between the biceps and brachialis muscles. While less frequently injured than the radial or axillary nerves in diaphyseal fixation, anterior pins placed too medially or too deep proximally may be at risk.
- Ulnar Nerve: Courses posteriorly around the medial epicondyle in the cubital tunnel. While primarily a concern for distal humeral and elbow fixation, pins inserted in the distal medial epicondyle or supracondylar region of the humerus require vigilance to avoid this structure.
- Median Nerve & Brachial Artery/Vein: These structures lie in the medial neurovascular bundle of the arm. Anterior or anteromedial pin placement, particularly in the distal humerus, must meticulously avoid these vital structures.
- Deep Brachial Artery: Accompanies the radial nerve in the spiral groove. While smaller than the brachial artery, injury can cause significant bleeding.
Safe Corridors for Pin Placement
General principles for safe pin placement include:
1.
Blunt Dissection:
Always make a small skin incision and use a hemostat or trocar to bluntly dissect down to the bone, creating a safe path for the drill. This pushes neurovascular structures aside.
2.
Sleeves and Guides:
Utilize protective sleeves and drill guides to prevent soft tissue entanglement and ensure precise drilling.
3.
Low-Speed Drilling with Cooling:
High-speed drilling generates heat, leading to thermal osteonecrosis and subsequent pin loosening or infection. Low-speed, high-torque drilling with saline irrigation is paramount.
4.
Bicortical Purchase:
For optimal stability, pins should engage both cortices. For half pins, this means stopping just through the far cortex. For transfixion pins, the pin fully penetrates and exits the opposite side.
-
Proximal Humerus:
- Anterolateral Aspect: The preferred zone for pins in the humeral head and surgical neck. Pins are typically inserted anterior to the deltoid insertion or through a limited deltoid-splitting approach. This avoids the axillary nerve posteriorly and laterally, and the musculocutaneous nerve medially. Aim for the anterior two-thirds of the humerus.
-
Care must be taken to remain distal to the articular cartilage of the humeral head and lateral to the biceps tendon.

-
Mid-Diaphysis (Shaft):
- Anterolateral Aspect: This is the primary safe corridor for diaphyseal humeral pins. By approaching from the anterolateral side, the radial nerve in the spiral groove (posterior) is avoided. Pins should be placed anterior to the lateral intermuscular septum.
- Posterior or posteromedial pin placement in the mid-diaphysis carries an unacceptably high risk of radial nerve injury.
- Avoid the deltoid insertion proximally to prevent impingement.
-
Distal Humerus (Supracondylar Region):
- Anterolateral or Lateral Column: Pins can be safely placed in the lateral column of the distal humerus, avoiding the ulnar nerve medially and the median nerve/brachial artery anteriorly.
- Posterolateral: While possible, there is a risk to the radial nerve as it passes anteriorly.
-
Extreme caution is advised to avoid intra-articular penetration. Fluoroscopic guidance is essential.

Biomechanics of External Fixation
External fixators stabilize fractures by connecting pins or wires inserted into the bone to external bars or rings. The stability of the construct is influenced by several factors:
-
Pin Characteristics:
- Diameter: Larger diameter pins offer greater stiffness and pull-out strength.
- Design: Threaded pins provide better bone purchase than smooth wires. Cancellous threads are used in metaphysis, cortical threads in diaphysis.
- Number of Pins: More pins generally provide greater stability, but also increase surgical complexity and potential for pin site complications.
-
Pin Placement:
- Transfixion Pins/Wires: Go through the limb and connect at both ends. These provide superior stability due to broader triangulation and fixation points. They are often used in ring fixators (Ilizarov, spatial frames) for complex reconstructions or bone lengthening, where high stability is paramount. However, they limit joint movement significantly.
- Half Pins: Stop at the far cortex of the bone. They are more common for simple fracture stabilization, allowing greater soft tissue and joint mobility. They are typically used in uniplanar or biplanar frames.
-
Frame Configuration:
- Uniplanar: Pins are placed in a single plane and connected by a single bar. Least stable.
- Biplanar/Multiplanar: Pins are placed in multiple planes, connected by multiple bars. Offers increased torsional and bending stiffness. Often preferred for diaphyseal fractures.
- Hybrid/Ring Frames: Combine half pins with transfixion wires in a ring or semi-ring construct. Offers versatile fixation for complex periarticular or metaphyseal fractures, allowing significant stability while permitting some joint motion.
- Bone-to-Bar Distance: Reducing the distance between the bone and the external bar increases stiffness. Shorter lever arms reduce bending moments.
- Pin Spacing: Spreading pins further apart within a fracture segment increases stability. Pins should be placed as far as possible from the fracture site (but within safe zones) and as close as possible to the joint, without impeding joint motion.
- Preloading: Compressing the fracture fragments slightly can enhance stability, particularly for simple transverse or short oblique fractures.
Indications & Contraindications
External fixation of the humerus, while versatile, is reserved for specific clinical scenarios where its advantages outweigh the potential drawbacks of pin site care and potential stiffness.
Indications for External Fixation of the Humerus
- Damage Control Orthopedics (DCO): In hemodynamically unstable polytrauma patients (the "lethal triad" of hypothermia, acidosis, and coagulopathy), external fixation provides rapid, minimally invasive provisional stabilization, allowing resuscitation and delaying definitive surgery until the patient is physiologically stable.
- Open Fractures (Gustilo Type II and III): Particularly Gustilo Type IIIB and IIIC, with extensive soft tissue damage, contamination, or vascular injury. External fixation stabilizes the fracture, facilitates wound debridement and inspection, and allows for subsequent soft tissue coverage (flaps) without compromising internal fixation.
- Severe Soft Tissue Injury: Extensive degloving injuries, severe contusions, burns, or impending compartment syndrome where internal fixation would necessitate further dissection and compromise already damaged tissues.
- Infected Fractures/Non-unions: External fixation allows for debridement of infected bone and soft tissue, provides stability for bone healing, and facilitates local antibiotic delivery or bone transport without introducing further foreign material into an infected field.
- Acute Bone Loss/Segmental Defects: Following high-energy trauma or debridement of infected non-unions, external fixation (often ring fixators) can be used for bone transport or distraction osteogenesis to bridge the defect.
- Periarticular Fractures with Extensive Soft Tissue Swelling: Provisional stabilization of complex proximal or distal humeral fractures to allow swelling to subside before definitive internal fixation, or as a definitive treatment if soft tissues preclude internal fixation.
- Floating Elbow/Shoulder: When both ipsilateral proximal humerus/scapula and distal humerus/forearm are fractured, external fixation can stabilize one or both segments.
- Burns: External fixation avoids placing hardware directly into burned tissue and allows for wound care.
- Pathological Fractures: In patients with limited life expectancy or poor bone quality where internal fixation is difficult or carries high morbidity.
Contraindications
-
Absolute Contraindications:
- Inadequate bone stock for stable pin placement (e.g., severe osteopenia where pins would pull out).
- Active infection at planned pin insertion sites (localized cellulitis or abscess). Note: This differs from infected fractures where EF is indicated to treat the infection.
- Patient non-compliance or inability to manage pin site care (cognitive impairment, substance abuse) without reliable caregiver support.
-
Relative Contraindications:
- Severe comminution where external fixation alone may not achieve adequate stability or reduction.
- Fractures amenable to less invasive or more definitive internal fixation with better long-term outcomes (e.g., isolated simple diaphyseal fractures in healthy individuals).
- Poor skin quality or scarring that makes safe pin insertion challenging.
- Patients with significant peripheral vascular disease if pins could compromise marginal perfusion.
Operative vs. Non-Operative Indications
| Category | Indications for External Fixation | Alternative Management Strategies (and why EF might be preferred) |
|---|---|---|
| Trauma Severity | Polytrauma, hemodynamic instability (DCO) |
Definitive ORIF (too long, physiologically demanding)
Non-operative (insufficient stability) |
| Soft Tissue Status | Open fractures (Gustilo II/III), severe degloving, burns, impending compartment syndrome |
Definitive ORIF (contraindicated due to infection risk, further soft tissue compromise)
Non-operative (inadequate for open fractures) |
| Infection | Infected non-unions, osteomyelitis of the humerus |
Internal fixation (contraindicated in active infection)
Non-operative (will not achieve stability/eradicate infection) |
| Bone Loss | Segmental bone defects requiring bone transport or distraction osteogenesis |
ORIF with bone graft (may not be sufficient for large gaps, high failure rate)
Non-operative (will not bridge defect) |
| Provisional Fixation | Highly comminuted intra-articular fractures (proximal/distal humerus) with severe swelling |
Early definitive ORIF (increased surgical time/risk due to swelling)
Non-operative (poor reduction/instability) |
| Specific Fracture Types | Highly unstable diaphyseal fractures, impending compartment syndrome of the arm |
Non-operative (inadequate stability)
Definitive ORIF (if soft tissue issues preclude) |
Pre-Operative Planning & Patient Positioning
Meticulous pre-operative planning is essential for successful external fixation, minimizing operative time and complications.
Pre-Operative Planning
-
Clinical Assessment:
- Thorough history and physical examination, focusing on mechanism of injury, associated injuries, and comorbidities.
- Detailed neurovascular assessment of the affected limb (radial, ulnar, median, axillary, musculocutaneous nerves; brachial and radial/ulnar arterial pulses). Document deficits pre-operatively.
- Assess soft tissue envelope: evaluate skin integrity, presence of open wounds, swelling, and signs of impending compartment syndrome.
-
Imaging:
- Standard Radiographs: AP and lateral views of the entire humerus, including shoulder and elbow joints, to assess fracture morphology, comminution, and articular involvement.
- CT Scan: May be necessary for complex periarticular fractures (proximal/distal humerus) to define articular involvement, fragment orientation, and aid in reduction planning.
- Angiography/Doppler Ultrasound: If vascular injury is suspected.
-
Frame Design and Pin Placement Strategy:
- Based on fracture location, type, and soft tissue status, determine the most appropriate frame configuration (e.g., uniplanar, biplanar, hybrid, ring).
- Pre-draw potential pin insertion sites on X-rays or CT images, keeping safe zones in mind, and plan for adequate length of bone segments proximal and distal to the fracture.
- Consider the type and size of pins (e.g., 5.0mm or 6.0mm cortical half-pins for diaphysis, smaller pins for metaphysis).
-
Equipment Preparation:
- Ensure all components of the chosen external fixator system are available and sterile (pins, clamps, rods, wrenches).
- Power drill with low-speed/high-torque setting, drill bits corresponding to pin diameter, pin sleeves, and blunt dissection instruments (hemostats, trocars).
- Fluoroscopy unit (C-arm) and lead shielding.
- Sterile drapes, surgical prep solutions, irrigation fluid (saline).
-
Patient Preparation:
- Antibiotic Prophylaxis: Administer pre-operative intravenous antibiotics according to hospital protocol and fracture type (e.g., Cefazolin for closed fractures, broader spectrum for open fractures).
- Tetanus Prophylaxis: Update as needed for open fractures.
- Anesthesia: General anesthesia is typically used. Regional blocks (e.g., interscalene or supraclavicular for shoulder/proximal humerus, infraclavicular for entire arm) can be used as an adjunct for post-operative pain control.
Patient Positioning
The patient's position should allow for optimal access to the entire humerus, facilitate fracture reduction, and enable unhindered fluoroscopic imaging.
-
Supine Position:
This is the most common position.
- Patient lies supine on the operating table.
- The affected arm is placed on a padded arm board or hand table, allowing full manipulation and traction.
- The torso may be slightly tilted to provide better access to the lateral aspect of the humerus.
- The C-arm can be positioned to obtain AP and lateral views without repositioning the patient.
- Ensure adequate padding to pressure points.
-
Lateral Decubitus Position:
- May be considered for complex posterior approaches or specific fracture patterns, but less common for general humeral external fixation.
- Requires careful padding and positioning to prevent brachial plexus or peroneal nerve compression.
-
Sterile Prep and Drape:
- The entire arm, shoulder, and axilla are prepped with an antiseptic solution (e.g., chlorhexidine or povidone-iodine).
- The limb is draped freely to allow full range of motion during reduction maneuvers. Stockinette is often applied from the hand to the axilla.
Detailed Surgical Approach / Technique
The primary goal of external fixation is to achieve stable reduction and fixation with minimal soft tissue disruption, respecting critical neurovascular structures.
Step-by-Step Procedure
- Pre-operative Timeout: Standard verification of patient, site, and procedure.
-
Fracture Reduction:
- Achieve an acceptable alignment and length. This can involve gentle manual traction, manipulation, or ligamentotaxis.
- For open fractures, thorough debridement and irrigation are performed prior to reduction.
- Fluoroscopic guidance (AP and lateral views) is essential to monitor reduction.
-
Pin Placement – Proximal Humerus Segment:
- Identify the planned insertion sites in the anterolateral aspect of the proximal humerus, distal to the articular surface and inferior to the acromion. Typically 2-3 pins are needed.
- Make a small (5-10mm) stab incision down to the subcutaneous tissue.
- Use a blunt trocar or hemostat to dissect through the muscle (e.g., deltoid fibers) directly down to the bone surface. This maneuver carefully pushes neurovascular structures (like the axillary nerve posteriorly) out of the path.
- Insert a drill sleeve/guide onto the bone.
- Using a low-speed, high-torque drill with saline irrigation, drill the first pin bicortically. Aim for maximal spread of pins within the safe zone for divergent pin placement, enhancing stability.
- Verify pin depth and position fluoroscopically. Ensure pins are not intra-articular or impinging on the joint capsule.
-
Repeat for subsequent proximal pins, maintaining parallel or slightly divergent trajectories for optimal frame construction.

-
Pin Placement – Distal Humerus Segment:
- Identify planned insertion sites in the anterolateral aspect of the distal humerus, proximal to the olecranon fossa and articular surface. Again, 2-3 pins are typically used.
- Perform stab incisions and blunt dissection to the bone, as described for the proximal segment, meticulously avoiding the radial nerve (which has now passed anteriorly), median nerve, ulnar nerve, and brachial artery. The anterolateral surface of the distal humerus is generally considered the safest.
- Insert pins bicortically using low-speed drilling and irrigation.
- Confirm pin position and depth fluoroscopically, ensuring no intra-articular penetration or nerve impingement.
- Ensure adequate distance from the elbow joint to allow for elbow flexion/extension after frame application.
-
Frame Assembly:
- Once all pins are inserted and their positions verified, attach the clamps to the pins.
- Connect the pins to external bars (usually carbon fiber or aluminum rods) to create a stable construct. The frame can be uniplanar (pins in one plane, connected by one bar), biplanar (pins in two planes, connected by two bars), or hybrid depending on the fracture pattern and stability required.
- Ensure the bar is as close to the skin as possible to minimize the bone-to-bar distance, thereby increasing stiffness, but allowing sufficient space for pin site care.
- Tighten all clamps securely. Re-check fracture alignment under fluoroscopy after tightening to ensure no loss of reduction.
- For highly comminuted fractures, gentle compression or distraction may be applied through the frame to optimize reduction or manage soft tissues.
-
Wound Closure & Pin Site Care:
- Close skin incisions around the pins with a single suture or sterile strips. Avoid tight closure around the pin, which can promote infection.
- Apply sterile, non-adherent dressings around each pin site.
- Post-Operative Radiographs: Obtain final AP and lateral radiographs to confirm definitive reduction and frame integrity.
Specific Considerations by Humerus Segment
- Proximal Humerus: For complex proximal humerus fractures, an external fixator can provide indirect reduction via ligamentotaxis and stabilize articular fragments, acting as a "joint-spanning" or "periarticular" frame. Pin placement often involves humeral head pins (anterolateral) and diaphyseal pins, connected by rods to reconstruct the proximal segment.
- Diaphyseal Humerus: Primarily involves a uniplanar or biplanar frame with pins placed in the anterolateral safe corridor proximal and distal to the fracture. This avoids the radial nerve traversing the spiral groove posteriorly.
- Distal Humerus: For complex supracondylar or intercondylar fractures, external fixators can be used for joint distraction, provisional stabilization, or definitive stabilization. Pins are placed in the supracondylar columns (lateral preferred, avoiding ulnar nerve medially) and/or forearm (if spanning the elbow).
Complications & Management
Despite its utility, external fixation of the humerus is not without potential complications. Proactive recognition and management are critical for optimal patient outcomes.
| Complication | Incidence (Approx.) | Salvage Strategies & Management |
|
Pin Site Infections (PSI)
| 5-30% |
Minor (Localized Cellulitis):
Strict pin site care, oral antibiotics (e.g., cephalexin) targeting skin flora. Often resolves without pin removal.
Major (Abscess, Osteomyelitis, Loosening):
Pin removal, debridement, IV antibiotics (culture-specific). May require new pins at different sites, conversion to ORIF or definitive ring fixator. Occasionally, external fixator component replacement. |
|
Neurovascular Injury
| <1% (but significant) |
Nerve Palsy (e.g., Radial Nerve):
Most are neuropraxia (stretch injury) and resolve within weeks to months. Monitor closely. Electromyography (EMG) and nerve conduction studies (NCS) for persistent deficits. If no improvement, exploration and neurolysis may be considered. Prevention is key (blunt dissection, safe corridors).
Vascular Injury:
Immediate intraoperative repair by vascular surgeon. |
|
Delayed Union/Non-union
| 5-20% |
Delayed Union:
Prolonged fixation, functional bracing after removal, bone stimulators.
Non-union:
Revision surgery with bone grafting (autograft/allograft), internal fixation (plate/nail), or conversion to a dynamic external fixator (e.g., Ilizarov) for compression/distraction osteogenesis. |
|
Malunion
| 5-15% | Corrective osteotomy (after fixator removal) with internal fixation for symptomatic deformities (e.g., rotational, angular). Prevention through careful reduction and intraoperative fluoroscopy is paramount. |
|
Loss of Reduction
| 5-10% | Early recognition allows for re-manipulation and re-tightening of clamps. If gross instability, pin replacement or conversion to a more stable construct (e.g., biplanar frame from uniplanar) or definitive internal fixation. |
|
Hardware Failure
| <5% | Rod bending, clamp loosening, pin breakage. Replacement of failed components. May indicate inadequate frame stability or premature loading. |
|
Joint Stiffness
| Variable (high if joint-spanning) | Early, aggressive physiotherapy for non-fixed joints. If joint-spanning, careful consideration of the duration of fixation. For persistent stiffness, manipulation under anesthesia, arthrolysis, or total joint arthroplasty may be required. |
|
Refracture After Removal
| <5% | Occurs if fixator removed prematurely before adequate bone healing. Treatment as a new fracture, often requiring internal fixation. Gradual weaning or protection with a functional brace after removal can mitigate risk. |
|
Cosmetic Deformity
| Subjective | Pin scars are permanent. Counseling patients pre-operatively about scar burden is important. Minimal incisions and proper pin care can improve appearance. |
Prevention Strategies:
- Aseptic Technique: Meticulous surgical technique, proper skin preparation, and sterile pin site dressings.
- Safe Pin Placement: Strict adherence to anatomical safe zones, blunt dissection to bone, use of drill guides/sleeves.
- Thermal Protection: Low-speed drilling with copious saline irrigation.
- Optimal Frame Design: Sufficient pins, appropriate frame configuration, adequate pin spread, minimal bone-to-bar distance.
- Patient Education: Comprehensive instructions for daily pin site care, activity restrictions, and signs of complications.
- Regular Follow-up: Clinical and radiographic assessment to monitor healing, pin sites, and frame integrity.
Post-Operative Rehabilitation Protocols
Post-operative rehabilitation following humeral external fixation aims to preserve joint function, prevent complications, and ultimately restore the limb to maximal functional capacity. The protocol must be individualized based on the fracture type, stability of fixation, and patient comorbidities.
Phase 1: Immediate Post-Operative (Days 0-14)
- Pain Management: Multimodal analgesia including opioids, NSAIDs, and regional nerve blocks as appropriate.
-
Pin Site Care:
- Daily cleaning of pin sites with sterile saline and/or chlorhexidine solution.
- Removal of any crusts or exudate.
- Application of sterile, non-adherent dressings (e.g., gauze squares). Avoid tight dressings that occlude drainage.
- Patient and/or caregivers instructed on proper technique.
- Edema Control: Elevation of the extremity, gentle compression (if not interfering with frame or pin sites).
-
Early Motion (Adjacent Joints):
- Encourage immediate active and passive range of motion (ROM) of the wrist and hand.
- For frames not spanning the elbow or shoulder, initiate gentle active and passive ROM exercises for the free joints, respecting pain limits. This helps prevent stiffness.
-
Weight Bearing/Activities:
- Strict non-weight-bearing of the affected limb.
- Assistance with activities of daily living (ADLs) as needed.
- Monitoring: Regular neurovascular checks and monitoring of pin sites for signs of infection (redness, swelling, pain, purulent discharge).
Phase 2: Intermediate Healing (Weeks 2-8)
- Continue Pin Site Care: As per Phase 1.
- Progressive ROM: Gradually increase the intensity and range of motion exercises for non-fixed joints.
- Initiate Fracture Site Motion (if indicated): For specific fracture types or non-unions, controlled micromotion at the fracture site (e.g., through dynamic external fixators or specific exercises) may be introduced to stimulate healing. This is highly dependent on fracture stability and surgeon preference.
- Isometric Strengthening: Begin gentle isometric exercises for muscles not crossing the fracture site or adjacent joints that are free.
- Functional Activities: Progress to light functional activities as tolerated, still avoiding direct stress on the external fixator.
- Radiographic Assessment: Regular follow-up radiographs (every 2-4 weeks) to monitor fracture healing progression and identify early signs of complications (e.g., loss of reduction, pin loosening).
Phase 3: Transition to Removal & Post-Removal (Weeks 8 onwards, or as per healing)
-
Criteria for Fixator Removal:
- Radiographic evidence of clinical union (bridging callus, obliteration of fracture lines).
- Absence of pain or motion at the fracture site on clinical examination.
- Resolution of infection (if applicable).
-
Fixator Removal Procedure:
- Performed in an outpatient setting or minor operating room, typically under local anesthesia or sedation.
- Pins are unscrewed and removed.
- Pin sites are cleaned and dressed.
-
Post-Removal Care:
- Pin Site Care: Continue cleaning pin sites until healed.
- Protection: The limb may require protection with a functional brace, sling, or cast for a period (2-6 weeks) to prevent refracture, especially if bone density is still compromised or healing is tenuous.
-
Intensified Rehabilitation:
- Full ROM: Aggressive rehabilitation to regain full active and passive ROM of all joints (shoulder, elbow, wrist).
- Strengthening: Progressive strengthening exercises for all muscle groups, gradually increasing resistance.
- Proprioception and Coordination: Exercises to restore proprioception and coordination.
- Functional Re-integration: Gradual return to activities of daily living, work, and sports as strength and ROM allow.
- Monitoring for Refracture: Patients are advised on activity restrictions and monitored for signs of refracture until full cortical remodeling occurs, which can take several months.
Throughout the rehabilitation process, close communication between the surgeon, physical therapist, and patient is vital to adapt the protocol as needed, address any emerging complications, and ensure optimal functional recovery.
Summary of Key Literature / Guidelines
External fixation of the humerus, while not always the primary definitive treatment, remains an indispensable tool in the orthopedic trauma surgeon's armamentarium, particularly in complex scenarios. The evidence base for its application is robust, largely guided by principles established through decades of experience with external fixation in general trauma and specific to the humerus.
- Damage Control Orthopedics (DCO): The concept of DCO, which heavily relies on external fixation for provisional stabilization, is a cornerstone of modern trauma management. Literature consistently supports its use in polytrauma patients with humeral fractures to mitigate the "second hit" phenomenon associated with prolonged definitive surgery in unstable patients. The focus is on rapid stabilization, allowing physiological resuscitation before conversion to definitive internal fixation when the patient is optimized.
- Open Fractures (Gustilo Type II/III): AOTrauma principles and numerous studies advocate for external fixation as the initial stabilization method for severe open humeral fractures (Gustilo Type II and III). This allows for serial debridement, reduces the risk of deep infection compared to immediate internal fixation in contaminated wounds, and facilitates soft tissue reconstruction. The definitive management, often involving delayed internal fixation, is typically performed once the soft tissue envelope is healthy.
- Infected Non-unions: External fixation, particularly circular frames (Ilizarov/spatial frames), is a well-established treatment for infected humeral non-unions. These frames allow for debridement, compression at the non-union site, bone transport for segmental defects, and stable fixation while managing active infection. The success rates are often superior to repeated attempts at internal fixation in a septic environment.
- Neurovascular Protection: The paramount importance of respecting safe corridors for pin placement to avoid iatrogenic neurovascular injury is underscored in all anatomical and surgical technique literature. Studies detailing the precise anatomical relationship of the radial, axillary, musculocutaneous, and ulnar nerves to the humeral shaft, surgical neck, and supracondylar region provide the foundation for safe surgical practice. The use of blunt dissection, drill guides, and low-speed drilling with irrigation are universally recommended to minimize complications.
- Biomechanics of Fixation: Research into the biomechanics of external fixation has guided frame design, pin selection, and optimal construct configuration. Principles such as maximizing pin spread, minimizing bone-to-bar distance, and achieving bicortical purchase are evidence-based recommendations to optimize construct stiffness and stability, thereby reducing risks of hardware failure and loss of reduction.
- Complication Management: Guidelines for managing common complications like pin site infections, neurovascular injuries, and non-unions are well-defined. Early recognition and stratified treatment algorithms, ranging from oral antibiotics for minor infections to surgical exploration for persistent nerve palsies or revision fixation for non-unions, are standard practice.
In conclusion, mastering safe external fixation of the humerus requires a comprehensive understanding of surgical anatomy, biomechanical principles, clear indications, meticulous pre-operative planning, and a precise surgical technique. Adherence to established guidelines and a commitment to post-operative rehabilitation are essential for optimizing patient outcomes and minimizing the inherent risks associated with this powerful limb-salvage and stabilization modality.
Clinical & Radiographic Imaging
