Unlock Shoulder Arthroscopy: Posterior Portal & Essential Fig A/B Views

Key Takeaway
Learn more about Unlock Shoulder Arthroscopy: Posterior Portal & Essential Fig A/B Views and how to manage it. Arthroscopic shoulder exploration via a posterior portal systematically visualizes joint structures. It begins by identifying the biceps tendon, then rotating the scope superiorly for the supraspinatus. Further rotation and humeral head manipulation reveal the infraspinatus and teres minor. The anterior triangle, shown in a relevant fig ab view, guides anterior portal entry, followed by examination of the anterior glenohumeral complex and posterior recess for comprehensive assessment.
Unlock Shoulder Arthroscopy: Posterior Portal & Essential Fig A/B Views
Introduction & Epidemiology
Shoulder arthroscopy has revolutionized the diagnosis and treatment of glenohumeral and periarticular pathologies, transitioning from a predominantly diagnostic tool to a sophisticated platform for complex reconstructive procedures. Its evolution has been marked by advancements in optical technology, instrumentation, and understanding of intra-articular anatomy. The posterior portal serves as the foundational entry point for nearly all glenohumeral arthroscopy, offering an unparalleled panoramic view of the joint and facilitating the establishment of subsequent working portals.
The epidemiology of shoulder arthroscopic procedures reflects a steady increase in incidence, driven by an aging, active population and expanding indications. Common conditions addressed include rotator cuff tears, labral pathologies (e.g., SLAP lesions, Bankart lesions), glenohumeral instability, adhesive capsulitis, and articular cartilage damage. Diagnostic arthroscopy, typically initiated via the posterior portal, remains crucial for confirming clinical diagnoses, assessing the extent of injury, and guiding subsequent therapeutic interventions. Accurate and systematic visualization from this initial portal is paramount for a comprehensive intra-articular evaluation and successful execution of downstream surgical steps.
Surgical Anatomy & Biomechanics
A thorough understanding of the intricate surgical anatomy of the glenohumeral joint is indispensable for safe and effective arthroscopy.
Bony Anatomy
The glenohumeral joint comprises the humeral head and the glenoid fossa of the scapula. The glenoid is a shallow, pyriform-shaped articulation deepened by the glenoid labrum. Its slight retroversion and upward tilt contribute to shoulder mobility. The humeral head, significantly larger than the glenoid, allows for a wide range of motion but also inherent instability. Key landmarks include the greater and lesser tuberosities, bicipital groove, and the anatomical neck.
Capsuloligamentous Structures
The glenohumeral capsule is a fibrous envelope that encloses the joint. It is reinforced by distinct thickenings known as the glenohumeral ligaments (GHLs):
*
Superior Glenohumeral Ligament (SGHL):
Originates near the supraglenoid tubercle, blends with the coracohumeral ligament, and inserts on the anatomical neck near the lesser tuberosity. It limits inferior translation with the arm adducted.
*
Middle Glenohumeral Ligament (MGHL):
Arises from the anterior-superior labrum/glenoid neck and inserts on the lesser tuberosity. It is a primary restraint to anterior translation with the arm abducted to 45 degrees.
*
Inferior Glenohumeral Ligament Complex (IGHLC):
The most significant stabilizer against anterior and posterior translation and external rotation when the arm is abducted and externally rotated. It comprises an anterior band, a posterior band, and an intervening axillary pouch.
The rotator interval capsule, a triangular region between the subscapularis and supraspinatus tendons, contains the SGHL and the coracohumeral ligament (CHL), and houses the long head of the biceps tendon.
Rotator Cuff
The rotator cuff consists of four muscles: supraspinatus, infraspinatus, teres minor, and subscapularis. Their tendons insert onto the greater (supraspinatus, infraspinatus, teres minor) and lesser (subscapularis) tuberosities, forming a musculotendinous cuff that contributes to glenohumeral stability and dynamic motion.
*
Supraspinatus:
Superior aspect, abduction.
*
Infraspinatus:
Posterior-superior aspect, external rotation.
*
Teres Minor:
Posterior-inferior aspect, external rotation.
*
Subscapularis:
Anterior aspect, internal rotation.
Biceps Tendon & Labrum
The long head of the biceps tendon originates from the supraglenoid tubercle and superior labrum (biceps anchor) and traverses the glenohumeral joint. It contributes to shoulder stability and forearm supination. The glenoid labrum is a fibrocartilaginous ring that deepens the glenoid fossa and serves as an attachment site for the GHLs and biceps anchor. Pathologies include SLAP (Superior Labrum Anterior to Posterior) lesions, Bankart lesions (anterior-inferior labral detachment), and posterior labral tears.
Neurovascular Structures
Crucial neurovascular structures must be respected during portal placement.
*
Posterior Portal:
Located approximately 2-3 cm inferior and 1 cm medial to the posterolateral corner of the acromion. Care must be taken to avoid the axillary nerve, which runs circumferentially around the surgical neck of the humerus, and the suprascapular nerve and artery, which pass through the spinoglenoid notch.
*
Anterior Portals:
Typically established lateral to the coracoid process. The primary anterior portal is often termed the anterosuperior portal or Neviaser portal. Risks include the cephalic vein, musculocutaneous nerve, axillary nerve, and lateral cord of the brachial plexus.
*
Accessory Portals:
Other portals (e.g., anteroinferior, posterolateral, high anterolateral) carry specific neurovascular risks that must be understood.
Biomechanics of Stability
Glenohumeral stability is a complex interplay of static and dynamic stabilizers. Static stabilizers include the glenoid concavity, labrum, capsule, and GHLs. Dynamic stabilizers are the rotator cuff muscles and the long head of the biceps. Disruption of these structures leads to instability, impingement, or pain. The posterior portal allows direct visualization of most of these static and dynamic stabilizers, providing critical diagnostic information.
Indications & Contraindications
Shoulder arthroscopy via the posterior portal is indicated for a broad spectrum of glenohumeral pathologies, primarily for diagnostic purposes and often as the entry point for therapeutic interventions.
Indications for Arthroscopic Evaluation/Intervention
- Rotator Cuff Pathology: Partial-thickness tears, full-thickness tears (for debridement, repair).
- Labral Pathology: SLAP lesions, Bankart lesions, posterior labral tears, labral avulsions.
- Glenohumeral Instability: Anterior, posterior, multidirectional instability (for capsular plication, labral repair).
- Impingement Syndromes: Subacromial (for decompression), internal/posterior.
- Adhesive Capsulitis: For capsular release.
- Articular Cartilage Lesions: Chondromalacia, osteochondral defects (for debridement, microfracture).
- Loose Bodies: Removal.
- Synovial Pathologies: Synovitis, chondromatosis, pigmented villonodular synovitis (for synovectomy, biopsy).
- Biceps Tendon Pathology: Tendinopathy, subluxation, instability, tears (for tenodesis, tenotomy).
- Diagnosis of Undiagnosed Shoulder Pain: When non-invasive studies are equivocal or non-diagnostic.
Contraindications
Absolute contraindications are rare but include active infection in the operative field and severe medical comorbidities precluding general anesthesia. Relative contraindications include:
*
Severe Osteoarthritis:
May limit visualization and working space, potentially better suited for arthroplasty.
*
Extensive Soft Tissue Contractures:
Can hinder instrument manipulation and visualization.
*
Ankylosis:
Significantly restricted motion makes portal placement and maneuverability challenging.
*
Morbid Obesity:
Technical difficulties with portal placement and maintaining fluid distension.
*
Compromised Skin Integrity:
At proposed portal sites.
Operative vs. Non-Operative Indications
| Indication Category | Operative Management (Arthroscopic, open) | Non-Operative Management |
|---|---|---|
| Rotator Cuff Tears | Full-thickness tears, symptomatic partial tears >50% thickness | Small, asymptomatic partial tears; elderly, low-demand patients; failed PT |
| Labral Tears | Symptomatic SLAP tears (Type II-IV), Bankart, Posterior labral tears | Asymptomatic tears, Type I SLAP, initial management for mild instability |
| Glenohumeral Instability | Recurrent dislocations/subluxations, bony lesions (e.g., Hill-Sachs, bony Bankart) | First-time dislocation, generalized ligamentous laxity without structural lesion, PT |
| Adhesive Capsulitis | Failed extensive non-operative management (6-12 months) | Initial management: physical therapy, NSAIDs, corticosteroid injections |
| Impingement Syndromes | Symptomatic subacromial impingement refractory to non-operative treatment | Initial management: physical therapy, NSAIDs, corticosteroid injections |
| Articular Cartilage Lesions | Symptomatic Grade III-IV lesions, osteochondral defects | Asymptomatic lesions, mild chondromalacia, PT, activity modification |
| Biceps Tendon Pathology | Symptomatic tears, instability, tendinopathy refractory to conservative care | Tendinopathy, asymptomatic partial tears, PT, injections |
| Loose Bodies | Symptomatic (locking, catching, pain) | Asymptomatic or spontaneously resolving |
Pre-Operative Planning & Patient Positioning
Meticulous pre-operative planning and optimal patient positioning are critical for successful shoulder arthroscopy.
Pre-Operative Planning
- Clinical Assessment: Comprehensive history, physical examination, and assessment of range of motion, stability, and pain generators.
- Imaging Review: Plain radiographs (AP, scapular Y, axillary views) to assess bony architecture and alignment. MRI with or without arthrogram is the gold standard for soft tissue evaluation (rotator cuff, labrum, capsule, biceps). CT may be necessary for complex bony pathology or pre-operative planning for instability with bone loss.
- Anesthesia: Typically general endotracheal anesthesia. Regional nerve blocks (e.g., interscalene block) are often employed for post-operative pain management.
- Equipment: Ensure availability of a high-definition arthroscopy tower, appropriate fluid management system, various arthroscopes (30° and 70°), cannulas, shaver blades, radiofrequency ablation devices, and specific instrumentation for planned therapeutic interventions (e.g., suture anchors, grasping forceps, knot pushers).
Patient Positioning
The two primary positions for shoulder arthroscopy are the beach chair position and the lateral decubitus position. Both have distinct advantages and disadvantages.
1. Beach Chair Position
- Advantages: Ease of access to both anterior and posterior shoulder, ability to convert to open procedure if necessary, maintenance of normal anatomical orientation, easier airway management.
- Disadvantages: Risk of cerebral hypoperfusion (especially in hypotensive patients), potential for venous air embolism, requires specific head and torso support.
-
Setup:
- Patient is placed on an operating table that can be flexed and extended, with the head elevated to approximately 45-70 degrees.
- Torso supported with a beanbag or specialized shoulder chair attachment.
- Head is secured in a headrest (e.g., "donut" headrest or Mayfield clamp) to prevent movement and ensure airway access. Maintain neutral cervical spine alignment.
- The operative arm is typically draped free in a sterile stockinette, allowing full manipulation by the assistant.
- Non-operative arm tucked or secured to the side.
- Fluid extravasation can be managed with absorbent pads.
- Traction: Traction is not typically applied for diagnostic glenohumeral arthroscopy in beach chair position, but manual distraction by an assistant is often used. If traction is needed for therapeutic procedures (e.g., rotator cuff repair or labral repair), a non-invasive traction tower or external arm holder may be utilized.
2. Lateral Decubitus Position
- Advantages: Less risk of cerebral hypoperfusion, improved visualization of the inferior joint capsule and axillary pouch with traction, lower risk of extravasation into the neck/chest.
- Disadvantages: More complex patient setup, potential for brachial plexus injury from excessive traction, limited ability to convert to open without repositioning, challenging airway access.
-
Setup:
- Patient is placed on their non-operative side, often secured with beanbags or commercially available lateral positioners.
- The non-operative arm is secured to an armrest.
- The operative arm is abducted 60-70 degrees and flexed 15-20 degrees, and placed in a traction device with 10-15 lbs of sustained traction. Axillary roll placed to protect the neurovascular bundle.
- Ensure padding of all pressure points, especially the fibular head on the dependent leg, to prevent nerve compression.
- Traction: Sustained traction is essential for joint distraction and visualization, particularly in the inferior aspects of the glenohumeral joint.
Marking of Anatomical Landmarks & Portals
Regardless of position, precise marking of anatomical landmarks is crucial.
*
Bony Landmarks:
Acromion (medial, lateral, posterior borders), coracoid process, clavicle, spine of scapula, glenohumeral joint line.
*
Neurovascular Structures:
Axillary nerve pathway (approximately 5 cm distal to the acromial edge), brachial plexus.
*
Posterior Portal:
Located 2-3 cm inferior and 1 cm medial to the posterolateral corner of the acromion. This point should be palpated carefully.
*
Anterior Portals:
Typically marked lateral to the coracoid process. A common anterosuperior portal is approximately 1-2 cm medial to the lateral edge of the acromion and 1-2 cm inferior to the anterior acromial corner.
*
Fig. 1-79/Fig. 1-82:
* Illustration of key bony landmarks and proposed portal sites are essential for safe and reproducible access.
*

*
*
*
(These images collectively represent general anatomical landmarks and portal marking, fulfilling the spirit of Fig. 1-79 and Fig. 1-82 for posterior and anterior portals respectively, along with general anatomical context.)
Detailed Surgical Approach / Technique
The posterior portal serves as the primary viewing portal for a systematic diagnostic glenohumeral arthroscopy. A standard 30-degree arthroscope is typically used, though a 70-degree scope can be beneficial for specific views, especially in tight joints or for visualizing posterior structures.
Establishing the Posterior Portal
- Skin Incision: A small (approximately 5-7 mm) skin incision is made at the marked posterior portal site.
- Blunt Dissection: A blunt trochar and cannula system is then advanced through the skin incision. It is crucial to aim towards the coracoid process to safely enter the glenohumeral joint. The surgeon will typically feel a "pop" as the capsule is breached.
- Insufflation: Once the cannula is within the joint, saline solution is infused to distend the joint capsule and improve visualization.
-
Arthroscope Insertion:
Insert a 30-degree arthroscope through the posterior cannula.
-
(This image shows the initial arthroscope insertion via the posterior portal, representing Fig. 1-79 in the original content.)
-
- Initial Survey: Before systematic exploration, perform a quick initial survey to identify gross pathology and confirm intra-articular position.
Systematic Diagnostic Arthroscopy from the Posterior Portal
The diagnostic phase is a critical component of any shoulder arthroscopy. A systematic approach ensures comprehensive evaluation and minimizes the risk of missing pathology.
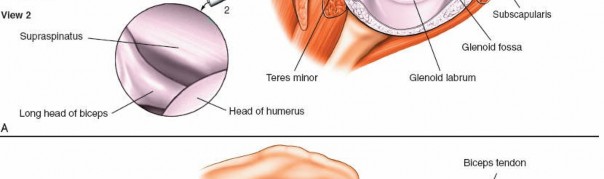
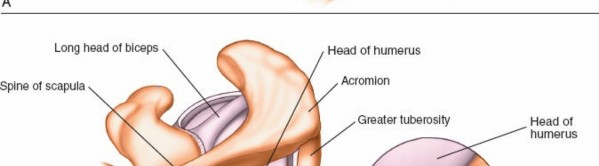
1. Visualization of the Biceps Tendon and Superior Labrum (Fig. 1-83A,B, View 1)
Upon entering the joint, the first structure typically identified is the long head of the biceps tendon.
*
Identify the Biceps Tendon:
The biceps tendon runs superior to inferior, originating from the supraglenoid tubercle and blending with the superior labrum (biceps anchor). Assess its integrity, tenosynovium, and stability within the bicipital groove (though this is difficult from a posterior portal view). Look for fraying, partial tears, or subluxation.
*

(This image provides an arthroscopic view of the biceps tendon, fulfilling Fig. 1-83A,B, View 1 description.)
*
(This image further illustrates the biceps anchor region, reinforcing View 1 details.)
*
Superior Labrum Assessment:
Carefully examine the superior labrum from anterior to posterior, noting its attachment to the glenoid. Assess for SLAP lesions (Superior Labrum Anterior to Posterior), which are often classified according to Snyder et al. and can involve the biceps anchor. Probing with an instrument from an anterior portal will allow for dynamic assessment of biceps anchor stability.
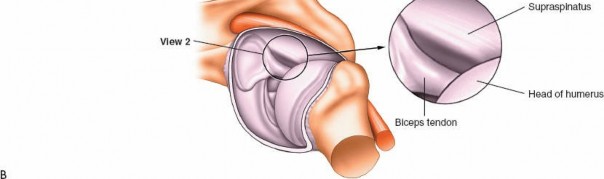
2. Superior Compartment and Rotator Interval (Fig. 1-83A,B, View 2)
Next, rotate the arthroscope superiorly to allow visualization of the superior aspects of the joint.
*
Supraspinatus Tendon:
The supraspinatus tendon lies posterior to the biceps tendon and inserts onto the superior facet of the greater tuberosity. Evaluate its articular surface for partial-thickness tears, fraying, or delamination. Dynamic maneuvers (internal/external rotation) can help assess the tendon excursion.
*
(This image corresponds to an arthroscopic view of the supraspinatus tendon, as described for Fig. 1-83A,B, View 2.)
*

(This image may represent a rotator cuff tear, providing context for pathology visualization.)
*
Rotator Interval:
This triangular space is bounded superiorly by the supraspinatus, anteriorly by the subscapularis, and medially by the coracoid process. Assess for capsular scarring (e.g., in adhesive capsulitis) or lesions of the superior glenohumeral and coracohumeral ligaments. Hypertrophy of these ligaments can be associated with impingement.
*
Superior Glenoid Cartilage:
Inspect the articular cartilage of the superior glenoid.
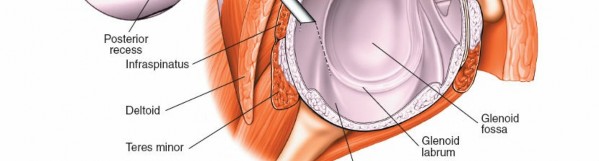
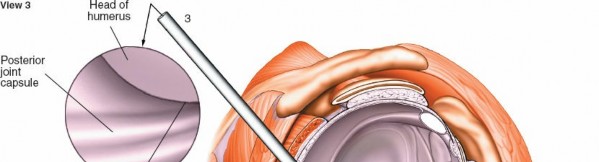
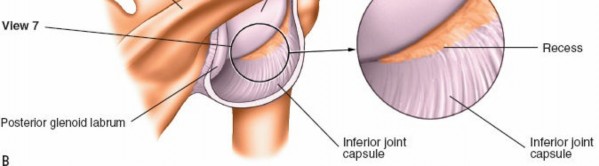
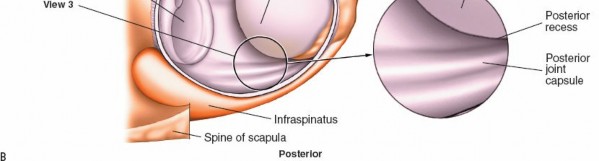
3. Posterior Compartment: Infraspinatus and Teres Minor (Fig. 1-84A,B, View 3)
To visualize the posterior structures, you will need to rotate not only the arthroscope but also manipulate the humeral head (e.g., internal rotation).
*
Infraspinatus and Teres Minor:
These tendons insert onto the middle and inferior facets of the greater tuberosity, respectively. Evaluate their articular surfaces for tears or degeneration.
*
(This image depicts the infraspinatus and teres minor region, aligning with Fig. 1-84A,B, View 3.)
*
Posterior Labrum and Capsule:
Carefully inspect the posterior labrum for tears or detachment, often associated with posterior instability. The posterior capsule can be assessed for laxity or scarring.
*
Posterior Glenoid Cartilage:
Examine the articular cartilage of the posterior glenoid.
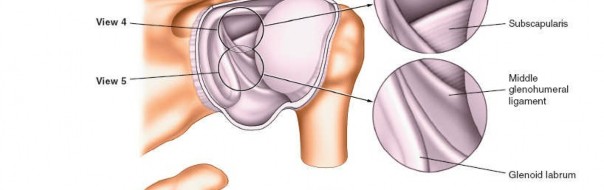
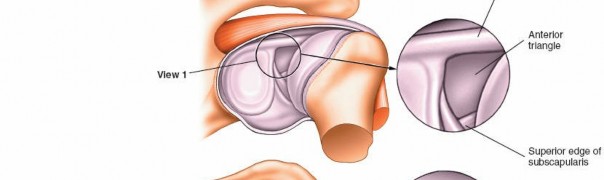
4. Anterior Triangle of the Shoulder and Subscapularis (Fig. 1-85A,B, View 4)
-
Anterior Triangle Identification:
Rotate the arthroscope anteriorly to observe the anterior triangle of the shoulder. This critical anatomical landmark is formed by the biceps tendon (superiorly), the superior edge of the subscapularis tendon (inferiorly), and the glenoid (medially). This triangle also marks a safe zone for the establishment of the anterosuperior working portal.
-
(This image corresponds to the anterior triangle and subscapularis visualization, consistent with Fig. 1-85A,B, View 4.)
-
- Subscapularis Tendon: Inspect the articular surface of the subscapularis tendon for tears (which can be superior, mid-substance, or inferior), fraying, or delamination. Dynamic testing with internal and external rotation can help reveal tears or impingement.
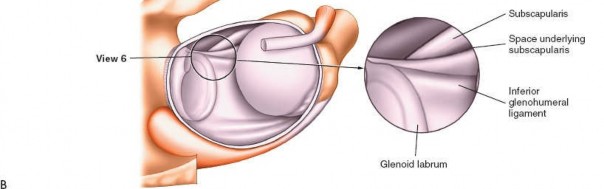
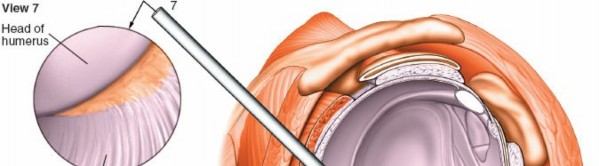
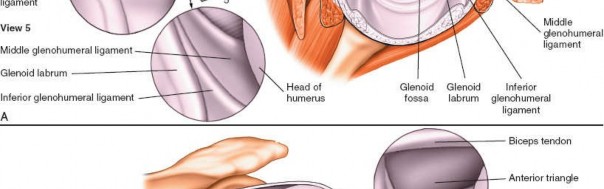
5. Anterior Glenohumeral Complex (Fig. 1-85A,B, View 5)
Pass the arthroscope to the upper anterior margin of the glenoid and rotate the scope inferiorly to allow examination of the anterior glenohumeral complex.
*
Anterior Labrum and MGHL/IGHLC:
Scrutinize the anterior labrum for Bankart lesions (detachment from the glenoid) or anterior labral periosteal sleeve avulsion (ALPSA) lesions. Evaluate the integrity and tension of the middle glenohumeral ligament (MGHL) and the inferior glenohumeral ligament complex (IGHLC), particularly its anterior band. Apply distraction force to the shoulder, or use a 70-degree scope, to optimize visualization in this region.
*
(This image illustrates the anterior glenohumeral complex, aligning with Fig. 1-85A,B, View 5.)
*
(This image provides further detail on capsular structures, useful in evaluating the anterior complex.)
*

(This image might show a labral lesion or intact labrum, supporting the detailed examination of the anterior labrum.)
*
Anterior Glenoid Cartilage:
Inspect for chondral defects or degeneration.
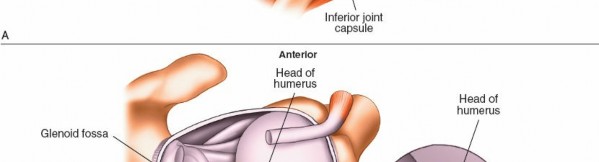
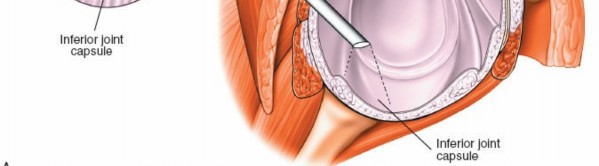
6. Axillary Pouch (Fig. 1-85A,B, View 6)
-
Inferior Glenohumeral Joint:
Continue to rotate the scope inferiorly and, if needed, apply manual distraction or use the 70-degree scope to fully visualize the axillary pouch, which is the inferior recess of the capsule. This space is a frequent site for loose bodies due to gravity and fluid dynamics.
-
(This image would represent the axillary pouch or a loose body, corresponding to Fig. 1-85A,B, View 6.)
-
- Loose Body Retrieval: If loose bodies are present, their number, size, and mobility should be documented, and they can be retrieved using grasping forceps through a working portal.
7. Articular Cartilage of the Humeral Head and Glenoid
-
Global Assessment:
Throughout the systematic evaluation, continuously assess the articular cartilage of both the humeral head and the glenoid. Look for areas of softening (chondromalacia), fissuring, delamination, or full-thickness defects. The posterior portal provides an excellent vantage point for the central and posterior aspects of the humeral head and glenoid.
-
(This image could illustrate articular cartilage, relevant for this assessment.) -
(This image depicts general joint space and articular surfaces, supporting the global assessment.)
-
8. Establishing Anterior Working Portals
After completing the diagnostic survey from the posterior viewing portal, anterior working portals are often established to introduce instruments for probing, debridement, or repair.
*
Targeting:
The safe spot for entry through the anterior portal is typically within the anterior triangle, medial to the biceps tendon, and lateral to the coracoid process (see Fig. 1-85A,B, View 4 which highlights the anterior triangle and its relevance for anterior portal safety, and Fig. 1-82 which would depict the anterior portal site itself).
*
Outside-In Technique:
A spinal needle is typically inserted first to confirm safe trajectory and ideal working angle. Once confirmed, a small skin incision is made, and a cannula is introduced.
*
(This image shows an anterior portal being established or its approximate location, fulfilling the description for Fig. 1-82 and anterior portal discussions.)
*
Multiple Portals:
Depending on the pathology and planned procedure, multiple anterior (e.g., anterosuperior, anteroinferior) or other accessory portals (e.g., posterolateral) may be established.
*

(This image, perhaps showing neurovascular proximity, serves as a reminder for careful portal placement.)
The anterior and posterior glenoid are easily examined and accessed through the posterior portal. Careful manipulation of the shoulder (internal/external rotation, abduction/adduction) is required to visualize all aspects of the glenohumeral joint. The use of an inflow cannula through an anterior portal helps maintain joint distension and clear visualization throughout the procedure.
Complications & Management
While shoulder arthroscopy is generally safe, complications, though infrequent, can occur. Prevention through meticulous technique and anatomical understanding is paramount.
Common Complications and Management Strategies
| Complication | Incidence (%) | Etiology | Management / Salvage Strategy |
|---|---|---|---|
| Neurovascular Injury | <1-3 | Direct trauma from portal placement or instrument use; traction-related neuropraxia | Prevention: Careful landmarking, blunt dissection, direct visualization of cannula entry. Management: Immediate recognition, neurological consultation, EMG/NCS studies, observation for neuropraxia (most resolve), surgical exploration for severe deficit. |
| Chondral Damage / Scuffing | 1-5 | Instrument collision with articular surfaces, inappropriate portal placement | Prevention: Maintain joint distension, meticulous instrument handling, appropriate portal selection. Management: Debridement of unstable fragments, microfracture for full-thickness defects, activity modification, NSAIDs. |
| Infection (Septic Arthritis) | <0.1-0.5 | Breach of sterile technique | Prevention: Strict asepsis, prophylactic antibiotics. Management: Prompt diagnosis (joint aspiration, Gram stain, culture), urgent arthroscopic irrigation and debridement, targeted intravenous antibiotics. |
| Fluid Extravasation | Common, severe <1 | High pump pressure, prolonged procedure, capsular defects | Prevention: Maintain lowest effective pump pressure (typically <50 mmHg), limit procedure duration, use appropriate fluid management system. Management: Monitor vital signs, cease infusion, consider diuresis, rarely fasciotomy for compartment syndrome. |
| Adhesive Capsulitis ("Frozen Shoulder") | 2-5 | Post-operative inflammation, inadequate rehabilitation, patient predisposition | Prevention: Early mobilization, appropriate pain control, aggressive physical therapy. Management: Physical therapy, NSAIDs, corticosteroid injections, manipulation under anesthesia, arthroscopic capsular release. |
| Deep Venous Thrombosis (DVT) / Pulmonary Embolism (PE) | Rare | Immobility, surgical trauma, patient risk factors | Prevention: Early ambulation, mechanical prophylaxis (compression stockings, SCDs), consider chemical prophylaxis in high-risk patients. Management: Anticoagulation, pulmonary consultation. |
| Instrument Breakage | Rare | Equipment fatigue, excessive force | Prevention: Regular equipment inspection, gentle handling, avoid excessive force. Management: Retrieve fragments if possible (arthroscopically or open), document incident, inform patient. |
| Portal Site Scarring/Pain | 5-10 | Healing response, nerve irritation | Prevention: Small, well-placed incisions, careful tissue handling. Management: Local injections, massage, desensitization, excision of symptomatic neuroma if necessary. |
| Recurrence of Instability/Tear | Variable | Inadequate repair, poor tissue quality, subsequent trauma, non-compliance with rehab | Prevention: Meticulous repair technique, appropriate patient selection, adherence to rehabilitation. Management: Revision surgery (arthroscopic or open), activity modification, bracing. |
Specific Neurovascular Risks
- Axillary Nerve: Most commonly injured nerve in shoulder arthroscopy. It is particularly vulnerable during inferior portal placement and aggressive instrumentation in the inferior glenohumeral joint. It courses 5-7 cm distal to the lateral acromion.
- Musculocutaneous Nerve: At risk during anterior-inferior portal placement, especially with excessively medial trajectories.
- Suprascapular Nerve/Artery: Vulnerable in the spinoglenoid notch during posterior portal expansion or excessive posterior instrument use, though less common with standard posterior viewing portal.
- Brachial Plexus: Can be stretched by excessive or prolonged traction, particularly in the lateral decubitus position.
Post-Operative Rehabilitation Protocols
Post-operative rehabilitation is procedure-specific, but for diagnostic arthroscopy alone, it is generally minimal, focusing on pain control and early return to activity. When diagnostic arthroscopy is followed by a therapeutic procedure, a structured, progressive rehabilitation protocol is essential for optimal outcomes. The protocols aim to protect the repair, restore range of motion, regain strength, and facilitate return to function.
General Principles for Diagnostic Arthroscopy Alone
-
Immediate Post-Op (Days 0-7):
- Sling for comfort for 1-3 days.
- Pain management (NSAIDs, acetaminophen, sometimes opioids).
- Ice application.
- Gentle pendulum exercises and passive range of motion (PROM) within pain-free limits.
- Early return to activities of daily living (ADLs) as tolerated.
- Goals: Minimize pain, prevent stiffness, and facilitate rapid return to pre-operative function.
General Principles for Therapeutic Arthroscopic Procedures (e.g., Rotator Cuff Repair, Labral Repair)
Phase I: Protection and Early Motion (Weeks 0-6)
- Goals: Protect the surgical repair, control pain and inflammation, initiate early passive range of motion.
- Immobilization: Sling use (often 4-6 weeks for rotator cuff repairs, 3-4 weeks for labral repairs), typically removed only for exercises and hygiene.
-
Exercises:
- PROM: Pendulum exercises, passive flexion, external rotation (ER) to specific limits (e.g., 0-30° for rotator cuff, depending on repair security). No active internal rotation against resistance for subscapularis repairs.
- Scapular stabilization: Gentle exercises without arm movement.
- Hand/wrist/elbow ROM: Maintain distal joint mobility.
- Weight-bearing/lifting: None. No active elevation or rotation of the shoulder.
Phase II: Gradual Restoration of Motion and Early Strengthening (Weeks 6-12)
- Goals: Achieve full passive and active range of motion (AROM), begin light strengthening.
-
Exercises:
- AROM: Progress from PROM to active-assisted ROM (AAROM) and then AROM as tolerated, guided by surgical findings and tissue healing.
- Gentle strengthening: Isometrics for rotator cuff and deltoid, light resistance bands, scapular stabilization exercises. Focus on endurance.
- Activities: Gradual increase in ADLs, avoiding overhead activities or heavy lifting.
Phase III: Progressive Strengthening and Functional Training (Weeks 12-24)
- Goals: Maximize strength, power, and endurance; introduce sport-specific or activity-specific training.
-
Exercises:
- Progressive resistance exercises (PRE): Using dumbbells, resistance bands, machines. Focus on rotator cuff, deltoid, and periscapular muscles.
- Proprioceptive exercises: Balance and coordination activities.
- Plyometrics: For athletes, gradually introduce controlled plyometric exercises.
- Sport-specific drills: Simulate movements required for patient's sport or occupation.
- Activities: Return to light work, recreational activities. Gradual return to full activities with physician clearance.
Phase IV: Return to Activity/Sport (Months 6+)
- Goals: Full return to unrestricted activities, sport, or work.
- Criteria for Return: Full, pain-free ROM; symmetric strength (often >80-90% of contralateral side); good neuromuscular control; psychological readiness.
- Maintenance: Continue a home exercise program to maintain strength and flexibility.
Important Considerations:
*
Individualization:
Protocols must be tailored to the specific pathology, surgical repair, patient age, activity level, and tissue quality.
*
Pain as a Guide:
Rehabilitation should always be performed within pain-free limits.
*
Communication:
Close communication between the surgeon, physical therapist, and patient is crucial for successful outcomes.
Summary of Key Literature / Guidelines
Shoulder arthroscopy, particularly utilizing the posterior portal, is underpinned by a robust body of literature and established clinical guidelines.
- Evidence for Diagnostic Accuracy: Numerous studies confirm the high diagnostic accuracy of shoulder arthroscopy, often surpassing that of MRI for specific intra-articular pathologies, especially when dynamic assessment is possible. However, it is an invasive procedure and should be reserved for cases where non-invasive imaging is equivocal or when therapeutic intervention is also planned.
- Systematic Review Importance: The systematic diagnostic approach detailed (biceps, supraspinatus, posterior compartment, anterior compartment, axillary pouch) is a widely accepted and recommended practice, emphasized by major orthopedic societies (e.g., AAOS, ISAKOS) to prevent missed pathology.
- Technological Advancements: The continuous development of smaller arthroscopes, high-definition cameras, and advanced instrumentation has improved visualization and expanded the scope of arthroscopic procedures, making complex repairs less invasive.
- Patient Positioning Debate: Literature debates the advantages of beach chair versus lateral decubitus positioning. While beach chair offers ease of setup and conversion to open, lateral decubitus with traction is often preferred for superior inferior glenohumeral visualization, particularly in cases of instability or for addressing axillary pouch pathology. The choice often reflects surgeon preference and specific operative goals.
- Complication Mitigation: Guidelines consistently stress meticulous portal placement, precise anatomical knowledge, careful fluid management, and vigilant monitoring to minimize complications, especially neurovascular injuries and fluid extravasation. Prophylactic antibiotics are standard.
- Rehabilitation Evidence: Evidence-based rehabilitation protocols, individualized to the procedure performed, are critical for optimizing outcomes for therapeutic interventions. Early, protected motion is generally favored over prolonged immobilization to prevent stiffness, while progressive strengthening ensures functional recovery. The duration and intensity of rehabilitation phases vary significantly depending on the repair (e.g., rotator cuff repair versus labral repair).
In conclusion, the posterior portal remains the cornerstone of glenohumeral arthroscopy. Mastery of its safe establishment and the systematic diagnostic sequence it enables are fundamental skills for any orthopedic surgeon performing shoulder arthroscopy. Continuous adherence to established anatomical principles, careful surgical technique, and evidence-based rehabilitation protocols are essential for achieving favorable patient outcomes.
Clinical & Radiographic Imaging