Operative Management of Metacarpal Shaft Fractures: Open Reduction and Percutaneous Techniques
Key Takeaway
Metacarpal shaft fractures frequently require surgical intervention when conservative management fails to maintain acceptable alignment. This comprehensive guide details the operative techniques for metacarpal stabilization, including open reduction with internal fixation (ORIF), percutaneous intramedullary pinning, and interfragmentary screw fixation. Mastery of these techniques ensures restoration of hand biomechanics, minimizes soft tissue complications, and facilitates early mobilization for optimal functional recovery in orthopedic patients.
INTRODUCTION TO METACARPAL SHAFT FRACTURES
Metacarpal shaft fractures are ubiquitous in orthopedic trauma, accounting for a significant proportion of all hand injuries. While many of these fractures can be managed non-operatively with appropriate immobilization, surgical intervention is mandated when fractures exhibit unacceptable angulation, shortening, or any degree of rotational malalignment. The primary goal of operative management is the restoration of precise hand biomechanics, allowing for early mobilization and the prevention of debilitating stiffness.
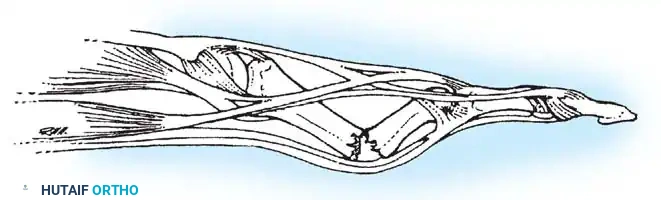
The intrinsic musculature of the hand—specifically the volar and dorsal interossei—exerts a deforming force on metacarpal shaft fractures, typically resulting in apex dorsal angulation. If left uncorrected, this angulation alters the mechanics of the extensor mechanism, leading to a pseudo-claw deformity, loss of grip strength, and prominent palmar metacarpal heads that can cause pain during grasping.
This masterclass delineates the definitive surgical techniques for stabilizing metacarpal shaft fractures, ranging from open reduction and intramedullary Kirschner wire (K-wire) fixation to advanced percutaneous pinning, interfragmentary lag screw fixation, and rigid plate-and-screw constructs.
SURGICAL INDICATIONS AND BIOMECHANICAL CONSIDERATIONS
The decision to proceed with operative fixation hinges on strict radiographic and clinical parameters. The tolerance for deformity varies significantly depending on the specific digit involved, owing to the compensatory mobility of the carpometacarpal (CMC) joints.
Acceptable vs. Unacceptable Deformity
- Rotational Malalignment: Zero tolerance. Even 5 degrees of rotational deformity at the metacarpal shaft can result in up to 1.5 cm of digital overlap (scissoring) at the fingertips during flexion, severely impairing grip function.
- Shortening: Greater than 2 to 3 mm of shortening alters the length-tension relationship of the interossei and lumbricals, leading to extensor lag. Shortening > 5 mm is an absolute indication for surgery.
- Angulation (Apex Dorsal):
- Index and Long Fingers: Maximum acceptable angulation is 10° to 20° (due to the rigid nature of the 2nd and 3rd CMC joints).
- Ring Finger: Maximum acceptable angulation is 30°.
- Small Finger: Maximum acceptable angulation is 40° (due to the highly mobile 5th CMC joint, which can compensate for greater deformity).
💡 Clinical Pearl: Assessing Rotation
Radiographs are notoriously poor at detecting rotational malalignment. Clinical examination is paramount. Ask the patient to actively or passively flex the digits; all fingernails should point symmetrically toward the scaphoid tubercle. Any deviation indicates a rotational deformity requiring surgical correction.
PREOPERATIVE PLANNING AND POSITIONING
Meticulous preoperative planning ensures a streamlined surgical workflow and minimizes intraoperative complications.
- Imaging: True posteroanterior (PA), lateral, and oblique radiographs of the hand are mandatory. The true lateral view is critical for assessing apex dorsal angulation, while the oblique view helps delineate fracture geometry (e.g., spiral, oblique, or transverse).
- Patient Positioning: The patient is positioned supine with the affected extremity extended on a radiolucent hand table.
- Tourniquet: A well-padded upper arm tourniquet is applied and inflated to 250 mm Hg after exsanguination with an Esmarch bandage.
- Equipment: A mini-fragment set (1.5 mm, 2.0 mm, 2.4 mm), a K-wire driver, an assortment of K-wires (0.045-inch and 0.062-inch), and a mini C-arm image intensifier must be available in the operative suite.
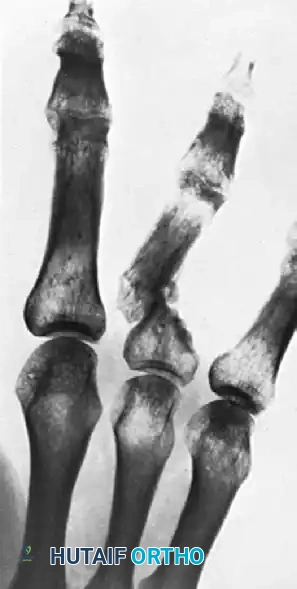
OPEN REDUCTION AND FIXATION OF METACARPAL SHAFT FRACTURE (Technique 67-13)
When closed reduction is unattainable due to soft tissue interposition or severe displacement, open reduction and intramedullary K-wire fixation provides an excellent, low-profile stabilization method. This technique is particularly useful for transverse or short oblique fractures.
Surgical Approach
- Incision: Make a dorsal longitudinal incision centered over the fractured metacarpal. For adjacent metacarpal fractures, a single incision placed in the intermetacarpal space can be utilized to access both bones, minimizing soft tissue trauma.
- Soft Tissue Dissection: Carefully dissect through the subcutaneous tissue, preserving the dorsal sensory branches of the radial or ulnar nerves.
- Extensor Mechanism: Incise the extensor paratenon longitudinally. Retract the extensor digitorum communis (EDC) tendon laterally or medially to expose the dorsal periosteum.
- Periosteal Elevation: Incise the periosteum longitudinally and elevate it minimally—only enough to visualize the fracture ends. Excessive periosteal stripping devascularizes the bone and delays union.
Intramedullary K-Wire Fixation Steps
- Proximal Wire Introduction: Introduce a 0.045-inch or 0.062-inch K-wire into the medullary canal of the proximal fragment at the fracture site.
- Retrograde Drilling: Drill the wire proximally out through the skin at the metacarpal base.
- Crucial Maneuver: While drilling, force a bow in the wire convex toward the palm and hold the patient's wrist in flexion. This biomechanical manipulation ensures that the wire emerges safely on the dorsum of the wrist, avoiding penetration of the volar neurovascular structures or the carpal tunnel.
- Fracture Reduction: Once the wire has exited the dorsal wrist, withdraw it distally until the tip is flush with the fracture site. Anatomically reduce the fracture under direct vision, ensuring perfect rotational alignment.
- Antegrade Advancement: Drill the wire in the opposite direction (distally) into the medullary canal of the distal fragment.
- Depth Control: Stop advancing the wire just proximal to the metacarpophalangeal (MCP) joint. Penetrating the MCP joint articular surface can lead to chondral damage and postoperative stiffness.
- Hardware Management: Cut off the proximal end of the K-wire beneath the skin at the dorsal wrist to prevent pin tract infections and allow for unobstructed wrist motion.
- Closure and Splinting: Close the periosteum (if possible) and skin. Apply a volar splint holding the wrist in 30° of extension, the MCP joints in 70° to 90° of flexion, and the interphalangeal (IP) joints in full extension (the intrinsic-plus or "safe" position).
⚠️ Surgical Warning: Metacarpal Neck Fractures
A fracture of the metacarpal neck can be treated similarly using this intramedullary technique if open reduction is necessary. However, extreme care must be taken not to violate the articular cartilage of the metacarpal head during distal wire advancement.
PERCUTANEOUS PINNING OF METACARPAL SHAFT FRACTURE (Technique 67-14)
For fractures that can be reduced closed but are inherently unstable, percutaneous intramedullary pinning offers a minimally invasive alternative that preserves the fracture hematoma and periosteal blood supply.
Step-by-Step Percutaneous Technique
- Positioning the Digit: Acutely flex the MCP joint of the affected digit to 90°. This maneuver tightens the collateral ligaments, stabilizing the metacarpal head, and translates the extensor hood distally, providing a safe, central entry point.
- Wire Introduction: Introduce a 0.062-inch K-wire directly into the center of the metacarpal head.
- Advancement to Fracture: Drill the wire proximally through the medullary canal until it reaches the level of the fracture.
- Closed Reduction: By manual pressure, longitudinal traction, and manipulation of the wire—strictly under the guidance of an image intensifier—reduce the fracture. Ensure rotational alignment is perfect by checking the cascade of the flexed digits.
- Proximal Advancement: Once reduced, drill the wire across the fracture site and out through the dorsum of the wrist, utilizing the same biomechanical principles described in Technique 67-13 (wrist flexed, wire bowed).
- Distal Withdrawal: Withdraw the wire proximally from the wrist until the distal tip is pulled back just proximal to the MCP joint articular surface. This critical step frees the MCP joint, allowing for early postoperative range of motion.
- Final Verification: Confirm fracture reduction, wire placement, and joint clearance using multi-planar fluoroscopy. Cut the proximal wire beneath the skin.
💡 Clinical Pearl: Intramedullary Wire Sizing
The medullary canal of a metacarpal is narrowest at the isthmus. Using a single 0.062-inch wire may not provide sufficient rotational stability in wider canals. In such cases, consider using two smaller (0.045-inch) wires stacked within the canal (Bouquet technique) to achieve a three-point interference fit.
INTERFRAGMENTARY SCREW FIXATION
Oblique or spiral metacarpal shaft fractures present a unique biomechanical challenge. When the fracture length is at least twice the diameter of the metacarpal shaft, interfragmentary lag screw fixation is the gold standard.
Biomechanical Advantages
The primary advantage of interfragmentary screw fixation is the generation of absolute stability through dynamic interfragmentary compression. This rigid fixation allows for primary bone healing without callus formation. Furthermore, it requires less periosteal stripping than plate fixation and significantly reduces hardware prominence, which is a common cause of extensor tendon irritation.
Surgical Technique
- Approach: Expose the fracture via a dorsal longitudinal incision. Anatomically reduce the fracture using pointed reduction forceps.
- Screw Selection: Typically, 1.3 mm, 1.5 mm, or 2.0 mm cortical screws are utilized depending on the size of the metacarpal.
- Lag Technique:
- Drill the gliding hole in the near cortex (matching the external diameter of the screw threads).
- Insert a drill sleeve into the gliding hole and drill the thread hole in the far cortex (matching the core diameter of the screw).
- Countersink the near cortex to ensure the screw head sits flush and distributes compressive forces evenly, preventing cortical micro-fractures.
- Measure the depth and insert the appropriate length screw.
- Multiple Screws: For optimal rotational stability, at least two (preferably three) lag screws should be placed perpendicular to the fracture plane. The distance between screws should be at least one screw diameter, and the distance from the fracture edge should be at least two screw diameters.
⚠️ Pitfall: Radiographic Evaluation of Healing
Because interfragmentary lag screws provide absolute stability and anatomical reduction, healing occurs via primary osteonal reconstruction. Consequently, standard radiographic evidence of healing (callus formation) is usually lacking. Clinicians must rely on the absence of pain at the fracture site and the passage of time (typically 6 weeks) to determine clinical union. Fracture site protection is strictly advised for 6 weeks.
PLATE-AND-SCREW FIXATION
Short oblique, transverse, or highly comminuted fractures with unacceptable angulation or displacement cannot be adequately stabilized with lag screws alone. These fracture patterns require the application of a plate-and-screw construct or robust intramedullary fixation.
Indications for Plating
- Transverse fractures with high rotational instability.
- Comminuted fractures requiring bridge plating to maintain length.
- Multiple adjacent metacarpal fractures (crush injuries).
- Fractures with associated segmental bone loss.
Surgical Technique
- Exposure: Utilize a dorsal approach. Care must be taken to preserve the periosteum to the greatest extent possible.
- Plate Selection: Low-profile 2.0 mm or 2.4 mm titanium or stainless steel plates are standard. Locking plates are highly advantageous in osteoporotic bone or severe comminution.
- Application:
- For transverse fractures, apply the plate dorsally to act as a tension band against the volar-flexing forces of the intrinsic muscles. Use dynamic compression principles to compress the fracture site.
- Ensure at least three cortices (preferably four) of fixation are achieved both proximal and distal to the fracture zone.
- Alternative Intramedullary Alignment: If plating is deemed too morbid for the soft tissue envelope, these short oblique or transverse fractures can be aligned by intramedullary fixation using a 0.062-inch K-wire. Image intensification is absolutely required for correctly establishing the entry portal in the middle of the metacarpal base and for ensuring that the wire crosses the fracture and enters the distal canal perfectly (Fig. 67-37).
POSTOPERATIVE PROTOCOL AND REHABILITATION
The ultimate success of metacarpal fracture fixation is dictated by the postoperative rehabilitation protocol. The hand is unforgiving of prolonged immobilization.
- Immediate Postoperative Phase (0-2 Weeks):
- The hand is immobilized in a volar intrinsic-plus splint (wrist extended 30°, MCPs flexed 70°-90°, IPs free).
- Elevation and edema control are paramount.
- Active range of motion (AROM) of the IP joints is encouraged immediately to prevent extensor tendon adhesions.
- Intermediate Phase (2-6 Weeks):
- For rigid fixation (plates/lag screws), the splint is transitioned to a removable orthosis, and supervised AROM of the wrist and MCP joints is initiated.
- For K-wire fixation, the splint is maintained, but gentle, protected motion may begin depending on the stability of the construct.
- Hardware Removal:
- Percutaneous or buried K-wires are typically removed in the clinic under local anesthesia at 4 to 6 weeks, once clinical union is achieved.
- Plates and screws are generally left in situ unless they cause symptomatic extensor tendon tenosynovitis or restrict motion, in which case they are removed after complete radiographic consolidation (usually > 6 months).
Complications
- Extensor Tendon Adhesions: The most common complication following dorsal plating. Mitigated by low-profile hardware, meticulous handling of the paratenon, and early mobilization.
- Malunion: Usually rotational. Requires corrective osteotomy if symptomatic.
- Nonunion: Rare in metacarpals due to excellent vascularity, but can occur with excessive periosteal stripping or inadequate fixation.
- Infection: Pin tract infections are common with exposed K-wires. Treat with oral antibiotics and early pin removal if the fracture is sufficiently sticky.
By adhering to these rigorous biomechanical principles and precise surgical techniques, the orthopedic surgeon can reliably restore the complex anatomy and function of the hand following metacarpal shaft fractures.
You Might Also Like