Mastering Posterior Cruciate Ligament Reconstruction: The Tibial Inlay Technique with Bone-Patellar Tendon-Bone or Achilles Tendon-Bone Grafts
Key Takeaway
Posterior cruciate ligament (PCL) reconstruction utilizing bone-patellar tendon-bone (BTB) or Achilles tendon-bone grafts is a technically demanding procedure reserved for high-grade or symptomatic PCL injuries. This comprehensive guide details the preoperative templating, dual-positioning surgical approach, graft harvesting, tunnel preparation, and rigid fixation techniques required to restore native knee kinematics. Strict adherence to biomechanical principles and a phased postoperative rehabilitation protocol are paramount for achieving optimal clinical outcomes and preventing graft attenuation.
Introduction to Posterior Cruciate Ligament Reconstruction
The posterior cruciate ligament (PCL) is the primary restraint to posterior tibial translation, bearing the brunt of posteriorly directed forces across the knee joint. Reconstruction of the PCL is a formidable surgical challenge, historically plagued by graft attenuation and residual laxity. The evolution of surgical techniques has led to the popularization of the tibial inlay technique, utilizing either autogenous bone-patellar tendon-bone (BTB) or Achilles tendon-bone allografts.
Unlike traditional transtibial techniques, which force the graft to negotiate an acute angle at the posterior tibial aperture (the infamous "killer turn"), the tibial inlay technique directly secures a bone block to the posterior tibial cortex. This anatomical restoration eliminates abrasive shear stresses on the tendinous portion of the graft, significantly improving long-term biomechanical stability. This masterclass details the comprehensive surgical approach, originally popularized by Berg, integrating meticulous preoperative planning, complex dual-positioning, and rigorous neurovascular protection.
Preoperative Radiographic Templating and Graft Selection
Precise preoperative templating is the cornerstone of a successful PCL reconstruction. The surgeon must meticulously calculate the required graft length to prevent the bony portion of the tendon graft from recessing too proximally within the femoral tunnel. A recessed graft subjects the tendinous portion to abrasive attenuation against the tunnel aperture, leading to premature failure.
Radiographic Sizing Protocol
- Obtain a strictly calibrated, true lateral radiograph of the knee flexed to exactly 30 degrees. Ensure there is 3 mm or less of posterior femoral condylar overlap to guarantee a true orthogonal projection.
- Utilize a high-intensity illuminator or digital templating software to identify the exact tibial tuberosity insertion site of the patellar tendon, located just anterior to the infrapatellar fat pad density.
- Map the native PCL trajectory. The PCL's biomechanical strength is optimized when reconstructed from the anterior margin of the intercondylar line to a precise point 1 cm below the posterior articular surface of the tibia.
- Measure the anticipated intra-articular length of the reconstructed PCL.
Surgical Warning: Compare the measured PCL length to the anticipated length of the patient's autogenous patellar tendon. If the autogenous patellar tendon exceeds the measured PCL length by more than 1.5 cm, the graft will "bottom out" or recess excessively. In such instances, the surgeon must abandon the autograft and utilize an Achilles tendon-bone allograft or a pre-measured BTB allograft of specified tendinous length.
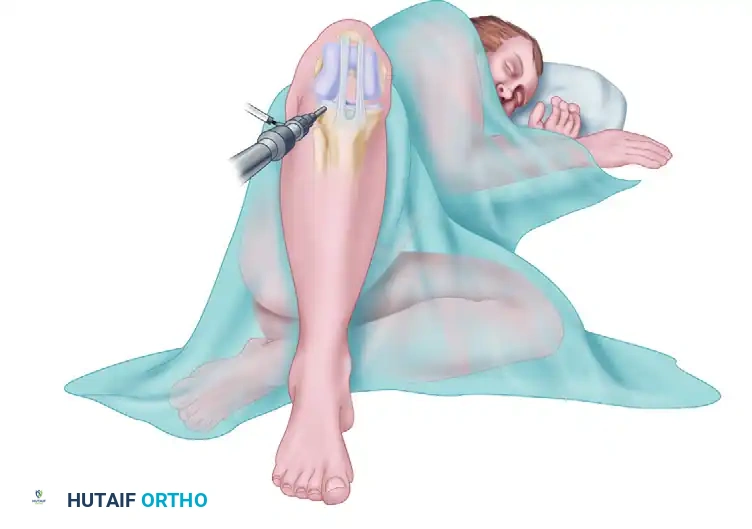
Patient Positioning and Anesthesia
The Berg technique requires a highly orchestrated, dual-phase positioning strategy to allow seamless transition between the anterior arthroscopic phase and the posterior open popliteal phase without compromising sterility or requiring complete re-draping. General anesthesia with profound muscle relaxation is mandatory.
Phase 1: Anterior and Arthroscopic Access
Place the patient in the lateral decubitus position with the operative leg suspended upward. Circumferentially prepare and drape the limb from the proximal thigh to the midcalf. Abduct and externally rotate the hip to 45 degrees, and flex the knee to 90 degrees. In this configuration, the anterior aspect of the knee directly faces the operating surgeon, facilitating ergonomic access for graft harvest and diagnostic arthroscopy.
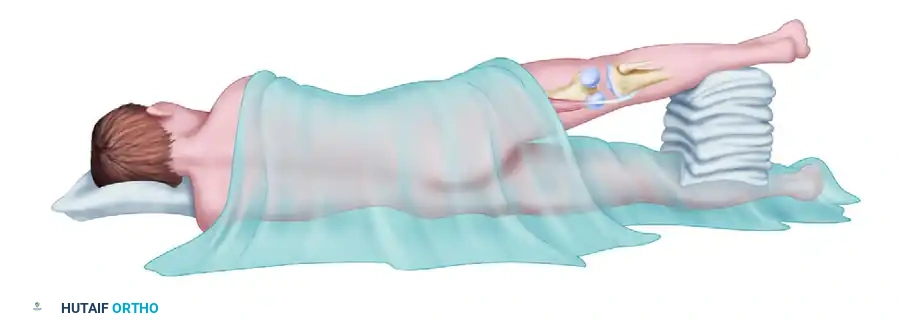
Phase 2: Posterior Popliteal Access
Following the anterior phase, the patient's position is dynamically modified. Extend the knee, tilt the operating table anteriorly toward the prone position, and abduct the thigh, supporting the extremity with stacked sterile towels. This maneuver opens the popliteal fossa, providing the necessary trajectory for the posterior approach while maintaining the sterile field.

Surgical Technique: Step-by-Step Execution
1. Graft Harvest and Preparation
Begin with the harvest of a 10-mm-wide central-third bone-patellar tendon-bone autograft (if preoperative templating confirmed appropriate length).
* Extract the graft with standard trapezoidal bone blocks from the patella and tibial tubercle.
* Immediately drill and tap the tibial tubercle bone block to accept a 6.5-mm cancellous titanium screw and a spiked washer. This preparation is critical for the subsequent tibial inlay fixation.
* Pass heavy, non-absorbable traction sutures (e.g., #5 FiberWire) through the patellar bone block to facilitate retrograde passage.
2. Diagnostic Arthroscopy and Concurrent Procedures
Establish standard anterolateral and anteromedial arthroscopic portals. Alternatively, utilize the incision created through the patellar tendon defect and fat pad, or a medial parapatellar arthrotomy, to thoroughly examine the intra-articular structures. Address any concurrent meniscal or chondral pathology before proceeding with the ligamentous reconstruction.
Clinical Pearl: If a combined arthroscopic anterior cruciate ligament (ACL) and open PCL reconstruction is planned, always perform the ACL reconstruction first. The subsequent popliteal arthrotomy required for the PCL inlay will compromise the joint capsule, leading to massive extravasation of arthroscopic irrigation fluid into the posterior calf compartments if arthroscopy is attempted afterward.
3. Femoral Tunnel Preparation
The femoral origin of the PCL is broad, but the isometric center of the anterolateral bundle is the primary target for single-bundle reconstruction.
* Introduce a femoral aiming jig through the anteromedial portal. Position the guide pin in the anterosuperior femoral origin of the PCL, precisely 4 mm from the anterior articular margin of the medial femoral condyle.
* Make a 5-cm longitudinal incision proximal to the medial femoral epicondyle. Divide the medial patellar retinaculum and expose the medial femoral condyle subperiosteally.
* Over-drill the guide pin using a cannulated reamer matched to the diameter of the patellar bone block (typically 10 mm) to create an interosseous tunnel in the medial femoral condyle.
* Meticulously chamfer the intra-articular margins of the femoral tunnel with a rasp to prevent guillotine-effect abrasion on the graft.
* Pass an 18-gauge wire loop (or a specialized suture passing device) through the femoral tunnel, directing it toward the posterior joint space. This will be utilized later to shuttle the graft retrograde.
4. The Posterior Approach to the Popliteal Fossa
Transition the patient to the modified prone position (Phase 2) as described above.
* Make a vertical incision in line with the palpable semitendinosus tendon. As the incision reaches the popliteal crease, veer it laterally and extend it distally over the posterior calf.
* Expose the deep fascia overlying the gastrocnemius muscle and incise it vertically.
* Neurovascular Identification: Carefully identify and protect the sural nerve, which courses between the medial and lateral heads of the gastrocnemius muscle.
* Bluntly develop the interval between the medial head of the gastrocnemius and the semimembranosus tendon.
* Surgical Tip: Slightly flexing the knee at this stage significantly improves deep exposure and relieves dangerous tension on the popliteal vessels.
* Incise the medial head of the gastrocnemius near its tendinous insertion and retract it laterally. Crucial: Protect the motor branch of the tibial nerve innervating the medial gastrocnemius during this retraction.
* Identify the inferior medial geniculate artery and vein. These vessels transversely overlie the posterior joint capsule at the superior margin of the popliteus muscle. Ligate and divide them to prevent postoperative hematoma.
* Make a vertical incision through the oblique popliteal ligament and the posterior joint capsule to enter the joint.
* Identify the native PCL remnants and expose the posterior tibial plateau subperiosteally, preparing the bed for the inlay.
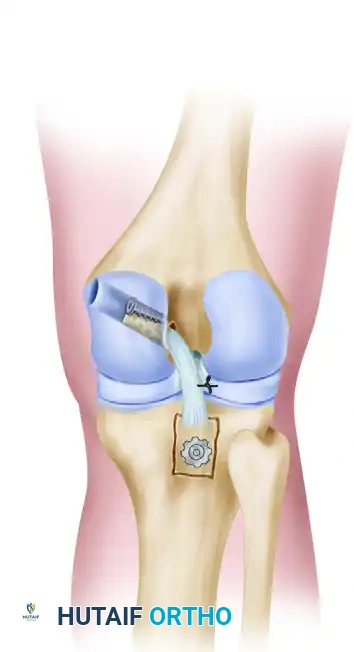
5. Graft Passage and Femoral Fixation
- Retrieve the 18-gauge wire loop previously placed through the femoral tunnel.
- Pass the traction sutures of the patellar bone block through the wire loop and advance the graft retrograde into the medial femoral condyle tunnel.
- Secure the graft within the femoral tunnel using a 7-mm or 9-mm diameter cannulated interference screw.
Biomechanical Imperative: Optimally, the bony portion of the graft should not be recessed deep within the condylar tunnel. It must lie flush at the tunnel margin interface. This precise positioning prevents the tendinous portion of the graft from abrading against the hard cortical edge of the tunnel during cyclical knee flexion.
6. Tibial Inlay Preparation and Final Fixation
- Position the knee in full extension. This is a critical step: full extension utilizes the geometric congruity of the femoral condyles and the tibial plateau to automatically reduce posterior tibial subluxation. Caution: Avoid hyperextension (recurvatum).
- Apply slight manual tension to the tendinous portion of the graft to determine the exact site for posterior tibial fixation.
- Using a sharp osteotome or a high-speed burr, create a precise unicortical window in the posterior tibia. The dimensions of this window must perfectly match the size of the tibial tubercle bone block.
- Inlay the bone block into the prepared tibial window.
- Secure the block rigidly to the underlying cancellous bone using the previously prepared 6.5-mm titanium cancellous screw and spiked washer.
- Contingency: If the tendinous portion of the graft is found to be marginally too long despite preoperative templating, advance the tibial insertion site further distally along the posterior tibial cortex before creating the window.
- Assess the meniscofemoral ligaments (ligaments of Wrisberg and Humphry). If they are incompetent or detached, suture the peripheral margin of the lateral meniscus directly to the PCL substitute to restore posterior horn stability.
7. Closure
Thoroughly irrigate the posterior compartment. Repair the medial head of the gastrocnemius to its insertion site. Close the deep fascia, subcutaneous tissues, and skin in a routine, layered fashion.
Alternative Surgical Approaches
In 1990, Burks and Schaffer described an alternative posterior approach that circumvents the need to divide the medial head of the gastrocnemius. This approach utilizes the interval between the medial head of the gastrocnemius and the semimembranosus, retracting the intact gastrocnemius laterally.
While this spares the muscle insertion, it mandates repositioning, re-prepping, and re-draping the patient into a full prone position after the graft has been harvested and secured in the femoral tunnel. Although the full prone position provides excellent direct visualization of the posterior tibia and may be ergonomically easier for the surgical team, the logistical burden of intraoperative repositioning makes the lateral decubitus/semi-prone technique described by Berg highly advantageous for fluid surgical workflow.
Postoperative Care and Rehabilitation Protocol
Rehabilitation following a tibial inlay PCL reconstruction is inherently conservative, designed to protect the healing graft from posterior shear forces while restoring functional range of motion.
Phase I: Maximum Protection (Weeks 0–2)
- Immobilization: The knee is locked in a hinged knee brace in full extension (0 degrees) at all times. This prevents posterior tibial sag.
- Weight Bearing: Partial weight-bearing with bilateral axillary crutches is permitted immediately to stimulate joint proprioception without overloading the construct.
- Therapeutic Exercise: Strict elevation and cryotherapy. Active ankle pumps to prevent deep vein thrombosis.
Phase II: Controlled Mobilization (Weeks 2–6)
- Weight Bearing: Progression to full weight-bearing is allowed at the 2-week mark, provided the patient demonstrates adequate quadriceps control.
- Range of Motion (ROM): The brace is unlocked to permit a protected arc of motion from 0 to 90 degrees. Flexion beyond 90 degrees is strictly prohibited to avoid excessive tension on the graft.
- Strengthening: Isometric quadriceps exercises (quad sets, straight leg raises) are initiated. Crucially, these should be performed with the knee positioned between 70 and 90 degrees of flexion, as this arc minimizes posterior tibial translation forces. Active hamstring contraction is strictly avoided, as the hamstrings act as direct antagonists to the PCL.
Phase III: Advanced Strengthening (Weeks 6 and Beyond)
- Ambulation: The patient is typically weaned off crutches and the brace by week 6.
- Range of Motion: Progression to full, unrestricted arc of motion is encouraged.
- Strengthening: Prone quadriceps exercises are advanced. Light, closed-kinetic-chain hamstring exercises may be cautiously introduced, progressing to full arc hamstring strengthening as graft incorporation solidifies.
- Return to Play: Return to cutting and pivoting sports is generally delayed until 9 to 12 months postoperatively, contingent upon the restoration of 90% contralateral quadriceps strength and the absence of posterior instability on clinical examination.
You Might Also Like