Posterior Cruciate Ligament: Comprehensive Anatomy, Biomechanics, and Surgical Reconstruction
Key Takeaway
The posterior cruciate ligament (PCL) is the primary restraint to posterior tibial translation. While isolated grade I and II injuries may be managed nonoperatively, chronic deficiency often leads to medial compartment and patellofemoral osteoarthritis. This comprehensive guide details PCL anatomy, biomechanics, diagnostic protocols, and advanced surgical reconstruction techniques, including transtibial and tibial inlay approaches, to restore knee kinematics and prevent long-term joint degeneration.
INTRODUCTION
The posterior cruciate ligament (PCL) is a critical intra-articular, extrasynovial structure that serves as the primary stabilizer of the knee against posterior tibial translation. Historically, the management of PCL injuries has been a subject of intense debate, largely due to an incomplete understanding of its natural history and the technical demands of surgical reconstruction. However, contemporary biomechanical studies and long-term clinical follow-ups have elucidated the severe kinematic consequences of chronic PCL deficiency, notably the accelerated onset of medial compartment and patellofemoral osteoarthritis.
This masterclass provides an exhaustive, evidence-based review of PCL anatomy, biomechanics, clinical evaluation, and operative management, tailored for the practicing orthopedic surgeon and advanced surgical trainee.
SURGICAL ANATOMY
The PCL is the largest and strongest ligament in the human knee. It is composed of two distinct functional bundles named for their tibial and femoral attachment sites:
* Anterolateral (AL) Bundle: Forms the bulk of the ligament. It is tight in knee flexion and lax in extension.
* Posteromedial (PM) Bundle: A smaller, obliquely oriented band that is tight in extension and lax in flexion.
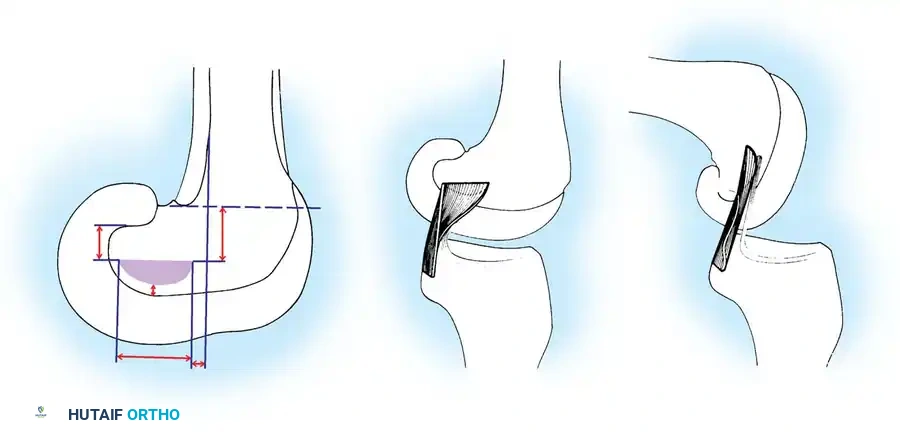
Femoral and Tibial Attachments
The PCL attaches proximally to the posterior aspect of the lateral surface of the medial femoral condyle. Like the anterior cruciate ligament (ACL), its footprint forms a segment of a circle. The tibial attachment is located in a central depression behind and below the intra-articular portion of the posterior tibia, known as the PCL facet. A slip of the PCL usually blends with the posterior horn of the lateral meniscus.
Surgical Pearl: The cross-sectional area of the PCL increases from the tibia to the femur. It is approximately 50% larger than the ACL at the femoral insertion and 20% larger at the tibial insertion. The insertion sites themselves are 300% to 500% larger than the midsubstance cross-section, a critical factor when considering footprint restoration during reconstruction.
The Meniscofemoral Ligaments
The meniscofemoral ligaments (MFLs) are vital accessory structures that arise from the posterior horn of the lateral meniscus and attach to the medial femoral condyle, intimately associating with the PCL.
* Ligament of Humphry: Passes anterior to the PCL.
* Ligament of Wrisberg: Passes posterior to the PCL.
Together, the MFLs account for approximately 22% of the entire cross-sectional area of the PCL complex and contribute significantly to posterior stability.
BIOMECHANICS AND KINEMATICS
The PCL is oriented more vertically than obliquely, acting as the central axis around which knee rotation occurs. It guides the "screw-home" mechanism, facilitating internal rotation of the femur on the tibia during terminal extension.
Biomechanical evaluations demonstrate that the anterolateral component possesses significantly greater linear stiffness and ultimate load to failure compared to the posteromedial component and the MFLs. The maximal failure force of the native PCL is approximately 1627 ± 491 N, which is statistically comparable to the ACL (1725 ± 660 N).
The PCL provides 89% of the resistance to posterior translation of the tibia on the femur. When the PCL is sectioned, posterior drawer displacement increases dramatically, particularly in flexion. Furthermore, the PCL acts as a secondary check against hyperextension, but only after the ACL has been compromised.
NATURAL HISTORY OF PCL DEFICIENCY
The natural history of the isolated PCL rupture is characterized by a predictable progression of joint deterioration. Dejour et al. classically described this progression in three phases:
1. Functional Adaptation (3 to 18 months): The patient alters their gait and activity to accommodate the laxity.
2. Functional Tolerance (15 to 20 years): The knee functions adequately, though micro-kinematic alterations persist.
3. Osteoarthritic Deterioration (>25 years): Disabling osteoarthritis manifests.
Kinematic Consequences
In vivo kinematic studies utilizing open-access MRI reveal that PCL rupture leads to persistent posterior subluxation of the medial tibia. The medial femoral condyle rides up the anterior slope of the medial tibial plateau throughout the entire flexion-extension arc.
Clinical Pitfall: During activities requiring deep knee flexion (e.g., stair climbing), the patella and patellar tendon are forced to resist posterior tibial translation. This abnormal posterior sag shortens the moment arm of the quadriceps, decreasing its mechanical advantage and exponentially increasing patellofemoral and medial compartment contact pressures.
CLINICAL EVALUATION
Mechanism of Injury
Isolated PCL tears typically occur via a direct blow to the anterior aspect of a flexed tibia, such as a "dashboard injury" in a motor vehicle collision, or a fall directly onto a flexed knee with the foot in plantar flexion.
Physical Examination
Accurate diagnosis requires a high index of suspicion and meticulous physical examination.
- Posterior Sag Sign (Godfrey's Test): With the hips and knees flexed to 90 degrees, the affected tibia sags posteriorly due to gravity.
- Quadriceps Active Test: The patient is asked to actively contract the quadriceps while the knee is flexed to 90 degrees. In a PCL-deficient knee, the posteriorly subluxed tibia will translate anteriorly to its reduced position.
- Posterior Drawer Test: Performed at 90 degrees of flexion.
Diagnostic Warning - The False-Positive Anterior Drawer: A common and critical error occurs when the examiner fails to recognize that the tibia is starting in a posteriorly subluxed position. When an anterior drawer test is performed, the tibia translates anteriorly (from subluxed to neutral), leading to a misdiagnosis of an ACL tear. To prevent this, place both knees in the drawer position and palpate the anteromedial joint line. Normally, the medial tibial plateau sits 5 to 10 mm anterior to the medial femoral condyle. In a PCL tear, this "step-off" is lost.
Diagnostic Imaging
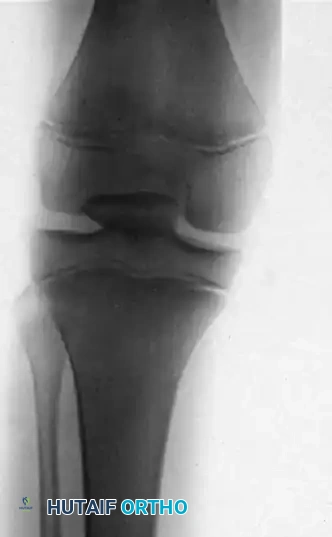
- Stress Radiography: Superior to manual arthrometers. An 89-N posterior load is applied to the proximal tibia at 70 degrees of flexion. Increased posterior translation of ≥8 mm compared to the contralateral knee indicates a complete PCL rupture.
- Magnetic Resonance Imaging (MRI): Highly reliable for acute PCL injuries. It is essential for evaluating concomitant meniscal pathology, chondral lesions, and posterolateral corner (PLC) injuries.
INDICATIONS FOR TREATMENT
Nonoperative Management
Historically, isolated Grade I (<5 mm posterior translation) and Grade II (5-10 mm translation) injuries have been managed nonoperatively with a structured rehabilitation program focusing on quadriceps strengthening.
* Criteria for Nonoperative Care: Posterior drawer <10 mm, <5 degrees of abnormal rotary laxity, and no varus/valgus instability.
Operative Management
Surgical reconstruction is indicated for:
1. Acute Grade III injuries (>10 mm posterior translation).
2. Combined multi-ligamentous knee injuries (e.g., PCL + PLC or PCL + ACL).
3. Chronic PCL deficiency with symptomatic instability, pain, or early degenerative changes in the medial or patellofemoral compartments.
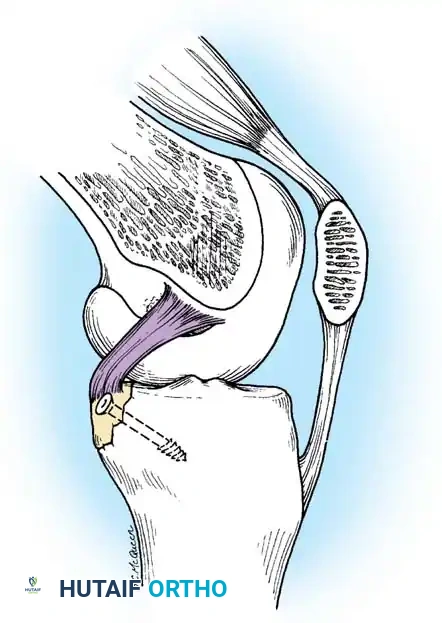
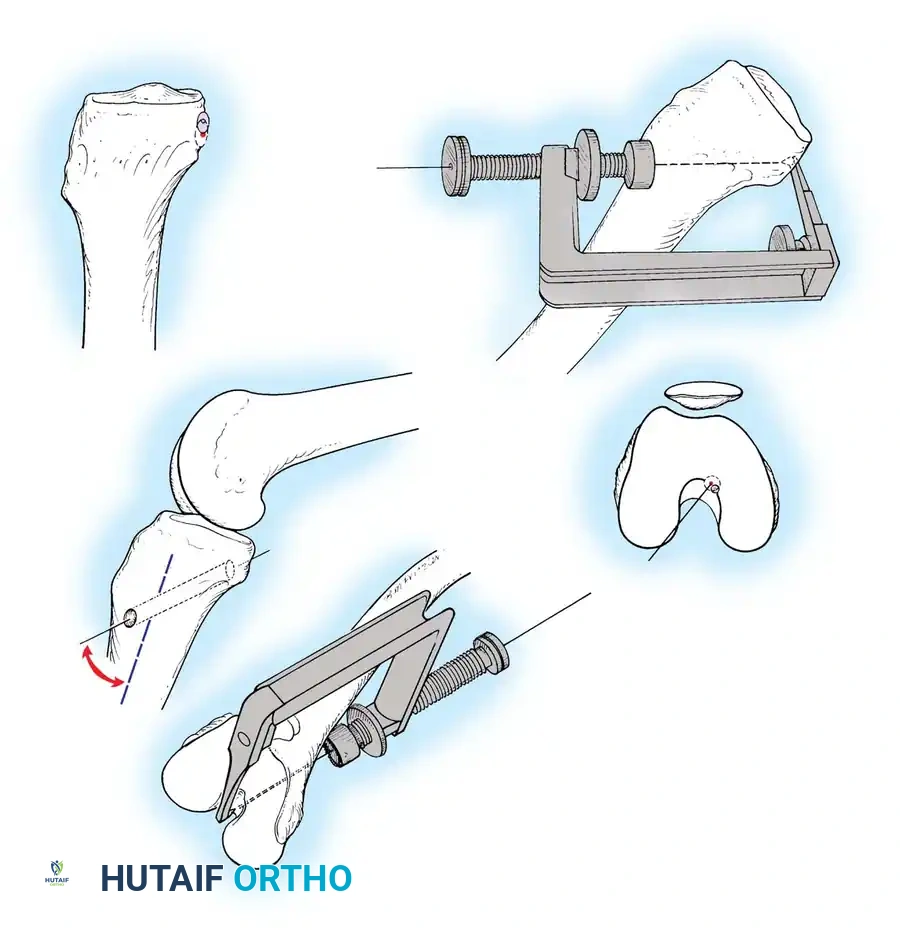
4. Bony avulsion fractures of the tibial insertion (amenable to primary repair).
SURGICAL RECONSTRUCTION TECHNIQUES
PCL reconstruction is technically demanding. The two primary techniques are the Arthroscopic Transtibial Approach and the Open Tibial Inlay Approach.
Preoperative Setup and Graft Selection
The patient is positioned supine for the transtibial approach or prone/lateral for the tibial inlay approach. A tourniquet is applied to the proximal thigh.
Graft Options:
* Achilles Tendon Allograft: The gold standard for single-bundle reconstruction due to its large cross-sectional area and bone block, which allows for robust fixation.
* Bone-Patellar Tendon-Bone (BPTB): Excellent bone-to-bone healing but associated with donor site morbidity.
* Quadrupled Hamstring Autograft: Used frequently in double-bundle reconstructions.
Technique 1: Arthroscopic Transtibial Reconstruction
The transtibial technique is entirely arthroscopic but requires navigating the "killer turn"—the acute angle the graft must make as it exits the posterior tibial tunnel and turns superiorly toward the femur.
Step 1: Portal Placement and Notch Preparation
Standard anterolateral and anteromedial portals are established. A posteromedial portal is mandatory for visualizing the posterior tibial facet and protecting the neurovascular structures.
The remnant of the PCL is debrided, preserving the MFLs if intact. The posterior capsule is elevated off the posterior tibia using a periosteal elevator to create a safe space for guide pin passage.
Step 2: Tibial Tunnel Preparation
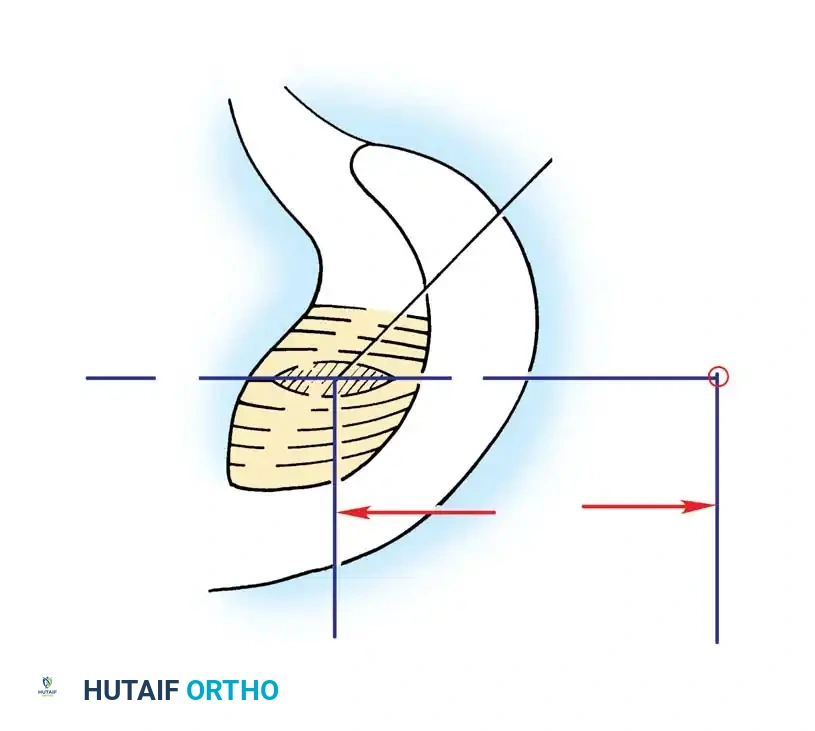
A PCL tibial guide is introduced through the anteromedial portal and positioned on the posterior tibial facet, approximately 7 mm anterior to the posterior cortical edge.
Surgical Warning: The popliteal artery lies immediately posterior to the posterior capsule. A curette or specialized posterior retractor must be placed through the posteromedial portal to cap the guide pin as it breaches the posterior cortex.

A guide pin is drilled from the anteromedial tibia, aiming for the anatomic footprint. The tunnel is then reamed to the appropriate diameter of the graft.
Step 3: Femoral Tunnel Preparation
The femoral footprint of the AL bundle is identified on the medial femoral condyle. A guide pin is placed 2-3 mm from the articular cartilage margin at the 1 o'clock (right knee) or 11 o'clock (left knee) position.
The femoral tunnel is reamed from inside-out or outside-in, depending on surgeon preference and the fixation method chosen.
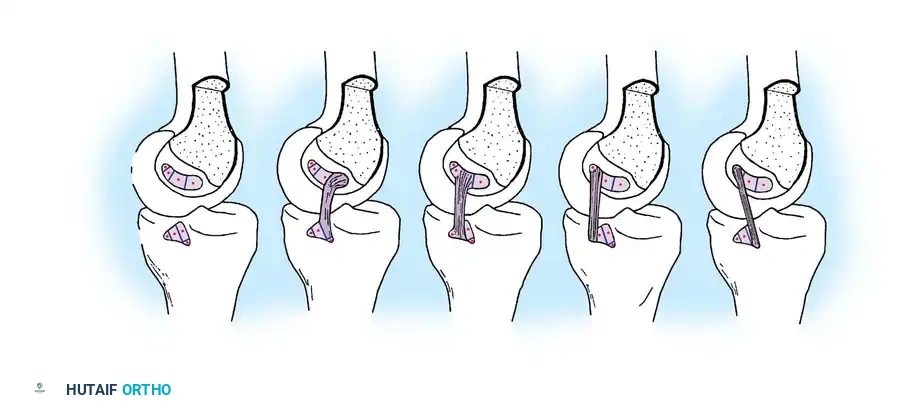
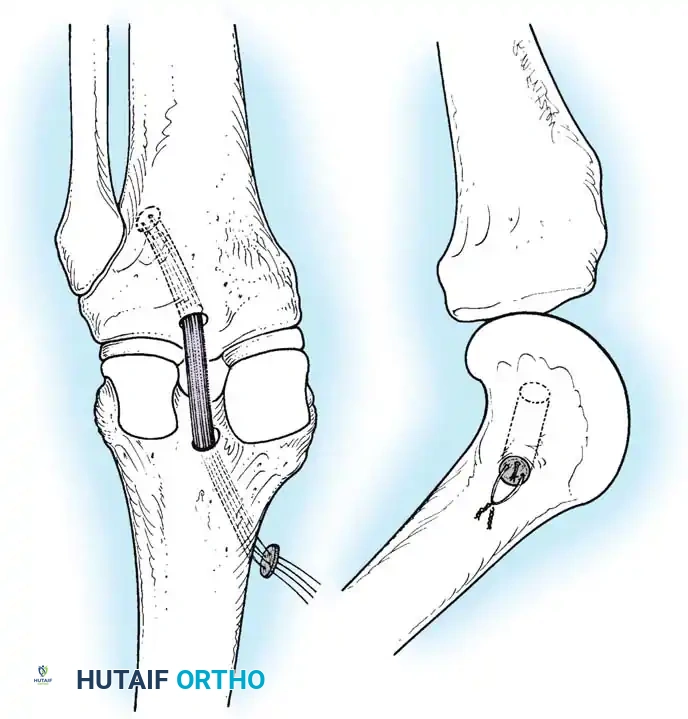
Step 4: Graft Passage and Fixation
A passing suture is shuttled from the tibial tunnel, into the joint, and out the femoral tunnel. The graft is pulled into the knee.

Femoral fixation is achieved first (e.g., using an interference screw or suspensory button).
The graft is then tensioned distally. To counteract the "killer turn" effect, the knee is cycled through a full range of motion. The tibia is reduced (anterior drawer applied), and the graft is fixed in the tibial tunnel at 90 degrees of flexion using a bioabsorbable or titanium interference screw.
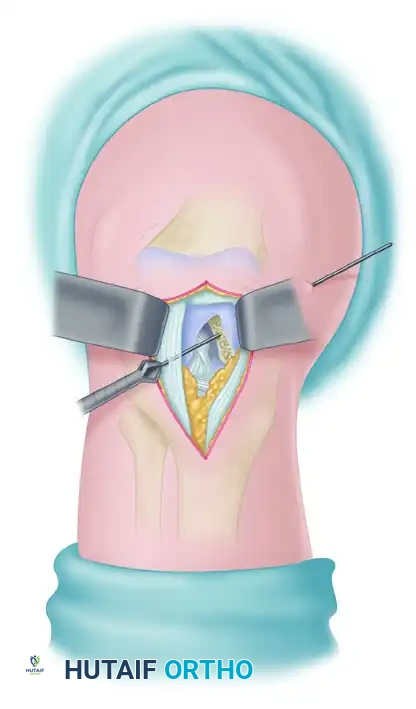
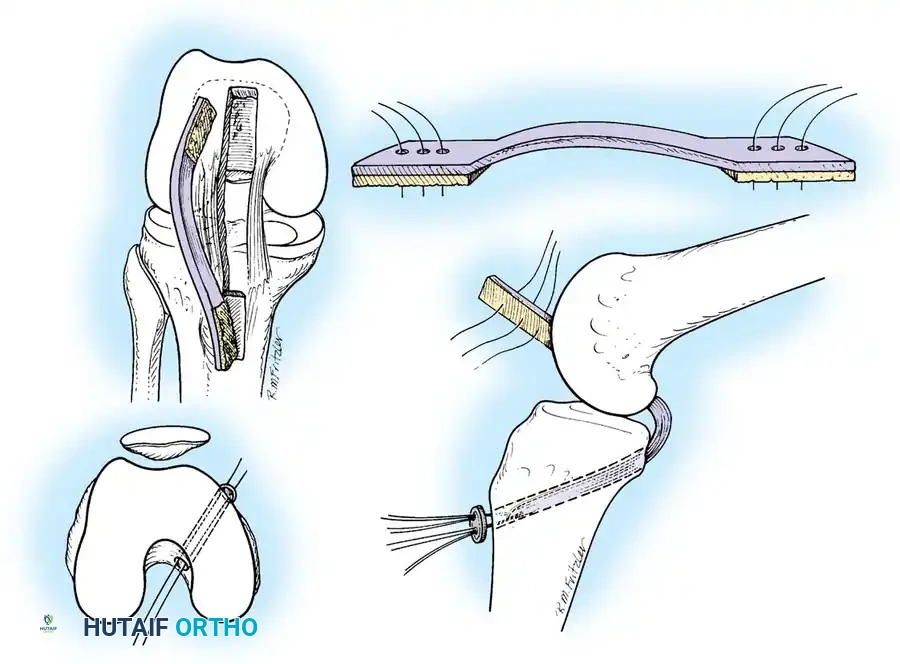
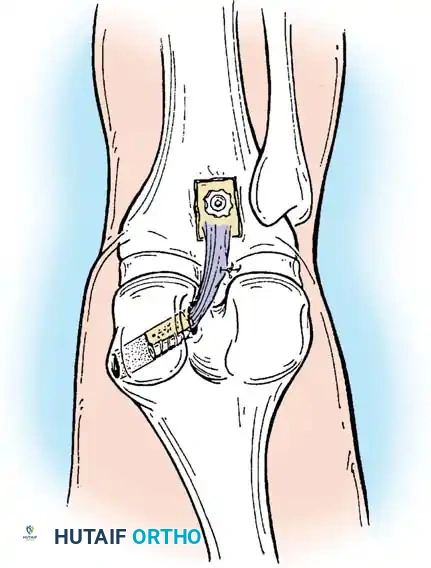
Technique 2: The Tibial Inlay Approach
The tibial inlay technique was developed to eliminate the "killer turn," thereby reducing graft abrasion and attenuation. It involves an open posterior approach to secure a bone block directly into a trough on the posterior tibia.
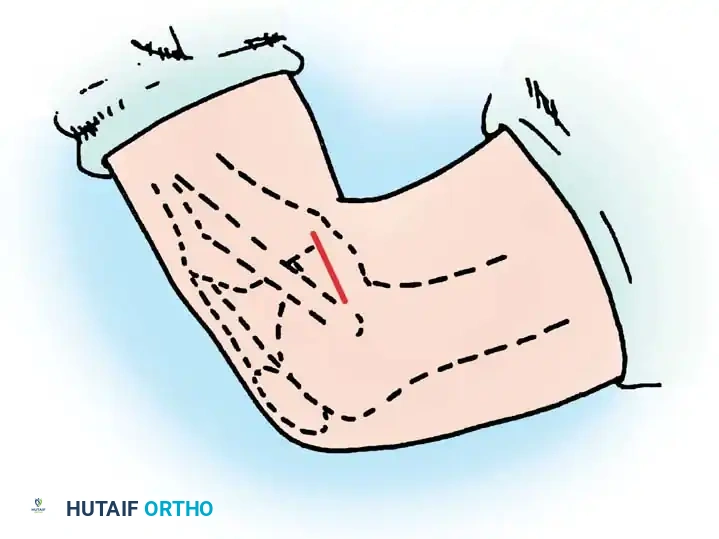
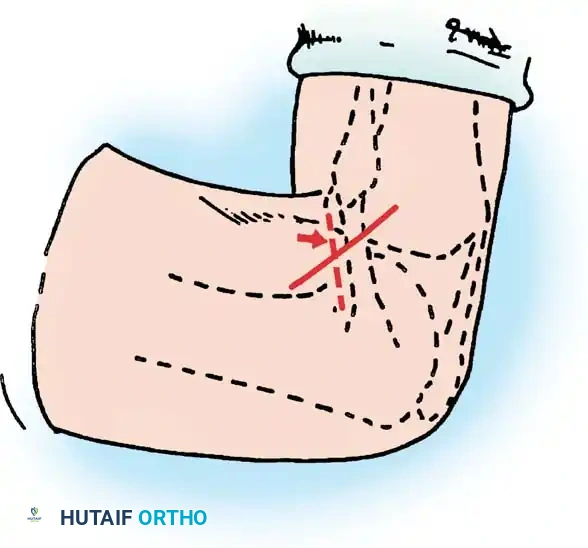
Step 1: Patient Positioning and Incision
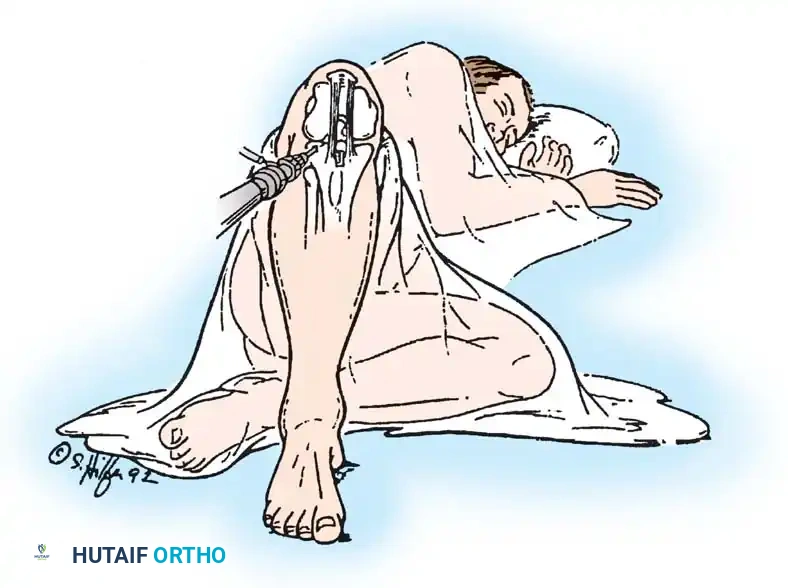
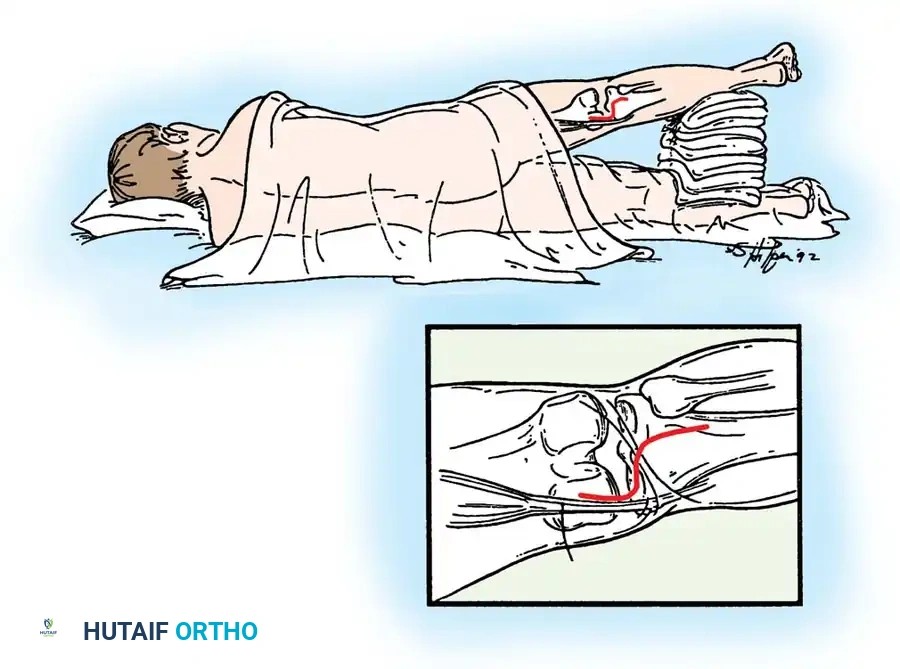
The patient is positioned in the lateral decubitus or prone position. An inverted L-shaped or straight incision is made over the posterior aspect of the knee.
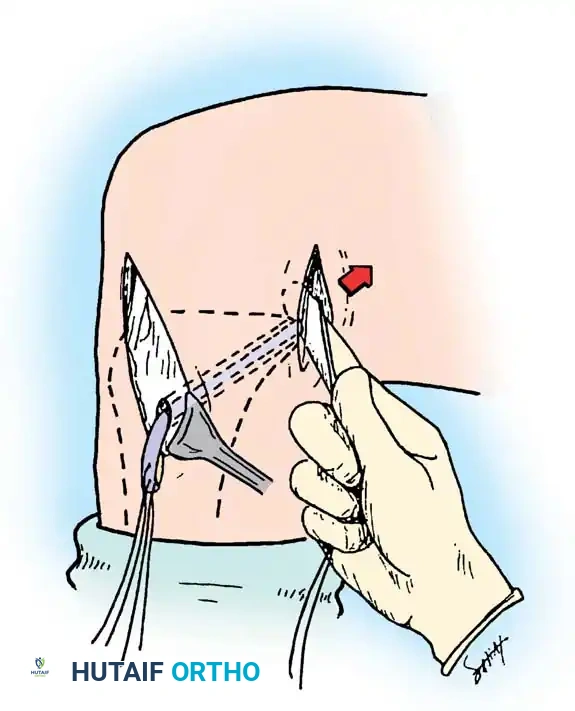
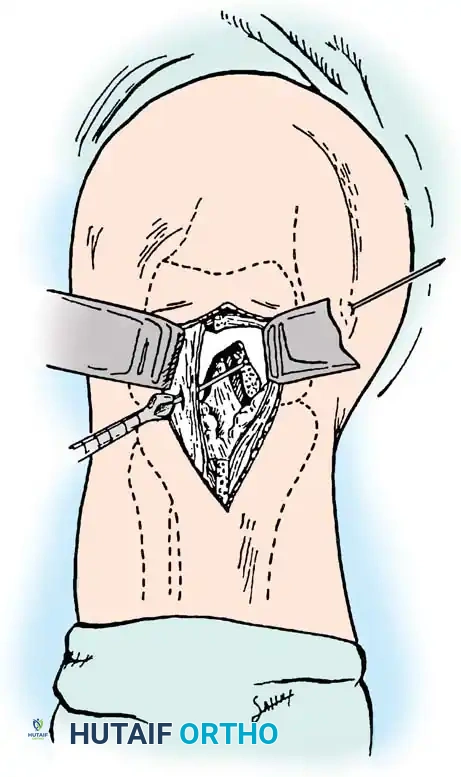
Step 2: Posterior Exposure
The crural fascia is incised. The interval between the medial head of the gastrocnemius and the semimembranosus is developed.
The medial gastrocnemius is retracted laterally, which inherently protects the popliteal neurovascular bundle.
Step 3: Trough Preparation and Graft Fixation
The posterior capsule is incised vertically to expose the PCL facet. A rectangular bony trough is created at the anatomic tibial insertion site.
The bone block of the Achilles allograft is press-fit into the trough and secured with two bicortical cancellous screws. The tendinous portion of the graft is then passed anteriorly into the joint and secured in the femoral tunnel via standard arthroscopic techniques.
POSTOPERATIVE REHABILITATION
Rehabilitation following PCL reconstruction is inherently more conservative than ACL reconstruction to protect the graft from early elongation.

- Phase I (0-6 weeks): The knee is locked in full extension in a dynamic PCL brace (which applies an anterior force to the proximal tibia). Weight-bearing is restricted to toe-touch. Passive prone range of motion (ROM) is initiated, limited to 0-90 degrees to prevent excessive graft tension. Active hamstring contraction is strictly prohibited.
- Phase II (6-12 weeks): Progressive weight-bearing is allowed. ROM is advanced to full. Closed kinetic chain quadriceps exercises (e.g., mini-squats, leg presses) are initiated.
- Phase III (3-6 months): Proprioceptive training and light jogging begin.
- Phase IV (6-9+ months): Return to sport-specific activities is permitted once quadriceps strength reaches >90% of the contralateral limb and clinical stability is confirmed.
COMPLICATIONS AND PITFALLS
- Neurovascular Injury: The popliteal artery is at extreme risk during tibial tunnel drilling in the transtibial technique. Strict adherence to posteromedial portal visualization and physical protection of the posterior capsule is non-negotiable.
- Residual Laxity: Graft elongation is the most common cause of failure. It is often secondary to unrecognized and untreated posterolateral corner (PLC) injuries. Always assess for concomitant rotary instability prior to isolated PCL reconstruction.
- Loss of Motion: Arthrofibrosis can occur if early passive ROM is neglected
📚 Medical References
- posterior cruciate ligament–retaining total knee replacements. A 10-year survivorship study of 445 arthroplasties, Am J Knee Surg 119:9, 1998.
- Barrack RL, Bertot AJ, Wolfe MW, et al: Patellar resurfacing in total knee arthroplasty: a prospective, randomized, doubleblind study with fi ve to seven years of follow-up, J Bone Joint Surg 83A:1376, 2001.
- Bartel DL, Bicknell VL, Wright TM: The effect of conformity, thickness, and material on stress in ultra-high molecular weight components for total joint replacement, J Bone Joint Surg 68A:1041, 1986.
- Bartel DL, Burstein AH, Santavicca EA, et al: Performance of the tibial component in total knee replacement, J Bone Joint Surg 64A:1026, 1982.
- Berger RA, Nedeff DD, Barden RM, et al: Unicompartmental knee arthroplasty: clinical experience at 6to 10-year followup, Clin Orthop Relat Res 367:50, 1999.
- Bhan S, Malhotra R, Kiran EK, et al: A comparison of fi xedbearing and mobile-bearing total knee arthroplasty at a minimum follow-up of 4.5 years, J Bone Joint Surg 87A:2290, 2005.
- Bloebaum RD, Rubman MH, Hofmann AA: Bone ingrowth into porous-coated tibial components implanted with autograft bone chips: analysis of ten consecutively retrieved implants, J Arthroplasty 7:483, 1992.
- Brick GW, Scott RD: The patellofemoral component of total knee arthroplasty, Clin Orthop Relat Res 231:163, 1988.
- Buechel FF: New Jersey low-contact-stress (LCS) knee replacement system, Clin Orthop Relat Res 264:211, 1991.
- Buechel FF: Mobile-bearing knee arthroplasty: rotation is our salvation! J Arthroplasty 19(4 suppl 1):27, 2004.
- Burnett RS, Haydon CM, Rorabeck CH, et al: Patella resurfacing versus nonresurfacing in total knee arthroplasty: results of a randomized controlled clinical trial at a minimum of 10 years’ followup, Clin Orthop Relat Res 428:12, 2004.
- Callaghan JJ, Squire MW, Goetz DD, et al: Cemented rotatingplatform total knee replacement: a nineto twelve-year followup study, J Bone Joint Surg 82A:705, 2000.
- Campbell WC: Arthroplasty of the knee: a report of cases, J Orthop Surg 9:430, 1921.
- Campbell WC: Interposition of Vitallium plates in arthroplasties of the knee: preliminary report, Am J Surg 47:639, 1940.
- Cartier P, Sanouiller JL, Grelsamer RP: Unicompartmental knee arthroplasty surgery: 10-year minimum follow-up period, J Arthroplasty 11:782, 1996.
- Churchill DL, Incavo SJ, Johnson CC, et al: The infl uence of femoral rollback on patellofemoral contact loads in total knee arthroplasty, J Arthroplasty 16:909, 2001.
- Clark CR, Rorabeck CH, MacDonald S, et al: Posterior-stabilized and cruciate-retaining total knee replacement: a randomized study, Clin Orthop Relat Res 392:208, 2001.
- Collier J, Mayor MB, McNamara JL, et al: Analysis of the failure of 122 polyethylene inserts from uncemented tibial knee components, Clin Orthop Relat Res 273:232, 1991.
- Collier MB, Engh CA Jr, Engh GA: Shelf age of the polyethylene tibial component and outcome of unicondylar knee arthroplasty, J Bone Joint Surg 86A:763, 2004.
- Collier MB, Engh CA Jr, McAuley JP, et al: Osteolysis after total knee arthroplasty: infl uence of tibial baseplate surface fi nish and sterilization of polyethylene insert: fi ndings at fi ve to ten years postoperatively, J Bone Joint Surg 87A:2702, 2005.
- Conditt MA, Noble PC, Bertolusso R, et al: The PCL signifi cantly affects the functional outcome of total knee arthroplasty, J Arthroplasty 19(7 suppl 2):107, 2004.
- Cook SD: Clinical radiographic and histologic evaluation of retrieved human noncemented porous-coated implants, J Long Term Eff Med Implants 1:11, 1991.
- Cope MR, O’Brien BS, Nanu AM: The infl uence of the posterior cruciate ligament in the maintenance of joint line in primary total knee arthroplasty: a radiologic study, J Arthroplasty 17:206, 2002.
- Coventry MB, Upshaw JE, Riley LH, et al: Geometric total knee arthroplasty, I: conception, design, indications, and surgical technic, Clin Orthop Relat Res 94:171, 1973.
- Dennis DA, Komistek RD: Kinematics of mobile-bearing total knee arthroplasty, Instr Course Lect 54:207, 2005.
- Dennis DA, Komistek RD, Colwell CE Jr, et al: In vivo anteroposterior femorotibial translation of total knee arthroplasty: a multicenter analysis, Clin Orthop Relat Res 356:47, 1998.
- Dennis DA, Komistek RD, Hoff WA, et al: In vivo knee kinematics derived using an inverse perspective technique, Clin Orthop Relat Res 331:107, 1996.
- Dennis DA, Komistek RD, Mahfouz MR, et al: A multicenter analysis of axial femorotibial rotation after total knee arthroplasty, Clin Orthop Relat Res 428:180, 2004.
- Dennis DA, Komistek RD, Mahfouz MR, et al: Mobile-bearing total knee arthroplasty: do the polyethylene bearings rotate? Clin Orthop Relat Res 440:88, 2005.
- Dennis DA, Mahfouz MR, Komistek RD, et al: In vivo determination of normal and anterior cruciate ligament-defi cient knee kinematics, J Biomech 38:241, 2005.
- Dichiara JF, Vitolo J, Higham PA, et al: Detailed histologic evaluation of tissue ingrowth into retrieved non-cemented porous-coated implants, Trans Soc Biomater 10:15, 1987.
- D’Lima DD, Chen PC, Colwell CW Jr: Polyethylene contact stresses, articular congruity, and knee alignment, Clin Orthop Relat Res 392:232, 2001.
- D’Lima DD, Patil S, Steklov N, et al: The Chitranjan Ranawat Award: in vivo knee forces after total knee arthroplasty, Clin Orthop Relat Res 440:45, 2005.
- Donaldson WF III, Sculco TP, Insall JN, et al: Total condylar III knee prosthesis: long-term follow-up study, Clin Orthop Relat Res 226:21, 1988.
- Easley ME, Insall JN, Scuderi GR, et al: Primary constrained condylar knee arthroplasty for the arthritic valgus knee, Clin Orthop Relat Res 380:58, 2000.
- Engh GA, Ammeen DJ: Periprosthetic osteolysis with total knee arthroplasty, Instr Course Lect 50:391, 2001.
- Ezzet KA, Hermida JC, Colwell CW Jr, et al: Oxidized zirconium femoral components reduce polyethylene wear in a knee wear simulator, Clin Orthop Relat Res 428:120, 2004.
- Faris PM, Herbst SA, Ritter MA, et al: The effect of preoperative knee deformity on the initial results of cruciate-retaining total knee arthroplasty, J Arthroplasty 7:527, 1992.
- Feng E, Stulberg S, Wixson RL: Progressive subluxation and polyethylene wear in total knee replacements with fl at articular surfaces. Abstracts of the Knee Society Scientifi c meeting, San Francisco, 1993.
- Fergusson M: Excision of the knee joint: recovery with a false joint and a useful limb, Med Times Gaz 1:601, 1861.
- Figgie HE, Goldberg VM, Figgie MP, et al: The effect of alignment of the implant on fractures of the patella after condylar total knee arthroplasty, J Bone Joint Surg 71A:1031, 1989.
- Font-Rodriguez DE, Scuderi GR, Insall JN: Survivorship of cemented total knee arthroplasty, Clin Orthop Relat Res 345:79, 1997.
- Gioe TJ, Bowman KR: A randomized comparison of all-polyethylene and metal-backed tibial components, Clin Orthop Relat Res 380:108, 2000.
- Goodfellow J, O’Connor J: The anterior cruciate ligament in knee arthroplasty: a risk factor with unconstrained meniscal prostheses, Clin Orthop Relat Res 276:245, 1992.
- Goodfellow JW, O’Connor JJ, Murray DW: Principles of meniscal bearing arthroplasty for unicompartmental knee replacement. In Cartier P, ed: Unicompartmental knee arthroplasty, Paris, 1997, Expansion Scientifi que Francaise. Grood ES, Suntag WJ, Noyes FR, et al: Biomechanics of the knee-extension exercise, J Bone Joint Surg 66A:725, 1984.
- Gunston FH: Polycentric knee arthroplasty: prosthetic simulation of normal knee movement, J Bone Joint Surg 53B:272, 1971.
- Hofmann AA, Tkach TK, Evanich CJ, et al: Posterior stabilization in total knee arthroplasty with use of an ultracongruent polyethylene insert, J Arthroplasty 15:576, 2000.
- Hozack WJ, Rothman RH, Booth RE Jr, et al: The patellar clunk syndrome: a complication of posterior stabilized total knee arthroplasty, Clin Orthop Relat Res 241:203, 1989.
- Huberti HH, Hayes WC: Patellofemoral contact pressures: the infl uence of Q-angle and tendofemoral contact, J Bone Joint Surg 66A:715, 1984.
- Hungerford DS, Barry M: Biomechanics of the patellofemoral joint, Clin Orthop Relat Res 144:9, 1979.
- Hvid I: Trabecular bone strength at the knee, Clin Orthop Relat Res 227:210, 1988.
- Jeffery RS, Morris RW, Denham RA: Coronal alignment after total knee replacement, J Bone Joint Surg 73B:709, 1991.
- Jones RE, Barrack RL, Skedros J: Modular, mobile-bearing hinge total knee arthroplasty, Clin Orthop Relat Res 392:306, 2001.
- Jordan LR, Olivo JL, Voorhorst PE: Survivorship analysis of cementless meniscal bearing total knee arthroplasty, Clin Orthop Relat Res 338:119, 1997.
- Kaper BP, Smith PN, Bourne RB, et al: Medium-term results of a mobile bearing total knee replacement, Clin Orthop Relat Res 367:201, 1999.
- Kaper BP, Woolfrey M, Bourne RB: The effect of built-in external femoral rotation on patellofemoral tracking in the Genesis II total knee arthroplasty, J Arthroplasty 15:964, 2000.
- Karnezis IA, Vossinakis IC, Rex C, et al: Secondary patellar resurfacing in total knee arthroplasty: results of multivariate analysis in two case-matched groups, J Arthroplasty 18:993, 2003.
- Kelman GJ, Biden EN, Wyatt MP, et al: Gait laboratory analysis of a posterior cruciate–sparing total knee arthroplasty in stair ascent and descent, Clin Orthop Relat Res 248:21, 1989.
- Kettlekamp DB: Gait characteristics of the knee: normal, abnormal and postreconstruction. In American Academy of Orthopaedic Surgeons: Symposium on reconstructive surgery of the knee, St Louis, 1976, Mosby. Khaw FM, Kirk LM, Gress PT: Survival analysis of cemented Press-Fit Condylar total knee arthroplasty, J Arthroplasty 16:161, 2001.
- Landy M, Walker PS: Wear of ultra high molecular weight polyethylene components of 90 retrieved knee prostheses, J Arthroplasty 3(suppl):73, 1988.
- Laskin RS, Maruyama Y, Villaneuva M, et al: Deep-dish congruent tibial component use in total knee arthroplasty: a randomized prospective study, Clin Orthop Relat Res 380:36, 2000.
- Lewold S, Goodman S, Knutson K, et al: Oxford meniscal bearing knee versus the Marmor knee in unicompartmental arthroplasty for arthrosis: a Swedish multicenter survival study, J Arthroplasty 10:722, 1995.
- Li G, Papannagari R, Most E, et al: Anterior tibial post impingement in a posterior stabilized total knee arthroplasty, J Orthop Res 23:536, 2005.
- Li G, Zayontz S, Most E, et al: Cruciate-retaining and cruciatesubstituting total knee arthroplasty: an in vitro comparison of the kinematics under muscle loads, J Arthroplasty 16:150, 2001.
- L’Insalata JL, Stern SH, Insall JN: Total knee arthroplasty in elderly patients: comparison of tibial component designs, J Arthroplasty 7:261, 1992.
- Lotke PA, Ecker ML: Infl uence of positioning of prosthesis in total knee replacement, J Bone Joint Surg 59A:77, 1977.
- MacIntosh DL: Arthroplasty of the knee, J Bone Joint Surg 48B:179, 1966.
- Mahoney OM, Noble PC, Rhoads DD, et al: Posterior cruciate function following total knee arthroplasty, J Arthroplasty 9:569, 1994.
- Malkani AL, Rand JA, Bryan RS, et al: Total knee arthroplasty with the kinematic condylar prosthesis, J Bone Joint Surg 77A:423, 1995.
- Marmor L: Marmor modular knee in unicompartmental disease: minimum four-year follow-up, J Bone Joint Surg 61A:347, 1979.
- Marmor L: Unicompartmental arthroplasty of the knee with a minimum ten-year follow-up period, Clin Orthop Relat Res 228:171, 1988.
- Maruyama S, Yoshiya S, Matsui N, et al: Functional comparison of posterior cruciate–retaining versus posterior stabilized total knee arthroplasty, J Arthroplasty 19:349, 2004.
- Mayor MB, Collier JP: The histology of porous-coated knee prostheses, Orthop Trans 10:441, 1986.
- McGovern TF, Ammeen DJ, Collier JP, et al: Rapid polyethylene failure of unicondylar tibial components sterilized with gamma irradiation in air and implanted after a long shelf life, J Bone Joint Surg 84A:901, 2002.
- McKeever DC: Tibial plateau prosthesis, Clin Orthop 18:86, 1960.
- Meding JB, Ritter MA, Faris PM: Total knee arthroplasty with 4.4 mm of tibial polyethylene: 10-year followup, Clin Orthop Relat Res 388:112, 2001.
- Mitchell D, Friedman RJ, Baker JD III, et al: Prevention of thromboembolic disease following total knee arthroplasty. Epidural versus general anesthesia, Clin Orthop 269:109, 1991.
- Moreland JR: Mechanisms of failure in total knee arthroplasty, Clin Orthop Relat Res 226:49, 1988.
- Most E, Zayontz S, Li G, et al: Femoral rollback after cruciateretaining and stabilizing total knee arthroplasty, Clin Orthop Relat Res 410:101, 2003.
- Muoneke HE, Khan AM, Giannikas KA, et al: Secondary resurfacing of the patella for persistent anterior knee pain after primary knee arthroplasty, J Bone Joint Surg 85B:675, 2003.
- Nelissen RG, Hogendoorn PC: Retain or sacrifi ce the posterior cruciate ligament in total knee arthroplasty? A histopathological study of the cruciate ligament in osteoarthritic and rheumatoid disesase, J Clin Pathol 54:381, 2001.
- O’Rourke MR, Callaghan JJ, Goetz DD, et al: Osteolysis associated with a cemented modular posterior-cruciate-substituting total knee design: fi ve to eight-year follow-up, J Bone Joint Surg 84A:1362, 2002.
- Padgett DE, Stern SH, Insall JN:
You Might Also Like