Dissection for Latissimus Dorsi and Serratus Anterior Flap Transfer
Key Takeaway
The latissimus dorsi and serratus anterior flaps are workhorses in orthopaedic reconstructive surgery. This guide provides a step-by-step approach to their dissection, emphasizing vascular anatomy, pedicle preservation, and donor site management. By mastering the thoracodorsal and subscapular arterial axes, surgeons can achieve reliable soft tissue coverage and functional muscle transfers while minimizing donor site morbidity and preventing scapular winging.
INTRODUCTION TO THORACODORSAL-BASED FLAPS
The subscapular artery axis provides some of the most versatile and reliable soft tissue flaps in reconstructive orthopaedic surgery. Among these, the latissimus dorsi and the serratus anterior flaps remain the workhorses for the coverage of massive soft tissue defects, particularly in the lower extremity, and for functioning free muscle transfers in the upper extremity.
The shared vascular tree—arising from the subscapular artery, which bifurcates into the circumflex scapular artery and the thoracodorsal artery—allows for the harvest of these muscles independently or as a massive chimeric flap. Mastery of the axillary and thoracic anatomy is mandatory for the orthopaedic microsurgeon to ensure optimal pedicle length, minimize donor site morbidity, and prevent catastrophic denervation injuries to the shoulder girdle.
THE SERRATUS ANTERIOR FLAP
The serratus anterior free flap was first formally reported by Takayanagi and Tsukie in 1982. Originally described as a musculocutaneous flap utilizing the lower three muscular digitations based on the thoracodorsal artery, it was successfully employed to cover complex lower extremity defects.
Brody et al. subsequently delineated three major biomechanical and surgical advantages of the serratus anterior flap:
1. Low Donor Site Morbidity: Harvest of the lower digitations preserves scapular mechanics.
2. Easy Divisibility: The three separate muscular slips can be independently contoured to fit complex, multidimensional defects.
3. Durability and Adhesion: The muscle provides a highly stable, adherent resurfacing layer, which is particularly advantageous for restoring grasp in the hand or providing a non-shearing surface over lower extremity joints.
The serratus anterior is a relatively thin, flat muscle with a remarkably long vascular pedicle. It can be harvested through a concise midaxillary incision, making it an elegant solution for small-to-medium defects requiring thin, pliable coverage.
Vascular Anatomy and Innervation
The serratus anterior originates from the anterolateral surfaces of the first eight to nine ribs and inserts on the costal surface of the medial border of the scapula.
- Arterial Supply: The muscle possesses a dual blood supply. The upper six digitations are primarily vascularized by the lateral thoracic artery. However, the lower three to four digitations—the standard harvest territory—are reliably supplied by a consistently present anterior branch of the thoracodorsal artery.
- Pedicle Length: By dissecting proximally and preserving the subscapular artery (which typically measures 2 to 3 mm in external diameter), a vascular pedicle of up to 15 cm can be achieved.
- Innervation: The long thoracic nerve (of Bell), arising from the C5, C6, and C7 nerve roots, courses superficially along the serratus anterior fascia, positioned just anterior to the vascular pedicle. It provides motor innervation to all digitations.
🚨 SURGICAL WARNING: Scapular Winging
Removal of the lower three to four digitations does not cause winging of the scapula. However, iatrogenic injury to the proximal portion of the long thoracic nerve during pedicle dissection will result in profound scapular winging and shoulder dysfunction. Meticulous identification and protection of this nerve are paramount.
Surgical Technique: Serratus Anterior Harvest (Technique 63-18)
Patient Positioning and Preparation
- Position the patient in the lateral decubitus position, ensuring all pressure points are meticulously padded.
- Utilize an axillary roll to protect the contralateral brachial plexus.
- Prepare and drape the entire upper extremity free, along with the ipsilateral hemithorax, to allow for unrestricted manipulation of the arm during axillary dissection.
Incision and Exposure
- Make a linear incision along the midaxillary line, centered over the 6th through 10th ribs.
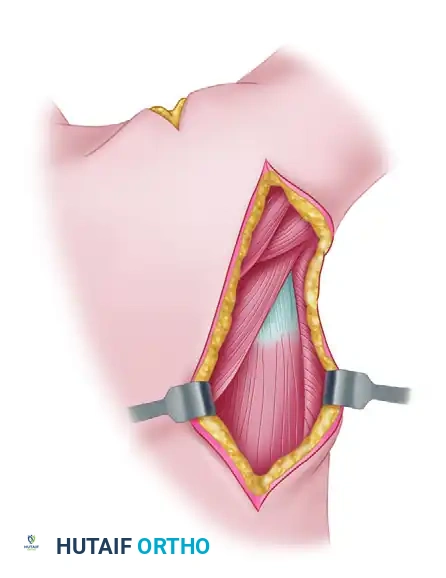
- Deepen the incision through the subcutaneous tissues, remaining anterior to the leading edge of the latissimus dorsi muscle.
- Retract the latissimus dorsi posteriorly to expose the underlying serratus anterior fascia.
Pedicle Identification and Muscle Harvest
- Identify the thoracodorsal artery and vein as they course along the deep surface of the latissimus dorsi.
- Trace the pedicle distally to identify the anterior branch of the thoracodorsal artery entering the lower digitations of the serratus anterior.
- Carefully identify the long thoracic nerve coursing longitudinally over the serratus fascia. Gently mobilize and retract the nerve away from the lower digitations.
- Divide the lower three digitations (typically the 6th, 7th, and 8th slips) at their costal origins using electrocautery.
- Elevate the slips from distal to proximal, ligating intercostal perforators.
- Divide the muscular insertions at the inferior angle of the scapula.
- Complete the pedicle dissection proximally to achieve the desired length, and divide the vessels once the recipient site is fully prepared.
DISSECTION FOR LATISSIMUS DORSI TRANSFER
The latissimus dorsi is a Mathes-Nahai Type V muscle flap, possessing a dominant vascular pedicle (the thoracodorsal artery) and secondary segmental pedicles (posterior intercostal and lumbar perforators). It is the largest muscle in the human body, offering massive surface area for coverage of extensive defects, such as those following severe open tibial fractures or massive oncologic resections.
Preoperative Planning and Skin Island Design
Although the entire muscle can be harvested as a free or pedicled flap, the inclusion of a skin paddle (musculocutaneous flap) requires careful planning.
- Skin Island Dimensions: Most of the skin overlying the latissimus dorsi can be transplanted. However, if primary closure of the donor site is desired, the skin island should be designed over the anteroinferior aspect of the muscle and limited to a maximum width of 10 to 12 cm.
- Alternative Coverage: For massive lower extremity defects requiring larger coverage, the muscle may be harvested without its overlying skin. Once transferred and revascularized, a split-thickness skin graft is applied directly to the muscle belly. This approach significantly reduces donor site morbidity and provides a highly contoured, aesthetic result at the recipient site.
Step-by-Step Surgical Dissection
1. Positioning and Marking
- Position the patient in the lateral decubitus position with the ipsilateral arm draped free. This allows the arm to be abducted and internally rotated, relaxing the muscle and opening the axilla.
- Draw a reference line along the anterior margin of the latissimus dorsi muscle, extending from the anterior margin of the posterior axillary fold down to the midportion of the iliac crest.
- Outline the planned skin island (if applicable) along this axis, preferably over the anteroinferior aspect.
2. Incision and Initial Exposure
- Make a curved incision extending from the axilla, following the anterior margin of the muscle, and incorporating the outline of the skin flap.
- If only a muscle flap is to be harvested, place the incision along a line 3 cm posterior to the anterior margin of the latissimus dorsi. This hides the scar more posteriorly and improves cosmesis.
- Deepen the incision through the subcutaneous tissue to identify the dorsal surface of the latissimus dorsi fascia.
💡 CLINICAL PEARL: Preventing Skin Shear
When harvesting a musculocutaneous flap, immediately suture the margins of the skin flap dermis to the underlying muscle fascia using interrupted absorbable sutures. This prevents shearing forces from avulsing the delicate musculocutaneous perforators during the extensive manipulation required for harvest.
3. Muscle Mobilization
- Identify the anterior border of the latissimus dorsi and separate it from the underlying serratus anterior muscle. The areolar plane between these two muscles is generally avascular and easily developed with blunt dissection.
- Proceed distally and separate the anterior margin of the muscle from the posterior iliac crest, distal to the skin island.
- Retract the muscle posteriorly and dissect deep to the muscle belly, moving medially toward the spine.
- Using bipolar cautery or surgical clips, systematically ligate or cauterize the segmental perforating vessels (intercostal and lumbar branches) entering the muscle medially.
4. Pedicle Dissection
- With the anterior margin and distal attachments mobilized, the muscle can be manipulated freely.
- Palpate the vascular pedicle proximally, near the humeral insertion, approximately 1 to 2 cm from the anterior margin of the muscle.
- Dissect carefully within the axillary fat pad to expose the thoracodorsal neurovascular bundle.
- Identify the nerve to the latissimus dorsi (thoracodorsal nerve), which accompanies the vascular pedicle.
- Identify and preserve the long thoracic nerve to the serratus anterior, which lies deep and anterior to the thoracodorsal pedicle.
🚧 PITFALL: Pedicle Avulsion
The thoracodorsal vein is thin-walled and highly susceptible to traction injury. When mobilizing the massive bulk of the latissimus dorsi, an assistant must support the weight of the muscle to prevent avulsion of the pedicle from the subscapular axis.
5. Maximizing Pedicle Length
- Dissect the pedicle proximal to the serratus anterior branch to obtain a standard pedicle length of 8 to 12 cm.
- Unless the serratus anterior is being included as a chimeric transfer, clamp, ligate, and divide the anterior branch to the serratus anterior.
- If maximal pedicle length is required (up to 15 cm), continue the dissection proximally. Identify, ligate, and divide the circumflex scapular branch. This allows the entire subscapular artery to be included as it arises from the axillary artery.
6. Final Release and Harvest
- After the neurovascular pedicle is fully dissected and protected, proceed with the dissection medially and superiorly, releasing the proximal aponeurotic attachments of the muscle to the chest wall and thoracic spine.
- Determine the exact amount of muscle required at the recipient site. Excise any redundant medial margin of the skin flap or muscle.
- Release the latissimus dorsi tendon at its insertion on the floor of the bicipital groove of the humerus.
- Crucial Step: Do not section the neurovascular pedicle until the recipient site (vessels and soft tissue bed) has been completely prepared and is ready for immediate anastomosis.
FUNCTIONING NEUROMUSCULAR TRANSFERS
The latissimus dorsi is frequently utilized as a functioning free muscle transfer for upper extremity reconstruction (e.g., restoration of elbow flexion or finger flexion following brachial plexus injury or severe Volkmann's ischemic contracture).
When a functioning muscle is required, the resting length of the muscle must be meticulously determined prior to detachment.
- Place marking sutures along the muscle belly at 5 cm intervals while the muscle is still at its physiological resting length in the donor site.
- Upon transfer to the recipient site, these markers are used to tension the muscle accurately. Over-tensioning leads to ischemia and fibrosis, while under-tensioning results in a profound loss of contractile excursion and weakness.
- The thoracodorsal nerve must be coapted to a robust recipient motor nerve (e.g., intercostal nerves, spinal accessory nerve, or a fascicle of the ulnar/median nerve) as close to the neuromuscular junction as possible to minimize reinnervation time.
POSTOPERATIVE PROTOCOL AND DONOR SITE MANAGEMENT
Meticulous closure of the donor site is critical to prevent the most common complication of latissimus dorsi harvest: donor site seroma.
Closure Techniques:
- If the skin defect is less than 10-12 cm, primary closure is usually achievable. Undermine the skin edges and perform a layered closure.
- Use heavy quilting sutures to tack the subcutaneous tissue down to the underlying chest wall fascia. This obliterates the massive dead space left by the muscle harvest.
- Place two large-bore closed-suction drains in the dependent portions of the axillary and dorsal dead spaces. These drains should remain in place until output is less than 30 cc per 24 hours (which may take 1 to 3 weeks).
- If primary closure is under excessive tension, do not hesitate to apply a split-thickness skin graft over the donor site defect to prevent wound dehiscence and secondary infection.
Rehabilitation:
- Shoulder mobilization can safely begin on the first postoperative day. Early passive and active-assisted range of motion prevents adhesive capsulitis of the shoulder.
- Because the teres major and pectoralis major muscles remain intact, patients rarely experience a clinically significant deficit in shoulder adduction or internal rotation, allowing for a rapid return to baseline activities of daily living.
📚 Medical References
You Might Also Like