Brand Tendon Transfer: ECRL and ECRB Techniques for Intrinsic Paralysis
Key Takeaway
The Brand tendon transfer utilizing the extensor carpi radialis longus or brevis is a cornerstone procedure for correcting the intrinsic minus claw hand. By routing a plantaris autograft volar to the deep transverse metacarpal ligament and attaching it to the lateral bands, this technique restores metacarpophalangeal flexion and interphalangeal extension. Precise tensioning and meticulous tunneling are critical to achieving optimal biomechanical outcomes and preventing postoperative deformities.
Introduction to Intrinsic Paralysis and the Brand Transfer
The intrinsic minus hand, classically presenting as a "claw hand" deformity, is a debilitating condition resulting from the loss of lumbrical and interosseous muscle function. Most commonly caused by ulnar nerve palsy, combined median and ulnar nerve lesions, or Hansen’s disease (leprosy), the deformity is characterized by hyperextension of the metacarpophalangeal (MCP) joints and flexion of the proximal and distal interphalangeal (PIP and DIP) joints.
To restore the delicate balance of the hand, Paul Brand popularized the use of wrist extensors—specifically the Extensor Carpi Radialis Brevis (ECRB) or Extensor Carpi Radialis Longus (ECRL)—as motor units. By utilizing a free tendon graft (typically the plantaris tendon) divided into multiple slips, the transfer mimics the anatomical path and biomechanical function of the native lumbricals. The grafts are routed volar to the deep transverse metacarpal ligament (DTML) to provide a primary flexion moment at the MCP joint and an extension moment at the IP joints via their insertion into the lateral bands of the extensor aponeurosis.
This comprehensive guide details the operative execution of the Brand tendon transfer, expanding upon the classical techniques for both ECRB and ECRL motors, with a strict focus on biomechanics, precise tunneling, and critical tensioning parameters.
Biomechanical Principles and Rationale
The primary goal of an intrinsic tendon transfer is to replace the flexion moment at the MCP joint. Once MCP hyperextension is prevented, the extrinsic extensor digitorum communis (EDC) can effectively extend the PIP and DIP joints.
💡 Clinical Pearl: The Bouvier Test
Before considering any intrinsic transfer, perform the Bouvier test. By passively blocking the MCP joints in slight flexion, observe if the patient can actively extend the IP joints using their extrinsic extensors. A positive Bouvier test indicates that the extrinsic extensor mechanism is intact and a simple MCP flexion block (like the Brand transfer) will successfully correct the clawing. If the test is negative, the IP joint extensor mechanism is attenuated, and a more complex reconstruction or joint arthrodesis may be required.
Motor Selection: ECRB vs. ECRL
- Extensor Carpi Radialis Brevis (ECRB): The ECRB is the primary central extensor of the wrist. Brand originally favored the ECRB because its central insertion (base of the third metacarpal) means its harvest does not induce a significant radial or ulnar deviation imbalance. However, sacrificing the ECRB can weaken absolute wrist extension strength.
- Extensor Carpi Radialis Longus (ECRL): The ECRL is a strong wrist extensor and radial deviator. Using the ECRL preserves the ECRB for central wrist extension and simultaneously eliminates a deforming radial deviation force, which is particularly advantageous in certain paralytic conditions.
Preoperative Evaluation and Preparation
Successful tendon transfer surgery demands meticulous preoperative optimization. The fundamental prerequisites for a successful Brand transfer include:
1. Supple Joints: All contractures must be resolved preoperatively through serial casting or surgical release. Tendon transfers cannot overcome fixed joint contractures.
2. Adequate Motor Strength: The selected motor tendon (ECRB or ECRL) must be Medical Research Council (MRC) Grade 5. A muscle will typically lose one grade of strength following transfer.
3. Tissue Equilibrium: The soft tissue envelope must be stable, with no active inflammation, edema, or progressive neurologic deficit.
Surgical Anatomy
- Plantaris Tendon: Present in approximately 80-85% of the population. It is harvested from the medial aspect of the Achilles tendon insertion and provides sufficient length to be doubled over, creating four distinct tails for the fingers.
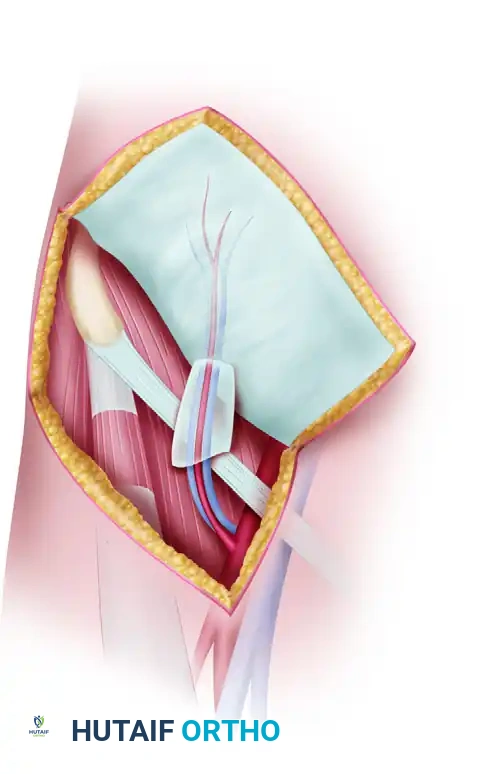
- Deep Transverse Metacarpal Ligament (DTML): A strong fascial band connecting the volar plates of the MCP joints. Routing the tendon grafts volar to the DTML is the most critical biomechanical step of this procedure, as it ensures the transfer acts as an MCP flexor.
- Lateral Bands: The tendinous slips of the intrinsic muscles that join the extensor mechanism dorsally to extend the PIP and DIP joints.
Surgical Technique: ECRB Motor with Dorsal Routing (Brand's Method)
Patient Positioning and Anesthesia
The patient is positioned supine with the operative arm extended on a radiolucent hand table. A well-padded pneumatic tourniquet is applied to the proximal arm. The procedure is typically performed under regional anesthesia (brachial plexus block) or general anesthesia. The ipsilateral lower extremity is prepped and draped for plantaris tendon harvest.
Phase 1: Plantaris Graft Harvest
- Make a small transverse incision on the medial aspect of the distal leg, just anterior to the Achilles tendon insertion.
- Identify the plantaris tendon, which lies medial and deep to the Achilles tendon.
- Using a Brand tendon stripper, harvest the tendon proximally to the musculotendinous junction.
- Divide the harvested graft in half, or double it upon itself, to create two robust grafts. These will later be split to form four individual slips. Place the grafts in a moist saline sponge.
⚠️ Surgical Warning: Graft Alternatives
If the plantaris tendon is absent, alternative graft sources must be utilized. The palmaris longus (if present and not paralyzed), a strip of fascia lata, or split extensor digitorum longus tendons from the toes are acceptable alternatives.
Phase 2: Motor Tendon Isolation (ECRB)
- Distal Incision: Make a short dorsal transverse incision over the base of the third metacarpal. Identify the insertion of the ECRB tendon and divide it sharply from the bone.
- Proximal Incision: Make a second transverse or longitudinal incision approximately 9.0 cm proximal to the first incision, over the dorsal forearm.
- Withdraw the ECRB tendon through the proximal incision. Ensure the muscle belly is adequately mobilized to allow for a straight line of pull.
Phase 3: Tendon Weaving and Preparation
- Split the distal end of the ECRB motor tendon along its natural longitudinal plane of cleavage. Spread the split ends to create a broad surface area.
- Take the prepared plantaris grafts and weave them through the split ECRB tendon using a Pulvertaft weave technique.
- Suture the grafts securely to the motor tendon using non-absorbable braided sutures (e.g., 3-0 or 4-0 polyester). Ensure the repair is smooth to prevent adhesions during excursion.
- Split the distal ends of each of the two plantaris grafts to form a total of four distinct slips or tails.
Phase 4: Distal Incisions and Tunneling
- Finger Incisions: Make a longitudinal dorsoulnar incision over the proximal phalanx of the index finger. For the long, ring, and little fingers, make longitudinal dorsoradial incisions. This specific placement mimics the natural insertion of the lumbricals (radial side for digits 3, 4, 5; the index finger often receives an ulnar insertion to prevent excessive radial deviation, though radial insertion is also common depending on the specific deficit).
- Subcutaneous Tunneling: Introduce a tendon-tunneling forceps at the distal forearm incision. Pass it subcutaneously to the proximal forearm incision, grasp the four tails of the graft, and pull them distally under the intact skin.
- Deep Palmar Tunneling: Identify the lumbrical tendon and the lateral band of the extensor aponeurosis in each finger incision.
- Pass the tendon-tunneling forceps from the finger incision, proximally through the palm, navigating through the appropriate interosseous space.
- Crucial Step: The forceps must pass to the volar side of the deep transverse metacarpal ligament (DTML) and then between the appropriate metacarpal shafts to retrieve the graft slip.
- Grasp one strand of the tendon graft and withdraw it distally into the finger. Repeat this process for all four digits.
🚨 Pitfall: Incorrect Routing
Routing the graft dorsal to the DTML is a catastrophic error. It will convert the transfer into an MCP extensor, exacerbating the claw deformity rather than correcting it. Always directly visualize or palpate the DTML to ensure volar routing.
Phase 5: Distal Fixation and Tensioning
- Once all four tendon grafts are in position at the proximal phalanges, prepare for fixation to the lateral bands.
- The 45-70-0 Tensioning Rule: The assistant must hold the hand in the exact position of tensioning:
- Wrist extended 45 degrees.
- Metacarpophalangeal (MCP) joints flexed 70 degrees.
- Interphalangeal (IP) joints held in neutral (0 degrees) extension.
- With the hand in this position, the transfers should be pulled until they are completely relaxed (zero tension), and then sutured to the dorsal expansion lateral band of each finger.
- Suturing Sequence: Suture the grafts one by one under equal tension. Begin with the index finger, proceed to the little finger, and finally secure the intermediate (long and ring) fingers. This sequence helps establish and balance the border digits before setting the central digits.
- Perform a tenodesis test by passively flexing and extending the wrist to ensure synchronous MCP flexion and IP extension.
- Close the wounds in layers and apply a bulky, well-padded light plaster cast maintaining the tensioning position.
Alternative Technique: ECRL Motor with Volar Routing
In cases where the ECRL is selected as the motor unit, Brand described an alternative routing pathway through the carpal tunnel. This volar approach provides a more direct line of pull for MCP flexion and avoids the potential for dorsal bowstringing over the wrist.
Rationale for Volar Routing
Routing the ECRL volarly through the carpal tunnel changes its function from a wrist extensor to a wrist flexor, while simultaneously acting as an MCP flexor. This is highly beneficial in high ulnar/median nerve palsies where wrist flexion power may be compromised.
Surgical Steps for ECRL Volar Transfer
- Motor Harvest: Through a dorsal transverse incision, free the insertion of the ECRL tendon at the base of the second metacarpal.
- Withdraw the ECRL tendon through a second incision at the middle of the dorsal forearm.
- Volar Transposition: Make an incision on the anterior (volar) aspect of the forearm, approximately 7.5 cm proximal to the wrist crease.
- Tunnel from the anterior incision, deep to the brachioradialis muscle, to the proximal dorsal incision. Draw the ECRL tendon into the anterior forearm incision.
- Graft Attachment: Suture the plantaris grafts to the ECRL motor tendon using the Pulvertaft weave described previously.
- Carpal Tunnel Routing: Make a midpalmar incision. Pass a tendon passer from the midpalmar incision, proximally through the carpal tunnel, into the volar forearm.
- Draw the four graft slips into the palm. Crucial: Ensure the bulky tendon junctions (the weave) remain proximal to the carpal tunnel to prevent median nerve compression or tendon triggering within the canal.
- Pass each strand of the graft separately to its respective finger destination, routing volar to the DTML, and suture to the lateral bands under the same tensioning parameters (45-70-0 rule) as the ECRB technique.
Postoperative Care and Rehabilitation Protocol
The success of the Brand tendon transfer relies as much on meticulous postoperative rehabilitation as it does on surgical execution. The protocol follows the modified Bunnell technique guidelines.
Phase 1: Immobilization (Weeks 0-4)
- The patient remains in the postoperative plaster cast for exactly 3.5 to 4 weeks.
- Cast Position: Wrist in 30-45 degrees of extension, MCP joints in 70-90 degrees of flexion, and IP joints in full extension. This position removes all tension from the healing tendon weaves and distal insertions.
- Elevation and strict edema control are mandatory.
Phase 2: Early Active Motion (Weeks 4-6)
- The cast is removed, and a thermoplastic dorsal blocking splint is fabricated. The splint maintains the wrist in slight extension and blocks MCP extension past 30 degrees, while allowing full IP motion.
- Active Exercises: The patient begins active MCP flexion and IP extension exercises. The therapist focuses on motor re-education, teaching the patient to fire the wrist extensor (ECRB/ECRL) to achieve finger intrinsic motion.
- Passive extension of the MCP joints is strictly prohibited to prevent stretching of the transfer.
Phase 3: Strengthening and Weaning (Weeks 6-12)
- At 6 weeks, the dorsal blocking splint is gradually weaned during the day but worn at night.
- Gentle passive stretching is introduced if MCP flexion contractures develop.
- Progressive resistive exercises are initiated. The patient practices grasping and pinching, integrating the new motor pattern into functional daily activities.
- Full unrestricted activity is typically permitted by 10 to 12 weeks postoperatively.
Complications and Surgical Pitfalls
- Swan Neck Deformity: This is the most common complication, resulting from over-tensioning the graft or inserting it too far distally on the lateral band. It causes excessive PIP extension and secondary DIP flexion. If this occurs, surgical revision to loosen the transfer or alter its insertion (e.g., to the proximal phalanx instead of the lateral band) may be required.
- Intrinsic Plus Deformity: Caused by severe over-tensioning, resulting in fixed MCP flexion and IP extension. Strict adherence to the 45-70-0 tensioning rule prevents this.
- Tendon Rupture or Attenuation: Usually occurs at the weave site or distal insertion due to premature mobilization or poor suture technique.
- Adhesions: Particularly common if the tendon junctions are placed within the carpal tunnel or tight interosseous spaces. Meticulous handling of the paratenon and early, controlled active motion mitigate this risk.
Conclusion
The Brand tendon transfer utilizing the ECRL or ECRB remains a highly reliable, biomechanically sound procedure for the correction of the intrinsic minus hand. By meticulously harvesting the motor and graft, routing the slips volar to the deep transverse metacarpal ligament, and adhering strictly to the 45-70-0 tensioning protocol, the orthopaedic surgeon can predictably restore functional grasp, eliminate the claw deformity, and significantly improve the patient's quality of life. Mastery of both the dorsal ECRB and volar ECRL routing techniques provides the surgeon with the necessary versatility to address varying patterns of paralytic hand deformities.
You Might Also Like