Microsurgical Treatment of Nerve Injuries: Operative Guide
Key Takeaway
Peripheral nerve injuries demand meticulous microsurgical techniques to restore motor and sensory function. This comprehensive guide details the principles of neurorrhaphy, including epineurial, perineurial, and epiperineurial repairs, alongside advanced interfascicular nerve grafting. By minimizing anastomotic tension and optimizing fascicular alignment, orthopedic surgeons can significantly enhance axonal regeneration and patient outcomes following complex traumatic nerve transections.
MICROSURGICAL TREATMENT OF PERIPHERAL NERVE INJURIES
The microsurgical reconstruction of peripheral nerve injuries represents one of the most technically demanding and biologically complex challenges in operative orthopaedics. Because anomalous innervations (such as Martin-Gruber or Riche-Cannieu anastomoses) are sufficiently common to produce profound confusion when evaluating postoperative nerve regeneration, a meticulous and detailed neurological examination of the extremity before surgery is paramount to accurately determine baseline motor and sensory deficits.
The ultimate success of peripheral neurorrhaphy is dictated by a multitude of intersecting variables. These include the nature of the wounding agent (sharp transection versus crush/avulsion), the longitudinal extent of the nerve injury, the presence of concomitant soft tissue or vascular injuries, the anatomical level of the injury (proximal injuries carry a poorer prognosis due to the distance regenerating axons must travel), the delay between injury and repair, the stability of the skeletal fixation, the choice of suture material, and the specific suturing technique employed.
Furthermore, the condition of the nerve ends at the time of coaptation, the age of the patient (neuroplasticity and regenerative capacity are significantly higher in pediatric populations), and the amount of tension at the suture anastomosis are critical determinants of success. Experimental evidence unequivocally demonstrates that tension across a nerve repair induces intraneural ischemia and subsequent fibrosis, which is the single most detrimental mechanical factor affecting the outcome of axonal regeneration.
Controversies in Nerve Repair Techniques
The orthopedic and microsurgical communities have long debated the relative advantages of epineurial versus perineurial (fascicular) repair, as well as the optimal timing (primary versus secondary repair) for injured nerves. Based on the foundational anatomical work of Sunderland regarding the internal fascicular topography within respective peripheral nerves, it is generally accepted that perineurial (fascicular) repairs are highly advantageous for nerves possessing relatively few, distinct fascicles. This principle applies directly to the digital nerves, the median and ulnar nerves at the level of the wrist and distally, and potentially the radial nerve at the elbow. For larger, polyfascicular nerves with complex internal plexuses, grouped fascicular or epiperineurial repairs are often indicated to prevent fascicular mismatch.
🔪 Clinical Pearl: The primary goal of any neurorrhaphy is the exact coaptation of corresponding motor and sensory fascicles without tension. Misalignment leads to axonal escape into the extraneural environment (neuroma formation) or cross-innervation, resulting in poor functional recovery.
SURGICAL TECHNIQUES FOR NEURORRHAPHY
Epineurial Neurorrhaphy (Technique 60-4)
Epineurial repair is the traditional standard for nerve coaptation, particularly useful in acute, sharp transections where the internal fascicular anatomy has not been significantly disrupted or scarred.
Surgical Steps:
* Exposure and Preparation: After the nerve has been exposed proximally and distally, utilize low magnification (6×) on the operating microscope or high-quality 3× to 5× magnifying loupes. Use fine microsurgical scissors to meticulously dissect and excise redundant areolar tissue from the epineurium proximally and distally. This prevents the interposition of connective tissue into the repair site.
* Debridement: Gently trim the nerve ends using a diamond knife or specialized nerve cutting forceps to identify healthy, pouting neural tissue (the "mushrooming" effect of axoplasm). Locate fascicles and groups of fascicles that reside in similar anatomical locations within the proximal and distal stumps.
* Rotational Alignment: Using the internal arrangement of the fascicles and the longitudinal vasa nervorum (small vessels on the surface of the epineurium), determine the correct rotational alignment of each end of the nerve.
* Contrast Enhancement: When suturing nerves, place a small piece of blue or green sterile plastic material (or balloon rubber) behind the nerve. This background significantly improves visual contrast, reducing eye fatigue and enhancing precision.
* Initial Suture Placement: Place a 9-0 monofilament nylon suture through the epineurium on the posterior (deep) surface of the nerve. Tie this stitch, or leave the ends untied and clamped with a micro-hemostat as a means of approximating the nerve ends and acting as a traction suture.
- Circumferential Coaptation: Place subsequent sutures circumferentially around the cut surface, attempting to align appropriately corresponding fascicles without directly suturing the fascicles themselves. Usually, 9-0 nylon is required to complete the structural repair, although 10-0 nylon can be utilized to supplement and fine-tune the coaptation between the primary structural sutures. A completely tension-free repair must be achieved with this technique to prevent ischemic fibrosis.
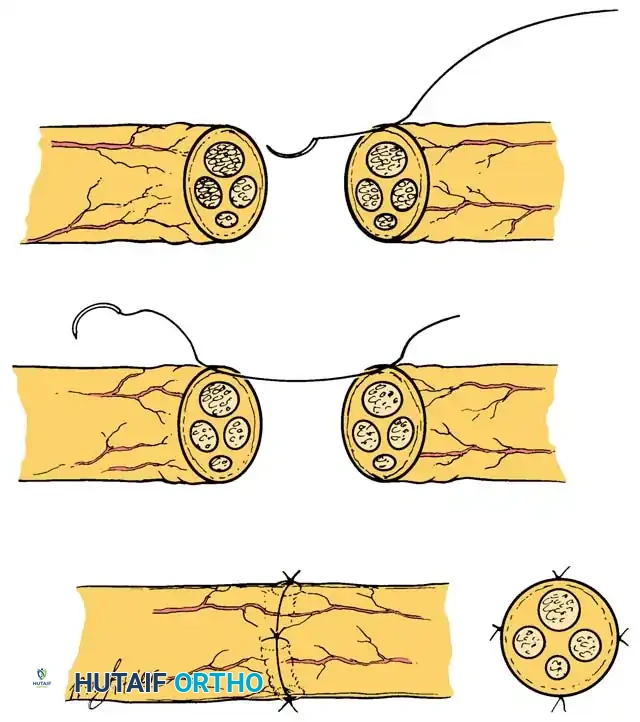
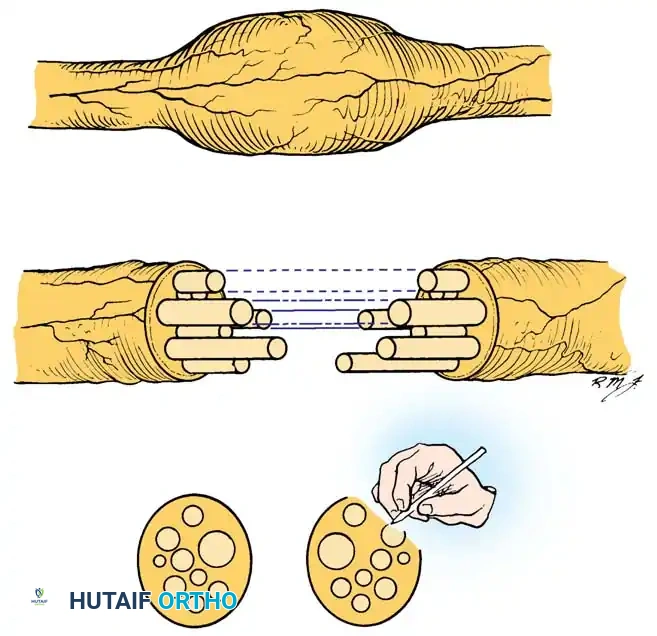
Perineurial (Fascicular) Neurorrhaphy (Technique 60-5)
Perineurial repair is indicated when precise matching of individual fascicles is required, particularly in distal nerves where motor and sensory fibers have segregated into distinct bundles.
Surgical Steps:
* Microscopic Dissection: Dissect the nerve proximally and distally using the operating microscope (6× to 10× magnification) or high-power magnifying loupes.
* Areolar Clearance: With sharp microsurgical scissors, remove redundant areolar tissue from the cut ends of the nerve.
* Epineuriectomy: Carefully excise the outer epineurium from the circumference of the cut ends of the nerve, as well as the internal epineurium surrounding the specific groups of fascicles. This exposes the perineurium of the individual fascicles.
* Fascicular Matching: Further dissection of the fascicles is facilitated by the operating microscope and the placement of a high-contrast background material. Attempt to meticulously match corresponding groups of fascicles proximally and distally based on size, topography, and intraoperative nerve stimulation if applicable.
* Tissue Hydration: Frequent irrigation of the operative field with balanced salt solution or Ringer's lactate is mandatory to prevent the desiccation of delicate neural tissues and to prevent adherence of the nerve to the background material.
* Fascicular Coaptation: After the fascicles have been matched and all intervening epineurium has been excised, repair the nerve by suturing the ends of the fascicles together. Utilize at least two 10-0 monofilament nylon sutures placed directly through the perineurium at 180 degrees to each other to ensure a secure, gap-free coaptation.
🚨 Surgical Warning: When passing the needle through the perineurium, extreme care must be taken to avoid piercing the endoneurial contents. Intrafascicular bleeding or suture material within the fascicle will cause severe scarring and block axonal regeneration.
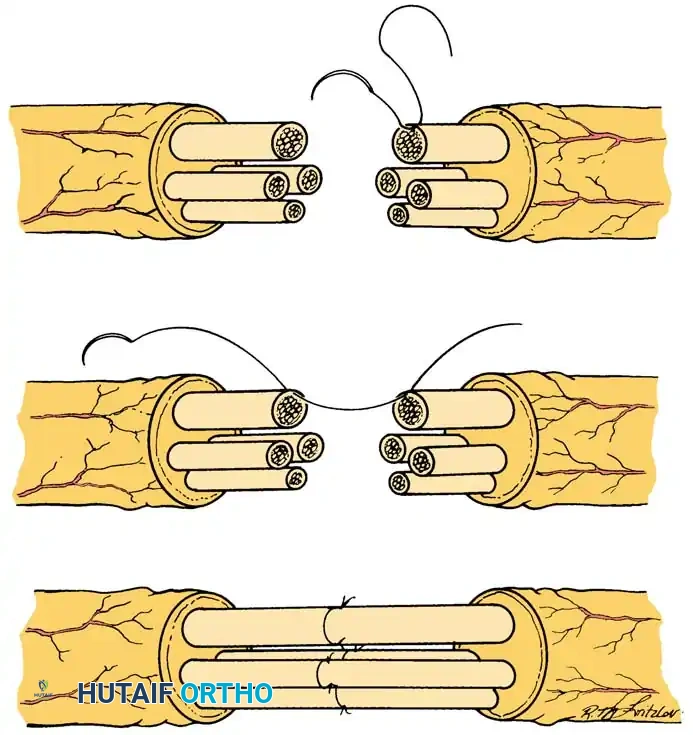
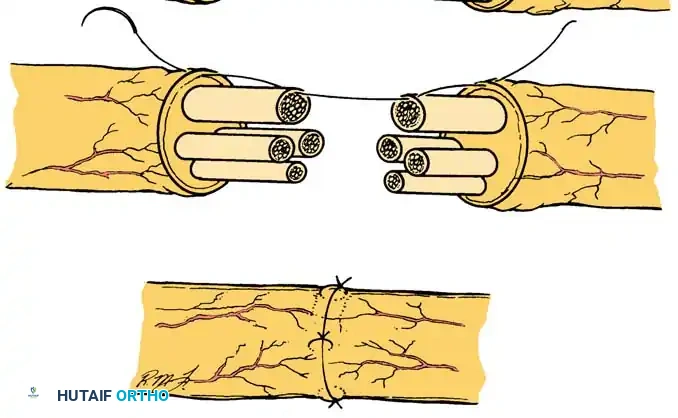
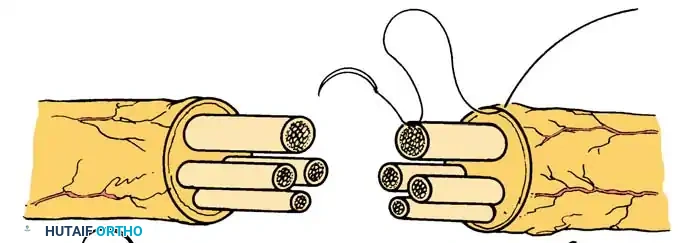
Epiperineurial Neurorrhaphy (Technique 60-6)
Epiperineurial neurorrhaphy is a hybrid technique that includes the repair of both the epineurium and the perineurium. It is highly useful in aligning large groups of fascicles in major mixed nerves (e.g., the sciatic or proximal median nerve) and may be technically easier when nerves have been incompletely transected. The epineurial sutures provide mechanical strength, while the perineurial sutures ensure precise fascicular alignment.
Surgical Steps:
* Preparation: After the nerve has been exposed and redundant scar or areolar tissue has been excised, match the large groups of fascicles proximally and distally.
* Central Fascicular Repair: Repair the individual fascicles or groups of fascicles located in the central portion of the nerve trunk first, utilizing 10-0 nylon suture through the perineurium.
* Peripheral Coaptation: Approximate the fascicles and the groups of fascicles that lie near the periphery of the nerve by placing 9-0 nylon sutures through the epineurium and simultaneously through the edge of the underlying perineurium. This "bite" secures the outer architecture while maintaining internal alignment.
- Drainage and Closure: If hemostasis is a concern, place small Silastic drains carefully so that they do not physically interfere with or compress the nerve repair site. Close the surgical wounds in layers.
POSTOPERATIVE REHABILITATION (PRIMARY REPAIRS)
The postoperative management of a primary nerve repair is as critical as the surgery itself. The goal is to protect the fragile anastomosis from tension while preventing debilitating joint contractures.
- Initial Immobilization: Bandages consist of a nonadherent, wide-mesh gauze placed directly adjacent to the wound, followed by soft gauze and cotton padding applied from the fingers to the elbow (for nerve repairs in the hand and wrist). A plaster splint is applied, usually on the dorsum of the hand, wrist, and forearm, to immobilize the limb in a position that minimizes tension on the repair.
- Early Phase (0-3 Weeks): The initial postoperative splinting is strictly maintained for 3 weeks. During this time, the patient is allowed minimal, highly supervised active movement of the finger joints strictly within the physical limits of the splint to prevent tendon adhesions. The wound is inspected, and skin sutures are removed between 7 to 14 days.
- Intermediate Phase (3-8 Weeks): After the first 3 weeks, the splint is changed. If the wrist was flexed (e.g., to protect a median nerve repair), it is gradually extended—first to neutral, and then to slight extension over the next 3 to 4 weeks. This gradual positioning prepares the wrist for effective functional finger and thumb movement. Between 4 to 8 weeks postoperatively, removable custom plastic splints are utilized for reliable, compliant patients.
- Late Phase (6-12+ Weeks): From 6 to 12 weeks after surgery, careful attention must be paid to the avoidance of fixed joint contractures. The patient is encouraged to stretch the thumb web passively. If a contracture begins to develop, a removable thumb web spacer splint is applied.
- Managing Intrinsic Paralysis: In patients with intrinsic muscle paralysis (e.g., ulnar nerve injury), passive stretching of the fingers is vital to prevent metacarpophalangeal (MCP) extension and proximal interphalangeal (PIP) flexion contractures. If these "claw" deformities become troublesome, a removable MCP extension-blocking splint (lumbrical bar) is highly effective.
- Strengthening and Sensory Reeducation: Eight to 12 weeks after surgery, progressive strengthening exercises are initiated. Clinical evaluations of motor and sensory return are conducted monthly. When the advancing Tinel sign, appreciation of constant and moving touch, and vibratory perception have progressed sufficiently distally, formal sensory reeducation programs (as advanced by Dellon, Curtis, and Edgerton) are initiated to maximize cortical reorganization and functional recovery.
ADVANCED INTERFASCICULAR NERVE GRAFTING
The secondary repair of nerve injuries is frequently complicated by the presence of a significant gap between the retracted ends of the nerve. Because of inherent nerve elasticity and fibrotic retraction, direct approximation of the nerve ends is often impossible without inducing severe tension.
To circumvent tension at the suture line, Millesi developed the revolutionary technique of interfascicular nerve grafting. This utilizes multiple segments of expendable cutaneous nerve grafts to bridge the defect, allowing for the precise alignment of corresponding fascicles between the proximal and distal nerve stumps. This technique requires advanced microsurgical experience and has been used successfully to bridge massive nerve gaps greater than 20 cm.
Primary Indications for Interfascicular Nerve Grafting:
1. The bridging of defects after segmental nerve injury when a primary neurorrhaphy cannot be performed without tension.
2. The transfer of nerves, such as an intercostal nerve transfer to the distal brachial plexus in avulsion injuries.
3. The innervation of free functioning muscle transfers (FFMT) by nerve grafts, and the connection of free neurovascular flaps to local recipient nerves.
(Note: While Taylor and Ham pioneered vascularized nerve grafts, this technique has not achieved widespread clinical application, as long-term functional results have generally proven to be no better than those achieved with meticulously performed free interfascicular grafts.)
Neuroma Dissection and Preparation (Technique 60-7)
Before a graft can be placed, the zone of injury must be radically resected back to healthy, viable fascicular tissue.
Surgical Steps:
* Exposure: In the hand and forearm, dissect the injured nerve in a completely bloodless field achieved with a pneumatic tourniquet. Utilize extensile skin incisions to allow wide exposure of the proximal neuroma and the distal glioma on the injured nerve stumps.
* Proximal Dissection: Incise the epineurium proximal to the neuroma in normal-appearing, healthy tissue on the proximal stump. Dissect distally toward the scarred neuroma.
* Fascicular Identification and Step-Cutting: Identify the major fascicle groups and follow them distally to the exact point at which they become obscured by dense intraneural scarring. At this junction, transect thin fascicle groups with sharp microscissors, and use a diamond knife for thicker fascicle groups. This meticulous resection results in a "step-cutting" geometry of the fascicle groups, maximizing the surface area for graft coaptation.
* Distal Dissection: After the interfascicular dissection and fascicle group transections have been completed, individual fascicle groups of varying lengths will protrude from the nerve stumps. If anatomically possible, expose the distal stump distally to the point where it divides into its final motor and sensory branches. Follow these fascicle groups proximally to the glioma end of the distal stump to accurately identify and segregate the motor and sensory fibers.
- Tourniquet Deflation: When both ends of the nerve have been adequately prepared and the exact length of the required nerve graft has been determined, deflate the tourniquet to ensure absolute hemostasis before grafting.
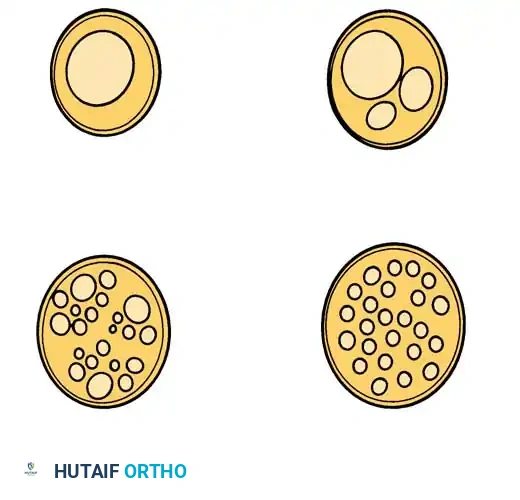
Understanding Fascicular Patterns
Millesi stressed the critical importance of recognizing that most cross-sections of peripheral nerves exhibit one of four distinct fascicular patterns. Understanding these patterns is essential for accurate graft mapping.
- Monofascicular nerves: A single, large fascicle.
- Oligofascicular nerves: A few large fascicles.
- Polyfascicular nerves with group arrangements: Multiple fascicles clustered into distinct functional groups.
- Polyfascicular nerves without group arrangements: A diffuse scattering of fascicles without clear grouping.
- Mapping the Defect: Make a detailed intraoperative sketch of the cross-sectional ends of the two nerve stumps and their respective fascicular patterns. Attempt to identify the corresponding groups in the distal stump by matching size, number of fascicles, and spatial arrangement with the proximal stump. Over short distances, this clinical estimation is highly accurate. However, due to the complex fascicular plexus formation within the nerve over longer distances, identifying corresponding groups in massive defects can be highly challenging.
Harvesting the Donor Nerve
Expendable sensory nerves utilized as donors include the sural nerve, the saphenous nerve, the medial and lateral antebrachial cutaneous nerves, the superficial branch of the radial nerve, and the intercostal nerves. The sural nerve is the most commonly utilized donor due to its length (up to 40 cm can be harvested), consistent anatomy, and favorable ratio of neural tissue to epineurial connective tissue.
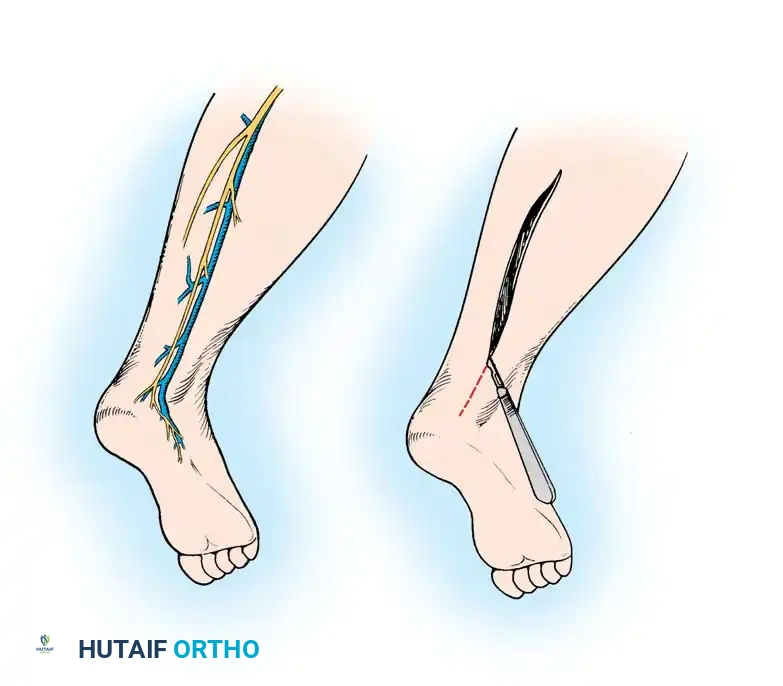
Sural Nerve Harvest Technique:
* Expose and dissect the sural nerve in a bloodless field using a pneumatic tourniquet on the lower extremity. The nerve is located posterolateral to the lateral malleolus, running adjacent to the lesser saphenous vein.
* Harvesting the nerve through a single, long longitudinal incision (rather than multiple step-incisions or a tendon stripper) facilitates the removal of the nerve with minimal traction trauma and allows for the safe identification and transection of its branches.
* After the dissection is complete, remove the tourniquet, obtain meticulous hemostasis, and close the leg wound.
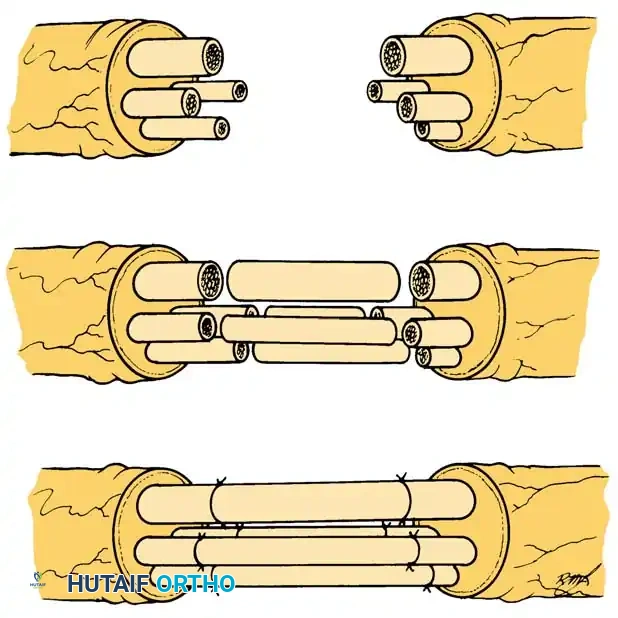
Graft Preparation and Inset
- Graft Handling: Keep the harvested nerve graft continuously moist with Ringer's solution. Never allow the graft to desiccate.
- Sizing the Graft: Using a diamond knife on a sterile wooden tongue depressor, cut the nerve graft into sections that are approximately 10% to 15% longer than the measured defect. This measurement must be taken with the adjacent joints (e.g., elbow and wrist) fully extended. This extra length compensates for the inevitable fibrotic shrinkage of the graft and allows for full joint excursion without placing tension on the coaptation sites.
- Graft Debridement: Prevent epineurial tissue from covering the ends of the graft by transecting the graft gently and cleanly. Excise any redundant epineurial and areolar tissue from the ends of the graft segments.
- Coaptation: Place the nerve grafts between the proximal and distal nerve stumps. Utilize your intraoperative sketch of the fascicle groups to determine exactly where to attach each graft segment at both ends.
- Suturing: Obtain exact, tension-free coaptation of the nerve graft to the corresponding fascicle groups. Suture the nerve graft at each end with a single 10-0 monofilament nylon suture placed through the epineurium of the graft and the perineurium of the recipient fascicle.
🔪 Clinical Pearl: Because the graft is placed entirely without tension, a single 10-0 suture at each coaptation site is often sufficient to maintain alignment. Excessive suturing increases foreign body reaction and scarring, which impedes axonal crossing.
POSTOPERATIVE REHABILITATION (NERVE GRAFTING)
The postoperative protocol following interfascicular nerve grafting differs slightly from primary repairs due to the absolute lack of tension on the anastomoses.
- Immobilization: The operated extremity is immobilized in a bulky, non-compressive splint for 8 to 10 days. This brief period allows for initial fibrin sealing and neovascularization of the free nerve grafts from the surrounding soft tissue bed.
- Wound Care: Hematomas must be evacuated early in the postoperative period, as blood breakdown products are highly neurotoxic and promote severe fibrosis. Any necrotic skin must be aggressively debrided. If a nerve graft becomes exposed, local rotational flaps or free tissue transfer must be utilized immediately to provide vascularized coverage; free skin grafts placed directly over a nerve graft will fail and lead to graft necrosis.
- Mobilization: After the initial 8 to 10 days, the splint is removed, and free, unrestricted motion of the adjacent joints is allowed. Because the grafts were cut 10-15% longer than the defect, joint motion will not place tension on the repair sites. Early motion prevents the grafts from adhering to the surrounding soft tissue bed.
- Physical Therapy: Formal physical therapy, incorporating active and active-assisted range-of-motion exercises, is instituted under strict supervision 2 weeks after nerve grafting.
- Monitoring Regeneration: The progress of axonal regeneration is monitored clinically by observing the advancement of the Tinel sign along the course of the grafted nerve. Axons typically cross the proximal coaptation site within 2-4 weeks and proceed distally at a rate of approximately 1 mm per day, though this rate slows as the axons cross the distal coaptation site and navigate the distal stump toward the end organs.
You Might Also Like
