Mastering Free Tissue Transfer: Surgical Dissection of the Groin and Anterolateral Thigh Flaps
Key Takeaway
The free groin flap and anterolateral thigh (ALT) flap are workhorse fasciocutaneous flaps for complex orthopaedic soft tissue reconstruction. Successful microvascular transfer requires meticulous preoperative Doppler mapping, precise dissection of the superficial circumflex iliac or lateral circumflex femoral vessels, and strategic flap elevation. This guide details the medial and lateral dissection approaches, vascular anatomy, and postoperative protocols essential for optimizing flap survival and minimizing donor site morbidity in reconstructive microsurgery.
INTRODUCTION TO ADVANCED SOFT TISSUE RECONSTRUCTION
The evolution of microvascular surgery has revolutionized the orthopaedic approach to complex soft tissue defects. When local or regional pedicled flaps are insufficient, free tissue transfer becomes the gold standard for limb salvage, osteomyelitis coverage, and trauma reconstruction. Among the myriad of available donor sites, the free groin flap and the anterolateral thigh (ALT) flap remain foundational techniques in the armamentarium of the reconstructive microsurgeon.
This comprehensive guide details the precise surgical anatomy, preoperative planning, and step-by-step dissection techniques required to successfully harvest and transfer these critical fasciocutaneous flaps. Mastery of these procedures demands a profound understanding of vascular topography, meticulous tissue handling, and rigorous postoperative protocols.
THE FREE GROIN FLAP: ANATOMY AND INDICATIONS
The free groin flap is a reliable, axial-pattern fasciocutaneous flap based on the superficial circumflex iliac artery (SCIA) and its accompanying venous system. Historically significant as one of the first successful free flaps, it remains highly relevant for upper and lower extremity reconstruction due to its primary closure capability and concealed donor site.
Vascular Anatomy and Biomechanics of Flap Survival
The arterial supply of the groin flap is derived from the SCIA, which typically originates from the medial or anterior aspect of the femoral artery, approximately 2 to 5 cm inferior to the inguinal ligament.
* Arterial Course: The SCIA courses laterally, parallel to the inguinal ligament, piercing the deep fascia near the lateral border of the sartorius muscle to enter the subcutaneous fat.
* Venous Drainage: Venous outflow is managed via the superficial circumflex iliac vein (SCIV) and the superficial inferior epigastric vein (SIEV), which drain into the saphenous bulb or directly into the femoral vein.
* Flap Dimensions: Groin flaps as large as 30 cm × 20 cm can be harvested. However, the biomechanics of perfusion dictate that the portion of the flap extending lateral to the anterior superior iliac spine (ASIS) functions as a random pattern flap.
Surgical Warning: For the random pattern portion of the groin flap (lateral to the ASIS), the length-to-base width ratio must strictly be 1.5 to 1 or less to prevent distal marginal necrosis.
Preoperative Planning and Templating
Before initiating the dissection, meticulous preoperative mapping is mandatory.
* Utilize an 8-MHz handheld Doppler probe to identify and trace the course of the SCIA.
* Using sterile paper, plastic sheeting, or a specialized template material, outline the exact dimensions of the recipient defect.
* Transfer this pattern to the inguinal region. The axis of the flap should generally parallel the inguinal ligament, centered directly over the Doppler-mapped course of the SCIA.
DISSECTION FOR FREE GROIN FLAP: SURGICAL APPROACHES
The approach to the vascular pedicle can be initiated from either the medial or the lateral end of the flap. While pioneers like Daniel, Taylor, Harii, and Ohmori favored a lateral-to-medial approach to avoid premature arterial injury, contemporary consensus (supported by O’Brien and Jackson) often favors the medial approach.
Starting medially allows the surgeon to immediately assess the suitability of the vascular trunk before committing to the full flap elevation. If the vessels are deemed unsuitable for microvascular anastomosis, the flap can still be salvaged as a pedicled groin flap for upper extremity defects.
The Medial Approach (Preferred for Vascular Assessment)
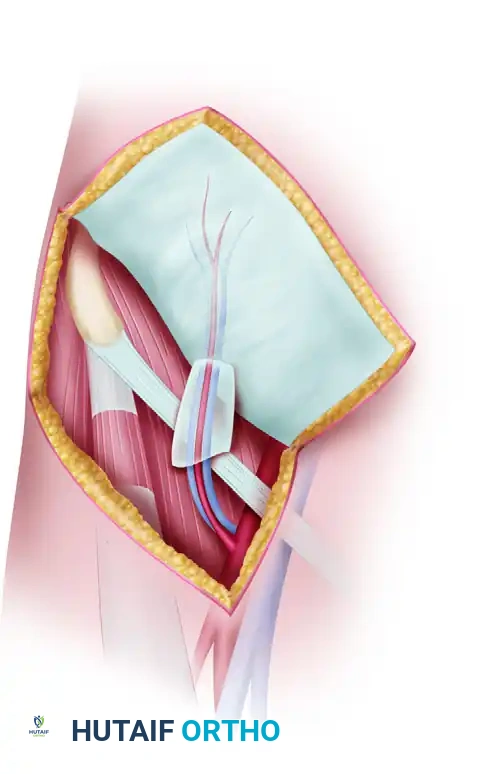
- Incision and Initial Exposure: Make a longitudinal incision directly over the femoral artery, centered approximately 5 cm inferior to the inguinal ligament.
- Vascular Identification: Employ gentle sharp and blunt dissection, staying strictly to the medial side of the femoral artery. Carefully observe for the SCIA arising from the medial or anterior aspect of the femoral artery.
- Venous Dissection: Concurrently identify the superficial venous system (SCIV and SIEV) and dissect them with atraumatic micro-forceps.
- Tracing the Pedicle: Follow the SCIA as it passes laterally. It is imperative to include the fascia overlying the sartorius muscle in the flap elevation.
- Fascial Inclusion: Continue tracing until the artery is visualized passing through the sartorius fascia into the subcutaneous fat near the muscle's lateral border. Before reaching this terminal point, incise the remaining outline of the cutaneous flap to permit adequate visualization of muscular landmarks.
Clinical Pearl (Jackson's Criteria): Jackson identified four specific anatomical variations that render the groin vascular trunk unsuitable for microvascular transfer: (1) Multiple small veins unsuitable for anastomosis; (2) A single, inadequate small vein; (3) Several small arteries with none large enough for anastomosis; and (4) One extremely narrow, vasospastic artery.
The Lateral Approach
When beginning the dissection from the lateral end, the primary goal is to elevate the flap rapidly while protecting the pedicle as it enters the deep surface.
- Incision: Incise the outlined margins of the flap, leaving a generous medial skin bridge intact. The axis remains centered 5 cm inferior to the inguinal ligament.
- Elevation: Dissect from lateral to medial in the subfascial plane. As you cross the lateral border of the sartorius, you must carry the deep fascia with the flap to protect the SCIA perforators.
- Pedicle Isolation: Once the vessels are reached, follow the SCIA across the femoral triangle, superficial to the iliacus muscle and the femoral nerve, until it joins the femoral artery.
- Venous Identification: Locate the superficial inferior epigastric vein (SIEV) on the anterior aspect of the femoral vein within the same anatomical triangle.
Flap Harvest and Microvascular Anastomosis
Regardless of the approach, once the vascular pedicle is isolated, the vessels must be evaluated for caliber and flow.
- Vasospasm Management: If arterial spasm is visually apparent, apply topical papaverine or 2% lidocaine (without epinephrine) directly to the adventitia to relieve it.
- Timing of Transection: Do not transect the pedicle until the recipient site is fully prepared, debrided, and the recipient vessels are isolated and ready for immediate anastomosis.
- Sequence of Transection: Transect the artery first. This allows the flap to utilize its remaining venous drainage to empty, reducing the risk of microvascular thrombosis from congestion. Subsequently, transect the veins.
- Securing the Pedicle: Apply micro-suture tags or small vascular clips to the vessel ends to prevent them from retracting into the subcutaneous tissue of the flap.
- Flap Inset: Transfer the free flap to the recipient defect. Orient the flap so that the pedicle aligns perfectly with the recipient vessels without kinking or tension. Place several anchoring sutures in the flap margins to prevent dislodgement during the delicate anastomosis.
- Anastomosis: Perform the arterial and venous anastomoses as promptly as possible to minimize ischemia time and avoid venous congestion.
Donor Site Closure and Postoperative Protocol
While the primary microsurgical team performs the anastomosis, a secondary team should close the groin donor defect.
* Closure: The donor site can usually be closed directly side-to-side. To minimize tension, extensively undermine the superior and inferior skin margins.
* Positioning: Flex the patient's hip to approximately 30-45 degrees to facilitate tension-free closure.
* Postoperative Care: The patient must be maintained in a hip-flexed posture for 5 to 7 days postoperatively. Following this initial period, gradual hip extension is initiated and progressively increased over the subsequent 7 to 10 days. Flap circulation is monitored hourly using clinical observation (color, capillary refill, turgor) and surface Doppler.
THE ANTEROLATERAL THIGH (ALT) FLAP
First described by Song et al. for the reconstruction of severe burn contractures of the head and neck, the Anterolateral Thigh (ALT) flap has evolved into a premier workhorse flap in orthopaedic trauma and hand reconstruction.
Advantages and Limitations
The ALT flap is a highly reliable fasciocutaneous flap (with a reported 0% failure rate in early foundational series of hand reconstructions).
* Advantages:
* Massive potential surface area (up to 800 cm²).
* Exceptionally long vascular pedicle (up to 15 cm).
* Can be utilized as a "flow-through" flap to simultaneously revascularize a distal ischemic limb or digit.
* Potentially sensate if the lateral femoral cutaneous nerve (LFCN) is harvested with the flap, making it ideal for weight-bearing areas of the foot (as described by Maamoon).
* Disadvantages:
* The flap can be excessively thick in certain demographics. However, elevating it purely as a fascial flap and applying a split-thickness skin graft can obviate this issue.
* Dissection can be technically demanding if the perforators take an intramuscular course through the vastus lateralis rather than a septocutaneous route.
* Contraindications: It is generally considered unsuitable for highly obese patients (particularly females with significant thigh adiposity) and in men with extremely hirsute thighs, unless specifically planned for fascial harvest.
Vascular Anatomy of the ALT Flap
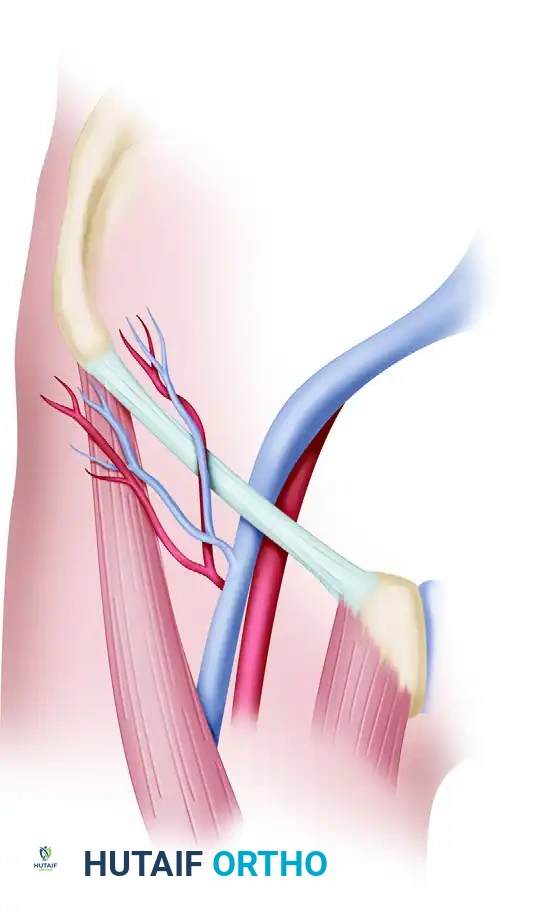
The free ALT flap is axially supplied by the descending branch of the lateral circumflex femoral artery (LCFA).
* Arterial Course: The descending branch courses distally in the intermuscular space between the rectus femoris and the vastus lateralis. It boasts a robust internal diameter, typically greater than 3 mm.
* Perforator Anatomy: After giving off major motor branches to the rectus femoris, the descending branch provides cutaneous perforators. These perforators reach the skin either by passing directly through the intermuscular septum (septocutaneous) or by piercing the anterior 4 cm of the vastus lateralis muscle (musculocutaneous).
* Anatomical Variations: Kimata et al. demonstrated in a study of 74 patients that perforators were entirely absent in 5.4% of cases, while musculocutaneous perforators (requiring intramuscular dissection) were present in 81.9% of cases.
* Key Landmark: The largest and most reliable perforator typically reaches the deep fascia at a specific topographic point: 2 cm lateral and 2 cm distal to the exact midpoint of a line drawn between the ASIS and the superolateral border of the patella.
* Venous and Neural Anatomy: Venous drainage is facilitated by one or two robust venae comitantes that accompany the descending branch of the LCFA. Motor nerve branches to the vastus lateralis run intimately with the vascular pedicle and must be meticulously preserved during dissection to prevent donor site morbidity.
Surgical Technique: ALT Flap Harvest (Javaid and Cormack)
🔪 Surgical Technique 63-14: ALT Flap Planning and Dissection
Phase 1: Preoperative Mapping and Flap Planning
* Prior to surgery, utilize an 8-MHz handheld Doppler transducer to precisely detect and mark the location of all cutaneous perforators along the ASIS-patella axis.
* In the operating theater, thoroughly debride the recipient defect and expose the potential recipient artery and vein outside the zone of injury.
* Design the surgical incision connecting the defect to the anastomosis site.
* Pitfall Avoidance: Strictly avoid tunneling the vascular pedicle under intact skin bridges. Postoperative edema can cause these skin bridges to tighten, leading to catastrophic compression of the vascular pedicle. Always use an open incision or a very loose, wide tunnel.
* Create a precise paper or plastic pattern covering both the primary defect and the anastomosis site. This will dictate whether the flap and its pedicle require a "tadpole" (narrow proximal extension) or "mushroom" (wide distal paddle with a narrow stalk) configuration.
Phase 2: Flap Elevation and Perforator Dissection
* Make the initial incision along the medial border of the designed flap. Incise through the skin, subcutaneous tissue, and deep fascia to expose the rectus femoris muscle.
* Retract the rectus femoris medially to expose the intermuscular septum between it and the vastus lateralis.
* Identify the descending branch of the LCFA within this space.
* Carefully trace the pre-marked perforators down to the main descending branch. If the perforators are septocutaneous, the dissection is rapid. If they are musculocutaneous (approx. 82% of cases), you must perform a meticulous intramuscular dissection.
* Intramuscular Dissection: Unroof the perforator by longitudinally splitting the vastus lateralis muscle fibers overlying the vessel. Ligate all small muscular side branches with micro-clips or bipolar electrocautery to free the perforator down to the main LCFA trunk.
* Preserve the motor branches of the femoral nerve innervating the vastus lateralis, which often cross the vascular pedicle.
* Once the pedicle is fully mobilized to the required length (up to 15 cm), complete the lateral and distal skin incisions.
* Ligate the distal continuation of the descending branch of the LCFA.
* Allow the flap to perfuse in situ while final preparations are made at the recipient site.
* Transect the pedicle, transfer the flap, and perform the microvascular anastomoses following standard microsurgical principles.
Postoperative Care and Monitoring
Postoperative management of the ALT flap requires admission to a specialized microsurgery unit. The limb should be elevated to promote venous return. Continuous or hourly monitoring using clinical parameters (temperature, color, capillary refill) and implantable or surface Doppler is critical for the first 72 hours. Any signs of venous congestion (bluish discoloration, brisk capillary refill, dark bleeding on pinprick) or arterial insufficiency (pallor, sluggish refill, loss of Doppler signal) mandate immediate return to the operating theater for pedicle exploration.
You Might Also Like