Anterolateral Thigh & Scapular Flaps: Surgical Techniques
Key Takeaway
The anterolateral thigh (ALT) and scapular flaps are workhorse options in orthopaedic reconstructive surgery. The ALT flap, based on the descending branch of the lateral circumflex femoral artery, offers massive, versatile soft-tissue coverage. Conversely, the scapular flap utilizes the circumflex scapular arterial system, providing thin, pliable tissue ideal for smaller defects. This guide details the precise vascular anatomy, step-by-step surgical dissection, and donor site management for both critical reconstructive procedures.
INTRODUCTION TO ADVANCED SOFT TISSUE RECONSTRUCTION
The evolution of orthopaedic microsurgery has established free tissue transfer as a cornerstone in the management of complex musculoskeletal defects. Among the myriad of available donor sites, the Anterolateral Thigh (ALT) flap and the Scapular/Parascapular flaps represent two of the most versatile and reliable options in the reconstructive armamentarium.
The ALT flap, a fasciocutaneous or myocutaneous workhorse, provides massive amounts of pliable tissue with a long, robust vascular pedicle, making it ideal for extensive extremity trauma, tumor resection beds, and chronic osteomyelitis coverage. Conversely, the scapular and parascapular flaps, based on the circumflex scapular arterial system, offer thin, hairless skin with minimal functional donor site morbidity, perfectly suited for smaller, contour-specific defects.
This comprehensive guide details the precise vascular anatomy, preoperative planning, step-by-step surgical dissection, and postoperative management required to successfully harvest these critical flaps.
THE ANTEROLATERAL THIGH (ALT) FLAP
The anterolateral thigh flap is widely considered the ideal soft-tissue flap due to its remarkable versatility. It can be harvested as a purely cutaneous, fasciocutaneous, or chimeric myocutaneous flap (incorporating portions of the vastus lateralis). Its long pedicle and large caliber vessels facilitate straightforward microvascular anastomosis.
Vascular Anatomy and Biomechanics
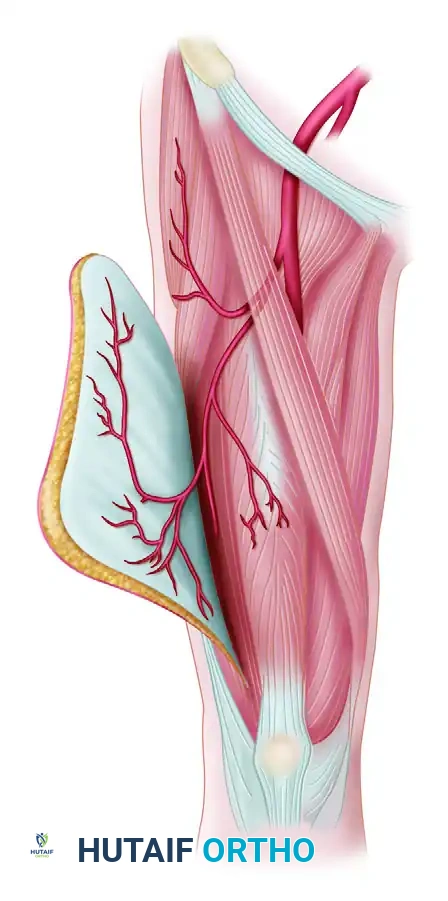
The ALT flap is perfused by perforators arising from the descending branch of the lateral circumflex femoral artery (LCFA). The LCFA is a major branch of the profunda femoris artery.
As the descending branch courses distally in the intermuscular septum between the rectus femoris and the vastus lateralis, it gives off several perforators to the overlying skin. These perforators are anatomically categorized into two types:
* Septocutaneous Perforators: Traveling directly through the intermuscular septum to the skin without traversing muscle tissue.
* Musculocutaneous Perforators: Piercing the vastus lateralis muscle before reaching the skin. These require meticulous intramuscular dissection to free the vessels without inducing vasospasm.
Surgical Warning: The descending branch of the LCFA also provides the primary arterial supply to the rectus femoris muscle. During proximal pedicle dissection, it is imperative to identify and preserve the specific arterial branch and venous drainage supplying the rectus femoris to prevent devastating ischemic necrosis of this critical extensor muscle.
Preoperative Planning and Patient Positioning
Preoperative mapping of the perforators using handheld Doppler ultrasound or CT angiography is highly recommended to confirm the presence and location of dominant perforating vessels.
- Positioning: The patient is placed in the supine position. The entire lower extremity from the iliac crest to the toes is prepped and draped free to allow for circumferential manipulation of the limb.
- Tourniquet Application: A sterile Esmarch tourniquet is utilized to exsanguinate the limb and provide a bloodless surgical field.
- Steinmann Pin Technique: Because the proximal thigh is conical, a standard pneumatic tourniquet often rolls distally or impedes the proximal dissection. To circumvent this, a sterile Steinmann pin is driven into the anterior superior iliac spine (ASIS). The Esmarch tourniquet is then wrapped tightly around the proximal thigh and secured directly to the Steinmann pin, anchoring it securely out of the operative field.
Skin Marking and Flap Design
Accurate skin marking is the foundation of a successful ALT flap harvest. The design is centered around the anticipated location of the primary perforators.
- Draw a straight line connecting the Anterior Superior Iliac Spine (ASIS) to the superior lateral border of the patella. This line approximates the intermuscular septum between the rectus femoris and vastus lateralis.
- Identify the midpoint of this line.
- The main septocutaneous or musculocutaneous perforating artery is reliably found approximately 2 cm inferior and 2 cm lateral to this midpoint.
- Place a paper or sterile template pattern on the thigh, centering it over the principal perforator and orienting it to achieve the required configuration for the recipient site defect.
Step-by-Step Surgical Dissection
1. Initial Incision and Medial Elevation
Begin the flap elevation at its medial edge. Incise through the skin, subcutaneous tissue, and deep fascia (fascia lata) down to the epimysium of the rectus femoris.
During this superficial dissection, the lateral femoral cutaneous nerve will be encountered in its downward course from the ASIS.
* If a standard fasciocutaneous flap is required, carefully dissect the nerve free from the anterior margin of the flap and preserve it to prevent lateral thigh numbness.
* If a sensate (neurosensory) flap is planned for the recipient site, the nerve should be deliberately included within the flap substance and divided proximally for later coaptation.
2. Septal Exploration
Elevate the medial aspect of the flap laterally to expose the intermuscular septum between the rectus femoris and the vastus lateralis. Retract the rectus femoris medially to open the septal space. Explore this space meticulously to identify the descending branch of the LCFA and its venae comitantes.
3. Perforator Identification and Dissection
Continue exploration until the perforating vessels (either septocutaneous or musculocutaneous) arising from the descending branch are visualized.
* Septocutaneous Perforators: If present, these are easily traced down to the main descending branch.
* Musculocutaneous Perforators: If no septocutaneous perforators are present, carefully unroof the vastus lateralis muscle. Dissect the perforators out from the anterior part of the vastus lateralis as they pass through the muscle belly on their way to the skin. Use bipolar electrocautery and fine tenotomy scissors to divide small muscular side branches.
* Accessory Perforators: If accessory perforators are found arising above or below the main perforator, preserve two or more if possible. This increases the vascular connecting points between the flap and its pedicle, ensuring robust perfusion for larger flap designs.
* Ligate and divide any branches to the muscle that do not pass through to supply the skin flap.
4. Flap Isolation
Once the vascular supply to the flap is definitively ensured and the perforators are safely dissected down to the main descending branch, incise the posterior, lateral, and distal margins of the flap. Elevate the lateral portion of the flap in a subfascial plane toward the septum.
5. Pedicle Development
Remove the Esmarch tourniquet to assess flap perfusion. If a longer pedicle or a "tadpole" flap configuration is required, develop the pedicle further proximally. This may require a proximal skin extension incision.
Pitfall: Do not carry the dissection of the pedicle above the point where the arterial branch to the rectus femoris arises. At approximately this level, the venae comitantes of the descending branch may unite to form a single vein before joining with veins from the rectus femoris. Compromising this junction risks devascularizing the rectus femoris.
6. Donor Site Closure
The ability to close the donor site primarily depends on the width of the harvested flap. Generally, defects narrower than 8 cm can be closed primarily.
* If primary closure is impossible (partly because the harvest of deep fascia allows the vastus lateralis to bulge), advance the skin edges and suture them directly to the underlying muscle to reduce the overall size of the defect.
* Cover the remaining exposed muscle with a meshed split-thickness skin graft (STSG) harvested from the medial aspect of the ipsilateral thigh.
THE SCAPULAR AND PARASCAPULAR FLAPS
Cutaneous flaps based on the circumflex scapular arterial system include the cutaneous scapular flap (oriented transversely) and the cutaneous parascapular flap (oriented longitudinally).
The scapular flap is considered a highly versatile cutaneous flap capable of covering defects measuring up to 10 × 16 cm. Its primary advantages include negligible functional donor site morbidity, a long and constant pedicle (4 to 9 cm), and thin, hairless skin that provides excellent contouring for distal extremity or head and neck reconstruction.
Disadvantages:
* Lack of a reliable cutaneous nerve, precluding its use as an innervated (sensate) flap.
* The tendency for the donor site scar on the back to widen and spread over time due to multidirectional tension, which may limit its cosmetic acceptability, particularly in female patients.
* The hilum of the flap near the pedicle base can occasionally be bulky.
Vascular Anatomy
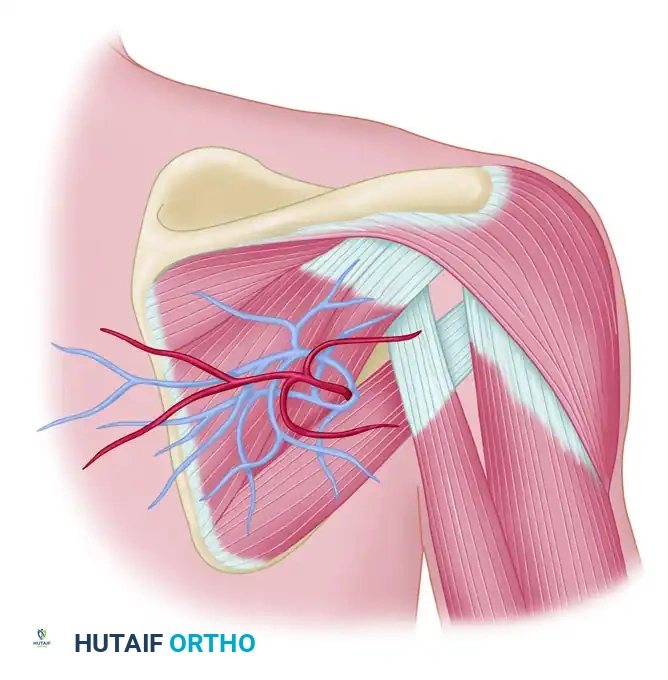
The cutaneous scapular and parascapular flaps receive their circulation through the circumflex scapular artery and its accompanying veins.
The circumflex scapular artery is a major branch of the subscapular artery (which arises from the third part of the axillary artery). As the circumflex scapular artery courses posteriorly, it gives off several terminal branches:
1. Superior Branches: Supply portions of the supraspinatus and infraspinatus muscles.
2. Infrascapular Branch: Supplies the muscles and skin down to the inferior angle of the scapula.
3. Descending Branch (Parascapular Artery): Continues inferiorly along the lateral border of the latissimus dorsi muscle. This forms the axis of the parascapular flap.
4. Transverse Branch (Cutaneous Scapular Artery): Courses transversely across the scapula. This forms the axis of the scapular flap.
The Triangular Space:
The cutaneous scapular artery and its two accompanying venae comitantes exit the axilla to reach the posterior thorax through a critical anatomical window known as the triangular space. This space is formed by:
* Superiorly: Teres minor muscle
* Inferiorly: Teres major muscle
* Laterally: Long head of the triceps brachii muscle
Preoperative Planning and Patient Positioning
- Positioning: The patient is typically placed in the lateral decubitus position (if simultaneous access to an extremity recipient site is required) or the prone position. The ipsilateral arm is prepped and draped free to allow for shoulder abduction and rotation, which facilitates access to the axilla and triangular space.
- Marking:
- Palpate and mark the spine of the scapula, the inferior angle, and the lateral border of the scapula.
- Identify the triangular space by palpating the muscular interval between the teres major and minor, approximately one-third of the way down the lateral border of the scapula.
- Use a handheld Doppler to locate the emergence of the circumflex scapular artery at the triangular space.
- For a Scapular Flap, draw a transverse ellipse centered over the transverse branch, staying superficial to the inferior two-thirds of the scapula.
- For a Parascapular Flap, draw a longitudinal ellipse centered over the descending branch, paralleling the lateral border of the latissimus dorsi.
Step-by-Step Surgical Dissection
1. Incision and Flap Elevation
Begin the incision at the distal/medial aspect of the designed flap (furthest from the triangular space). Incise through the skin and thick subcutaneous tissue of the back down to the deep muscular fascia overlying the infraspinatus (for scapular flaps) or latissimus dorsi (for parascapular flaps).
Elevate the flap in a subfascial plane, proceeding from medial to lateral (or inferior to superior for parascapular flaps). The dissection is generally rapid and avascular in this plane.
2. Identification of the Pedicle
As the elevation approaches the lateral border of the scapula, proceed with extreme caution. The deep fascia will begin to tether at the muscular intervals.
Identify the triangular space. Retract the teres minor superiorly and the teres major inferiorly. The transverse cutaneous branch (or descending branch) will be visualized emerging from this space, accompanied by two venae comitantes.
3. Pedicle Dissection
To achieve maximum pedicle length (up to 9 cm), the dissection must proceed into the triangular space and toward the axilla.
* Carefully dissect the circumflex scapular artery and veins free from the surrounding areolar tissue.
* Identify and ligate the muscular branches supplying the teres major, teres minor, and infraspinatus to mobilize the pedicle.
* If further length is required, the circumflex scapular artery can be traced back to its origin at the subscapular artery, though this requires deeper axillary dissection and potential division of the thoracodorsal artery (which would devascularize a subsequent latissimus dorsi flap).
Clinical Pearl: When dissecting within the triangular space, maintain meticulous hemostasis. The venae comitantes are thin-walled and easily injured. Bipolar electrocautery and fine right-angle clamps are essential for ligating the muscular side branches safely.
4. Flap Harvest and Donor Site Closure
Once the pedicle is fully mobilized and the recipient site is prepared, ligate the pedicle proximally and transfer the flap.
The donor site of a scapular or parascapular flap can almost always be closed primarily, provided the flap width does not exceed 10 to 12 cm.
* Undermine the surrounding skin edges widely over the latissimus dorsi and trapezius to mobilize the tissue.
* Perform a layered closure over a closed suction drain. Use heavy, slow-absorbing sutures for the deep dermal layer to mitigate the high tension across the back, which is the primary cause of postoperative scar widening.
POSTOPERATIVE PROTOCOLS AND FLAP MONITORING
Successful microvascular free tissue transfer relies heavily on rigorous postoperative care.
- Flap Monitoring: The flap must be monitored clinically (color, capillary refill, temperature, and turgor) every hour for the first 24 to 48 hours, and then every 2 to 4 hours for the subsequent 3 days. Implantable venous Doppler probes or tissue oximetry (ViOptix) can provide continuous objective monitoring.
- Positioning: The patient must be positioned to avoid any direct pressure or sheer forces on the flap or the pedicle. For scapular flaps, the patient must remain in a lateral or supine position, avoiding the prone position.
- Anticoagulation: Protocols vary by institution, but a common regimen includes subcutaneous low-molecular-weight heparin (LMWH) for deep vein thrombosis prophylaxis, and daily aspirin (81 mg) to prevent microvascular thrombosis.
- Donor Site Care:
- ALT Flap: If an STSG was used, the bolster dressing is removed at 5 to 7 days. Early mobilization of the knee is encouraged to prevent quadriceps tethering and stiffness.
- Scapular Flap: Drains are removed when output is less than 30 cc over 24 hours. Shoulder range of motion is typically restricted (no active abduction or flexion past 90 degrees) for 2 to 3 weeks to minimize tension on the dorsal closure and prevent seroma formation.
You Might Also Like