Combined Cleft Closure and Thumb Adduction Contracture Release
Key Takeaway
The combined cleft closure and release of thumb adduction contracture is a complex reconstructive procedure for congenital cleft hand. Utilizing techniques like the Snow and Littler or Miura and Komada methods, surgeons transpose the index ray to the third metacarpal while simultaneously releasing the adducted thumb. This comprehensive guide details flap design, soft tissue release, metacarpal osteotomy, and postoperative protocols to optimize functional and aesthetic outcomes.
Introduction to Cleft Hand Pathoanatomy
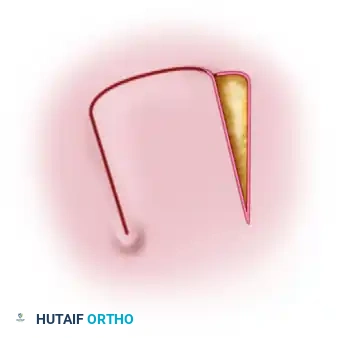
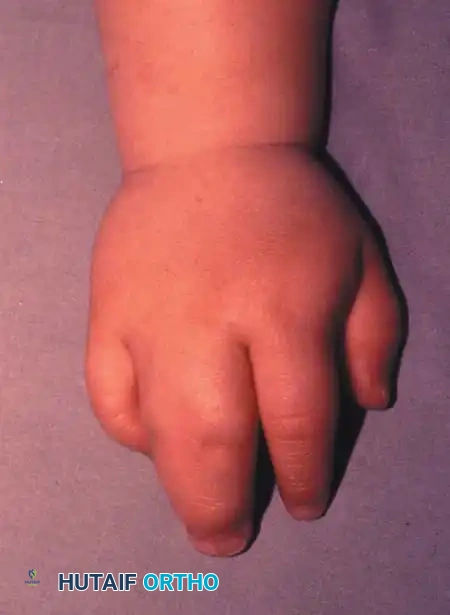
Congenital cleft hand (ectrodactyly) is a complex longitudinal deficiency characterized by the absence of central rays, resulting in a deep V-shaped central defect. A frequent and functionally debilitating component of this anomaly is the thumb adduction contracture. The absence of the central metacarpals compromises the transverse metacarpal arch, leading to structural collapse. Over time, the adductor pollicis and the first dorsal interosseous muscles undergo severe contracture, tethering the thumb to the index ray and obliterating the first web space.
The primary goals of surgical intervention are twofold:
1. Functional Restoration: Deepening the first web space to restore thumb opposition, abduction, and functional pinch kinematics.
2. Aesthetic Reconstruction: Closing the central cleft to normalize the appearance of the hand and restore the transverse metacarpal arch.
To achieve these goals, the index ray must be transposed ulnarly to the base of the third metacarpal, combined with a radical soft-tissue release of the first web space. The two most prominent, evidence-based techniques for this reconstruction are the Snow and Littler technique and the Miura and Komada technique.
Preoperative Evaluation and Biomechanics
Clinical Assessment
A meticulous preoperative evaluation is mandatory. Surgeons must assess the passive and active range of motion of the thumb, the severity of the adduction contracture, and the presence of any syndactyly between the remaining digits. The vascular status of the hand must be evaluated, as congenital anomalies frequently present with aberrant arterial arches.
Radiographic Planning
Standard posteroanterior (PA), lateral, and oblique radiographs of the hand are required. The surgeon must evaluate the presence and morphology of the third metacarpal base, as this will serve as the foundation for the transposed index ray.
Clinical Pearl: The transverse metacarpal arch is the keystone of hand function. When transposing the index ray, the surgeon must ensure the osteotomy and subsequent fixation recreate this arch. Failure to do so will result in digital overlap during flexion and a weakened grip.
Surgical Technique 1: The Snow and Littler Method
The Snow and Littler technique is a masterclass in local tissue rearrangement. It utilizes a broad, palmar-based flap to reconstruct the first web space while simultaneously transposing the index ray to close the central cleft.
1. Incision and Flap Design
The procedure begins with precise geometric planning of the skin incisions to ensure adequate coverage of the newly created web space without tension.
- Dorsal Cleft Incision: Make incisions that outline the sides of the cleft on the dorsal surfaces of the index and ring fingers. Join these incisions proximally so that the V-shaped apex extends just proximal to the level of the metacarpal heads.
- Commissure Flap: Make a small, straight incision on the ulnar side of the index finger. This accommodates a small flap raised on the radial side of the ring finger, which will be used to reconstruct a natural-appearing commissure.
Dorsal view demonstrating the initial skin incisions, flap elevation, and planned wound closure.
- Palmar Flap Elevation: As the incisions pass the metacarpal heads, curve them proximally onto the palm. These incisions should run almost parallel to each other, lying slightly toward the cleft side of the midline of the two fingers.
- Crucial Limit: Do not extend the palmar incisions any farther proximally than a point directly opposite the V-shaped apex of the dorsal incision. This creates the robust palmar flap destined to form the new thumb web.
Palmar view detailing the skin incisions and the elevation of the palmar flap.
2. Thumb Adduction Release
Releasing the tethered thumb requires meticulous deep dissection, balancing aggressive muscle release with neurovascular preservation.
- Begin by making another incision on the dorsum of the thumb web at the same level as the V-shaped cleft incision.
- Extend this incision distally, parallel with the index split incision, until it reaches the distal edge of the thumb-index web. This creates a vital strip of dorsal skin that remains connected to the index finger and the dorsum of the hand.
- Vascular Preservation: Develop the split flap from the dorsum. Carefully tie off small dorsal veins only when absolutely necessary; do not dissect them off the flap. The viability of this flap is entirely dependent on robust venous drainage.
Surgical Warning: The branches of the median nerve and the radial artery are highly vulnerable during this stage. The radial artery, in particular, must be identified and protected as it dives between the two heads of the first dorsal interosseous muscle.
- Deepen the thumb-index incision to release the dense fibrous bands tethering the two metacarpals.
- Detach the origins of the first dorsal interosseous muscle from the metacarpals.
- Elevate the adductor pollicis muscle and the radial belly of the flexor pollicis brevis from their origins.
- If full thumb abduction is still restricted, carry the dissection down to the capsule of the carpometacarpal (CMC) joint. A dorsal capsulotomy may be required to achieve a fully abducted posture.
3. Index Ray Transposition and Osteotomy
With the soft tissues released, the structural reconstruction begins.
- Perform a transverse or slightly oblique osteotomy at the base of the index metacarpal.
- Mobilize the entire index ray and transfer it ulnarly to align with the base of the third metacarpal.
The index finger is transposed following the osteotomy of the index metacarpal base and the release of the first dorsal interosseous muscle.
- Bone Fixation: If the third metacarpal base is hypoplastic or small, shape the proximal end of the transposed index metacarpal into a peg and impale it directly into the medullary canal of the third metacarpal base.
- If adequate bone stock is present, reduce the osteotomy and fix the index metacarpal to the third metacarpal base using crossed or parallel Kirschner wires (K-wires).
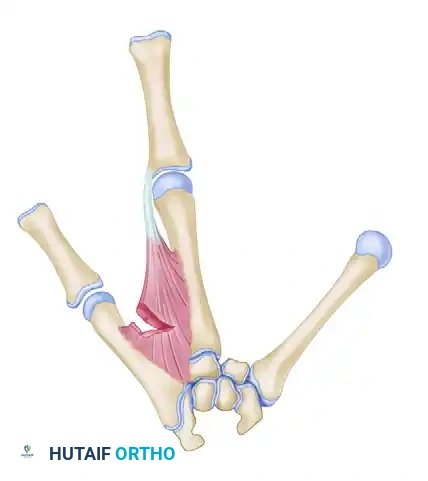
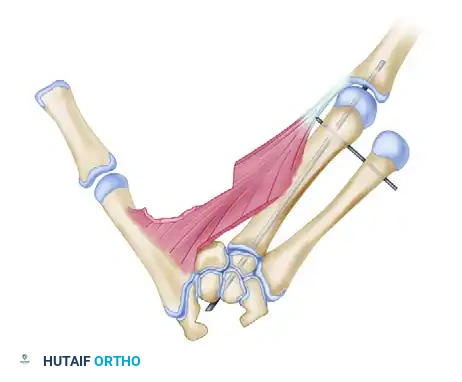
Additional subperiosteal release of the first dorsal interosseous allows tension-free transposition. The inset demonstrates the necessary rotation (up to 45 degrees) required to prevent digital overlap during flexion.
Clinical Pearl: Rotational alignment is the most critical aspect of the osteotomy. The transposed digit must be supinated (often up to 45 degrees) to ensure it flexes symmetrically into the palm without scissoring over the ring finger.
4. Wound Closure and Web Space Inset
- Suture the skin between the ring and index fingers, closing the central cleft.
- Inset the small, longitudinal flap into the ulnar side of the index finger to recreate a smooth, U-shaped commissure.
- Transpose the large palmar-based cleft flap into the newly opened space between the index finger and the abducted thumb.
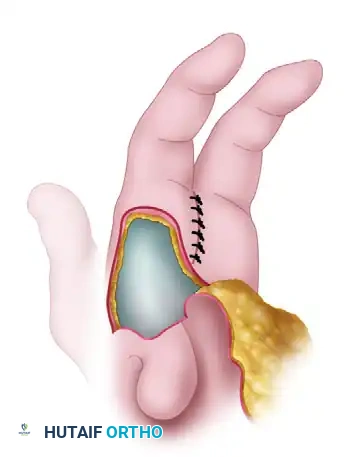
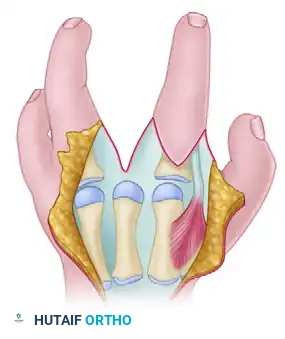
Relationship of the thumb adduction contracture release and the palmar flap. If the palmar flap is insufficient to cover the defect, a full-thickness or split-thickness skin graft must be utilized.
- Tension-Free Closure: Never place these flaps under tension. Ischemia will lead to flap necrosis and severe secondary contracture. If the palmar flap does not completely cover the dorsal defect, harvest a split-thickness or full-thickness skin graft to achieve complete, tension-free coverage.
- Insert a small surgical drain if dead space or oozing is a concern.
Surgical Technique 2: The Miura and Komada Method
The Miura and Komada technique offers an alternative approach to cleft hand reconstruction, utilizing a different geometric flap design that is particularly useful when the dorsal skin is more pliable or when a different vector of web space deepening is desired.
1. Incision and Exposure
- Initial Incision: Begin with a precisely planned skin incision on the dorsum of the hand, outlining the cleft and the planned web space.
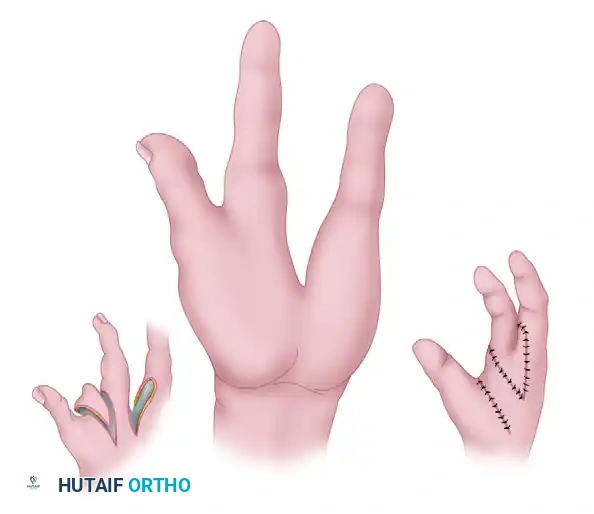
Initial skin incision mapped on the dorsum of the hand.
- Deep Exposure: Make additional incisions (often marked as broken lines in preoperative planning) to fully expose the metacarpals dorsally and the palmar surface of the digits.

Additional incisions are utilized to expose the metacarpal dorsally and the finger on the palmar surface.
- Flap Elevation: Elevate the index finger skin flaps, ensuring the subdermal plexus is preserved to maintain flap viability.

Elevation of the index finger skin flaps, preparing the soft tissue envelope for transposition.
2. Bone Transposition and Soft Tissue Release
- Transposition Scheme: The core principle remains the ulnar shift of the index ray to obliterate the central cleft.
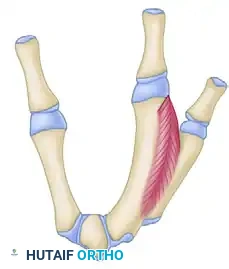
Schematic representation for transposing the index metacarpal to the middle metacarpal position.
- Muscle Release: To allow the index ray to shift and the thumb to abduct, the fasciae of the first dorsal interosseous and the adductor pollicis must be radically released. In severe cases, fractional lengthening or complete release of the muscle bellies from their metacarpal origins is required.
Bone transposition in progress: The fasciae of the first dorsal interosseous and adductor pollicis are released.
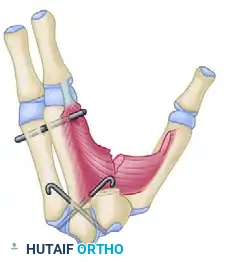
Detailed view of the bone transposition and the necessary muscular releases required to achieve a tension-free shift.
- Completion of Transposition: Once the osteotomy is performed and the soft tissues are released, the index ray is secured to the third metacarpal base, and the thumb is brought into full palmar abduction.
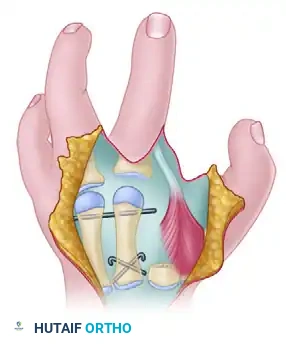
Transposition of the index ray and the release of the thumb adduction contracture are completed.
3. Closure
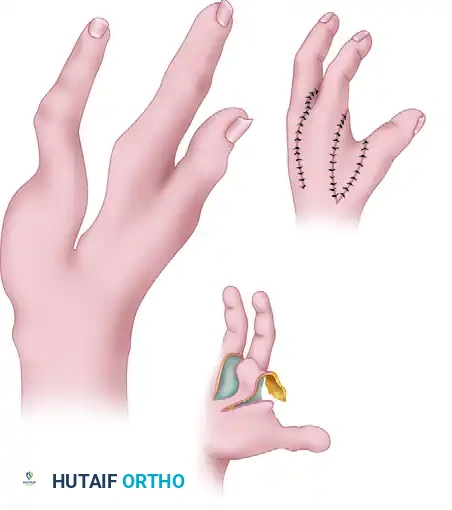
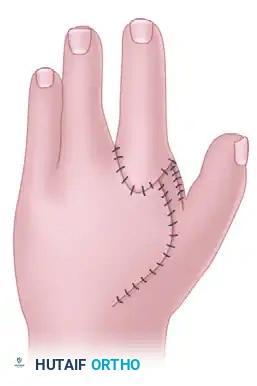
- The skin flaps are meticulously inset. The Miura and Komada design often allows for a primary closure that naturally deepens the first web space while closing the central defect.
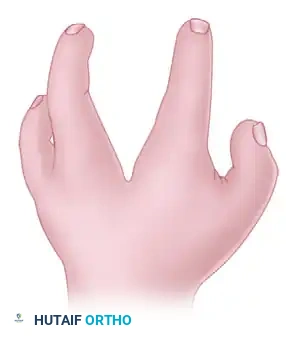
Final appearance of the hand after wound closure, demonstrating a restored transverse arch and a deepened first web space.
Postoperative Care and Rehabilitation Protocol
The success of a cleft hand reconstruction relies heavily on strict adherence to postoperative immobilization and subsequent rehabilitation.
Phase 1: Immobilization (Weeks 0 to 6)
- Immediately postoperatively, apply a bulky, well-padded long-arm cast.
- The cast must be molded to maintain the newly reconstructed transverse and longitudinal arches of the hand.
- The thumb must be immobilized in a position of maximum palmar abduction and opposition to prevent the recurrence of the adduction contracture.
- Ensure the distal tips of the fingers and thumb have enough freedom to allow for capillary refill checks and slight micro-motion to prevent tendon adhesions.
- Sutures are typically removed at the 2-week mark through a cast window or during a cast change.
Phase 2: Pin Removal and Mobilization (Week 6)
- At approximately 6 weeks postoperatively, obtain follow-up radiographs to confirm clinical and radiographic bone healing at the osteotomy site.
- Once bridging callus is visualized and the osteotomy is stable, the Kirschner wires are removed in the clinic.
- Transition the patient to a custom thermoplastic splint (e.g., a thumb spica splint with a web spacer) to be worn between exercise sessions and at night.
Phase 3: Functional Rehabilitation (Weeks 6 to 14+)
- Initiate a graduated occupational therapy program.
- Focus on active range of motion (AROM) of the transposed index finger to prevent extensor lag and flexor tendon adhesions.
- Emphasize thumb opposition exercises and first web space stretching.
- Normal, unrestricted activities and weight-bearing are permitted on a graduated basis over the subsequent 6 to 8 weeks, guided by the patient's functional recovery and radiographic consolidation.
Complications and Pitfalls
Orthopaedic surgeons must be vigilant regarding several high-risk complications associated with this complex reconstruction:
- Flap Necrosis: The most devastating soft-tissue complication. It is usually caused by excessive tension during closure, failure to preserve dorsal venous drainage, or arterial injury during the adductor release. If flap ischemia is noted intraoperatively, the surgeon must immediately release tension and utilize skin grafts.
- Digital Overlap (Scissoring): Caused by a failure to properly supinate the index ray during transposition. The index metacarpal must be rotated up to 45 degrees to align its flexion axis with the scaphoid tubercle.
- Recurrence of Adduction Contracture: Often results from an inadequate release of the carpometacarpal joint capsule or failure to maintain the thumb in abduction during the 6-week casting phase. Night splinting with a web spacer is critical for up to 6 months postoperatively.
- Nonunion or Delayed Union: Rare
You Might Also Like