Applying a Filleted Graft and Correcting Area Scars in Hand Reconstruction
Key Takeaway
The filleted finger graft is a highly reliable, sensate, and vascularized local flap utilized in hand reconstruction to cover complex dorsal or volar defects. By harvesting skin and neurovascular bundles from a non-salvageable digit, surgeons can achieve durable coverage without donor site morbidity from distant flaps. This guide details the indications, precise surgical technique, and postoperative protocols for filleted grafts and area scar correction.
INTRODUCTION TO SOFT TISSUE RECONSTRUCTION IN THE HAND
The management of complex soft tissue defects in the hand requires a profound understanding of vascular anatomy, biomechanics, and the principles of the reconstructive ladder. When trauma renders a digit unsalvageable but leaves its soft tissue envelope intact, the "spare parts" concept can be employed. The filleted graft (or filleted flap) represents the pinnacle of this philosophy, allowing the surgeon to utilize the skin and neurovascular bundles of a severely injured or amputated digit to provide sensate, durable coverage for adjacent defects.
Concurrently, the management of area scars—contracted regions of fibrotic tissue resulting from previous trauma or burns—demands meticulous surgical planning. Because an area scar represents an initial skin loss significantly greater than the visible scar, its excision creates a massive defect that mandates robust flap coverage. This comprehensive guide details the surgical techniques, anatomical considerations, and postoperative protocols for applying filleted grafts and correcting area scars.
PART I: THE FILLETED FINGER GRAFT
The filleted finger graft is an axial pattern flap based on the digital neurovascular bundles. It is most commonly utilized when a digit has sustained irreparable skeletal or tendinous trauma, but the volar soft tissue and its vascular supply remain viable.
Surgical Anatomy and Biomechanics
The survival of a filleted graft relies entirely on the integrity of the proper palmar digital arteries and their accompanying venous drainage.
- Arterial Supply: The main vessels course anterolaterally through the digit, volar to Cleland’s ligaments. Because the primary arterial inflow and venous outflow are located volarly, it is biomechanically and anatomically easier to fashion a flap with an anterior (volar) base to cover a defect on the dorsum of the hand than vice versa.
- Venous Drainage: Venous return in the digit is predominantly dorsal; however, a robust volar venous network exists. When filleting a digit, preserving the volar subcutaneous fat is critical to maintaining this delicate venous plexus.
- Innervation: The proper palmar digital nerves travel alongside the arteries. Preserving these nerves allows the filleted graft to provide sensate coverage, a massive advantage over distant flaps or skin grafts.
Clinical Pearl: When planning a filleted graft, always assess the vascular status of the donor digit using a handheld Doppler. If the digital arteries are compromised by the initial trauma, the filleted graft will fail, and an alternative reconstructive option must be selected.
Indications and Contraindications
Indications:
* Coverage of deep dorsal or volar hand defects exposing bare bone, joint capsules, or tendons.
* Traumatic amputations or severe crush injuries where a digit is functionally unsalvageable (e.g., severe intra-articular comminution with flexor/extensor tendon loss) but possesses a viable soft tissue envelope.
* Severe contractures or tumors requiring ray amputation, where the skin can be salvaged for adjacent reconstruction.
Contraindications:
* Crush or avulsion injuries that have compromised the digital arteries of the donor finger.
* Extensive degloving injuries of the donor digit.
* Pre-existing severe peripheral vascular disease or heavy tobacco use that critically diminishes microvascular flow.
Preoperative Planning and Patient Positioning
- Anesthesia: General anesthesia or a regional brachial plexus block is preferred to ensure complete sympathetic blockade, which maximizes vasodilation and flap perfusion.
- Positioning: The patient is positioned supine with the operative arm extended on a radiolucent hand table.
- Tourniquet: A well-padded pneumatic upper arm tourniquet is applied. Exsanguination should be performed gently with an Esmarch bandage, or simply by elevation if the trauma is acute, to avoid damaging traumatized endothelium.
- Magnification: Surgical loupes (minimum 2.5x to 3.5x magnification) are mandatory for the meticulous dissection of the neurovascular bundles.
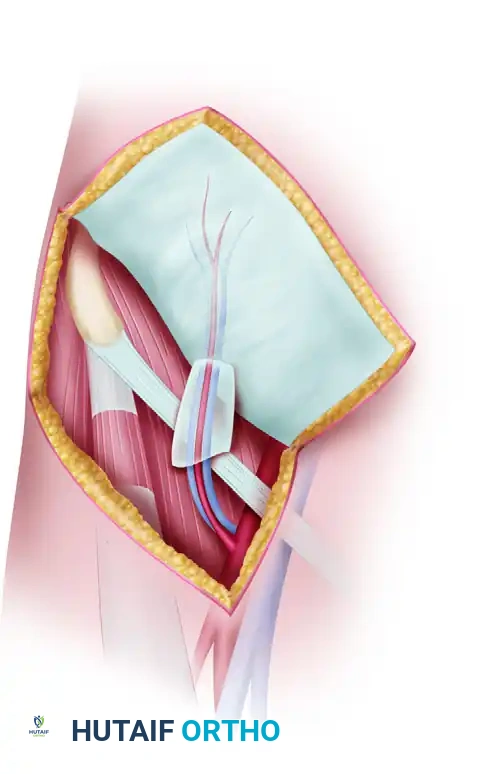
Surgical Technique: Applying a Filleted Graft
The following step-by-step technique describes the harvest of a filleted graft from an unsalvageable digit to cover a dorsal hand defect.
Step 1: Incision and Exposure
- Design a midline dorsal incision along the full length of the donor finger.
- Distally, skirt the incision around the nail bed to include the glabrous pulp skin in the flap, or amputate the distal phalanx if the pulp is not required.
- Deepen the dorsal incision directly through the subcutaneous tissue down to the extensor tendon mechanism.
Step 2: Dissection and Tissue Resection
- Skeletal and Tendinous Excision: Elevate the skin flaps volarly. Remove the extensor tendon, the underlying phalanges, the flexor tendons, and the flexor tendon sheath.
- Neurovascular Preservation: This is the most critical step. As you dissect volarly, you must preserve the thick layer of volar subcutaneous fat in which the neurovascular bundles are located. Dissect strictly on the bone and tendon sheath to avoid inadvertently buttonholing the skin or transecting the digital arteries.
- Hemostasis: Release the tourniquet temporarily to confirm perfusion to the newly filleted flap. Bipolar electrocautery should be used judiciously to control small bleeding points, strictly avoiding the main neurovascular pedicles.
Surgical Warning: Never use monopolar electrocautery near the neurovascular bundles. Thermal spread can cause delayed arterial thrombosis, leading to catastrophic flap necrosis.
Step 3: Flap Preparation and Insetting
- Spreading the Flap: Once the skeletal and tendinous structures are removed, spread the filleted soft tissue envelope open. It will now resemble a flat, vascularized sheet of sensate skin.
- Positioning: Pivot the flap on its anterior (volar) base and place it over the recipient defect on the dorsum of the hand.
- Trimming and Contouring:
- If the flap is too wide, carefully trim its edges.
- If the flap is too long, excise the distal end.
- Crucial Step: If the distal end is excised, you must meticulously ligate the distal ends of the digital vessels. Furthermore, resect the digital nerves far enough proximally into the flap to prevent them from becoming tethered in the distal scar, which would result in a painful neuroma.
- Suturing: Suture the flap in place using non-absorbable monofilament (e.g., 4-0 or 5-0 Nylon) so that it lies completely flat.
Step 4: Managing the Base and "Dog Ears"
- Avoid any tension or strangulation at the base of the flap. The pedicle must not be kinked.
- Trim "dog ears" (standing cutaneous cones) at the margins of the base only slightly. Aggressive excision of dog ears at the base will sever the venous outflow and arterial inflow, leading to flap ischemia. It is always preferable to leave a dog ear and revise it secondarily (after 3-6 months) rather than risk flap necrosis.
Postoperative Care and Rehabilitation
The postoperative protocol is designed to maximize perfusion and prevent vasospasm.
- Monitoring: Flap circulation (capillary refill, color, turgor, and temperature) must be monitored closely for at least 24 hours. If flap viability is uncertain, the patient should remain admitted for continuous monitoring until the flap is deemed safe.
- Positioning: The hand should be strictly elevated above heart level using a foam elevation sling to promote venous drainage and avoid excessive edema, which can compress the microcirculation.
- Vasospasm Prevention: Potential causes of vasospasm must be strictly avoided. This includes a total ban on smoking and nicotine products, avoidance of cold drinks, maintaining a warm ambient room temperature, and minimizing emotional upsets or pain (adequate analgesia is paramount).
- Wound Care: A bulky, non-compressive dressing is applied. A volar intrinsic-plus splint may be used to immobilize the wrist and adjacent digits, protecting the flap from sheer forces.
- Suture Removal: Skin sutures are removed in 10 to 14 days, depending on the clinical progression of wound healing.
- Rehabilitation: When flap healing is progressing satisfactorily (typically around week 2-3), rehabilitation appropriate for the specific underlying injury is begun. Early protected motion of the uninvolved digits is encouraged to prevent stiffness.
PART II: METHODS OF CORRECTING AREA SCARS
An area scar is a dense, fibrotic plaque that forms following secondary intention healing of a large cutaneous defect, severe burns, or extensive trauma.
The Pathophysiology of Area Scars
An area scar represents an initial skin loss that is significantly greater than the area of the final visible scar. This discrepancy occurs because the wound has contracted during the healing phase, driven by myofibroblast activity.
When a surgeon excises an area scar to restore mobility or prepare a bed for deeper reconstruction, the surrounding normal skin retracts to its original anatomical position. Consequently, the resulting surgical defect will always be substantially larger than the excised scar.
Pitfall: Novice surgeons often underestimate the size of the defect that will be created upon releasing a burn contracture or area scar. Always plan for a flap or graft that is 20% to 30% larger than the visible scar to accommodate this expansion and allow for tension-free insetting.
Principles of Scar Excision and Coverage
Because the skin utilized for any graft should be as similar to the lost skin as possible in terms of color, texture, thickness, and pliability, the reconstructive ladder must be carefully applied.
1. Small Area Defects
If a relatively small area is lost, local tissue rearrangement is preferred.
* Local Flaps: Z-plasties, V-Y advancement flaps, or rotation-advancement flaps (e.g., local flap techniques) provide ideal "like-with-like" tissue replacement.
* Cross-Finger Flaps: For small, deep defects on the volar aspect of a digit, a dorsally based cross-finger flap from an adjacent digit provides excellent, durable coverage.
2. Large Area Defects and Complex Reconstructions
If the area is large, or if bare bone, joint capsule, or tendon is left exposed after the excision of the scar, simple skin grafts (split-thickness or full-thickness) will fail. Furthermore, if a secondary reconstructive procedure (such as tendon grafting or nerve repair) is planned beneath the scar, a robust, vascularized soft tissue envelope is mandatory.
In these scenarios, a distant ("remote") flap or a vascularized free flap containing skin and subcutaneous fat is necessary.
- Pedicled Distant Flaps: The pedicled groin flap (based on the superficial circumflex iliac artery) remains a workhorse for massive hand defects, providing a large volume of supple skin. However, it requires the hand to be attached to the groin for 3 weeks, which can lead to stiffness.
- Vascularized Free Flaps: Advances in microsurgery have made free tissue transfer the gold standard for large area scar corrections.
- Anterolateral Thigh (ALT) Flap: Provides massive amounts of skin and can be thinned for hand contouring.
- Radial Forearm Free Flap: Provides thin, pliable, sensate skin, though it sacrifices a major artery and leaves a noticeable donor site defect.
- Lateral Arm Flap: Excellent for moderate-sized defects requiring thin, pliable tissue.
Staged Reconstruction: The Timing of Deep Repairs
When correcting an area scar to facilitate deeper reconstruction, staging is critical.
When the scar is excised and the flap is applied, deeper parts of the scar (such as fibrotic tissue encasing tendons or nerves) may be excised to create a healthy, vascularized bed. However, tendons or nerves must not be repaired during the initial flap coverage procedure.
Attempting to perform tendon grafts, tenolyses, or nerve repairs at the same time as a major flap coverage procedure is fraught with complications. The initial inflammatory response, combined with the risk of flap failure or infection, can destroy the delicate nerve or tendon repairs.
The Staged Protocol:
1. Stage 1: Radical excision of the area scar, release of contractures, and application of a distant or free flap to provide a supple, well-vascularized soft tissue envelope.
2. Maturation: Allow the flap to heal and mature for 3 to 6 months. During this time, aggressive occupational therapy is employed to maximize passive range of motion of the joints.
3. Stage 2: Once the soft tissue bed is mature and pliable, the flap is elevated (often using a zig-zag incision to prevent secondary contracture), and the definitive tendon grafting, tenolysis, or nerve reconstruction is performed in a pristine, highly vascularized environment.
CONCLUSION
The successful management of complex hand defects requires a mastery of both local and distant tissue transfer. The filleted graft remains an elegant, highly functional solution that turns a devastating digital injury into a reconstructive asset, providing sensate, durable coverage with minimal donor site morbidity. Conversely, the correction of area scars demands a profound respect for the biomechanics of tissue contracture and a strategic, often staged, approach to soft tissue and deep structure reconstruction. By adhering to these strict anatomical and surgical principles, orthopedic surgeons can restore maximum form and function to the severely traumatized hand.
You Might Also Like