Modified Peterson Procedure: Comprehensive Surgical Guide
Key Takeaway
The Modified Peterson Procedure is a powerful double osteotomy technique for correcting severe hallux valgus deformities, particularly in juvenile or adolescent patients with an open physis. This comprehensive guide details the biomechanical principles, precise preoperative templating, and step-by-step surgical execution—including the creation of a distally based osteoperiosteal flap, precise wedge osteotomies, and rigid internal fixation—ensuring optimal deformity correction and restoration of first ray biomechanics.
Introduction to the Modified Peterson Procedure
The surgical management of moderate to severe hallux valgus, particularly in the juvenile or adolescent population where the proximal physis of the first metatarsal remains open, presents a unique biomechanical challenge. The Modified Peterson Procedure, as described and popularized by Aronson, Nguyen, and Aronson, is a highly specialized double osteotomy technique designed to address complex multi-planar deformities of the first ray while meticulously preserving the proximal growth plate.
This procedure combines a distal closing wedge osteotomy to correct the distal metatarsal articular angle (DMAA) and the hallux valgus angle (HVA), with a proximal opening wedge osteotomy to reduce a widened intermetatarsal angle (IMA). By utilizing the bone resected from the medial eminence and the distal wedge as an autograft for the proximal opening wedge, the procedure achieves powerful correction without the need for allograft or distant autograft harvesting.
This comprehensive guide details the indications, biomechanical principles, preoperative templating, and the step-by-step surgical execution required to master this advanced technique.
Indications and Patient Selection
The Modified Peterson Procedure is not a first-line treatment for mild hallux valgus. It is a robust, technically demanding operation reserved for specific clinical scenarios.
Primary Indications
- Juvenile and Adolescent Hallux Valgus: Patients with a symptomatic, progressive deformity who possess an open proximal first metatarsal physis.
- Severe Deformity with High IMA and DMAA: Cases where a single osteotomy (either distal or proximal) is insufficient to correct both the intermetatarsal angle and the distal articular orientation.
- Congenital Deformities: Structural abnormalities of the first ray requiring multi-level spatial realignment.
Contraindications
- Advanced Degenerative Joint Disease: Severe osteoarthritis of the first metatarsophalangeal (MTP) joint (hallux rigidus) is an absolute contraindication, as this procedure relies on preserving MTP motion.
- Active Infection: Local or systemic.
- Severe Vascular Compromise: Peripheral arterial disease that threatens bone healing and soft tissue viability.
- Hypermobility of the First Ray: Without addressing the tarsometatarsal (TMT) joint, isolated metatarsal osteotomies in the presence of severe hypermobility may lead to high recurrence rates.
Clinical Pearl: Always assess the flexibility of the deformity and the presence of Achilles or gastrocnemius contracture. Unaddressed equinus forces will place excessive stress on the medial column, predisposing the patient to recurrence regardless of the osteotomy's success.
Biomechanics and Preoperative Templating
The success of the Modified Peterson Procedure hinges entirely on precise mathematical calculation and preoperative templating. The surgeon must accurately determine the size of the bone wedges required to achieve a rectilinear first ray.
Radiographic Analysis
Standard weight-bearing anteroposterior (AP), lateral, and sesamoid axial radiographs are mandatory.
1. Hallux Valgus Angle (HVA): The angle between the longitudinal axes of the first metatarsal and the proximal phalanx.
2. Intermetatarsal Angle (IMA): The angle between the longitudinal axes of the first and second metatarsals.
3. Distal Metatarsal Articular Angle (DMAA): The relationship of the articular surface of the metatarsal head to the longitudinal axis of the metatarsal.
Calculating the Osteotomy Wedges
The size of the distal closing wedge is calculated using precise trigonometric principles based on the preoperative standing radiographs and confirmed with intraoperative fluoroscopy.
The calculation relies on determining the sine of the HVA.
* Formula: Width of Wedge (mm) = Sine(HVA) × Diameter of Metatarsal at the Osteotomy Site
* Example: If a patient has a 30-degree HVA, the sine of 30 degrees is 0.5. Therefore, the width of the distal closing wedge must be exactly half the diameter of the metatarsal at the level of the distal cut.
The proximal opening wedge is subsequently created by inserting the bone harvested from the distal wedge and the medial eminence, effectively translating the degrees of correction into millimeters of opening to reduce the IMA exactly to normal parameters (typically < 9 degrees).
Surgical Technique: Step-by-Step
1. Patient Positioning and Anesthesia
The patient is placed in the supine position on the operating table. A regional ankle block or popliteal sciatic nerve block is highly recommended for postoperative pain control, supplemented by general anesthesia or deep sedation. A well-padded thigh or calf tourniquet is applied to ensure a bloodless surgical field.
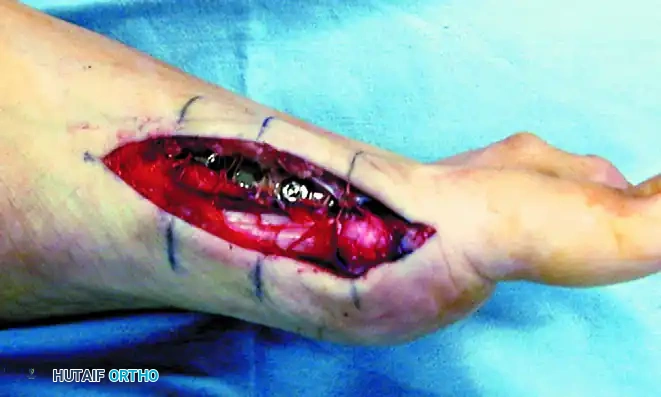
2. Incision and Soft Tissue Dissection
- Make a straight medial longitudinal incision extending from the palpable base of the first metatarsal to the mid-diaphysis of the proximal phalanx.
- Carefully deepen the incision through the subcutaneous tissue.
- Neurovascular Protection: Meticulously identify and retract the dorsal and plantar medial cutaneous veins and nerves. Use blunt dissection to reach the periosteal layer of the first metatarsal.
- Raise full-thickness soft tissue flaps: dorsal to the extensor hallucis longus (EHL) tendon and plantar to the tibial sesamoid. This extensive exposure will reveal the plantarly subluxed abductor hallucis tendon, which is a key deforming force in hallux valgus.
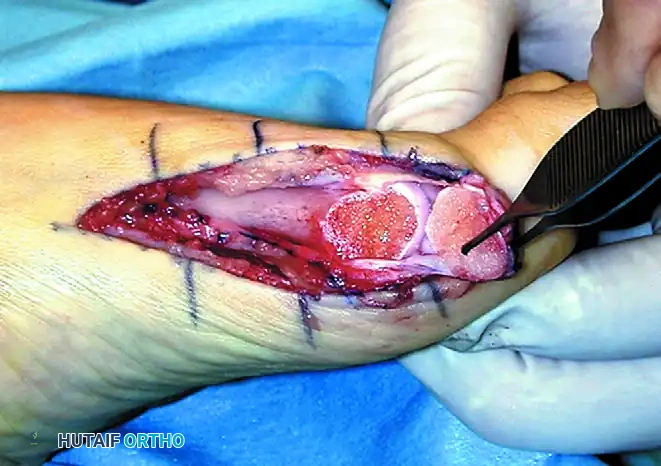
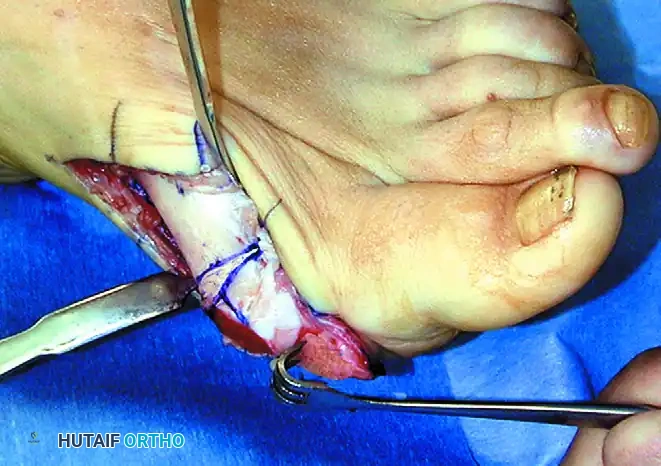
3. Creation of the Osteoperiosteal Flap
This is a defining step of the Modified Peterson Procedure. The flap will later be used to cover the hardware and maintain soft tissue tension.
- Using a sterile marking pen, delineate the medial periosteal incision.
- The incision must begin just distal to the proximal physis (to avoid growth plate injury) and extend to the base of the medial eminence (bunion).
- Branch the incision in a U-shaped fashion to encompass the bunion and extend distally onto the proximal phalanx.
- Sharply incise the periosteum along these markings. Incise the "U" dorsally and plantarward across the MTP joint capsule to the base of the proximal phalanx.
- Utilize a sharp, beveled osteotome or a fine oscillating saw to raise a distally based osteoperiosteal flap over the bunion.
- Crucial Detail: Raise this flap from proximal to distal, taking a 1-mm thickness of cortical bone with the periosteum. This vascularized bone flake enhances healing and capsular integrity.
4. Medial Eminence Resection
- Retract the newly created osteoperiosteal flap distally.
- Incise any residual capsular attachments to fully expose the first metatarsal head.
- Place Hohmann retractors subperiosteally at the metatarsal neck to protect the dorsal and plantar soft tissues.
- Use an oscillating saw to resect the remaining medial eminence (bunion) flush with the sagittal sulcus.
- Do not discard this bone. Save the resected bone wafer in a saline-soaked sponge; it will be utilized as structural autograft for the proximal osteotomy.
5. The Distal Closing Wedge Osteotomy
- Refer to your preoperative calculations (e.g., the sine of the HVA).
- Make the first (distal) cut of the wedge transversely at the base of the previous bunion resection.
- Hardware Planning: Ensure you leave a sufficient bridge of distal metatarsal head intact to allow for the secure purchase of a single 3.5-mm cortical screw later.
- Make the second (proximal) cut based on the calculated millimeter width.
- Surgical Technique: Direct the saw blade laterally, intentionally stopping short of the lateral cortex. Attempt to greenstick the lateral cortex rather than completing the cut. This preserves lateral column length and provides a stable hinge.
- Remove the wedge of bone and save it for grafting. Close the osteotomy manually to correct the DMAA.
6. The Proximal Opening Wedge Osteotomy
- Move to the proximal metatarsal metaphysis.
- Make a transverse osteotomy cut, ensuring you leave adequate space between the cut and the proximal physis to accommodate another 3.5-mm screw.
- Using a straight osteotome, gently lever open the proximal osteotomy. Again, meticulously attempt to greenstick the lateral cortex to maintain stability.
- Take the precalculated bone wedges (derived from the bunion resection and the distal wedge) and shape them to match the required opening.
- Insert this autograft wedge into the medial gap of the proximal osteotomy. This creates an opening wedge that directly reduces the intermetatarsal angle (IMA).
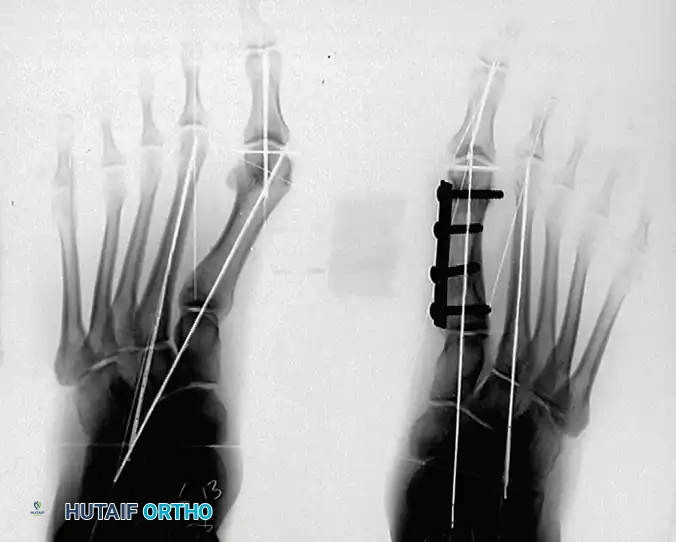
7. Internal Fixation
Rigid internal fixation is paramount to maintain the complex bi-level correction.
- Select a four-hole small fragment tubular plate, or a five- to six-hole mini tubular plate, depending on the patient's anatomy. The plate size is strictly dictated by the space available between the proximal physis and the distal metatarsal articular surface.
- Apply the plate medially. Insert the first 3.5-mm screw into the most proximal hole, loosely fixing the plate to the metatarsal base.
- Ensure the distal hole of the plate fits perfectly over the remaining metatarsal head.

8. Sesamoid Reduction and Flap Management
- Before final fixation, manually supinate the great toe. This action indirectly reduces the sesamoid apparatus beneath the metatarsal head.
- While holding the toe in supination, pull the distally based osteoperiosteal flap under the distal aspect of the plate to cover the distal osteotomy site.
- Pull the flap slightly dorsal to lock in the supination correction.
Surgical Warning: Do not tension the osteoperiosteal flap too tightly. Excessive tension will severely restrict postoperative metatarsophalangeal joint dorsiflexion and plantarflexion, leading to a stiff toe.
- Place the distal screws through the plate, directly across the osteoperiosteal flap, and into the metatarsal head.
- Place the remaining central screws. Utilize eccentric drilling if necessary to achieve inboard compression across both the proximal and distal osteotomy sites.
9. Soft Tissue Balancing and Closure
- Close the remaining periosteum meticulously over the plate, advancing from proximal to distal, until it is approximated to the osteoperiosteal flap.
- Tendon Transfer: Address the deforming force of the abductor hallucis. Transfer the abductor hallucis tendon from its subluxed plantar position to the medial base of the proximal phalanx, or suture it to the extensor hallucis longus (EHL) tendon over the periosteal closure.
- Motion Check: It is imperative to take the MTP joint through a full range of motion to confirm that there is no impingement and that the soft tissue repair allows for adequate excursion.
- Deflate the tourniquet, achieve meticulous hemostasis, and close the subcutaneous tissues and skin in a standard layered fashion.
Postoperative Protocol
The double osteotomy nature of the Modified Peterson Procedure requires a strict and conservative postoperative rehabilitation protocol to ensure bone healing and prevent hardware failure.
Phase 1: Maximum Protection (Weeks 0 - 6)
- Immobilization: Immediately postoperatively, apply loosely placed cotton gauze over the surgical wound and within the first web space to maintain alignment. Apply a well-molded short-leg cast extending to the toes.
- Weight-Bearing Status: The patient must remain strictly non-weight bearing (NWB) on the operative extremity for a full 6 weeks. Crutches, a knee scooter, or a wheelchair are required.
- Elevation: Strict elevation above heart level is encouraged for the first 72 hours to mitigate edema and lower the risk of wound dehiscence.
Phase 2: Transition and Mobilization (Weeks 6 - 10)
- Clinical Review: At the 6-week mark, the cast is removed, and weight-bearing AP and lateral radiographs are obtained to assess bridging callus formation and hardware integrity at both osteotomy sites.
- Weight-Bearing Status: If radiographic healing is evident, the patient is transitioned to weight bearing as tolerated (WBAT) in a rigid, hard-soled postoperative shoe or sandal. This footwear must be worn for an additional 4 weeks.
- Physical Therapy: Active and active-assisted range of motion (ROM) exercises of the ankle, hindfoot, midfoot, and specifically the MTP and interphalangeal joints of the toes are initiated immediately upon cast removal.
Phase 3: Return to Function (Weeks 10+)
- Transition to standard, wide-toe-box footwear.
- Progressive strengthening of the intrinsic foot musculature and the first ray stabilizers (peroneus longus, tibialis anterior).
- High-impact activities and sports are generally restricted until 4 to 6 months postoperatively, contingent upon complete radiographic union and the restoration of normal gait mechanics.
Complications and Pitfalls
While highly effective, the Modified Peterson Procedure carries risks inherent to complex foot reconstructions:
- Physeal Arrest: In juvenile patients, violating the proximal physis with the saw blade or a screw can lead to premature closure, resulting in a shortened first metatarsal and transfer metatarsalgia.
- Avascular Necrosis (AVN) of the Metatarsal Head: Extensive distal soft tissue stripping combined with a distal osteotomy can compromise the vascular supply. Preserving the plantar lateral soft tissue hinge is critical.
- Nonunion or Delayed Union: The proximal opening wedge is particularly susceptible to delayed healing if the autograft is not rigidly compressed or if the patient violates the NWB protocol.
- Hallux Varus: Over-resection of the medial eminence, over-tightening of the medial osteoperiosteal flap, or over-correction of the IMA can lead to a progressive, iatrogenic hallux varus deformity.
- Hardware Irritation: The medial tubular plate sits directly beneath the skin. Prominent screws or plate edges may cause bursitis or skin irritation, occasionally necessitating hardware removal after complete bony union (typically > 6-12 months post-op).
By adhering strictly to the biomechanical principles, executing precise preoperative templating, and respecting the delicate soft tissue envelope, the orthopaedic surgeon can utilize the Modified Peterson Procedure to achieve excellent, long-lasting correction of severe hallux valgus deformities.
You Might Also Like